Hip flexor muscle Exercises
Table of Contents
What are the hip flexor muscle Exercises?
Hip flexor muscle Exercises is an important exercise that strengthens weak Hip flexors and also improves flexibility as well as Mobility of the Hip joint.
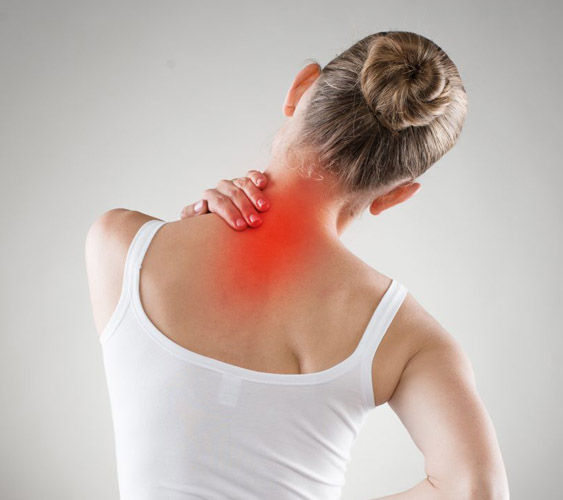
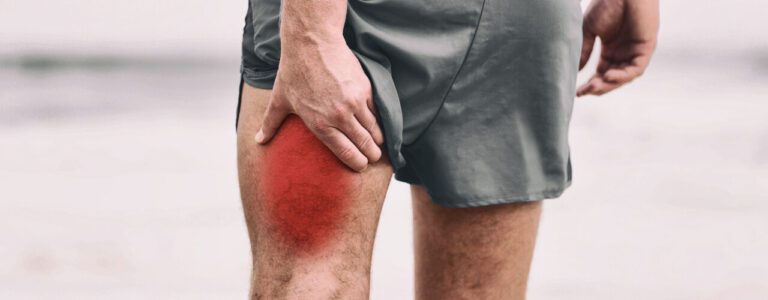
- Tightness & weakness of the hip flexors muscle can source lower back pain, hip pain, & injury. Try these hip flexor muscle exercises to strengthen & relieve tension. We can all benefit from stretching & strengthening the muscles that support these ball-&-socket joints. The hips muscle are not just responsible for the rocking dance moves we bust out on occasion. They are vital joints for runners, bikers, & nonathletes alike because they are essential for mobility & movement.
- Sitting for much of the day, as most of us do, gives to tight hip flexors muscles. In addition, a sedentary lifestyle is related to weakness in the hip flexor muscles — not just the hip flexors muscle but also the muscles opposite them, such as the glutes muscle, hamstring muscle, & abductors muscle. Developing greater strength & endurance of the hip stability muscles tends to happen between 3 & 6 weeks.
What is the hip flexor muscle?
- A hip flexor muscle is a muscle that flexes the hip, is bringing the knee closer to the chest. Hip flexion function is maximal with a high, forward kick that put forward the leg above the level of the waist. Every time you take a step, you are using the hip flexor muscles.
- They are important to maintain the posterior pelvic muscles in balance.
- A strong core muscle is one way to strengthen hip flexors and practice good posture.
- Stretching of these muscles will further increase their length & help prevent injury.
- The hip flexors include 5 key muscles that contribute to hip flexion: iliacus, psoas, pectineus, rectus femoris, & sartorius.
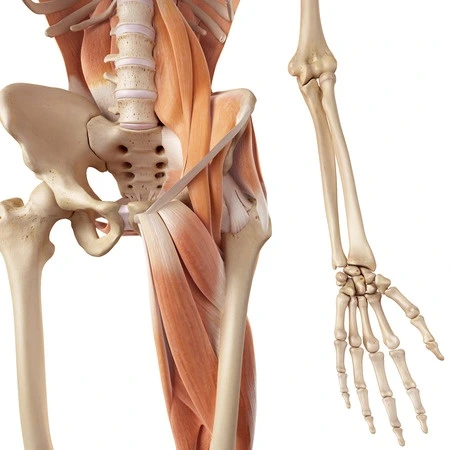
Iliacus muscle
- Introduction: The iliacus muscle is triangle shaped, flat & an exact fit of the iliac fossa — the curved surface of the largest pelvic bone. Together with the psoas major muscle, it is also called the iliopsoas muscle. A portion of this muscle is attached to the iliac fossa, 2/3rd from its top. another part is attached to the inside portion of the iliac crest, the top, outer part of the pelvic bone.
- Origin: Upper 2/3 of the iliac fossa of ilium, the internal lip of the iliac crest, lateral side of the sacrum, ventral sacroiliac ligament, & lower portion of the iliolumbar ligament
- Insertion: Lesser trochanter of femur. Its fibers are also attached in front of those of the psoas major & extend distally over the lesser trochanter.
- Function: The iliacus muscle function is the flex & externally rotate the femur.
- It is also one of the key muscles that assist to maintain proper body posture.
- Nerve supply: The iliacus muscle is supplied by the branches of the second & third nerves of the lumbar area through the femoral nerve. (L2, L3)
- Blood supply: Just like the psoas major muscle, the iliacus is supplied by the iliolumbar artery. It gathers the blood from the deep circumflex iliac, obturator, & femoral arteries.
- Introduction: The psoas minor muscle is a thin, paired muscle of the posterior abdominopelvic portion. It lies on the anterior portion of the psoas major muscle but does not extend with it beyond the inguinal ligament. Despite its close relation to the psoas major muscle, the psoas minor muscle is not considered a part of the iliopsoas muscle complex.
- Origin & insertion: The psoas minor muscle arising from the lateral side of the bodies of the T12 & L1 vertebrae, as well as the intervertebral disc found between them.
- The muscle then extends inferiorly & tapers into a long, flat tendon, which is also longer than the muscle belly.
- Function: The psoas minor muscle is a very weak muscle & its absence does not result in any reduced functionality of the body, thus its exact action is not entirely clear. However, it is submitted that it assists in trunk flexion, allowing a person to bend forward at the lumbar spine.
- Nerve supply: The psoas minor muscle is innervated by direct branches of the lumbar spinal nerves.
- Blood supply: The vascular supply of the psoas minor muscle comes mainly from the lumbar arteries. However, it also sustains many minor contributions from the blood supply network of the psoas major muscle. This may add branches of the iliolumbar, obturator, external iliac & femoral arteries.
Psoas major muscle
- Introduction: The psoas muscle is a paraspinal muscle located deep in the body, very close to the spine & the brim of the lesser pelvis. At its distal end, it emerged with the iliacus muscle to form the iliopsoas muscle. This depth, combined with the fact that the psoas arises from the sides of the 5 lumbar vertebrae, means it plays an important role in back health.
- Origin & insertion: Psoas major is a long muscle located immediately lateral to the vertebral column. It has an origin in the:
- Transverse processes of all the lumbar vertebrae
- Vertebral bodies of T12-L5
- Intervening intervertebral discs
- Function: The psoas major muscle actions include:
- To emerge the upper body & the lower body, the outside to the inside, the appendicular to the axial skeleton, & the front to the back, with its fascial relationship.
- Combined with the iliopsoas muscle, the psoas is a major muscle contributor to the flexion of the hip joint in a supine position & standing.
- Stabilizes the lumbar spine during sitting.
- Nerve Supply: Branches from the ventral rami of lumbar spinal nerves (L1, L2, & L3) prior they join to form the lumbar plexus. The lumbar plexus is inserted within the Psoas major muscle & its branches emerge from it.
- Blood supply: The psoas major muscle is innervated importantly by the iliolumbar branch of the internal iliac artery. The lumbar branches of the aorta or the obturator branch of the internal iliac artery & also branches of the external iliac &femoral arteries include the blood supply.
Pectineus muscle
- Introduction: The pectineus muscle is a flat muscle found in the superomedial portion of the anterior thigh. The fascial portion of the thigh muscles is specific in that each of them is supplied by a femoral nerve (L2, L3). Due to having a dual nerve supply, the pectineus muscle is one of a few muscles classified into 2 compartments simultaneously: anterior & medial. The others are adductor longus & adductor Magnus.
- Origin Pectineus muscle originates from the pectineal line & adjacent bone of the pelvis
- Insertion: The oblique line extending from the base of the lesser trochanter to linea aspera on the posterior surface of the femur.
- Nerve supply: The pectineus is predominately supplied by the femoral nerve (L2, L3). However, in some people pectineus may receive innervation from 2 separate nerves of the lumbar plexus.
- Blood supply: The superficial part of the muscle is innervated by the medial circumflex femoral artery, a branch of the femoral artery. The deep portion of the muscle is vascularised by the anterior branch of the obturator artery, itself a branch of the internal iliac artery.
- Function: Due to the course of its fibers, the pectineus both flexes & adducts the thigh at the hip joint when it contracts. When the lower limb is in the anatomical position, contraction of the muscle first causes flexion to occur at the hip joint. This flexion can go as far as the thigh at a 45-degree angle to the hip joint.
Rectus femoris muscle
- Introduction: The Rectus femoris muscle is a fusiform shape & is included in the quadriceps muscle. It is a bulk of muscle situated in the superior, anterior middle compartment of the thigh & is the only muscle in the quadriceps group that crosses the hip.
- It is superior & overlying of the vastus intermedius muscle & superior-medial portion of Vastus lateralis & Vastus medialis.
- The word rectus is a Latin word that suggests straight. Thus the rectus femoris is its name because it runs straight down the thigh.
- Origin: Rectus femoris muscle arising from the anterior inferior iliac spine(AIIS) & the portion of alar of ilium superior to the acetabulum.
- It has a proximal tendinous complex which is represented by a direct tendon, an indirect tendon, & a variable third head. Direct & indirect tendons finally meet into a common tendon.
- Insertion: Rectus Femoris muscle together with vastus medialis, vastus lateralis & vastus intermedius joins the quadriceps tendon to insert at the patella & tibial tuberosity through the patellar ligament.
- Function: The rectus femoris muscle, sartorius muscle,& iliopsoas are the flexors of the thigh at the hip. The rectus femoris muscle is a weaker hip flexor when the knee is extended because it is already shortened & thus suffers from active insufficiency; the action will recruit more iliacus muscle, psoas major muscle, tensor fasciae latae, & the remaining hip flexors than it will the rectus femoris.
- Nerve supply: The neurons for voluntary thigh contraction arise near the summit of the medial side of the precentral gyrus (the primary motor part of the brain).
- Blood supply: The rectus femoris muscle is supplied by the artery of the quadriceps, which can stem from 3 sources; femoral, deep femoral & lateral circumflex femoral arteries. The lateral circumflex femoral & superficial circumflex iliac arteries also contribute to the blood supply of rectus femoris, but to a lesser extent.
Sartorius muscle
- Introduction: You have a sartorius muscle on the sides of the body, each starting on the anterior superior iliac spine of the pelvis. From its start, the sartorius then crosses the front of the thigh, angling inward, ultimately ending on the medial side of the tibia.
- Origin & insertion: The sartorius muscle originates from a round tendon from the anterior superior iliac spine & the upper half of the notch between the anterior superior iliac crest & the anterior inferior iliac spine. The fibers form a thin, flat muscle, which extends anteromedially across the anterior surface of the thigh.
- The muscle descends in an almost vertical fashion through the medial side of the thigh. It crosses the medial side of the knee joint & then inserts onto the medial side of the proximal tibia, anterior to the gracilis & semitendinosus muscles.
- Function: At the hip, it flexes, weakly abducts, & rotates the thigh laterally. At the knee, it can flex the leg; when the knee is flexed, it also turns the leg medially.
- Nerve supply: Like the other muscles in the anterior compartment of the thigh, the sartorius is supplied by the femoral nerve.
- Blood supply: As sartorius is such a long muscle, it comes as no surprise that it needs extensive vascular supply from several sources:
- The proximal 3rd may receive its vascular supply from the branches of the femoral, deep femoral, lateral circumflex femoral arteries & or artery of quadriceps (branch of either the femoral, deep femoral, & lateral circumflex femoral artery).
- The middle 3rd is supplied by branches of the femoral artery.
Stretching exercise of hip flexor muscle
- Kneeling Sartorius Stretch
- Standing Sartorius Stretch
- Butterfly stretch
- Fire Log Pose
- Standing Hip Flexor Stretch
- Kneeling Hip Flexor Stretch
- Hip Flexor Bed Stretch
- Table Psoas Stretch
- Runner’s Lunge
- Hips Elevated stretch
- Supported Side-Plank Reach
- Knee to chest stretch
- Pigeon Pose
- Standing Stance Pelvic Tilt
- Cobra Stretch
- Wall psoas Stretch
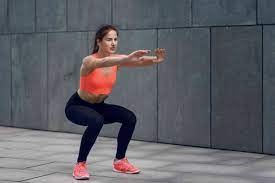
- Sumo Squat Stretch.
- Lunge Stretch
- Standing Lateral Lunge Stretch
- Pectineus AIS Release
- Supine Wall Stretch
- Standing Pectineus Stretch
- Kneeling Pectineus stretch
- Half-kneeling Pectineus dips
- Frogger stretch
- Lateral squat
- Crossover stretch
- Seated Pectineus Stretch
- Reclining angle bound pose
- Standing banded adduction
- Hip Opener and Groin Stretch
- Squatting Groin Stretch
- Frog Squat With Arm Raise
Kneeling Sartorius Stretch
- How to perform this stretch: Kneel with the left knee on the ground, the right knee bent at a 90-degree angle in front of you, with that foot flat on the ground. Support yourself against a wall, if you require, to keep the balance.
- Keep the spine upright & imagine the pelvis as a bucket full of water. Keep the pelvis in neutral position-that is, neither tilting forward nor backward-will keep the imaginary water from spilling out.
- Lean forward with the spine still completely straight. Think of pushing the pelvis forward while immobile maintaining its level.
- Clenching the buttock muscles while you do may help you get a feel for the right movement.
- Hold the stretch for between 10-30 seconds, breathing normally as you perform so, then gently release & repeat on the other side. Continue the kneeling stretch 2-5 times on each leg.
Standing Sartorius Stretch
- How to do this stretch: Stand on the left leg. Support against a sturdy piece of equipment if needed to keep the balance.
- Place the right heel close to the buttocks.
- Grasp the right foot in both hands if possible or in the right hand to assist maintain it close to the body.
- Thurst the hips forward without any arching of the back. You can feel the stretch in the front of the hip & possibly down the inner part of the thigh as well.
- Breathe normally. Hold the stretch for 15-30 seconds, then gently release & repeat on the other side.

Butterfly stretch
- How to do this stretch: Sit down on the mat with the legs in front of you.
- Reach forward & grab the left foot. It is ok to flex the knee to assist the hand & foot joints.
- Slowly pull the left foot up towards the groin bending until it is at a cozy spot & the sole is facing the right thigh.
- Flex the right knee to bring the right foot toward your groin so that it’s sole touches the sole of the left foot.
- Grip the feet with your hands & place the elbows on the knees.
- While keeping the back upright, allow the knees to fall toward the ground. You can give some amount of pressure on the inner thigh by pressing slowly on the knees with the elbows.
- When you perceive stretched pause it for 60 seconds.
- Repeat 3- 4 times.
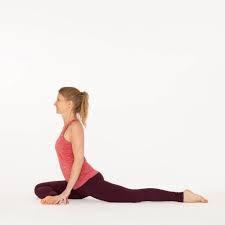
Fire Log Pose
- How to perform this: In a sitting position on 1 edge of a thickly-folded blanket, knees bent, & feet on the ground. gently shrug the shoulders up, & maintain the spine upright.
- Slide the right foot under the left leg to the outside of the left hip, & lay the outer leg on the ground. Then, stack the left leg on top of the right.
- If you have more flexibility in the hips, you can slide the right shin forward directly below the left to increase the challenge; otherwise, keep the right heel beside the left hip. If the hips muscles are tight, you may perceive that bringing the ankle to the outer knee is uncomfortable. In this take a sitting position with the shins crossed in the Sukhasana position.
- Press through the heels & spread the toes. Keep the front upper body long, exhale & bend forward from the groins. say that not to round forward from the belly. Lay the hands on the floor in front of the shins.
Standing Hip Flexor Stretch (Iliopsoas stretching)
- Standing Hip Flexor Stretch stretch is beneficial for the person who cannot take the kneeling position.
- How to do stretch: Stand tall with the feet surrounding the hip distance apart.
- Walk the left foot forward into the split stance.
- Grabe the core muscle as well as tuck the pelvis. The patient may place the hands on the left leg. keep the back leg straight as well as gently lunge forward with the left leg.
- The patient may perceive a stretch in the front of the hip, groin, as well as thigh on the right side.
- Hold the lunge position for 20 to 30 seconds. The person might not feel any low back pain. If you do, release the stretch.
- Slowly return to the initiating position & change sides.
- Do the standing hip flexor muscle stretch 2-3 times on each side.

Table Psoas Stretch
- How to stretch: Choose a table that is lower than the hip level.
- Stand with the left side next to the table & lift the left leg behind you as well as put it onto a table with a knee facing down.
- The leg will be aligned. The patient may put the folded towel under the knee to relieve any pressure from a table.
- Place the left hand on the table in front of you. The right leg should be slightly flexed.
- Gently move into the stretch by raising the chest up tall as well as opening up the hip flexor area.
- Pause when you feel the stretch in the left hip.
- Hold the standing position for 20- 30 seconds.
- Let go of the stretch & repeat on the opposite side.
- Do the table psoas stretch three times on each side.
Runner’s Lunge
- How to do this stretching: Start kneeling with both knees on the ground.
- Then, bring the left foot forward so that the left knee is directly above the left ankle.
- Simultaneously extend the right leg behind you so that the right knee is behind the right hip as well as the top of the foot
- is on the floor.
- Rest the hands on the left thigh.
- For a deeper stretch, drive the top of the back foot into the ground.
- Pause for 60-120 seconds, then repeat the movement on the opposite side.
- It is one repetition. Do it 3-4 times.
Hips Elevated stretch
- How to do the stretching exercise: Lie down in the supine position with the extended in front of you & the arms at the sides.
- After that, put the foam roller or block under the hips as well as low back.
- So the hips are elevated and the head & shoulders are resting on the ground.
- Bend the right knee & wrap the arms around the shin to bring it closer to the chest.
- Hang there for 60 – 120 seconds.
- Then repeat the movement on the opposite side.
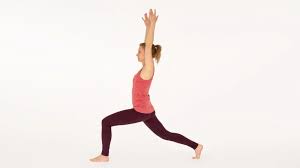
High Lunge
- How to stretch: Stand tall with the feet around shoulder-width apart and the hands at the sides.
- Step the right foot a couple of feet behind you & bend the left knee 90 degrees, so it is directly above the left
- ankle.
- Press the right toes as well as the ball of the foot into the ground and straighten the arms directly overhead.
- Hang up for one to two minutes before repeating on the opposite side.
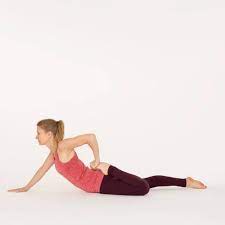
Half Frog
- How to do this stretch: Begin lying on your stomach with the legs extended behind you.
- Rest the forehead on the back of the hands.
- Bend the left knee so that it is parallel to the left hip, as well as flex the left foot.
- The left shin should be aligned with the right leg.
- Press the left knee into the ground to bring the left inner thigh as close to the mat as possible.
- Hold for 60-120 seconds before repeating on the opposite side.
Hero Pose
- How to do this stretching: Begin kneeling with both knees on the ground.
- Then put a block or even foam roller between the feet, just below the tailbone.
- Flex the knees to lower yourself down on the block or roller.
- Maintaining the knees together & the tops of the feet pressed into the ground.
- Sit tall with the shoulders directly above the hips.
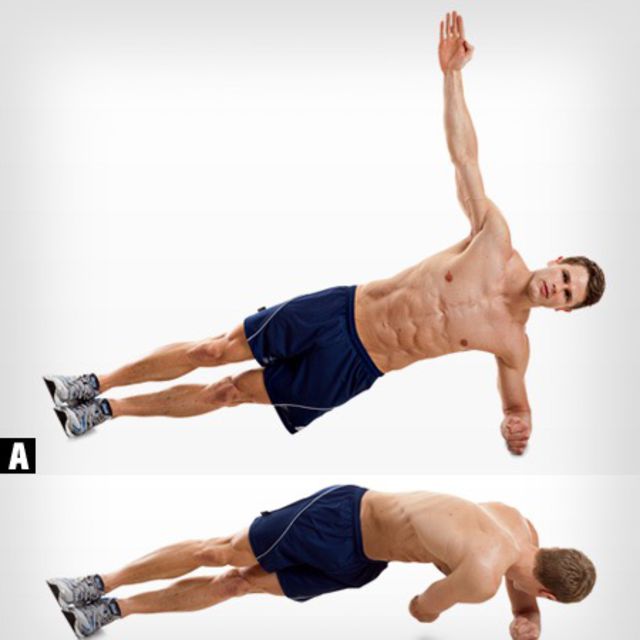
Supported Side-Plank Reach
- How to do this stretching exercise: Begin kneeling with both knees on the ground, then extend the right leg out to the side.
- Simultaneously place the left palm on the ground, directly below the left shoulder, & reach the right arm over the
- right ear.
- Your body should form a direct line from your right ankle to your right hand.
- Press the outer edge of your right foot into the floor and rotate your shoulders so they are side by side with the wall in
- front of you.
- Pause for one to two minutes, then repeat the movement on the opposite side.

Knee to chest stretch
- How to do this stretch: Lie down in the supine position with the legs extended on the floor.
- Gently bend the left knee toward the chest.
- Maintaining the back flat, pull the left knee as close to the chest as possible without discomfort.
- Stretch the right leg out as far as possible & squeeze the glute.
- Holding time is 10-15 seconds.
- Return to the starting position & repeat with the opposite leg.
Pigeon Pose
- How to do this stretching: Begin in the plank position.
- Lift the right foot off the floor and slide it forward so your knee is on the ground next to your right hand and your foot
- is near your left hand.
- Exactly where your knee and toes drop will depend on your flexibility.
- Slide your left leg back as far as you can while maintaining your hips square.
- Lower yourself to the ground and onto your elbows, bringing your torso down as far as possible.
- Hold the stretch without letting your chest drop.
- When you feel like you have gotten a good stretch, switch sides.
Standing Stance Pelvic Tilt
- How to do stretch: Stand up tall with good posture, chest pointed up as well as both shoulders back.
- Push the pelvis back & under.
- Hold the standing pose for 10 – 20 seconds.
- Release.
Cobra Stretch
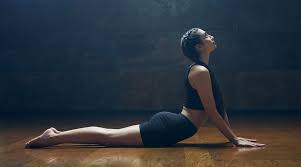
- How to do stretching: Lie down in the prone position.
- Press through the hands to extend the back.
- Engage the glutes to stabilize a pelvis.
- When the patient feels stretched in front of the thigh, pause there for 10-15 seconds as well as release.
- Perform the cobra stretch 3-4 times.
Wall psoas Stretch
- How to do this stretch: Take the Lunge position in front of a wall.
- Rest your right foot on a wall.
- Drive the knee closer to a wall.
- Rotate the hips backward again.
- To lower the intensity of the stretch, drive the knee forward.
- Hold the psoas stretch for 15-20 seconds & do it 3-4 times.
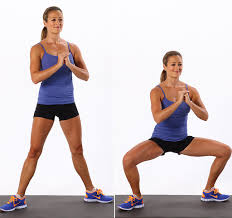
Sumo Squat Stretch
- How to do this stretch: Stand tall with the feet wider apart.
- Laterally rotate the feet. The knees & toes are pointing out.
- Maintain the back straight as well as the chest facing up.
- Squat downward while maintaining the thighs facing out.
- Pause that squatting position for 10-15 seconds & perform it 2-3 times.
Lunge Stretch

- How to perform the stretch: Begin kneeling on the ground in a lunge position.
- Bend your torso forward to bring the outside of the shoulder towards the interior of the lead knee.
- Then, lunge forward so the hips slide forward.
- You can feel a stretch along the inside of the forwarding leg.
- Hold this adductor stretch for 5- 10 seconds then release.
- Perform 10-12 repetitions.
Standing Lateral Lunge Pectineus Stretch
- How to perform stretch: Stand in a broad stance position.
- Now bend your & knee & move your hips to that side.
- maintain posterior pelvic tilt during the stretch
- You can feel a stretch inside of the opposite thigh.
- Hold for 5-10 seconds & release.
- You can enhance holding time in progression.
- Do this adductor stretch 4-5 times.
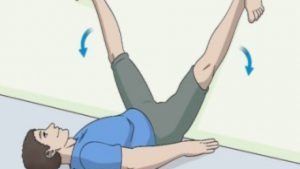
Pectineus AIS Release
- How to perform stretch: Begin in a supine position with a resistance strap on around one foot.
- The opposite end of the strap is grasped in the hand.
- Then, actively slide the foot sideways.
- make sure to slide the foot, don’t raise it or the hip flexors can contract.
- At the end of the movement gradually pull the foot further outwards with the resistance strap.
- You can feel a stretch in the adductors.
- Hold the stretch for 5 to 10 seconds then slide to return.
- Perform 8-10 repetitions.
Supine Wall Stretch
- How to perform stretch: In the supine position in front of a wall with the leg up on the wall.
- move towards the wall as you can, and maintain a comfortable stretch in the hamstrings.
- Maintain the leg straight while they slowly split open until you feel a stretch inner side of the legs.
- Hold the stretch for 15-30 seconds.
- Relax & repeat 3 times.
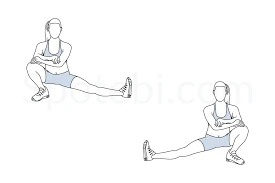
Standing Adductor Stretch
- How to perform stretch: Start standing with the feet around 3 feet apart.
- Transfer the weight to one side & bend your knee.
- Keep the other knee straight to feel a stretch on the inside of the thigh.
- Hold the stretch for 15-30 seconds.
- Relax & repeat on the other side.
Kneeling adductor stretch
- How to perform stretch: Begin with your knees & hands on the ground.
- Straighten out a left leg to the side. Try to keep the leg on the floor.
- Move your butt back to the heel of your right bent knee.
- You can feel the stretch on the inner thigh of the left leg.
- Pause for 8-10 seconds, then release the stretch & back in.
- Repeat 8-10 times.
Half-kneeling pectineus dips
- How to perform the stretch: Start in a half-kneeling position with the right knee on the floor & the left leg bent with the foot on the floor.
- Move the left leg out to the side as much as you can.
- Your foot might be at a right angle to your knee.
- With your hands on your hips, dip the body toward the left leg.
- You can feel the stretch on the inner thigh—especially on the right side.
- Repeat 8-10 times.

Frogger stretch
- How to perform stretch: Start with your knees & forearms on the ground with your knees & feet wider.
- Try to keep the inner part of your feet on the floor.
- Sit the butt back to the heels, feeling the stretch on the inner thighs.
- Pause for 10-15 seconds, then release the stretch & back in.
- Repeat 8-10 times.
Lateral squat
- How to perform stretch: Stand tall & put the feet double shoulder-width apart.
- Transfer your weight to your left leg, bend your left knee, & push your hips back as if you are taking a sitting position.
- Drop as low as possible while keeping your right leg straight.
- Keep the chest up & your weight on the left leg.
- Breathe & hold for 15 to 20 seconds prior to returning to the beginning position.
- Repeat 2-3 times, then move to the other side.
Crossover Stretch
- If you love dancing, this move might come naturally as it is the same as the “grapevine” dance move.
- How to perform the stretch: Start with the feet together, then step to the right with the right foot.
- Cross your both foot.
- Step to the right again with your right foot, & bring your left foot to join your right foot.
- Once both feet are together and repeat on the opposite side.
- You can start gradually, but pick up the stride as you get used to the move.
- Do it 5-10 times.
Seated pectineusStretch
- How to do stretch:
- Straight the legs out to the side, and make a “V” shape.
- To prevent joint strain, do not overdo this pose.
- For many people, simply sitting like this is enough to give an inner thigh stretch.
- If you want to feel more stretched, keep your back straight, and lean towards the floor from your hip joints.
- Stay there for around 10-15 seconds. breathe normally.
Reclining angle bound pose

- This is the best stretch if you spend most of the day in a sitting position.
- How to stretch: Take a supine position on the ground.
- Bend both knees & draw your soles inward so that their borders are touching each other.
- Move the knees down toward the floor so that you can feel the groin muscles stretching.
- Breathe & hold this position for 15- 30 seconds.
- Repeat 3-4 times. Try to draw the feet closer to the buttocks with every stretch.
Hip Opener & Groin Stretch
How to perform stretch:
- initiate in a forward lunge position & drop your right knee to the floor.
- put the left elbow on the inside of the left knee as pictured.
- Press the left elbow gently into the left knee & twist the torso to the right.
- Reach the right arm behind you until you feel a gentle stretch in the lower back & left groin.
- Hold the stretch for about 20-30 seconds, release & repeat on the right leg.
Squatting Groin Stretch
- How to do stretch:
- In the standing position with the feet wide apart, & toes pointing outwards.
- Slowly initiate squatting down until your knees are directly over the ankles & bend to 90 degrees.
- Put the hands on top of the inner thighs & gently push outward to open the hips.
- You will feel the stretch in the inner side of each leg.
- Hold for 20-30 seconds, relax & repeat 3 times.
Frog Squat With Arm Raise
- How to perform stretch: Moving directly from the 1st stretch, place the right hand on the ground.
- Resume to gradually push your inner thigh outward, as you reach the left hand directly up to the roof, fingers pointed upward.
- With each breath, twist the upper body slightly further, reaching as high as you can.
- The right heel might lift slightly.
- Then, switch the other sides.
Health the benefits of stretching the hip flexor muscle.
If a patient stretch properly they may have these many benefits are:
- Good quad stretches stimulate the muscles & increase blood flow to the part.
- This further decreases rectus femoris muscle tightness & pain.
- This stretch will make the muscle used for many physical activities namely the run, brisk walking, squats, yoga, & other sports activities.
- Rectus femoris muscle stretching exercises increase short-term range of movement, like hip flexion as well as knee extension.
- This muscle stretch assists you to prevent injuries while doing leg workouts.
- This improves long-term flexibility as well as mobility.
- This relieves muscle soreness.
What are the general mistakes the patient can avoid while hip flexor muscle stretching?
There are some mistakes that the patient cannot make during stretching:
- Bouncing: Do not bounce while doing the stretch. If the patient finds himself performing so, you need to stabilize him by holding onto sturdy objects.
- Locking the Knee: Never lock the standing knee while the stretch. maintain it soft.
- Knee moving Outward: Do not permit the bent knee to drift outward. Maintain the knees to each other.
- Stretching before Warm-up: To avoid muscle strain, the patient can stretch only after you are done with the warm-up.
- Stretching to Pain: Stretch until you perceive mild discomfort, do not stretch to the point of pain. Take safety not to strain the knee. The aim is not to touch the heel to the buttock, but rather to perceive the gradual stretch in the thigh.
- Arching the Back: you do not arch the low back as you bend the knee, keep the abdominals engaged to keep the back neutral as you drag into this stretch.
Hip flexor muscle Stretching Safety Guidelines
There are some guidelines the patient require to follow while stretching:
- Stretching is no exception: this Stretching may be dangerous & cause injury if you do it improperly.
- Breathe: Never hold the breathing. pause the breathing causes tension as well as stress in the muscle, & may increase blood pressure. The deeper you breathe, the more relaxed the muscles will be, & the deeper & longer you can stretch.
- Stretching tight muscles are uncomfortable for you, but the patient might never feel any stabbing or even sharp pain.
- Be consistent: perform stretching daily for a few minutes & seconds a couple of times a day that slowly builds flexibility & increases the range of movement over the long term. It is a good way to muscle stretch, rather than doing it prolonged times only once a week.
- Wear loose comfortable clothing, as it is tough to stretch if the clothes are tight & restrict movement.
Strengthening exercise of hip flexors
- Standing Leg Circles
- Side-Lying Hip Adduction
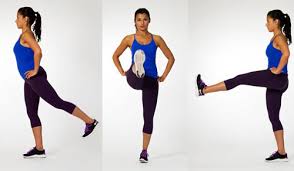
- Squat Side Kick
- Standing side Leg Raise
- Sumo Squat
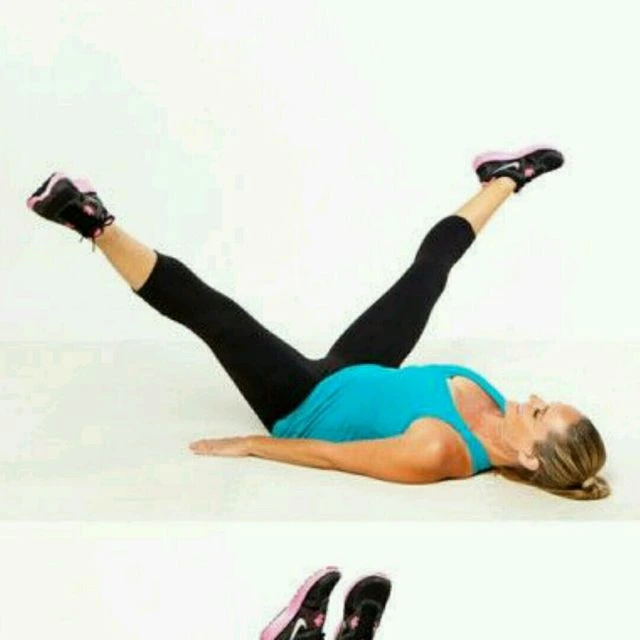
- Cross Scissors
- Dumbbell Side Lunge
- Cossack Squat
- Copenhagen Side Plank
- Cable Hip Adductor
- Seated Hip Adduction
- Adductor machine
- Wide stance squat
- Standing banded adduction
- Seated banded adduction
- Glute Bridge
- Hips Elevated
- High Lunge
- Half Frog
- Hero Pose
- Supported Side-Plank Reach
- Lying hip rotation
- Sidekick
- Hip raises
- Leg raises
- Frankensteins
- Hanging Leg Raise
- Bridging Psoas March
- Romanian Chair Leg Raises with Dumbbell
- boat pose
- Plie Squats
- Clam Exercise
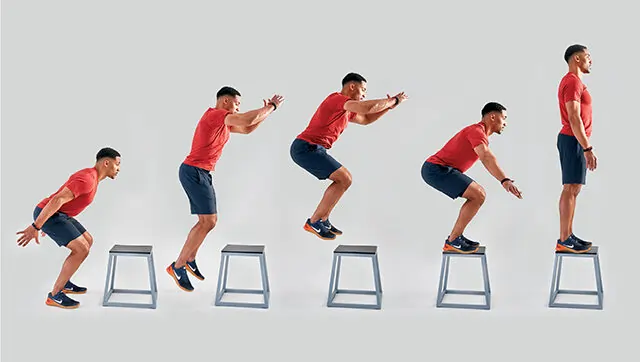
- Step-ups
- Lateral band walks
Standing Leg Circles
- How to do: Standing Leg Circles is a dynamic warm-up exercise, this exercise improves blood circulation to the hip muscle & upper leg.
- for the standing leg circle exercise, and stand with feet hip-width apart.
- Raise the left leg off the ground. while balancing on the right leg, keep a small circle with the left leg.
- Complete 10-20 repetitions on the left side then shift to the right leg.
- Note: If you have a balance problem then stand close to a prop where you can help to keep your body by holding something.
Side-Lying Hip Adduction
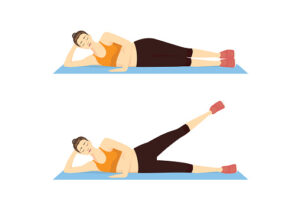
- How to do: Side-Lying Hip Adduction is the best exercise for the hip adductors that can be done on the floor while isolating a single leg at a time.
- All you require to do is to focus on contracting the hip adductor muscles to raise the leg off the floor.
- For this exercise, you have to lie down on the left side and take the arms in front of you with your elbows & forearm on the ground for support. raise the right leg over the lower leg placing your heels against the thigh of the bottom leg.
- keep the leg extended, and raise it upward as much as possible.
- Slowly return to the initiating position.
- Perform 10-25 repetitions on the left side then repeat to the right leg.
- Note: You can add some provocation to the exercise by using a resistance band attached to an anchor or by strapping an ankle weight to the leg.
Squat Side Kick

- How to do: The squat side kick bodyweight exercise will use both the adductors & the abductors & is a great all-around lower limb exercise.
- This exercise combines 2 motion that enables both muscle strengthening & stretching which is mainly to decrease the risk of suffering from groin pain.
- For the Squat Side Kick exercise, you have to stand with a shoulder hip-width apart, & the hands together in front of you.
- Flexed the knees until the thighs are parallel to the floor, then stand up & transfer your weight to your right leg while kicking out the left leg to the side.
- Back to squatting position then continue it on another leg.
- Note: Your core muscles might be engaged throughout the motion with the back straight, & chest up, & do not let the knees extend past your toes while squatting.
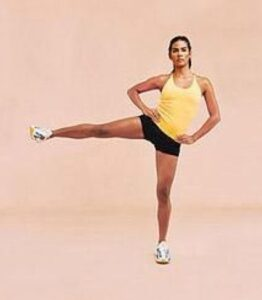
Standing side Leg Raise
- How to do it: Standing side Leg Raise is the best bodyweight exercise that can hit the hip adductors of one leg while hitting the hip abductors of the other leg as you will be using an isometric hold on the other leg to keep it in the air.
- For this exercise, you have to stand with the shoulders hip-width apart. now on the left leg away from the body.
- Then Lift the right leg as far as comfortable, & pause it there for 4-6 seconds.
- Raise the left leg to your right leg until they touch then lower back to the initiating position. Complete 10-18 repetitions of 2-3 sets.
- Note: To make the Standing side Leg Raise exercise more challenging strap ankle weights to both legs.
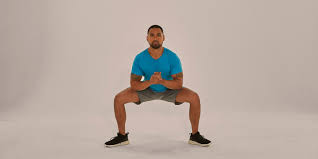
Sumo Squat
- How to do it: This variation of the squatting will hit the muscle groups in the lower limb plus the inner thighs.
- Keep the back straight & your chest up throughout the exercise.
- Even though the sumo squat has a smaller range of movement compared with a regular squat, it is still an effective exercise that can be incorporated into normal workouts.
- For this exercise, you have to stand wider than the shoulder-width stance with pointing outside.
- Take a squatting position, drop the hip down & back while the back is straight & chest up until your thighs are parallel to the ground.
- Push off through the floor & return to the initial position.
- Note: If you want to add provocation to the exercise then hold a kettlebell in your hand.
Cross Scissors
- How to do it: Cross Scissors is the best exercise to work the hip adductor muscles & the core muscle simultaneously.
- Cross scissors are challenging as you need to stay in a crunched position throughout the motion.
- keep this position by crossing the legs in front of the require all the stabilizing muscles to be contracted.
- For this exercise, you have to Sit down & brace yourself by putting your hands on the floor back to you. Shift your leg off the ground in front of you at a 30-40-degree angle with 1 leg crossed over the other.
- The core muscle might be engaged throughout the movement in a semi-“V” position change the legs out to the sides then bring them back closed while crossing the other leg over.
- Perform this with an Alternate leg until you complete 10-20 repetitions on each side.
- Note: You can enhance the difficulty of cross scissors by sitting in a “V” position without bracing the upper limb with the arms.
Dumbbell Side Lunge
- How to do it: The side lunge is an exercise to improve balance, stability, & lower limb strength.
- The side-to-side motion is both a strengthening & stretching exercise. The Dumbbell Side Lunge exercise uses your hip abductors & hip adductor muscles.
- For this exercise, you have to stand with the shoulders hip-width apart & hold the dumbbells at chest level.
- Take a large step to the side & drop your hip down & back until the thighs are parallel to the floor while your foot is planted on the ground.
- Push through the flexed foot, & bring your back to the starting position.
- Repeat it for 10-15 repetitions then move to the next leg.
- Note: To make this exercise easy you can do bodyweight side lunges. The back might be in a neutral position & chest up while trying not to lean forward.
Cossack Squat
- How to do it: The Cossack Squat exercise moves the body through the frontal plane of motion, going side to side.
- Working the lower limbs at this angle can improve the flexibility of hips, knees, & ankles.
- You will increase your stability by mastering this exercise by getting a good stretch & strengthening the hip adductors.
- For this exercise, you have to stand with your feet in a wide stance with toes pointing outside by dropping your hips downward & back.
- Squat down to that single side and shift your weight while your other leg is extended out with your heels on the floor, toes pointing up.
- Push through the ground with your flexed leg and bring your back to starting position.
- Repeat this exercise on the other leg by shifting the weight & lowering it down into a squat position on the other side.
- Note: Cossack Squat exercise requires a high degree of mobility so if you can not go all the way down then go as far as you can while trying to improve each workout. your back might be maintained in a neutral position throughout the exercise.
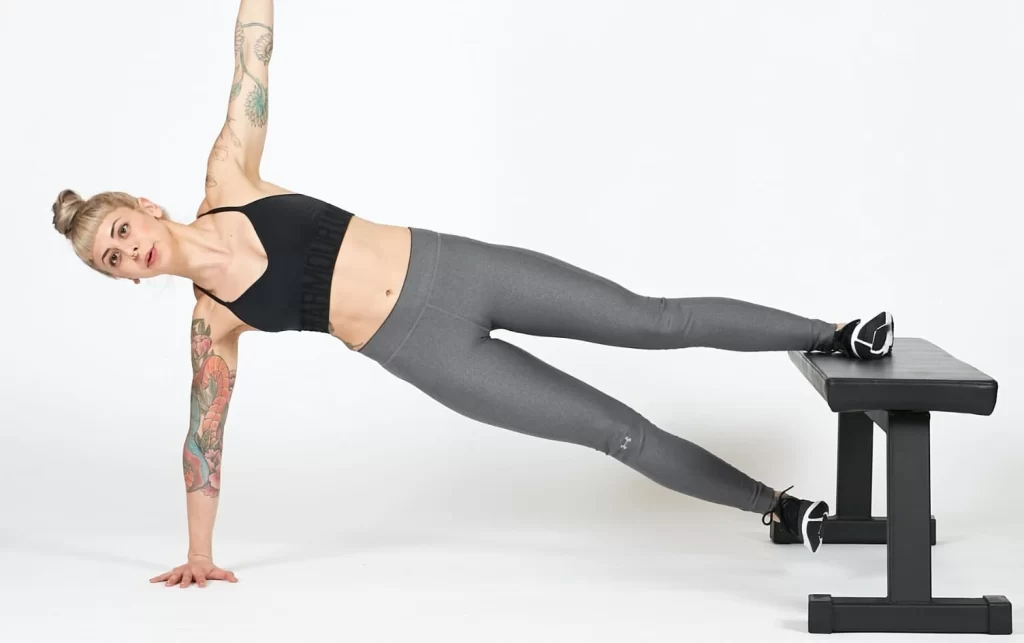
Copenhagen Side Plank
- How to do it: Copenhagen Side Plank exercise is the most difficult variation of plank that not only hits the core muscles but also strengthens the hip adductors. The Copenhagen Side Plank exercise will help to balance out the strength in the muscles on the outside of the hip.
- For this exercise, you have to lie down on the floor & perpendicular to the bench then brace yourself on your forearm & elbows.
- Lift with your flexed knee lift your top leg & place it on the bench.
- Hold this position.
- Complete 20-25 repetitions for 2 sets then do this on another side.
- Note: Increase the difficulty by doing this exercise with your legs extended with only your ankle placed on the bench.

Cable Hip Adductor
- How to do it: You may notice women at the gym doing this exercise while the men neglect it.
- It is time to move the stigma that cable hip adductions are not main, everyone might be doing this exercise to strengthen the adductors to reduce the risk of injury.
- Make sure you are warmed up with some dynamic stretches before performing this exercise then try to start with less weight & maximum repetitions until you are comfortable enough to increase the weight.
- Find an attachment that you can use to strap onto the ankle closest to the pulley.
- Set up the pulley around calve level. Stand to the side of the pulley. Brace yourself using your hand against the machine in a safe place where your fingers won’t get pinched. Your active leg might be up off the floor towards the pulley.
- Pull your leg away from the pulley towards the middle of your body.
- Slowly let the leg return to its starting position Completed the desired number of repetitions
- Note: exercise can also be done with this same technique by attaching a resistance band to a fixed anchor point.
Seated Hip Adduction
- The seated hip adduction will isolate the hip adductor muscles when you are seated, only having to focus on bringing the thighs together.
- Add a Seated Hip Adduction exercise towards the end of your leg day after completing the bigger compound lifts such as squatting.
- Seat in the machine with back against the backrest
- Set the width of the knee pads to a manageable position that gives a stretch to the inner thighs but does not over-stretch the adductor muscles.
- Set up a lightweight for the 1st time set so that you do not overdo it.
- Squeeze your thighs together while exhaling, until your knees meet in the center of the body.
- Slowly return to the initial position.
- Complete maximum repetitions.
Adductor machine
- How to do it: Most people think of isolating the adductors, they may think of the classic adductor machine established in gyms across the world.
- Though this machine can do the best job of training the adductor, it is not the only movement that can yield good results.
- Considering that you can modify the amount of weight & width of the pads, this exercise is great for beginners. It is best to begin super light to get a feel for the exercise & avoid getting injured.
- For this exercise, you have to sit on the machine begin sitting on the machine with the pads positioned between your legs as wide as is comfortable, & select your ability-wise resistance.
- In a controlled manner, contract your thighs together just until the pads touch, & feeling the muscles contract.
- gradually reverse the movement, returning your thighs to the initial position. Repeat this exercise number of sets & repetitions.
- If just beginning, try 2–3 sets of 10 reps.
Wide stance squat
- How to do it: Squatting is a king of leg exercises & this will stimulate the whole leg.
- There have different squat variations but here we discuss the wide stance squat also called the sumo squat which will utilize inner thigh muscles.
- You can do this exercise with a variety of weighted equipment like a barbell, kettlebell, dumbbell, or sandbag — or with just only body weight.
- For the Wide stance squat exercise, you have to stand a little wider than the shoulder hip-width apart, and turn your toes outside.
- Shift your weight backward & slowly lower your hips until your thighs are parallel to the ground.
- Then return to the starting position by pushing through the ground, and your inner thigh muscles are contracted.
- Do 10-15 repetitions of 2-3 sets.
Standing banded adduction
- How to do it: For this exercise, you need a resistance band, and wrap a resistance band on a solid anchor. you have to stand on either side of the body facing the anchor point & the resistance band.
- Allow the resistance band to pull the leg to the side by resisting the movement.
- To start this exercise you have to stand tall & bring a banded leg towards the midline of the body, you feel the good contraction in your inner thighs.
- Gradually release your leg back to the side with control movement.
- Switch the legs & do 10 to 20 repetitions for 3 to 4 sets on each leg.
Seated banded adduction

- How to do it: For the Seated banded adduction exercise, you need a resistance band, and wrap a resistance band on a solid anchor.
- You have to sit on the bench on either side of your body facing the anchor point & the resistance band.
- Put the internal foot through the resistance band, the band is positioned just below the knee joint. allow the resistance band to pull the leg toward the anchor point.
- Move your leg towards the center of the body by contracting the adductor muscle.
- Repeat this on each leg.
- Do 2-3 sets of 12-15 repetitions.
Lateral Lunge
- How to do it: For the Lateral lunge exercise, you have to stand with your feet hip-width apart. step out of your left leg & start by sending your hip back as you flex your left knee.
- You can extend your arms forward for counterbalance if you like. during the descent, the knee should not move more than 2 inches beyond your toes, &your knee should be aligned between 2 & 3 toes.
- The toe turns outwards slightly. push-off through left to return to a starting position.
- Repeat on the right side leg to complete the 1st repetitions.
- Do 3 to 4 sets of 8 to 10 repetitions on each leg.
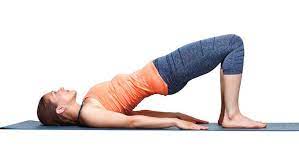
Glute Bridge:
- You are lying on your back with your arms at your sides knees bent & feet flat on the floor.
- Then Engage your glutes muscle & lift your hip joint to create a bridge between your shoulders & knees.
- Raise your hip joint till your feel a stretch in the iliopsoas muscle in both legs.
- When you feel lower back pain then lower your hip joint slightly, but must keep your glutes muscle tight.
- Hold this stretching position for 20 to 30 seconds.
- Then Slowly return to the starting position.
- Perform this exercise 10 times in 1 session & perform 3 sessions per day.
Hips Elevated:
- You are lying on your back with your legs straight out in front of you & your arms at your sides.
- Then, place a foam roller & block under your hip joint & low back so that your hip joint is elevated
- Must keep your shoulder joint & head resting on the ground.
- Then Bend your left knee & wrap your arms around your shin to bring it closer to your chest.
- Hold for this exercise 10 seconds.
- Then Slowly return to the starting position & repeat on the opposite side.
- Perform this exercise 10 times in 1 session & perform 3 sessions per day.
High Lunge:
- You are standing with your feet shoulder-width apart & your hands at your sides.
- Step your left foot a couple of feet behind you & bend your right knee joint at 90 degrees, so it is directly above your right ankle joint.
- Press your left toe & the ball of your foot into the ground.
- Then extend your arms directly overhead.
- Hold for this exercise 10 seconds.
- Then Slowly return to the starting position & repeat on the opposite side.
- Perform this exercise 10 times in 1 session & perform 3 sessions per day.
Half Frog:
- Start this exercise by lying on your stomach with your legs stretched out behind you.
- Rest your forehead on the back of your hands.
- Bend your right knee joint so that it stays parallel to your right hip joint & flex your right foot.
- Must be placed on Your right shin parallel to your left leg.
- Then Press your right knee joint into the ground to bring your right inner thigh as close to the mat as possible.
- Hold for this exercise 10 seconds.
- Then Slowly return to the starting position & repeat on the opposite side.
- Perform this pose 5 times in 1 session & perform 3 sessions per day.
Hero Pose:

- This exercise is Start with a kneeling position with both knee joints on the ground.
- Place a block & foam roller between your feet, just under your tailbone.
- Bend your knee joint to lower yourself down on the block & roller.
- Must be Keep your knees joint together & the tops of your feet pressed into the ground.
- You are sitting tall with your shoulder joint directly above your hip joint.
- For a deeper stretch in this pose, walk your hands behind you with fingers facing your toes & lean back slightly.
- Then Hold this pose for one to two minutes.
- Perform this pose 5 times in 1 session & perform 3 sessions per day.
Supported Side-Plank Reach:
- This exercise is to Start with a kneeling position & both knees on the ground, then extend your left leg out to the side.
- Place your right palm on the ground, directly below your right shoulder joint.
- Try to reach your left arm over your left ear.
- Keep Your body in a form a straight line from your left ankle joint to your left hand.
- Then Press the outer edge of your left foot into the ground & rotate your shoulder joint so that they are parallel to the wall in front of you.
- Hold this exercise position for 10 seconds & repeat the movement on the opposite side.
- Perform this exercise 10 times in 1 session & perform 3 sessions per day.

Lying trunk rotation:
- You are lying on the floor with your feet flat & knee joints bent.
- Then Lay one ankle joint across the other knee joint.
- Rotate the hip joint in & out.
- Hold this exercise position for 10 seconds
- Perform this exercise 10 times in 1 session & perform 3 sessions per day.
Sidekick:
- You are in a Standing position & raise one leg out to the side.
- Do this exercise on both sides & repeat between 10 times per side.
- When the strength increases, try adding light weights to the ankle joint.
- You are also Holding onto a wall for balance if you need it.
- Hold this exercise position for 10 seconds
- Perform this exercise 10 times in 1 session & perform 3 sessions per day.
Hip raises:
- You are lying on the ground with both feet planted on the floor near the buttocks.
- Then try to Raise your leg straight up must keep your thigh parallel.
- Raise the hip joint off the ground.
- Hold this exercise position for 10 seconds
- Perform this exercise 10 times in 1 session & perform 3 sessions per day.
Leg raises:
- Place your both hands & knee joints on the floor.
- Then Raise one foot back towards the sky & return to all fours.
- Hold this exercise position for 10 seconds
- Perform this exercise 10 times in 1 session & perform 3 sessions per day.
Frankenstein
- You are Standing up straight with your arms by your side & step forward with your left foot.
- Try to Swing your leg in the air as high as possible without arching your back.
- Then reach forward with your left hand to touch your right foot.
- Hold this exercise position for 10 seconds
- Perform this exercise 10 times in 1 session & perform 3 sessions per day.
Hanging Leg Raise
- First Hang from a pull-up bar that is high enough so that your feet do not touch the ground when the legs are extended.
- With a firm overhand grip try to flex your hip joint & knee joint simultaneously as you draw your legs out & up towards your chest without using the momentum.
- Then Slowly return to the starting position &repeat.
- Hold this exercise position for 10 seconds
- Perform this exercise 10 times in 1 session & perform 3 sessions per day.
Bridging Psoas March
- First Loop a mini band around the balls of your feet.
- Then place your heels on an elevated surface with your toes pointed up with your body straight.
- Try to Lift your hip joint, and engage your core & glute muscles.
- Try to bring one knee towards your chest but must keep the other leg straight.
- Must be Avoid the hip joint sagging your butt.
- Then Return to the working leg slowly & repeat on the other side.
- Hold this exercise position for 10 seconds
- Perform this exercise 10 times in 1 session & perform 3 sessions per day.
Romanian Chair Leg Raises with Dumbbell
- First, take to Position yourself in the Roman chair with a light dumbbell securely between your feet.
- Must be Keep your torso upright & press the lower back against the backrest while your forearms rest on the pad.
- Try to Lift your legs to parallel to the floor by flexing at the hip joint while keeping your knee joint straight.
- Then Slowly reverse to the starting position & repeat.
- Hold this exercise position for 10 seconds
- Perform this exercise 10 times in 1 session & perform 3 sessions per day.
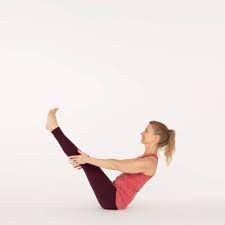
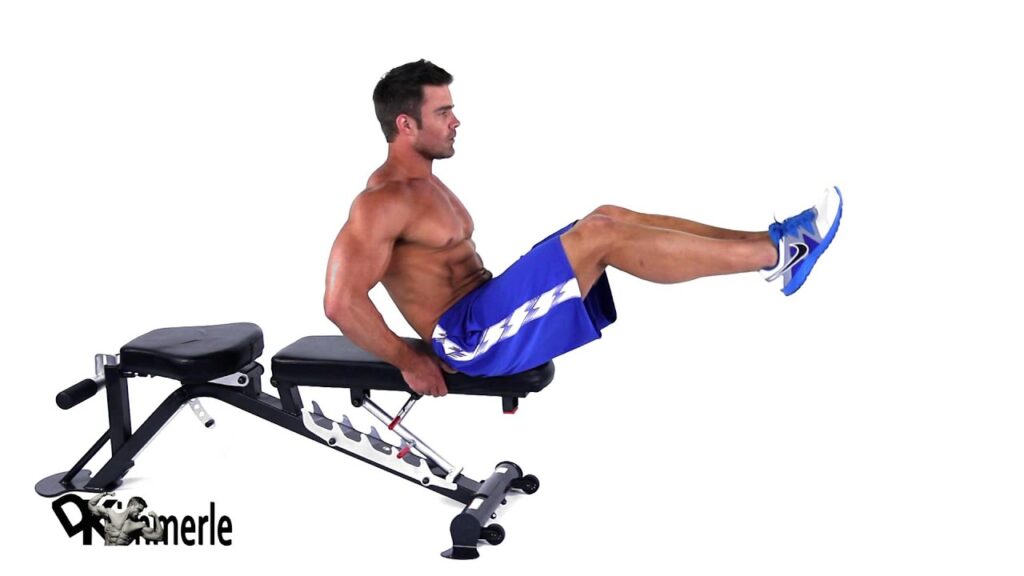
Boat Pose:
- You are sitting on a mat with your torso upright, knee joint bent & feet flat on the ground.
- Lean back slowly & tucking your tailbone under so that you are not putting pressure on it.
- While you leaning back try to extend your legs into the air & get your spine in a neutral position by eliminating the arching in your spine.
- Lift your chest &must keep your shoulders down & hold for time.
- Hold this pose for one to two minutes.
- Perform this pose 5 times in 1 session & perform 3 sessions per day.
Lunge:
- This exercise is to start in a standing position, look straight ahead & take a generous step forward with your right foot.
- Must be Keep your trunk upright throughout the movement.
- Then Bend your extended knee joint & transfer your weight onto your right leg.
- Try to lower yourself slowly into the lunge till your left knee joint is on the floor.
- Your right knee joint should be directly above your right ankle joint.
- Then Step back into a standing position & Repeat with your left leg in front.
- Hold this exercise position for 10 seconds
- Perform this exercise 10 times in 1 session & perform 3 sessions per day.

Plie Squats
- For the Plie Squats first abduct the hip joint by creating a wide base of support, stepping the feet out laterally from the midline.
- Then rotate the hip joint outward, so that the thighs, knees & feet point toward the sides of the room.
- Bend the knee & hip joint lowering the glutes muscle straight down while keeping the hip joint externally rotated so that the knee joint remains aligned with the toes.
- When the knee joint form a 90-degree angle, press the heels & return to the standing position.
- This exercise is performed to 10 repetitions in 1 session.
- This exercise is also done with dumbbells & a barbell to increase the resistance.
Clam Exercise
- The patient is lying on the affected side & bottom the arm extended upward to support the head & neck.
- Flex the hip & knee joints so that the thighs are positioned at a 90-degree angle to the torso & knees are also bent at roughly 90 degrees.
- Make sure the shoulder joint, hip joint & knee joint are stacked, and the body is perpendicular to the floor.
- Keep the big toes touching, tighten the core muscle & externally rotate the hip joint & knee joints open, as though the clam opening up.
- Rotate as far as comfortably with good form, then reverse the movement of exercise means, internally rotating the hip joint back into the starting position.
- Perform this exercise in 10 repetitions before repeating it on the opposite side.
- For the resistance used a small looped resistance band in the exercise.

Step-ups
- The starting position for the test is the standing position.
- Place one foot onto a platform, or step bench /to the lowest step of the staircase.
- The patient must be kept straight onto the pelvis level.
- Bend to the knee joint then slowly lower to the opposite foot onto the floor.
- Lightly touch the toe onto the floor, then rise to back up the position.
- Repeat this Step-ups exercise 10 times in 1 session & 3 sessions per day.
- This Step-up exercise targets almost all the muscles of the lower body but mostly the sartorius muscle.
Lateral band walks:
- For this exercise, used one prop-looped resistance band.
- The patient places the band around the legs, above the ankle joint.
- Then Bend both legs slightly & move the right leg laterally.
- Pull the band against the resistance & move the left leg closer.
- Then Take at least 10-12 steps in the right direction in the same way.
- Repeat this exercise with the other side.
Yoga poses of hip flexor muscle
- Crescent Lunge
- Sugarcane Pose
- Dancer’s Pose
- Little Thunderbolt Pose.
- Reclining Hero Pose (Supta Virasana)
- Half-Reclining Hero Pose (Ardha Supta Virasana)
- Bow Pose (Dhanurasana)
- Camel Pose (Ustrasana)
- Firefly Pose (Tittibhasana)
- Low Lunge (Anjaneyasana)
- One-Legged King Pigeon Pose
- Tree pose
High Crescent Lunge
- How to stretch: Take the lunge position on the ground.
- Put one knee forward around 90 degrees bend, one leg behind straight.
- After that, raise both hands overhead & clasp them together.
- Now push the hip forward & downward, and keep the back straight.
- Now slowly lean back to feel the stretch into the quads.
- The patient can feel the stretch on the backward leg.
- Holding time is around 20 – 30 seconds & repeat 2-3 times on both sides.
Sugarcane Pose
- How to stretch: Stand tall with the feet wide apart.
- Now raise both hands on the sides at shoulder level.
- After that, lift one leg, bend at the knee & hold that ankle with the corresponding hand.
- Now bend at the waist & put the other hand on the floor, at the side, or in front of you.
- If the patient feels stretched, then hold for 20-30 seconds.
- Repeat 2-3 times.
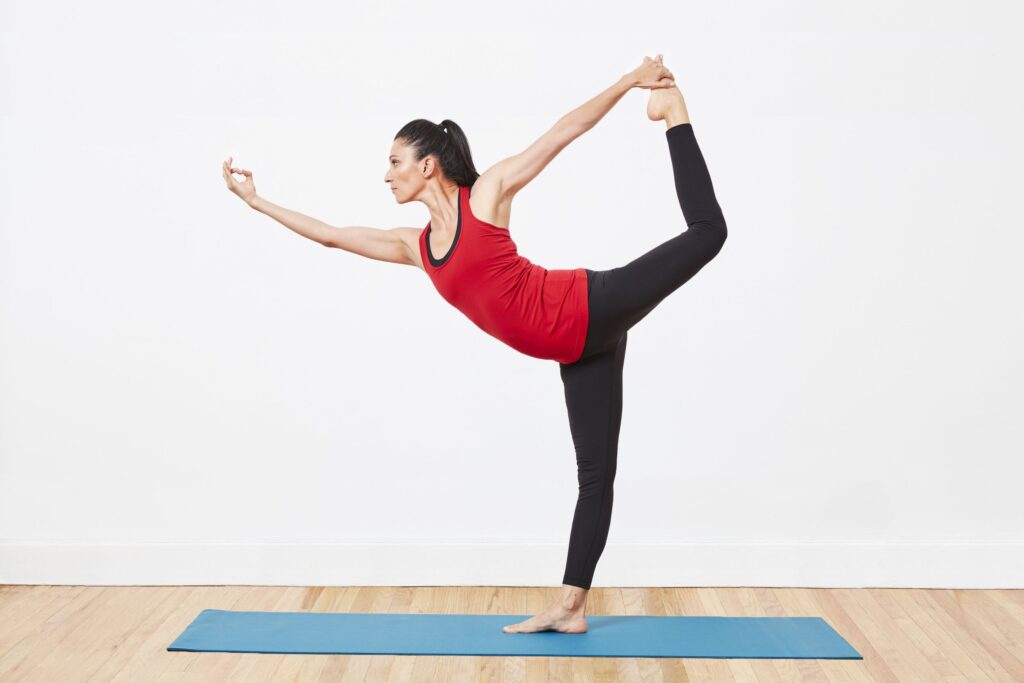
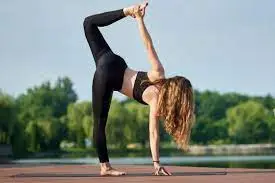
Dancer’s pose
- How to stretch: Stand tall as well as feet wide apart.
- Now raise both hands forward at shoulder level.
- Raise one leg behind you & grasp that ankle with the corresponding hand.
- Now lift that leg upward behind you.
- Hold this stretching pose for at least 10-15 seconds.
- Perform 2 – 3 times.

Little thunderbolt pose
- How to stretch: Take the kneeling position on the mat.
- Now raise both hands upwards & hold the ankle.
- Slowly backward bend at the waist & try to put the head between both heels.
- Maintain the pose for 10-15 seconds to feel stretched on both quads.
- Gently release & do it 3-4 times.
Supta Virasana (Reclining Hero Pose)
- The patient is first to Perform Virasana means Exhale & lower the back torso toward the floor.
- The patient is First to lean onto the hands, then the forearms & elbow joints.
- Once the hand is on the elbow joint, place the hands on the back of the pelvis & release the lower back & upper buttocks by spreading the flesh down toward the tailbone.
- Then Sink the heads of the thighbones deep into the back of the hip joint sockets.
- It is alright to lift the knee joint a little away from the floor to help soften the groins
- The patient is also raising the knee joint a few inches with a help of a thickly folded blanket.
- In To begin position, stay in this pose for 30 seconds to 1 minute.
- Then Gradually extend the time & try to stay in the yoga pose for 5 minutes.
Ardha Supta Virasana (Half-Reclining Hero Pose)
- The patient is in a kneeling position towards the front of the mat.
- Bring the right foot flat to the mat & drop down inside the left foot.
- Walk the right foot out to the right as far as the patient needs to so that both sitting bones are flat on the mat.
- Check the left foot & toes point straight back& that the right knee points straight ahead.
- Place the hands behind, palms down & fingertips facing forwards & lean back till the feel the stretch in the left quad.
- The patient is come down onto the elbows or lowers the down to the mat, brings the arms up overhead & holds onto the opposite elbow joint.
- To increase the intensity, the patient hugs the right knee into the chest.
- The patient holds this pose for 3-5 slow breaths.
- Then Release the arms, bring the hands to the mat & carefully press the back up for the other side.
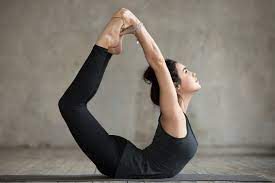
Dhanurasana (Bow pose)
- The patient is lying on the belly on the mat, with a blanket under the pelvis.
- Press all of the toes into the floor & then bend the knee joint, must keep the toes active.
- Grab the outer edges of the ankles with the hands & flex the feet strongly.
- During the inhalation, lift the rib cage & shoulders toward the ears.
- During the exhalation lengthen the tailbone & kick the legs back into the hands as they hold on firmly.
- Then lift the head & heart.
- Press down through the thighs to lift the chest.
- The patient is stay in the pose for 30 seconds.
Ustrasana (Camel Pose) :
- The patient is in a Kneeling position on the mat with both knees shoulder-width apart.
- Then Reach to the back & place the hands on to the bottoms of the feet.
- The patient becomes an Arch into a backbend
- So that the head is falling back & gazing at the wall behind the body.
- Hold this yoga pose for 30 seconds & repeat for several times.

Tittibhasana (Firefly Pose)
- Start with a Standing Forward Bend, with the toes pointing slightly out toes & the knees slightly bent.
- Take the right hand through the legs to clasp the right calf, placing the right shoulder behind the right knee.
- Then place the right hand on the floor behind the heel with fingers facing forward.
- Repeat this pose on the left side.
- Tilt the chest forward & carefully lower the legs onto the backs of the upper arms.
- Inhale, lift the feet off the mat & straighten the legs.
- The patient’s feet are pointed/flexed.
- Hold this yoga pose for 15 seconds & for a longer time, then release the feet to the floor with an exhale.
One-Legged King Pigeon Pose
- Starting on the hands & knees, slide the left knee forward, angling the left shin under the torso so that the left foot is at the front of the right knee & the outside of the left shin is resting on the floor.
- Slowly slide the right leg back, straightening the knee & resting the top of the thigh on the floor.
- Lower the outer left backside to the floor.
- Position the left heel just in front of the right hip joint.
- left knee is an angle slightly to the left, outside the line of the hip joint.
- Look back at the right leg. It extends the straight back from the hip joint.
- Lift the torso away from the thigh.
- Lengthen the lower back by pressing the tailbone down & forward.
- Draw the right front hip point slightly forward, toward the left heel.
- Stay in the pose for a few breaths, release the hands one by one & lower the torso over the left leg & down to the floor.
- The patient is held for a few breaths & repeats with the other side.

Tree pose
- This yoga pose is also known as the Vrksasana.
- The patient is standing in the Tadasana position means Spreading the toes, pressing the feet into the mat & firm the leg muscles.
- Then Raise the front hip points toward the lower ribs which are gently lifted in the lower belly.
- The patient inhales deeply, lifting the chest & exhales as they draw the shoulder blades down the back.
- The patient is looking straight ahead.
- Place the hands on the hip joint & raise the right foot high onto the left thigh or shin.
- Avoid making contact with the knee joint.
- Press the right foot & left leg with each other.
- Hold this yoga pose for several breaths, then step back into Mountain Pose & repeat this yoga pose on the other side.
FAQ
The hip flexors muscle are just like any other muscle in the body — they require an appropriate amount of functional strength to do the daily activities that you do each day. As such, you might be training your hip flexor muscles in accordance with these demands.
4 best Exercises to Strengthen the Hips
Knee lifts. Knee lifts stretch the hip flexors, thigh muscles, & gluteal muscles.
Leg raises. Leg raises to build strength in the hip muscles.
Butterfly pose.
Seated marching
Lie down in a supine position, bringing one leg to the chest, using the hands. If it is difficult to maintain the leg up close to the chest after letting go of it, a weak hip flexor muscle may be the culprit.
Walking is good for the hip flexor muscle, but to run far more efficiently (&, crucially, without pain), strategically opening & also strengthening the hip flexor muscle needs to be part of your running routine.
To strengthen the hip flexor muscle you can lie face up on the floor & do straight leg raises (one leg at a time) while keeping the arms on the floor alongside the torso. This takes the strain off the lower back & is easier to do one at a time to initiate with.
For: Hip flexors & Psoas
Due to the forward-leaning position on the bike, cyclists are prone to tight hip flexor muscles because the muscles are almost always in a shortened position while you are riding.