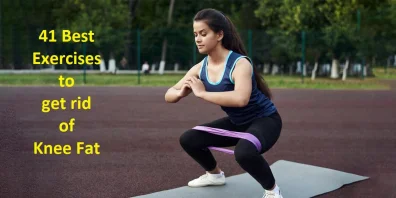
41 Best Exercises to get rid of Knee Fat
Table of Contents
Introduction
Exercise plays a crucial role to reduce Knee fat along with a Balanced diet plan and lifestyle modification. Excess fat around the knees can be a source of discomfort and concern for many individuals. Engaging in regular exercise is a fundamental component of an effective weight loss strategy, particularly when targeting specific problem areas like fat knees. While spot reduction of fat is not entirely possible, incorporating specific exercises that focus on strengthening the muscles around the knees can help tone the area and improve overall leg strength and stability.
The fat knee can occur due to lipedema. Lipedema is characterized by the uneven accumulation of fat beneath the skin in the lower body. Although lipedema doesn’t just affect the knees, it is highly frequent for people with this condition to have excessive knee fat. There are many exercises for fat knees.
When you think about trouble spots, your knees are probably not one of the first places that spring to mind. When it comes to fat reduction, the stomach, thighs, glutes, and even the face typically take precedence. However, if you are someone who struggles with knee fat, you are aware of how difficult it may be.
Knee aesthetics are influenced by several variables. Many are inherited and beyond our control. The amount of body fat we have, however, is something we can somewhat regulate. Although we cannot target the fat around the knees particularly, we can take efforts to reduce overall body fat, which will aid in removing knee fat.
Your knees’ appearance might be impacted by a variety of causes. The look of the knee region can be impacted by excess weight, sagging skin brought on by aging or recent weight reduction, and diminished muscle tone brought on by inactivity or injury.
While there isn’t a single strategy that will specifically reduce fat in the knees, there are several activities that can help your legs operate better and tone up, which will aid your knees as well.
The inner knee area and the area just above it are often fatty in women.
Even while extra knee fat has no negative health repercussions, wearing shorts or skirts might make you feel self-conscious.
What is a Fat Knee?
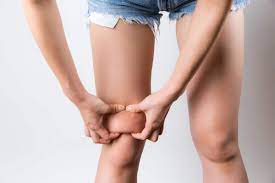
The word “fat knee” is not a medical term or ailment. However, when someone says they have a “fat knee,” they may be referring to a condition in which the knee joint or surrounding area appears enlarged or bigger than normal owing to an accumulation of fat or fluid. This might be due to several circumstances, including weight increase, inflammation, injury, or certain medical disorders.
Particularly as we age, fat can build up around the knees, giving the impression of a knee fat pad. Fat can build up behind the patella tendon and around the kneecap (also known as the patella), resulting in bulging, bulbous knees that contrast with the rest of the leg and appear out of proportion.
What causes Knee Fat?
Numerous causes, such as weight increase, aging, a lack of physical activity, or the use of extreme exercise, can contribute to the buildup of extra knee fat. Hormonal changes, particularly those that occur during pregnancy and menopause, can also contribute to the deposition of fatty tissue around the knees. Because there are so many insulin receptors in the knees and thighs, for example, certain parts of the body virtually work like a magnet in attracting and holding onto fat. Some people may never again be able to wear skirts above the knees, swimwear, or shorts due to their obese knees.
The same factor that creates body fat anyplace else in the body, including the knees, also promotes weight gain owing to an excess of calories.
Body fat is stored when you regularly consume more calories than you require. The balance of calories in and calories out determines where your body fat is stored, whether it’s in your muffin top, back, or chest.
In terms of evolution, it was crucial for survival over the majority of human history to store body fat. Humans haven’t always had access to food-filled cupboards and freezers. In reality, early humans frequently went for long stretches without eating. The larger your body fat percentage, the better your chances of surviving. The body responded by becoming extremely proficient at accumulating fat. Sadly, our DNA is still lagging behind contemporary comforts.
Everybody stores body fat differently because of genetics, body shape, and sex, among other factors. While some people retain more body fat in their stomachs, others do so in their limbs.
What is the fat called all around the knees?
We have so far discussed obese knees in general. We must first discuss a few distinct types of knee fat, though.
Lipedema is a chronic condition characterized by the abnormal accumulation of fat, typically in the lower body, including the hips, thighs, and sometimes the knees. It primarily affects women and is often resistant to diet and exercise. It can lead to the appearance of disproportionately large or fat knees.
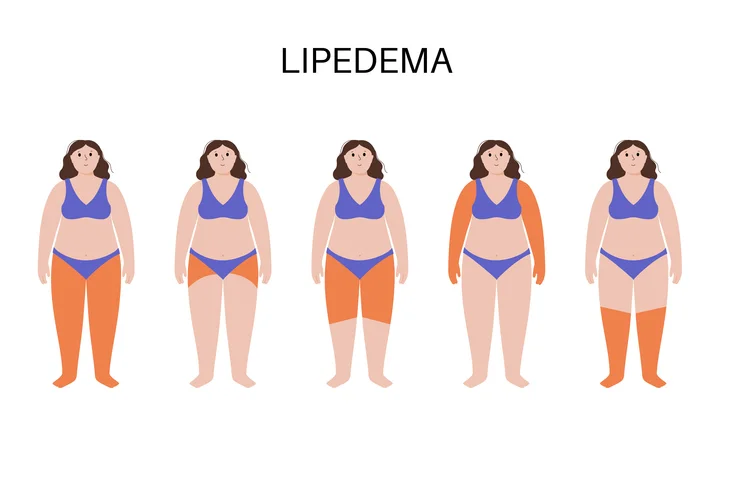
It is a problem that many women experience. Lipedema is characterized by the uneven accumulation of fat beneath the skin in the lower body. Although lipedema doesn’t just affect the knees, it is highly frequent for people with this condition to have excessive knee fat.
Having a big disparity between the upper and lower body is the most telling symptom of lipedema. Your lower body may have significantly higher fat storage while your upper body may be quite slim. The legs appear out of proportion to the chest, giving the impression that you have two separate bodies. Finding clothing that fits might be quite tough as a result. It appears to be a hereditary condition because it runs in families.
Exercise and nutrition are beneficial for therapy. Finding a fitness routine you love, including weekly aerobic activity, and adhering to a healthy eating plan are crucial to minimize fat deposits in the lower body and aid with the discomfort related to the disease. A small case of lipedema could be helped by wearing compression clothing on the lower body. However, liposuction could be the best choice in the worst scenarios.
When discussing knee fat, infrapatellar fat pad syndrome is another problem. It is important to note even if it is not an aesthetic issue.
Your patella is behind and beneath the infrapatellar fat pad. The shin and thigh bones and the kneecap are separated by a cushion. The front of the knee may experience discomfort if the fat pad becomes impinged. It often creeps up on you over time and grows gradually. You can have infrapatellar fat pad syndrome if you have swelling and knee discomfort.
How long will it take to fix fatty knees?
The total amount of body fat you possess will determine how long it takes to treat fatty knees. Unfortunately, if you have fatty knees, your body’s overall fat percentage is usually rather high. You should plan on it being at least a year if not more.
Being persistent and patient is essential. Most dieters don’t fail because they couldn’t, but rather because they couldn’t maintain their commitment for long enough to achieve their objectives. It’s not a race to lose weight. Be persistent and patient, and have faith in the process.
Additionally, when you make exercise a priority, you’ll gain strength and endurance (which will allow you to start integrating HIIT into your regimen), both of which will hasten your metabolism even more.
The following are the Best Exercise for fat knees:
The finest targeted workouts for the inner and upper knee region are those mentioned above. Therefore, if you want to get your legs back in shape, try these leg exercises with a specific goal in mind.
When exercising to reduce fat around the knees, focusing on general weight loss and body fat reduction is important rather than targeting a single location. Here are some workouts that will aid you in your weight reduction desire and perhaps help you lose fat around your knees:
Walking:
Walking is a low-impact workout that can help you lose weight and improve your general health. Although it might not specifically target fat loss around the knees, it can help with calorie burning and general weight loss, which can subsequently help with fat loss all over the body, including the knee region. Here are some instructions for maximizing the advantages of walking for reducing knee fat:
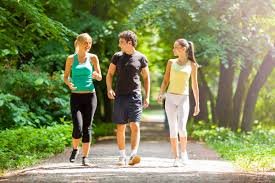
Increase intensity: By changing your pace, you may make your walks more effective in burning calories. Include quick walking or hill climbing exercises to work up your muscles and raise your heart rate.
Increase walking time: To expand the amount of time spent exercising, gradually lengthen your walks. On most days of the week, aim for at least 30 minutes of moderately intense walking.
Maintain proper posture: Be mindful of your posture while you walk. Maintain a straight posture with your head held high and your shoulders back. The tension on the knees is lessened and appropriate alignment is maintained.
Choose appropriate footwear: Spend money on a pair of cushioned, supportive walking shoes that offer stability. Your knees will experience less strain if you wear comfortable shoes.
Gradually up the intensity: If you’re just starting out walking or have knee issues, start cautiously and increase the length of your walks over time. By doing this, the risk of injury is reduced and your body has time to adapt.
Include strength training: Add leg-targeting strength training to your walking regimen, such as squats, lunges, and calf raises. The muscles that surround the knees can be strengthened to offer support and stability.
However, frequent walking can help you lose weight overall, which could subsequently reduce the amount of fat in your knees and other parts of your body.
How, to include walking into your training program to help reduce fat around your knees:
Consistency: Strive for steady and frequent walking workouts. Increase the frequency and length of your walks gradually to improve their effectiveness for weight loss.
Duration and intensity: To assist burn calories and encourage weight reduction, walk for at least 30 minutes per session, most days of the week. To make your walks more intense and calorie-burning, think about introducing short intervals of rapid walking or inclines.
Proper Form: When walking, pay attention to your posture. Maintain a straight posture with your head held high and your shoulders back. This encourages appropriate alignment and eases knee strain.
Terrain: Walking on different terrain, including slopes or uneven surfaces, will use more muscles and possibly make your walks more effective.
Use walking poles: If you feel comfortable using them, utilizing walking poles can help you utilize your upper body muscles and burn more calories while you walk.
Combine strength training with leg-specific workouts by including them in your regimen. These workouts can help the muscles surrounding the knees get stronger and more toned, thereby enhancing their look.
Running or Jogging:

Running and jogging are both great exercises for calorie burning. In addition, they exert your legs somewhat more than walking does, which may strengthen the region in front of your knees.
Running and jogging are cardiovascular workouts that can help you lose weight and lower your body fat.
Here are some pointers for jogging or running to burn fat:
Start with the right shoes: Spend money on a pair of running shoes that will cushion and support your feet properly. Your knees and joints may be less affected by this.
Warm up properly: To get your muscles and joints ready for running or jogging, warm up with dynamic stretches and easy aerobic activities.
Start slowly: If this is your first time jogging or running, start with shorter distances at a slower speed. Increase the time and intensity of your workouts gradually as your fitness level rises.
Keep your form correct: Keep your running or jogging form in mind. Maintain a firm core, relaxed shoulders, and a raised head. Push off with your toes after landing on your midfoot or forefoot.
Change up your intensity by including higher-intensity intervals in your exercise, such as sprints or running at a quicker speed. By doing so, you may burn more calories and advance your cardiovascular fitness.
Observe your body: Pay close attention to any knee pain or discomfort you experience during running or jogging or afterward. If you have problems, think about changing your form, slowing down, or adding low-impact exercises like swimming or cycling.
Cross-training: To increase general muscular strength and encourage fat reduction, combine jogging or running with other types of exercise, such as strength training. Strength exercise can help you lose weight and speed up your metabolism.
Recover correctly by giving your body time to relax and repair itself in between runs or jogs. Include enough rest days in your schedule to avoid overuse injuries and enhance healing.
Cycling or Biking:

Cycling regularly, in particular, can aid with general fat loss and weight loss, which may help to indirectly reduce fat around the knees. Your body burns calories when you do cardiovascular workouts like riding, which can reduce your total body fat.
Biking is a cardiovascular sport that is good for your heart and overall endurance, but it also has fantastic toning potential owing to the emphasis on utilizing your legs.
This comprises calves, thighs, and quads, as well as the area surrounding your knees.
Cycling is a low-impact alternative to jogging, especially if you have knee pain or a history of leg problems.
To receive the best toning advantages, ride your bike in one of two ways: as an interval or long-distance workout. The former emphasizes long, constant-speed periods, whereas the latter emphasizes short, regular intervals.
You may ride a stationary bike at the gym or outside on a bike.
Take into account the following advice to make the most of biking’s potential benefits for reducing fat and maintaining knee health:
Keep your form correct by making sure your bike is fitted to your body size and riding preferences. Keep a straight back and pedal in a smooth, circular motion.
Increase duration and intensity gradually: Start with shorter rides then, as your fitness level rises, lengthen them and intensify them.
Interval training: To push yourself and burn more calories, mix up your rides by including periods of increased effort or by adding resistance.
Strengthening activities that target the lower body, especially the legs, and core, can be added to your bicycling regimen as a supplement. Increasing metabolism and adding muscle can both aid in total fat reduction.
Practice a balanced diet: Combine riding with a healthy, balanced diet that promotes calorie control and offers necessary nutrients to efficiently decrease body fat.
Step-up exercise:
Step-up exercises can help build stronger leg muscles, such as the quadriceps, hamstrings, and glutes, which may help reduce body fat and make the knees seem better.
How to execute step-up workouts is as follows:
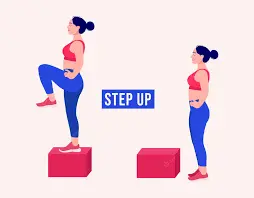
Locate a strong step or platform: Use a set of steps that are at a comfortable height for you, a step platform, or a bench. Make sure the flooring is stable and secure.
Position yourself in front of the platform while facing it, keeping your feet hip-width apart. Your arms can be at your sides for resting.
Lift one foot and plant it firmly on the step or platform as you ascend. Please make sure your full foot is on the step.
Push through the heel: To lift your body and put your second foot up onto the step, push through the heel of the foot that is on the step.
Return to the starting posture with both feet on the ground by taking a step backward with the foot that was raised last.
Repeat: Carry out the workout as many times as you choose. Start with a moderate amount, then as you feel more secure and stronger, raise it.
Guidelines for conducting step-up workouts to reduce knee fat:
Keep appropriate form: Throughout the workout, maintain an erect stance with your chest up. Never slouch or forward-lean.
Organize your movements: To properly engage the targeted muscles, move gently and under control. Avoid exerting too much effort with the pushing-off leg or employing momentum. Gradually make the workout harder: You may make the exercise harder by adding weights, performing it quicker, or raising the step height. However, put safety and appropriate form first. Before beginning any new workout regimen, keep in mind to speak with a medical expert or a trained fitness professional, especially if you have pre-existing knee ailments or concerns. Based on your particular requirements and capacities, they may offer tailored advice and solutions.
Side Step-ups:
Exercises that focus your glutes, quadriceps, and hip abductor muscles are side step-ups. How to accomplish side step-ups is as follows:
Standing with your feet hip-width apart next to a solid platform or bench is a good place to start. The platform should be at knee height or a little higher.
Make sure your right foot is supported completely by the platform by placing it firmly on it. Engage your core and maintain an erect posture.
Utilizing your glutes and quadriceps to get yourself onto the platform, push through your right foot and raise your body there. Your left leg should be elevated off the floor and slightly bent.
Bend your right knee and hip while lowering your left foot to bring your body back to the beginning position.
For the required amount of repetitions, perform the step-up on the same side again. After that, turn to the opposite side, walk onto the platform with your left foot, and repeat the process.
Advice on how to accomplish side step-ups:
As you step up, pay attention to keeping your knee in line with your toes to prevent any inward or outward collapse.
Focus on keeping your core steady while utilizing your glutes and quadriceps to lift yourself onto the platform.
Your arms can be used for balance by swinging them naturally or keeping them relaxed.
Squeeze your glutes at the height of the action and keep your balance after you are completely upright on the platform.
Select a platform height that enables you to complete the exercise without effort and with perfect form. Start at a lower height and work your way up to higher ones as you get more at ease and stronger.
You can wear a weighted vest or carry dumbbells in your hands to create resistance.
Squats:
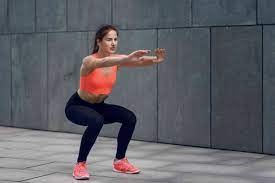
Squats work on a variety of lower body muscles. It may be executed solely using body weight.
Once you’ve gotten the hang of it, you can make it more challenging by squatting while holding a dumbbell or a kettlebell in each hand. If your goal is to do squats to strengthen the muscles between your knees and perhaps lose weight,
How to carry them out:
Standing with your toes pointed outward and your feet somewhat wider than shoulder-width apart.
Keep your chest up the entire time you are exercising and contract your abdominal muscles.
As if you were regaining a seat in a chair, lower your body by bending at the hips and knees. Make sure your knees are parallel to your toes and maintain your weight on your heels.
Continue to fall as far as you can without endangering your form, or until your thighs are parallel to the floor.
At the bottom of the squat, pause for a brief period before pushing through your heels to ascend to the starting position, completely extending your hips and knees.
The movement should be completed several amount of times.
Advice on how to execute squats:
To concentrate on your form, begin with bodyweight squats. As you get more comfortable and powerful, gradually increase your weight.
Avoid rounding or arching your back by maintaining its straightness.
Make sure your knees stay in line with your toes to maintain good alignment.
Avoid bouncing or employing momentum during the whole action.
As you lower your body, inhale, and as you push yourself back up, exhale.
As your strength increases, gradually increase the number of sets and repetitions.
Sumo squats:
The sumo squat is a lower-body workout that works your legs and glutes.
A sumo squat is performed as follows:
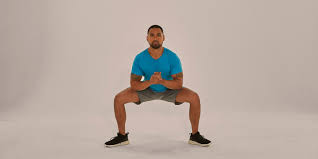
Begin by putting your feet shoulder-width apart and pointing your toes slightly outward. If you wish to add resistance, hold a dumbbell or kettlebell in front of you with both hands.
As you begin to lower your body into a squat stance, engage your core and maintain your chest up. Assume you’re attempting to sit back in a chair.
As you relax, bend your knees and push your hips back. Check that your knees are parallel to your toes and not falling inward.
Your thighs should be parallel to the ground when you have finished descending. Pause slightly at the bottom of the squat and concentrate on maintaining proper form.
Return to the beginning posture by exhaling and pushing through your heels. At the apex of the exercise, straighten your legs and clench your glutes.
Repeat the squat for the required amount of times. Aim for 8-12 repetitions each set, with 2-3 sets depending on your fitness level.
Here are some pointers for completing sumo squats:
Throughout the exercise, keep your weight evenly distributed on both feet.
Instead of rounding or arching your back, maintain a neutral spine by gazing straight ahead or slightly upward.
To stand back up, use your glutes and leg muscles by pushing through your heels.
If you’re using a weight, hold it in front of you with both hands, allowing it to dangle down between your knees.
To obtain a comfortable and effective position for your body, adjust your stance width and toe angle.
Cossack Squats:
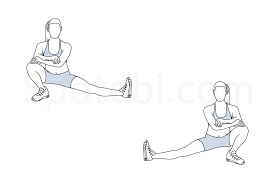
It, also known as side-by-side squats, are a lower-body exercise that targets the quadriceps, hamstrings, glutes, and adductor muscles. Cossack squats are performed as follows:
Begin with standing having your feet wider than shoulder-width apart and your toes pointed outward at an angle. For balance, maintain your hands on your hips or in front of your chest, or stretch them out in front of you.
Transfer your weight to one leg and begin bending that knee while maintaining the other leg parallel and extending out to the side. Try to maintain your foot level on the ground while you lower your body.
Descend into a squat on the bent leg, keeping your knee straight with your toes and your chest elevated. The extending leg should be straight and parallel to your body.
When you’ve reached an appropriate depth, rest for a second before returning to the beginning position by pushing through the heel of the bent leg. Simultaneously, stretch the opposing leg to another side and repeat the technique on the opposite side.
Alternate between sides, dropping into a squat on one leg while maintaining the other leg extended, then returning to the position from which you began.
Some pointers on how to do Cossack squats:
Maintain an erect posture with your chest elevated and your core engaged throughout the workout.
Maintain proper knee-to-toe alignment and avoid allowing your knees to fold inward.
Sit back into the squat as though you’re reaching for something behind you with your hips.
Begin with a broader stance if maintaining balance is difficult, then progressively tighten your stance as you grow more comfortable.
Cossack squats can also be performed while holding onto a sturdy object, such as a wall or a bar, to help with balance if necessary.
Wall squat:
The quadriceps, hamstrings, and glutes are worked out steadily during wall squats, often referred to as wall sits. How to conduct wall squats is as follows:
Locate a wall that is unobstructed and lean against it. Your toes can point slightly outward with your feet shoulder-width apart.
By bending your knees and lowering your body into a squat position, slowly slide your body along the wall. The ideal position is to have your knees at a 90-degree angle and your thighs parallel to the ground.
Throughout the exercise, be careful to maintain a flat back against the wall. Your weight should be evenly shared over both feet, and your heels should be in touch with the ground.
Don’t allow your knees to extend past your toes, and engage your core. For the whole exercise, try to keep your form and alignment correct.
Keep your body in the squat position as long as you like. As your strength and endurance improve, start with 20 to 30 seconds and then progressively extend the time. Also possible are many sets with brief breaks in between.
Once you’re ready to finish, carefully push through your heels, straighten your knees, and then bring yourself back up to a standing position by using your leg muscles.
Single leg squat:
How to carry out this activity: Start by advancing with your right foot. Raise your left leg, keeping it straight and directly in front of your torso. Alternatively, you might just keep your left leg up while bending your knee. You can keep your arms at your sides or out in front of you for balance.
Keep your torso upright and your core taut during the whole workout. As you lower yourself into a posture, start thrusting your hips back. Get as low to the ground as you can while keeping your hips parallel.
To get back up, use your right foot to push off while engaging your glutes. Keep your left leg up as much as you can in between repetitions.
Perform 5 to 10 repetitions on this side before moving to the left.
Produce three sets.
Lunges:
Your quadriceps, the muscles at the front of your legs, are what lunges work on. The development and toning of these muscles may cause your entire leg, including the glutes and the knee area, to become tighter over time.
A traditional lunge involves stepping one leg forward at a 90-degree angle while keeping your upper body straight. You can swap legs after completing 10 reps on each leg. You may gradually increase the repetitions, or you can hold a pair of dumbbells for added resistance.
Lunges are a wonderful workout for strengthening your legs generally and the muscles near your knees. Lunges can be done in the following ways:
Start by standing with your feet hip-width apart and placing your hands on your hips.
Step forward with one foot while maintaining a straight upper body and a tight core.
Bend both knees till your back knee is almost touching the ground or barely there. Make sure that your front and rear legs are at a 90-degree angle.
Make sure your front knee doesn’t extend past your toes and is directly above your ankle. Your back knee should only be just off the ground.
Bring yourself back to the beginning posture by applying pressure through your front heel. To make the action, contract your quadriceps and glutes, the front thigh, and buttock muscles.
The appropriate number of times should be spent repeating the lunge on the same leg.
Lunges should be done on the other leg after switching legs.
Advice on how to execute lunges:
During the lunge, maintain a straight upper body and prevent excessive forward or backward tilting.
To stay stable during the workout, contract your core muscles.
To enhance the intensity, start with bodyweight lunges and progressively add weights (such as dumbbells).
Try to maintain your front knee in line with your toes and avoid letting it fall inward.
Throughout the workout, move slowly and deliberately, avoiding any unexpected movements.
As you lower your body, inhale, and as you push yourself back up, exhale.
Start with 2-3 sets of 10-15 reps for each leg, and then modify as necessary according to your comfort level and level of fitness.
Side lunges:
This is a good workout for strengthening your legs generally and the muscles surrounding your knees. Side lunges can assist tone the muscles and increase knee stability even though they won’t particularly target fat loss around the knees. How to do side lunges is as follows:

Starting from a standing position, space your feet just wider than shoulder width. Maintain a forward or slightly outward toe point.
To stay stable during the workout, contract your core muscles.
With your right foot, take a sizable stride to the side. Make sure your toes are pointed forward and keep your right foot firmly planted on the ground.
Bring your body down to the right side by shifting your weight on your right foot and bending your right knee. At all times, maintain a straight left leg.
As you lower your body, keep your back straight and your chest up. As low as you can get without hurting your knee while keeping your right thigh parallel to the ground is your goal.
Straightening your right leg and putting your feet back together can help you get back to where you started. Push through your right heel to do this.
Step to the left and do a side lunge with your left leg to repeat the technique on the other side.
For the necessary number of repetitions, keep performing side lunges in alternation.
Advice on how to do side lunges:
To maintain appropriate form and avoid placing too much stress on the knee joint, make sure your knee is in line with your toes and doesn’t extend past them.
Throughout the action, keep your upper body straight and your spine in a neutral position.
To power the side lunge, contract the muscles in your inner and outer thighs and your glutes.
Start with bodyweight side lunges and add dumbbells or other weighted items as you gain strength and comfort to up the difficulty.
Perform 2-3 sets of 10-15 reps for each leg, modifying as necessary for your comfort and fitness level.
Reverse Lunge:
Reverse lunges are great for alleviating knee discomfort, improving muscular tone, and reducing fat around the knees. They also assist to strengthen your glutes and quads. If you experience knee discomfort, reverse lunges are better than forward lunges since they put less strain on the knee in the forward motion.
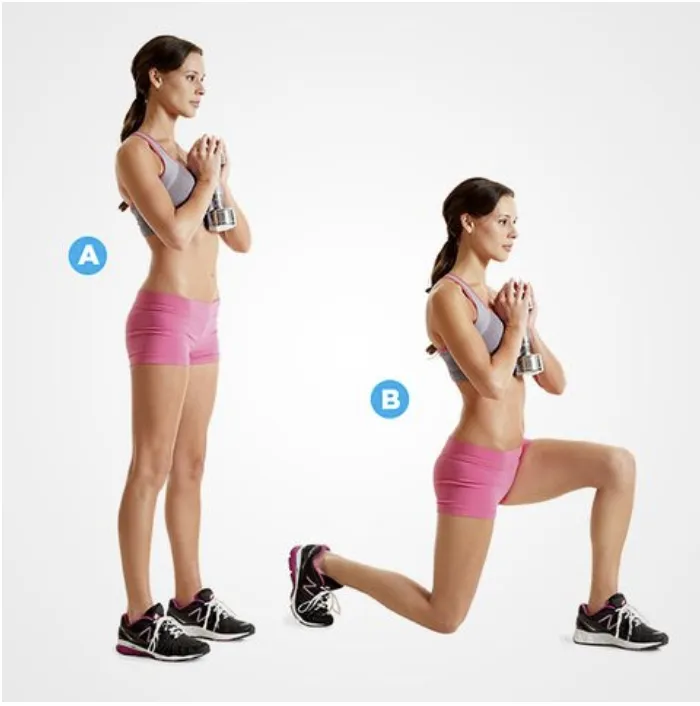
How to perform it: Stand with your arms at your sides, with your feet about hip-width apart.
With your right leg, take three steps back while bending your knees to a 90-degree angle. The ground should be parallel to your front thigh, and your back knee should be just an inch above the ground.
Maintain the majority of your weight on your front leg while pressing into your left heel and straightening your left leg.
Get to your feet after moving your right leg back to the starting position.
Tips: Both feet should be pointed directly ahead, with the front foot firmly planted with the heel on the ground.
While looking forward, keep your back straight and your neck in a neutral, comfortable position.
If necessary, grab a counter or a railing for support.
If bending through the full range of motion hurts, reduce your bending. Stop as the pain starts to set in.
Keep the rear leg straight and just bend the front knee.
Forward Lunge:
How to execute:
Onto the step, place one foot.
With both of your hands, hold onto the wall in front of you.
Keep your leg’s knee on the step in line with your toes the entire time you’re doing this exercise.
Squat ahead.
It is advised to bend your knee as much as you can without letting it click.
As much as is required, support the situation with your hands.
There must be 20 repeats.
Permit the knee to go forward more.
Gradually lessen the amount of support your arms are providing for you.
Curtsy Lunges:
A version of the standard lunge exercise that strengthens your glutes, quads, hamstrings, and calves is called a “curtsy lunge.” Curtsy lunges can be done as follows:
To begin, stand with your feet hip-width apart and your hands either in front of your chest or on your hips.
Crossing your right foot behind your left leg, step back diagonally. Similar to a curtsy, your right foot should fall on the outside of your left foot.
While maintaining your torso erect and your core engaged, lower your body by bending both knees. Your left knee should be squarely over your left ankle, and your right knee should be resting on the floor.
You should return to the beginning posture by pressing through your left heel and tightening your glutes. You should bring your right foot towards your left foot.
Step diagonally back with your left foot and cross it behind your right leg to repeat the lunge on the opposite side.
Long enough to achieve the target number of repetitions, alternate right and left lunges. Depending on your level of fitness, execute 2-3 sets with an aim of 8–12 repetitions on each leg.
Here are some pointers for doing curtsy lunges:
To stay balanced and stable during the workout, keep your core engaged.
Keep your shoulders back and your chest up in mind.
To properly work your glutes and inner thighs, take a step back and cross behind at a diagonal angle rather than directly behind.
Take a step back that is wide enough for your knees to be able to bend around 90 degrees when you lower yourself.
You can use a barbell over your shoulders or grip dumbbells, kettlebells, or both in each hand to create resistance.
Hip Bridge:
How to perform this exercise:
To carry out this strengthening and muscle-toning exercise:
The patient must be lying supine with both knees flexed and heels flat on the ground, around 6 inches away from the buttocks.
While clenching your core, press into your heels and lift your hips off the floor.
Instead of arching your lower back, maintain a relaxed line of ribs from your shoulders to your knees.
Hold for 15 seconds, then slowly release.
As the patient improves, raise one leg into the air to construct a single-leg bridge.
Crab kicks:
The muscles in your glutes, hips, and thighs are the main focus of crab kicks, sometimes referred to as crab walks or crab steps. It’s vital to keep in mind that while they can aid in lower body strengthening, they won’t particularly target fat reduction near the knees. Crab kicks, however, can increase your total leg strength and stability during your workouts. How to do crab kicks is as follows:
Begin by bending your knees and sitting on the ground with your feet flat on the ground. With your fingers pointing down towards your feet, place your hands behind you.
By using your hands and feet to balance your body weight, raise your hips off the ground. Your knees should be immediately over your ankles while your body forms a reverse tabletop position.
To stay stable during the workout, contract your core muscles.
Extend your right leg straight out in front of you to start the exercise. At the same time, lift your left hand off the floor and reach across your body to your right foot.
Repeat the motion on the other side, extending your left leg and reaching with your right hand as you bring your right leg and left hand back to the beginning position.
The crab kicks should be alternated for the necessary number of repetitions or times.
Crab kick technique suggestions:
To keep perfect form, regulate your movements and don’t speed through the workout.
During each kick, pay attention to contracting your leg muscles and squeezing your glutes.
To ensure that the targeted muscles are engaged to their full potential, keep your hips up throughout the exercise.
Aim to keep your spine neutral and refrain from arching or rounding your back.
Start with a comfortable range of motion and as you gain comfort and flexibility, progressively extend your leg and extend your hand farther.
Crab kicks are a useful exercise to incorporate into a full lower-body strength and conditioning regimen.
Single leg Deadlift:
How to carry out this activity:

The patient must perform this strengthening exercise while standing with both feet just beneath their hips.
The left leg should be straight with a small bend in the knee when you shift your weight to it. As you start to press the right foot back, keep the right leg straight and imagine the patient placing the bottom of their foot on a wall behind you.
When the trunk is almost parallel to the floor, gradually start to lean it forward at the waist.
The arms should always be parallel to the floor, straight, and at shoulder height.
The body must be at the bottom position with the right foot at the bottom and the head at the top, in a straight line.
The right leg will then start to go forward while remaining straight. Finally, raise the patient’s trunk until they are standing up.
It is once more spoken. Change legs after finishing all repetitions on one side.
Jumping jack:
Exercises with significant impact can be hard on the knees, especially if you already have knee problems. Here is an alternative that might lessen the strain on your knees if you want to change jumping jacks to make them more knee-friendly:
Stand with your arms at your sides and your feet shoulder-width apart.
Step your right foot out to the side instead of jumping, lifting both arms high and out to the sides at the same time.
Lower your arms back to your sides and put your right foot back in the beginning position.
Step your left foot out to the side while extending your arms aloft and out to the sides to repeat the exercise on the other side.
Continue to alternate raising and lowering your arms while stepping out to the sides with your feet.
Even though the pressure on your knees is lessened, the modified version still involves arm movement and stimulates the muscles in your shoulders, legs, and back. While reducing the possible stress on your knee joints, it enables you to perform a similar movement pattern to jumping jacks.
High knees:
Exercises with high knees may be high-impact and tax the knees. To make the workout more knee-friendly, you can alter it. An alternative to high knees that lessens the strain on the knees is as follows:
Your arms should be at your sides while you stand with your feet hip-width apart.
As you move your left arm forward and right arm back, as if you were jogging, lift your right leg as high as comfortable.
Lift your left leg as high as comfortable while pulling your right arm forward and your left arm back. Lower your right leg and repeat the motion with your left leg.
Continue to alternately raise your knees and swing your arms to simulate running.
You can still exercise your leg muscles and raise your heart rate by doing this modified variant of the high knees exercise without placing too much strain on your knees.
Straight Leg Raise Exercise:
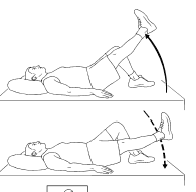
Your quadriceps, hamstrings, and hip flexors are the main muscles in your thighs that are worked out during the straight leg raise exercise.
While it can aid in toning and strengthening certain muscles.
You need to concentrate on general fat reduction through a mix of consistent exercise and a healthy diet if you want to reduce fat in your knees or any other area of your body.
How to perform a leg lift with the straight leg:
On a soft surface, such as a mat or carpeted floor, lie flat on your back.
Maintain a straight and compact stance.
The palms of your hands should be facing down when you hold them at your sides.
Draw your navel towards your spine to contract your abdominal muscles.
As high as you can go without feeling uncomfortable, slowly raise one leg off the ground while maintaining it straight.
For a brief period, maintain this posture while concentrating on maintaining your leg straight and activating your thigh muscles.
Lower your leg back to the starting position slowly.
Then move your other leg in the same manner.
Perform 15-20 reps on each leg while alternating legs. As you get more used to the workout, you can up the amount of repetitions.
Side straight leg raise:
The side straight leg raises exercise mainly targets the muscles in your outside thighs, particularly the gluteus medius and gluteus minimus, which are hip abductors. While it can assist in strengthening and toning these muscles, it is vital to note that spot fat removal is not achievable. To lose fat in your knees or anywhere else in your body, you must first focus on total fat reduction via a mix of regular activity and a well-balanced diet.
The following is how to do a side straight leg lift exercise:
To begin, take a tall stance and bring your feet close together.
If necessary, place your hands on your hips or grip a firm object for support.
To stimulate your core muscles, draw your navel towards your spine.
Shift your weight to one leg and maintain a little bend in that leg’s knee.
Raise your opposite leg to the side as far as you can comfortably go while maintaining it straight.
Maintain a forward stance with your toes and avoid tilting your body or hips in the other way.
Hold the lifted posture for a couple of seconds, concentrating on activating your outer thigh muscles.
Return your leg to the beginning position in a calm manner.
Repeat the exercise with the opposite leg.
Alternate legs and do 15-20 reps on each. As you feel more comfortable with the exercise, increase the number of repetitions.
As previously said, it is critical to include cardiovascular activities and eat a balanced diet to enhance total fat reduction. Combining strength training activities, such as the side straight leg raise, with other types of exercise and a healthy diet will help you reach your objectives.
Calf Raise:
Calf raises are exercises that primarily work the calf muscles, especially the gastrocnemius and soleus.
They will not immediately remove fat in your knees or any other specific location, but they will assist strengthen and tone your calves. To lose fat in your knees or anywhere else in your body, you must first focus on total fat reduction via a mix of regular activity and a well-balanced diet.
Calf raises, on the other hand, can be good for your lower body strength and general health.
Calf lifts are performed as follows:
Stand tall, feet hip-width apart, hands on hips or a firm object for balance.
As you rise onto the balls of your feet, lift your heels off the ground. Your weight should be distributed on the balls of your feet rather than your toes.
Throughout the action, keep your core engaged and your spine neutral.
Lower your heels to the ground slowly, experiencing a stretch in your calves.
Repeat the movement a number of times.
You can increase the range of motion by completing the exercise on a step or raised surface.
Calf raises should be supplemented with a combination of aerobic activities, strength training, and a nutritious diet to achieve overall fat reduction. Cardiovascular workouts such as jogging, cycling, and swimming aid in the burning of calories and the reduction of total body fat.
Exercises for strength training that targets the main muscle groups can help build muscle, burn calories, and improve body composition overall.
Keep in mind that fat reduction requires a mix of exercise, adequate nutrition, and persistence.
Prone leg raises:
This workout targeted both your hamstrings and gluteal muscles. As the exercise becomes easier to complete, you may add weight to the ankle joint (through theraband) and progressively go from a modest to a higher weight as your knee muscle strength increases.
You can use a mat to offer padding or a plinth to avoid a hard surface for this workout.
In the beginning, you can lay on your stomach with your legs extended behind you. If you don’t feel comfortable, you can rest your head on your arms.
Include your gluteus and hamstring muscles for your left leg, and elevate your leg as high as you can without pain.
Throughout this workout, be sure to maintain your pelvic bones stabilized using physiotherapy.
Hold this for a while before shifting back to your starting position.
Return to your starting leg, rest for 5 seconds, and then repeat.
Perform two to three sets of 10 repetitions per leg.
Leg extension:
This exercise works the quadriceps muscles at the front of the thigh. It might assist to strengthen your knee, lowering discomfort from knee arthritis. Combine this exercise with the knee curl since the muscles targeted in both exercises operate in tandem.
How to perform this exercise:
Put your ankle weight on.
Sit in the chair, with your back and hips against the chair’s back. Maintain a 90° angle with your knees and just your toes on the ground. If your chair is too low, add cushions or roll up a towel and position it beneath your knees. Arms should be resting on your thighs or at your sides. Set your feet shoulder-width apart.
In a count of 1-2-Up, stretch your left leg as straight as you can.
When you can elevate your leg no higher without experiencing discomfort or when it is parallel to the ground, take a quick pause for one second.
Slowly drop your leg back to a 90° angle in a 1-2-3-Down count.
To complete one set, perform 15 repetitions of this exercise on each foot. After 30 seconds of rest, repeat the second set.
Hamstring curl:
The glute and hamstring muscles are strengthened by this workout. Strong core muscles are also required to maintain upper body and hip stability.
How to do this exercise:
This strengthening exercise must be done by the patient when they are standing with their back against a wall or leaning against a chair.
The feet should be separated by hip space. Flex one foot’s knee while elevating the heel upward.
Instruct the patient to reach as far as they can while keeping their hips forward and their upper limb steady. Hold for 8 to 10 seconds.
At the same moment, relax and return to the beginning position.
Perform 3 to 5 sets of ten to fifteen repetitions on each leg.
What not to do: Try this workout with a lesser weight the first time. Beginners should begin with the smallest weight possible and progressively advance to heavier weights as their strength improves.
Hamstring curls on a weight bench:
This workout is a standing hamstring curl version. This strengthening exercise helps to reduce fat around the knee and improve muscle tone.
This version may be attempted if the patient has access to a weight bench constructed expressly for this activity. This may be more difficult than the standing hamstring curl depending on how much weight is applied.

To do this exercise, the patient must lie face down on the bench with their knees closely apart. Hold the grips to guarantee stability. Put some weight on your feet. The weight should be placed just above the heels.
Bend both knees gradually, raising the weight with the legs. Raise the weight in a steady stroke until your knees are at a 90-degree angle.
Hold the weight for five seconds before gradually reducing it.
Perform up to 10 repetitions.
When executing this workout for the first time, use a lightweight. Beginners should begin with the smallest weight feasible and work their way up to greater weights as their strength grows.
Knee Marching:
Knee Marching is a knee-strengthening exercise that trains the quadriceps without placing weight through the knee joint, This exercise helps to reduce fat in the lower limb and improve muscle tone in the quadriceps.
How to do this exercise:
Take a seat and put your feet on the ground.
March up and down each leg independently. Step forward with your foot and knee, then back down.
Repeat for about a minute twice a day and if you sit for more than 20 minutes to keep your knee from stiffening.
You can progress knee-strengthening activities by increasing the ankle weight or shoe.
Buttock Kicks:
The hamstring muscles at the back of the thigh are the primary focus of buttock kicks, often known as “butt kicks” or “hamstring curls,” which can increase leg strength. Buttock kicks can help improve the general tone and strength of your leg muscles but not precisely reduce fat around the knees.
How to execute buttock kicks is as follows:
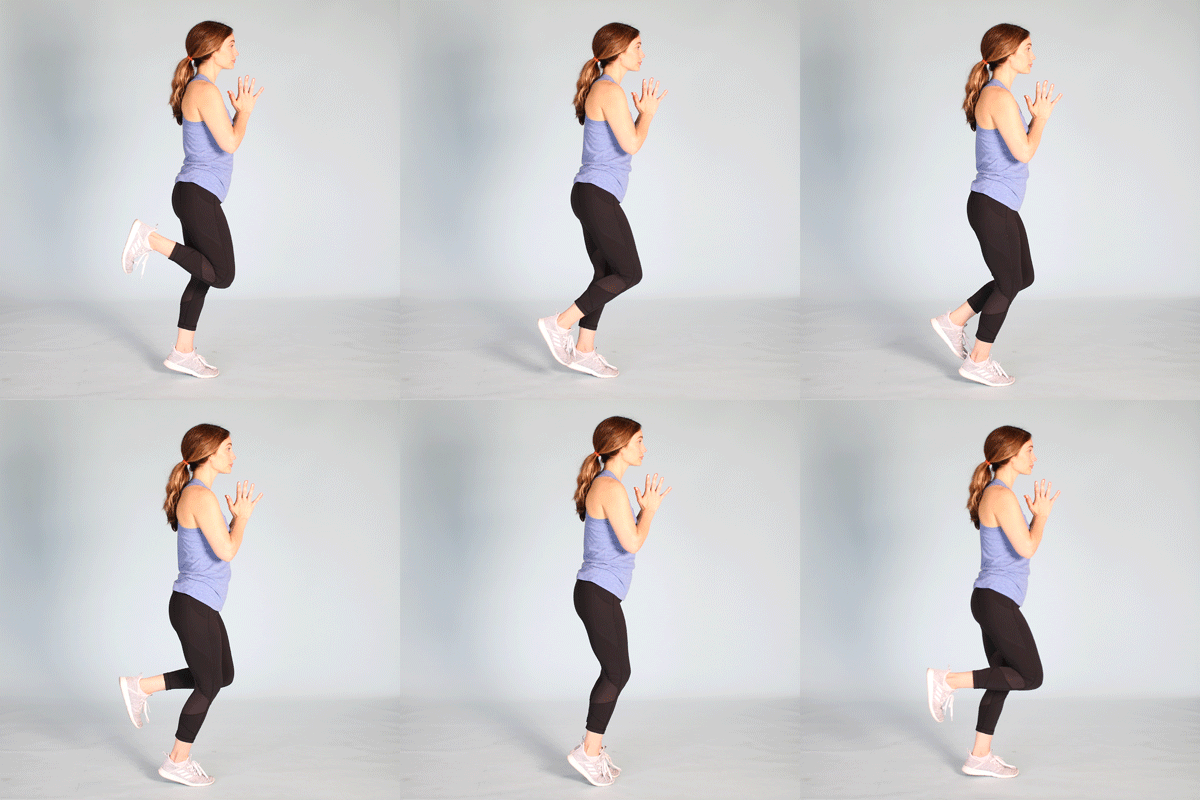
Your arms should be at your sides while you stand with your feet hip-width apart.
To stay stable during the workout, contract your core muscles.
By bending your right knee and pulling your right heel towards your buttocks, you may lift your right foot off the ground. Aim to touch or approach your glutes as closely as you can.
Return your right foot to its initial position, then move your left foot in the same manner.
As you continue to alternate buttock kicks, make sure your heel is always pointing in the direction of your glutes.
Suggestions for buttock kicks:
Throughout the workout, keep your upper body erect and your posture correct.
As you push your heels towards your glutes, concentrate on contracting your hamstring muscles.
Start with a comfortable range of motion, then as you get stronger and more at ease, progressively up the intensity and pace.
Avoid jerking or swinging motions and keep your movements regulated.
Throughout the workout, breathe normally, relaxingly inhaling and exhaling.
Work each leg for 2-3 sets of 10-15 repetitions, modifying as necessary based on your ability.
Jumping Rope:
This exercise is a good cardiovascular activity that can help you lose weight and reduce body fat. Jumping rope can help with general fat loss and increased fitness even if it doesn’t precisely target fat loss around the knees (spot reduction is impossible). The proper way to jump rope for general fat loss is as follows:
Pick the appropriate rope: The jump rope you choose should fit your height. The handles should be at your armpit level while you are standing in the middle of the rope.
begin with basic etiquette: The handles of the jump rope should be held in each hand while you stand with your feet shoulder-width apart and your knees slightly bent. Keep your wrists loose and your elbows close to your sides.
Jump off the balls of your feet and rotate the rope with a flick of your wrists to start. Begin with tiny leaps, then as you get more comfortable, progressively up the speed and intensity.
Keep your shoulders relaxed, your gaze ahead, and your core engaged to maintain proper posture. To lessen the impact on your knees, lightly land on the balls of your feet.
Establish a rhythm: As you leap, establish a consistent rhythm and stick to it. As your endurance develops, start with shorter times, like 1-2 minutes, and progressively increase your time.
Once you have mastered basic leaping, add variants like single-leg leaps, double unders (where you rotate the rope twice every jump), or high knees (where you bring your knees towards your chest as you jump).
Observe your body: Pay close attention to any knee pain or discomfort you experience during or after the workout. It’s important to adapt the activity or select easier-on-the-knee alternatives if you have any problems.
Combining jumping rope with other activities will produce the best results. Jumping rope should be a part of a comprehensive fitness program that also includes strength training and a healthy diet to promote total fat reduction.
Monster Walk (Side Steps):
Perform a minimum of four sets of 30 high knees on each leg to increase calorie burn. Additionally, you may time yourself with a stopwatch; a decent measurement is a one-minute high knee.
How to carry out this workout for strengthening and reducing fat around the knee:
Place a resistance band just above your ankles while standing with your feet hip-width apart, your knees slightly bent, and your toes pointed forward.
Keep your upper body erect, your knees slightly bent, and take a step to the left. Step out just far enough to meet resistance without overextending yourself to the point where your knees give way.
Continue going to the left for an additional 10 to 15 steps. Stop, then proceed back to your starting point by taking the same amount of steps to the right. Just one set.
In three sets, step 10 to 15 times to each side, beginning.
The Clamshell exercise:
One of the most popular exercises for bolstering the knees is the Clam. Anyone suffering from knee discomfort should perform it because it helps to build the glutes’ strength, which supports the knee and prevents too much weight from traveling through the inside of the knee.
Performing this exercise:
Your knees should be bent at a 45-degree angle, and your legs should be stacked while you lay on your side.
Put your lower arm behind your head, and use your upper arm to support your body. Aim to stack your hipbones on top of one another since the upper hip tends to swing backward.
Your abdominal muscles will be more active and your spine and pelvis will be stabilized if you pull your belly button in.
Lift your upper knee and keep your feet together while you try to maintain your hips and pelvis as still as possible. Ensure that the ground is firmly planted beneath your lower leg.
Once you’ve stopped, return your upper leg to the ground where it was before. 20 times for each side.
Clamshell exercise with a resistance band:
A typical clamshell rotation may be made more difficult by using a resistance band. This will assist to strengthen the glutes and hamstrings even more, which will aid in developing a strong core and back.
How to execute:
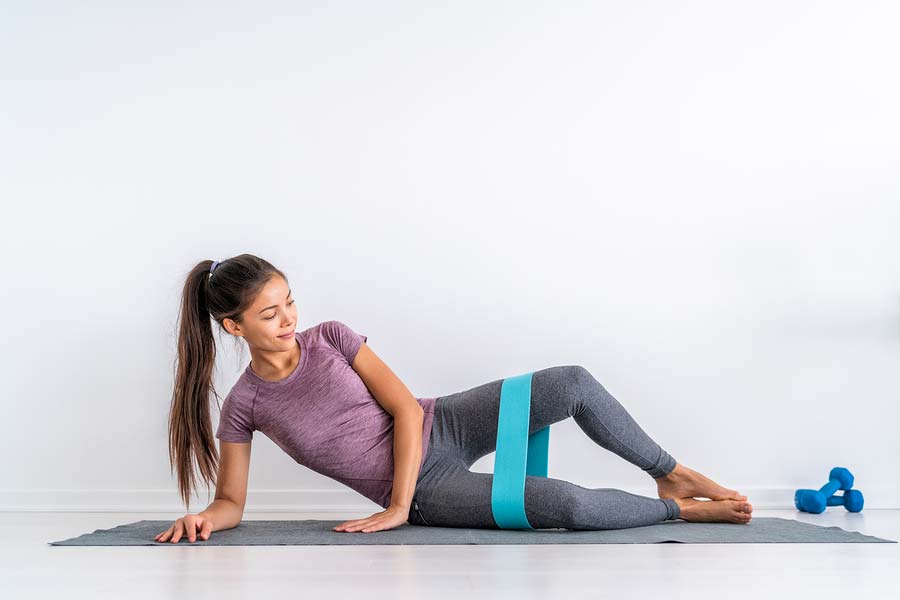
Wrap the band around each leg at the level of the knees.
Lay on one side with your knees bent at a 45-degree angle, stacking your hips and legs.
If you tighten your abdominal muscles, your core will become more stable.
Elevate your upper knee as high as possible while maintaining your hips and pelvis stable and your feet firmly planted in place. Do not let your lower leg move from the ground.
Take a brief pause at the peak before returning the upper knee to its starting position. Perform 20 repetitions on each side.
Twisted Leg Raise:
How to complete the exercise:
While lying on your back, maintain the other leg straight and bend the knee of the opposite leg. This eases lower back tension while you perform the straight leg exercise.
After externally twisting your foot by 20 degrees, lift your foot up until your thighs are parallel.
Hold for three seconds before lowering yourself gently while keeping your foot outward.
Again, by maintaining the leg extended outward, this vastus medialis exercise works to activate the VMO.
High Knee exercise:
Make sure that you’re wearing a pair of supportive yet comfortable shoes before you start. If you have knee or ankle problems, try to do this exercise on a supported gym floor or in a grassy location. Here’s how you do high knees in that vein.
With both feet hip-width apart with your arms by your sides, take a tall stance.
Straighten your neck, expand your chest, and engage your core.
Pull the right side of your knee towards your chest, just over your waist, to start. At the same moment, raise your left hand in a pumping motion.
As rapidly as you can, lower your left hand and right leg.
Use your right hand and leg to repeat.
For the allotted time, alternate between using your right and left leg.
Your aim and degree of overall fitness will determine how long you perform high knees. Aim for 30 seconds to begin with, with a 30-second break in between each set.
You only need your body weight and a set of supportive shoes to do high knees.
HIIT Workout:
HIIT workouts burn a ton of calories quickly and boost metabolism even further.
Avoid HIIT workouts that include squats and lunges if your objective is to lose knee fat without growing your thighs as a result. These exercises will work your quadriceps and enlarge them.
However, you could attempt one of the HIIT exercises if you want to avoid gaining weight.
Resistance Training:
The beginning of your exercise is not only cardio. Additionally, you’ll need to start putting on lean muscle and tone the muscle you already have. You don’t need to gain weight, but you do need to perform some strength training activities, so don’t worry.
The greatest place to start if you’re concerned about gaining too much muscle is with bodyweight workouts. Without adding unneeded heft, bodyweight workouts will help you get slim and toned.
The best exercises for mesomorphs and endomorphs are bodyweight exercises. Weightlifting is beneficial for ectomorphs and females who don’t mind gaining a little extra muscle. Strengthening exercises with free weights and weight machines are both highly effective.
Remember that you do need to participate in resistance training sessions three to four times each week. As a result, you might occasionally need to combine your aerobic and weight training sessions.
Leg press:
How to execute the leg press exercise while paying attention to your knees:
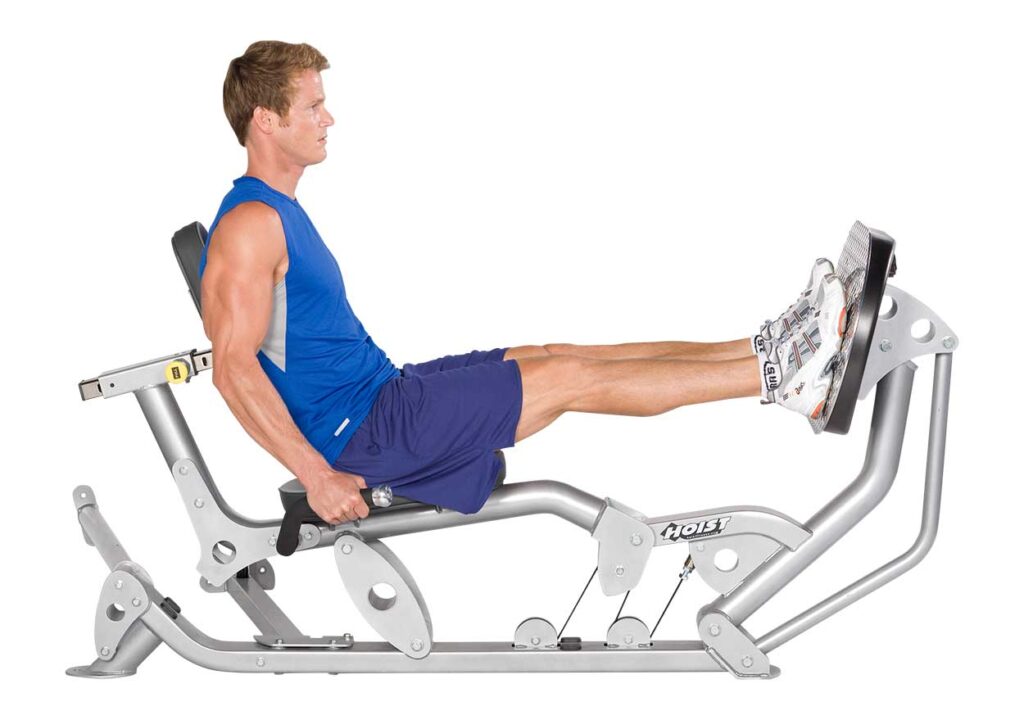
Adapt the device: You should adjust the seat and backrest so that you can easily push the weight with your legs. When placing your feet on the footplate, make sure that your knees are in line with your feet.
Place your feet on the footplate with your shoulders between them. To reduce knee tension, softly flex your toes outward.
Pulling your navel towards your spine can help you engage your core muscles before you start the workout. Your body will be more stable during the movement if you do this.
Launch the action: By extending your legs and keeping your knees slightly bent (avoid locking them out), you may push the footplate away from you. As you move the weight, breathe out.
Controlled motion: Bend your knees as you gradually drop the weight back down. As you do this, inhale. Reduce the force on your knees by controlling and slowing down the fall.
Replicate: Carry out the required number of times, usually 8 to 12, or as directed by your fitness professional. Start off with a weight that pushes you but yet enables you to keep good form.
Swimming or Water aerobics:
Swimming is a great low-impact workout that can aid in general weight loss, toning, and the reduction of fat near the knees. Here are several swimming workouts that concentrate on the knee region:
Freestyle (Front Crawl): Freestyle swimming is a fantastic aerobic workout that works all of the body’s muscles, including the legs. It promotes calorie burning and general fitness improvement, both of which can aid in fat loss.
Another efficient swimming technique that stimulates the leg muscles, notably the ones around the knees, is the breaststroke. Strong kicks and arm motions are used, which assist tone and strengthening the legs.
Interval training in the water is a good addition to your swimming regimen. Alternate between short bursts of high energy and slower rest intervals. Swim as quickly as you can for 1-2 laps, then slow down and recuperate for 1-2 laps, for instance. This HIIT (high-intensity interval exercise) can boost calorie burn and encourage fat reduction.
Water Treading: Using the leg muscles while water treading helps you burn calories. Keep your head above the water and continue to cycle or scissor your legs. To enhance calorie expenditure, try to continue this exercise for a longer length of time.
Consider taking a water aerobics class or practicing water aerobics exercises. These exercises, which focus on several muscular groups, particularly the legs, are frequently used in these programs. They can aid in calorie burning and general fat reduction.
Holding onto the side of the pool, kick your legs out straight in front of you. To activate various knee-related muscles, alternate between flutter kicks (short, rapid kicks) and dolphin kicks (long, forceful kicks).
Frog Kick: To begin, place your feet shoulder-width apart at the shallow end of the pool. Jump forward while bending your knees and putting your heels up towards your buttocks. Engage your leg muscles, especially those around your knees, as you repeat this movement.
Water jogging: To retain buoyancy, jog in place at the deep end of the pool by raising your knees high and propelling your legs downward. Your legs will get a tough workout from the water’s resistance, which will help you burn calories and lose weight.
Elliptical:
A wonderful low-impact training choice for building leg muscle and being kind to your knees is using an elliptical machine. Here are some elliptical training adjustments you may do to accommodate a chubby knee:
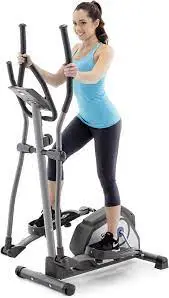
Warm-up: To begin, cycle the elliptical machine slowly and comfortably for 5 to 10 minutes. Your body will be more prepared for the workout and blood flow to your muscles will be increased as a result.
Set the elliptical’s resistance level to a comfortable level by adjusting the resistance. Avoid using high resistance levels that place an undue amount of stress on your knees. As your strength improves and your knee permits it, start with a lesser resistance and progressively increase it.
Pay attention to appropriate form: Throughout the workout, keep your feet level on the pedals. By doing this, you may more equally spread the burden and avoid putting undue strain on your knees. Maintain a straight posture and use your core muscles for support.
Try pedaling in reverse at various points during your workout. This exercise can assist target many muscle groups, especially the quadriceps, and hamstrings, giving your legs a more well-rounded workout.
Stride length modification: Play around with changing the stride length on the elliptical machine. Your knee will experience less stress and have less range of motion if you shorten your stride. Choose a stride length that is suitable for you to workout out without experiencing any pain or discomfort.
Observe your body: During your workout, pay close attention to any indications of pain or discomfort. If your knee hurts in any way, ease up on the resistance, go more slowly, or stop. It’s critical to put the health of your knees first and avoid suffering through severe discomfort.
After your elliptical workout, cool down and stretch by pedaling slowly for 5–10 minutes. After that, gently pull your legs, paying particular attention to the quadriceps, hamstrings, and calves. Stretching may ease muscular tension and increase flexibility.
Pilates:
The primary goals of pilates exercises are to increase flexibility, muscular strength and conditioning, and general body awareness. Pilates can be useful for numerous elements of fitness and well-being.
A complete strategy that involves consistent exercise, a good diet, and general fat reduction is required to remove fat around the knees or any other body portion, including the legs. This often entails following a well-rounded workout regimen that includes aerobic exercises (like jogging, cycling, or swimming) to burn calories and encourage fat reduction all around.
Pilates can help with general weight control and body toning when combined with cardiovascular activity and a nutritious diet. Pilates exercises can promote muscle tone and definition by strengthening the muscles surrounding the knee and enhancing flexibility, which may help produce a more aesthetically attractive look in the leg area.
It’s crucial to remember that genetics and personal body composition play a significant role in determining where your body sheds fat initially. While some people may have naturally higher levels of body fat in particular places, fat reduction often follows a general pattern across the body rather than targeting particular problem regions.
Pilates may be a useful addition to a well-rounded fitness program and help with total body toning, targeting fat, especially around the knees calls for a multifaceted strategy that incorporates consistent cardiovascular activity, a healthy diet, and overall fat loss.
FAQs:
Yes, losing weight can contribute to a reduction in fat around the knees. When you lose overall body fat through a combination of a healthy diet and regular exercise, you may notice a reduction in fat in various areas of your body, including the knees.
There are no exercises that specifically target knee fat. However, engaging in exercises that focus on strengthening the muscles around the knees, such as squats and lunges, can help improve the overall appearance and stability of the knee area.
Knee fat can be influenced by various factors, including genetics, overall body composition, and hormonal changes. Additionally, an inactive lifestyle and excess body weight may contribute to the accumulation of fat in the knee area.
It is always a good idea to consult with a healthcare professional, such as a doctor or a physical therapist, before starting any exercise routine, especially if you have pre-existing knee conditions or injuries. They can provide personalized advice and guidance based on your specific needs and help you choose exercises that are safe and appropriate for your situation.
Strength training exercises can help build muscle and improve overall body composition, which may contribute to a reduction in fat throughout the body. By strengthening the muscles around the knees, you can improve knee stability and support overall knee health.
Yes, losing weight can potentially reduce the appearance of a fat knee, especially if excess body weight is the primary cause. When you lose weight, your overall body fat percentage decreases, which can lead to a reduction in fat around various parts of the body, including the knees. However, it’s important to note that spot reduction (losing fat from specific areas only) is not possible. A comprehensive weight loss plan that includes a combination of regular exercise, a healthy diet, and overall weight management is recommended for achieving long-term results
If you are concerned about the appearance of a fat knee or if it is accompanied by pain, restricted movement, or other symptoms, it is advisable to seek medical advice. A healthcare professional can evaluate your specific situation, identify any underlying causes, and recommend appropriate treatment options.
While weight loss can have overall health benefits, it may not significantly reduce the appearance of fat knees caused by lipedema. Lipedema fat is often resistant to weight loss efforts, and individuals with lipedema may have difficulty losing weight in the affected areas through diet and exercise alone. It is important to consult with a healthcare professional familiar with lipedema for guidance on appropriate management strategies.
Non-surgical treatments for reducing fat knees caused by lipedema may include conservative measures such as compression therapy (wearing compression garments), manual lymphatic drainage (a type of massage therapy), and physical therapy exercises. These treatments aim to alleviate symptoms, improve lymphatic flow, and manage pain associated with lipedema.
Lipedema is a chronic condition characterized by the abnormal accumulation of fat, typically in the lower body, including the hips, thighs, and sometimes the knees. It primarily affects women and is often resistant to diet and exercise. It can lead to the appearance of disproportionately large or fat knees.
Lipedema is a chronic condition characterized by the abnormal accumulation of fat, typically in the lower body, including the hips, thighs, and sometimes the knees. It primarily affects women and is often resistant to diet and exercise. It can lead to the appearance of disproportionately large or fat knees.
While targeted exercises can help strengthen the muscles around the knees and improve their appearance, spot reduction (reducing fat in a specific area) is not scientifically supported. To reduce fat around the knees, a combination of overall body fat reduction through diet, cardio exercises, and strength training is recommended.
Low-impact cardio exercises that are gentle on the knees can be beneficial. Swimming, cycling, using an elliptical machine, or brisk walking are good options. Always start slowly and gradually increase the intensity to avoid unnecessary strain on the knees.
Alongside exercises, maintaining a balanced and healthy diet can support overall fat reduction, including around the knees. Focus on whole, nutrient-dense foods, limit processed and high-sugar items, and control portion sizes. Drinking plenty of water and avoiding excessive sodium intake can also help reduce bloating and water retention.

