Hill Sachs Deformity
Table of Contents
Description
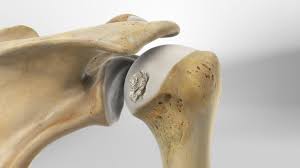
A Hill-Sachs deformity is an osseous defect or “dent” of the postero-supero-lateral humeral head that happens in alliance with anterior instability or dislocation of the glenohumeral joint. It was first explained by two different radiologists by the name HA Hill and MD Sachs in 1940.
This deformity is brought about by an anterior shoulder dislocation which causes a humeral head impression fracture. The posterolateral aspect of the humeral head impacts the anterior glenoid in the dislocated position, causing instability at the glenohumeral joint.
Clinically relevant anatomy
- The glenohumeral joint is a synovial ball-and-socket diarthrodial joint.
- It is the articulation in the middle of the glenoid of the scapula and the head of the humerus.
- It is generally known that the shoulder joint has a loose capsule, making it the most normally dislocated joint in the human body, of which 90% of these dislocations are anterior.
- This is the result of the scapular orientation of about 30° anterior to the frontal plane of the human body.
- The humerus is thus anteriorly placed to the glenoid in the glenohumeral joint.
Glenohumeral joint
Bones
- The glenoid of the scapula is persuasive with the humeral head to form a ball-and-socket joint.
Labrum
- The labrum, a fibro-cartilaginous structure, nearby the glenoid to ensure that there is enough contact between the surface of the glenoid and the humeral head.
- There is a concavity compression mechanism that plays a vital role in the stability of the shoulder.
- The less contact there is, the greater the risk for dislocations.
Ligaments
- Glenohumeral ligaments (pars superior, media, and inferior): Assists in the strengthening of the capsule
- Coracohumeral ligament: Assists in the strengthening of the capsule
- Transversal humeral ligament: Task with the Biceps Brachii muscle
Muscles
Abductors:
Deltoid
Supraspinatus
Adductors:
Pectoralis major
Flexors:
Rotator cuff muscles (Most important for the stability of the articulating humerus):
Supraspinatus, infraspinatus, teres minor, subscapularis
Extensors:
Deltoid muscle
Triceps brachii
Teres major
Latissimus dorsi
Internal Rotators:
Teres major
Latissimus dorsi
Subscapularis
Pectoralis major
External Rotators:
Teres minor
Infraspinatus
Bursae
There are 8 bursae in the shoulder complex as an outcome of the great number of muscles surrounding the shoulder. They make sure smooth contact between the muscle and the underlying structures. The subacromial bursa is one of the largest bursas in the human body.
- 1.Subacromial-subdeltoid bursa
- 2. Subscapular recess
- 3. Subcoracoid bursa
- 4. Coracoclavicular bursa
- 5. Supra-acromial bursa
- 6. Medial extension of subacromial- subdeltoid bursa.
Epidemiology
- The deformity of Hill-Sachs lesions is approximately 40%-90% of all anterior shoulder instability cases and even as high as 100% in patients with recurrent anterior instability.
- Research looking at this established Hill-Sachs lesions in 65% of acute dislocations and 93% in patients with recurrent instability.
- A Hill-Sachs lesion takes place in about 50% of first-time shoulder dislocations.
- For individuals with a shoulder dislocation history (in the essence of, shoulder instability), humeral head compression fractures are present in most cases.
Etiology
Anterior joint instability;
- Approximately 47% of the lesions are connected with the initial shoulder instability according to studies.
Bankart lesion
- 2.5 times more probably for a person with either of those lesions to have the other as well. Anterior glenoid bone injured (in cases of recurrent instability)
Classification
Classification systems are used to set out the amount of injured to the anterior capsule and the labrum, reflected by the depth of the lesion. Higher-grade lesions are connected with an increased risk of recurrent dislocation.
- Grade 1: Imperfection in the articular surface down to (but not including) the subchondral bone
- Grade 2: Lesion involves the subchondral bone
- Grade 3: Lesion by the cause of a large defect in the subchondral bone.
Further classification may be done by looking at the percentage of the damaged humeral head involvement in the compression fracture. The size of the lesion is connected in most cases to the number of previous dislocations.
- Minor: <20%
- Moderate: 20%-45%
- Severe: >45%
Other classification – ON track or OFF track
- If the Hill-Sachs lesion engages, it is known as an “off-track” Hill-Sachs lesion; if it does not engage, it is an “on-track” lesion.
Clinical presentation
- Shoulder dislocation rarely takes place isolated. It causes damage to various tissues nearby the glenohumeral joint, like ligaments, rotator cuff tendons, joint capsule as well as the bone and cartilage of the humeral head.
- This takes place when the round humeral head is forcefully impacted on the edge of the glenoid, which causes compression fractures in the humeral head.
- This creates a dimple structure on the articular surface of the humerus – a Hill-Sachs lesion.
- This is generally caused by dislocation, not only subluxation.
Who is affected by Hill-Sachs lesions?
Because accidents such as traumas or falls generally cause shoulder dislocations, an individual may dislocate their shoulder and
develop a Hill-Sachs lesion. Some groups of individuals are more likely to dislocate their shoulders, including:
- Athletes who play contact sports.
- People are assigned male at birth (AMAB).
- People between 15 and 30 years old.
- Anyone who has previously dislocated their shoulder.
- An individual assigned male at birth is more than two times more likely to dislocate a shoulder than a person assigned female at birth (AFAB).
Differential diagnosis
- Bankart lesion.
- Also as an outcome of shoulder dislocation, and often goes together.
- Pseudo-Hill-Sachs lesion:
- Humeral avulsion fractures
- Mid capsular tears
- Floating anterior capsule
- Reverse Hill-Sachs lesion.
Diagnostic Procedures
Physical examination
Bony apprehension test
- Positive test: Pain/reflex muscle contraction (in case of subluxation)
Jobe relocation test:
- Positive test: Apprehension
- Crepitus and catching can be experienced at the time of active and passive abduction and external rotation.
- Possible lesion indicated by audible/palpable clunk in active/passive abnormal rotation or an unstable feeling at the time of mid-range.
Special investigations
X-ray:
- Anteroposterior view (AP) in internal and external rotation; transcapular view (X-ray beam caudally from standard AP view); axillary views with exaggerated external rotation and West Pont views (if pain permits).
Ultrasound:
- Detect and localize a compression fracture.
- Cost-effective, minimal exposure to excessive radiation, comfortable for the patient,
- Hill-Sachs lesions: Apparent triangular depression in the contour of the humerus.
CT scan:
- Reliably diagnose the location and depth of the humeral lesion.
MRI:
- Identify the pathology of the soft tissue; determine the amount of humeral and glenoid bone loss.
Non-operative management
The non-operative rehabilitation of the injured shoulder consists of about seven key factors. It is necessary to include this in the rehabilitation program for the shoulder after a Hill-Sachs lesion;
- The onset of pathology
- The degree of instability
- The frequency of dislocation
- The direction of instability
- Concomitant pathologies
- Neuromuscular control
- Activity level
Physiotherapy management
Following a shoulder dislocation or when dealing with chronic wear and tear that has left the shoulder unstable, physical therapy is one of the better options for regaining shoulder function. When they work with a physical therapist, they will perform a full shoulder (and body) assessment to determine the unique deficits. From there, they may work with the patient to design a personalized rehabilitation program for the clinic and a home program to expedite the recovery.
In general, The PT will help the person with the following:
- Strengthening of the shoulder, shoulder blades, mid-back, and neck.
- Posture training with sitting, standing, sleeping, and other routine activities to improve the tissue health and coordination of the shoulder girdle muscles with movement.
- Decrease shoulder pain with modalities, such as ice, heat, electrical stimulation, ultrasound, and soft tissue massage.
- Restore capsular joint mobility.
- Normally when one area of the shoulder is hypermobile (most often anterior shoulder instability), other areas are immovable or stiff- targeted joint mobility with the guidance of the PT can help restore biomechanics.
- Biomechanical and proprioception training with dynamic exercises and employ of feedback (such as visual, verbal, and the use of tools like kinesiology tape).
- Provide extensive education regarding shoulder health to help the person feel empowered to keep the shoulder instability well managed at home and prevent chronic issues for years (even decades) to come.
Physiotherapy interventions include:
- 2-6 weeks of immobilization in mastering,
- Scapula stabilization exercises.
- Hand, wrist, and elbow exercises.
- Teach the patient about functional adaptions (e.g. personal hygiene, dressing, and undressing).
- No driving while still in the sling.
- When the use of a sling is discontinued (on the recommendation of the orthopedic surgeon): Pendulum exercises
- Passive, active-assisted, and active range of movement exercises (in progressions), Abduction, and external rotation are constricted during the starting phase of the rehabilitation
- Ligament healing requires to take place to prevent dislocation.
- Strengthening of the deltoid, rotator cuff, and periscapular (e.g. pectoralis major) muscles.
Shoulder exercise includes;
The two most important areas of focus for rehab for instability involve the rotator cuff muscles that directly support the shoulder and the supporting muscles in the mid-back and shoulder blade area. There are four muscles that made up the rotator cuff: the supraspinatus, infraspinatus, teres minor, and subscapularis.
When accurately synchronize and employed, these muscles keep up the ball of the joint (head of the humerus) in an optimal position as the arm goes within the socket (glenoid). This keeps it stable and stops unnecessary joint damage and strain. There are 4 four primary movements for strengthening the rotator cuff with isometrics: abduction, flexion, internal rotation, and external rotation.
Isometric adduction
- Using a small pillow or a rolled-up newspaper between the injured arm and the torso, squeeze inwards and try to maintain it in position.
- Begin with a small item and slowly move to larger sizes to work through a larger range of movements.
- Hold for five seconds (work to improve to ten).
- Repeat this five times (work to improve to ten).
Isometric Abduction
- Start with standing side-on to a wall, with the arm to be worked next to it.
- Place the back of the wrist against the partition and push outwards as if trying to raise the arm to the side.
- Hold for five seconds (work to improve to ten).
- Do it further for five times (work to improve to ten).
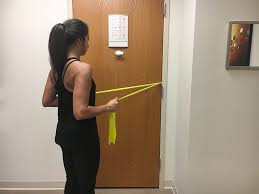
External Rotation
- Stand facing a door frame. Keep up the elbow bent to 90 degrees and put the back of the hand against the frame.
- Push against it.
- Hold for five seconds (work to improve to ten) and do it further for five times (work to improve to ten).
Internal Rotation
- Stand facing a door frame.
- Bend the elbow to 90 degrees, put the palm of the hand on the side of the doorframe, and push against it.
- Hold for five seconds (work to increase to 10) and do it further for five times (work to improve to ten).
Pendulum Stretch
This stretch does not need any instrument other than a countertop or table. It efforts the deltoids, supraspinatus, infraspinatus, and subscapularis muscles. Avoid rounding the back or locking the knees while performing this exercise.

- Put one hand on a counter or table for support and lean forward.
- Permit the other arm to hang freely at the side.
- Slowly swing the arm forward and back 10 times.
- Next, do it further by moving the arm side-to-side instead.
- Repeat it again using a pendular motion, completing ten circles.
- Repeat the entire motion with the other arm.
- Do 2 sets of the movement on each arm.
Crossover Arm Stretch
This stretch works the posterior deltoid, and the person should experience it at the back of the shoulder. Do not pull or put pressure on the elbow during the stretch.

- Keeping the shoulders relaxed, gently pull one arm across the chest as far as possible.
- Using the opposite hand for support, hold onto the upper arm.
- Hold for thirty seconds and then relax.
- Do it further with the other arm.
- Repeat the cross-over arm stretch to complete five stretches on both arms.
Passive Internal Rotation
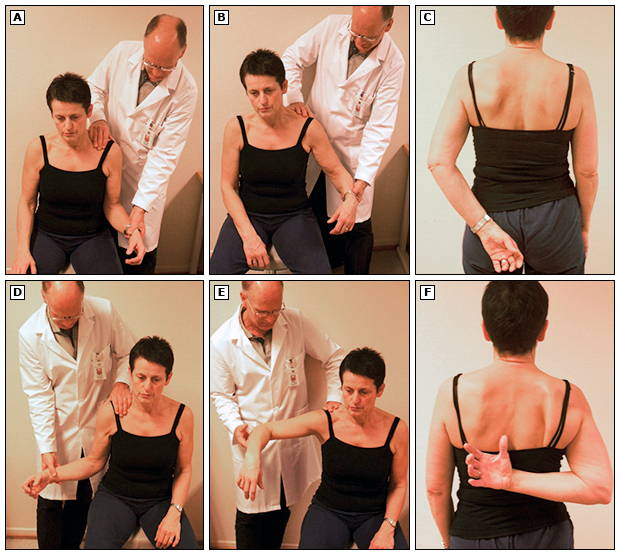
This exercise needs a light stick, like a yardstick or small broom, and works the subscapularis muscles. Do not lean over or
twist at the waist while performing this exercise. The person should experience a gentle stretch at the front of the shoulder while doing this exercise.
- Hold a stick behind the back with one hand and gently grasp the other end of the stick with the other hand.
- Gently pull the stick in a horizontal motion until the person feels a passive stretch or slight pull in the front of the shoulder.
- Hold for thirty seconds and then rest for 40 seconds.
- Do it on the other side.
- Complete three repetitions of the passive internal rotation on both arms.
Passive External Rotation
This exercise uses the same stick as the passive internal rotation exercise. It works the infraspinatus and teres minor muscles. The person should feel this stretch in the back of his shoulder. Try to keep up the hips facing forward and try to avoid twisting at the waist while doing this exercise.
- Hold the stick in front of the body with both hands about hip-width apart.
- Keeping the elbow of the shoulder the person is stretching against the side of the body, pushing the stick in a horizontal motion until the person feels a gentle pull in the back of the shoulder.
- Hold the motion for thirty seconds and then relax.
- Do it in the opposite direction.
- Complete three passive external rotation repetitions on each side.
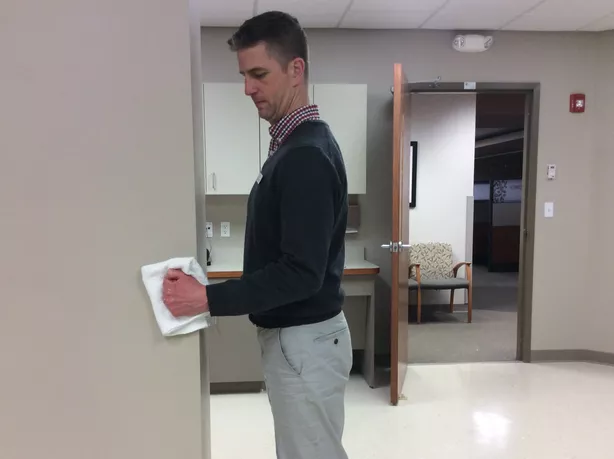
Shoulder Abduction
- Stand sideways by a wall with the elbow of the involved shoulder touching the wall (use a pillow for a cushion between if required).
- Push the elbow against the wall as if the person were going to lift the arm sideways and hold (to strengthen both the supraspinatus and deltoid muscles).
Flexion
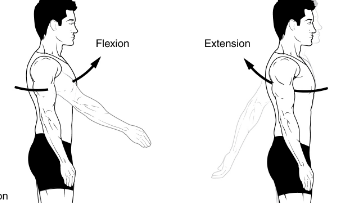
- Stand facing the wall with the arm at your side, elbow bent, and fist touching the wall (or pillow).
- Push the fist forward into the wall and hold.
- The key is to keep the muscle activation relatively pain-free and joint stable throughout.
Strengthening Exercise
Once the patient has mastered isometrics and they are getting too easy, it is time to progress to the active movement against
resistance. If the resistance experience like too much to start, a patient may also focus on the shoulder range of motion while keeping good form first instead. Grasp a resistance band to get started.
For every move, focus on keeping it low and controlled in both directions. Plus, it is necessary to keep good posture and the neck relaxed throughout (if the neck feels tense, the patient is probably using too much resistance). Complete 10-15 repetitions for 2-3 sets for every exercise. Stay within a range of motion that is tolerable for you and does not make the shoulder feel unstable.
Shoulder Abduction
- Hold one end of the band in the involved arm with the thumb pointing up toward the ceiling and the arm at the side with the elbow straight.
- Secure the other end of the band with the opposite hand against the hip bone (adjust the resistance as needed).
- Lift the straight arm sideways away from the body until it gets to shoulder height and holds for one to two seconds before returning to the starting position.
- When the person is ready, they may progress to a higher range of motion.
Shoulder Flexion
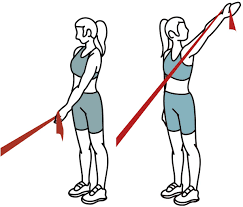
- The setup is equal to abduction for this move.
- However, this time you are lifting the arm straight up in front of you.
- Furthermore, start with a goal of shoulder height and progress from there.
- Be sure that the thumb is facing upward or inward (not downward to prevent pinching).
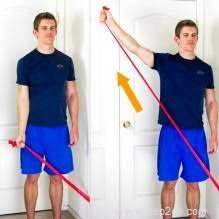
Shoulder External rotation
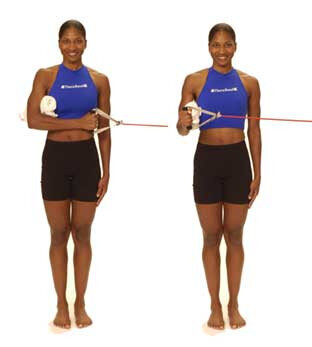
- Hold the band in both hands in front of the navel at shoulder width with the elbows bent to 90 degrees and palms facing upward.
- Keep up the elbows at the side as you pull the hands away from each other as far as possible and hold for one to two seconds. (In addition, adjust the resistance as needed.)
- Alternatively, you may focus on one shoulder at a time by securing the band to a door or other sturdy surface and completing the same move.
Shoulder Internal rotation
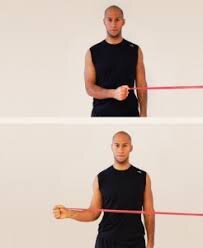
- Secure the band at navel height to a sturdy surface like a doorknob.
- Stand sideways to secure the band with the arm you want to work closest to it.
- Hold the band in the hand with the elbow bent to 90 degrees and resting by your side.
- Keep the elbow in place you pull that band across the body toward the belly button and hold for 1-2 seconds before returning.
- In addition, the person may add movements like bicep curls by standing on the band and tricep curls by securing the band overhead.
Standing Row
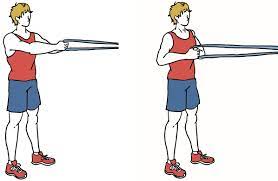
- This strengthening exercise needs an elastic stretch band and works the middle and lower trapezius muscles.
- You should feel it at the back of your shoulder and upper back.
- Using an elastic band, bind the ends together to make a 3-foot-long loop and attach it to a doorknob, hook, or another stable object.
- Hold the band in one hand with the elbow bent at a 90-degree angle at the side.
- Stand with the body facing the band, just far enough away so there is not any slack or pull in the elastic.
- Keeping up the arm close to the side, slowly pull the elbow straight back and squeeze the shoulder blades together as she pulls.
- Gently return the arm to the kick-off position.
- Do it a further eight to 12 times.
- Complete three sets on both arms.
- This exercise may also be performed with both arms at the same time using elastic exercise bands with handles.
- It may also be performed using a weight machine at the gym or free weights.
Scapular/Core Exercises
If the person trying to move the arm and does not have enough shoulder blade strength and coordination, the person is putting the shoulder at risk for re-injury and aggravation. Focusing the shoulder blades and mid-back is a part of the shoulder rehab
program that is often neglected. Consisting of these few exercises will make a great difference in the overall shoulder function.
Shoulder Blade Squeezes
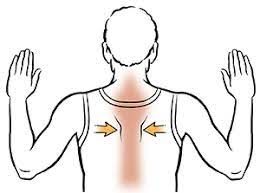
This is one of the most basic moves the person can start with to strengthen the muscles between the shoulder blades, particularly the middle and lower trapezius muscles (which are frequently overpowered by the upper trapezius muscle along the top of the shoulder and neck). It might seem simple but may be hard to coordinate with an involved shoulder or chronic bad posture.
- Sit or stand with better posture (shoulder back, head above the shoulders, chin normally tucked).
- Just imagine there is a quarter between the shoulder blades as you pinch the shoulder blades together (shoulder retraction) and hold for 5-10 seconds.
- Be sure the patient is keeping the shoulders relaxed and do not let them lift up toward the ears.
- The person may feel a stretch in the front of the chest if they tend to slump or have tight pec muscles.
- Do it further for 10-15 repetitions for 2-3 sets total.
- Progress to resistance exercises as tolerated.
- Although, keep up this one in mind with routine activities to build awareness of posture and keep these muscles strong.
Rows
- This traditional move is necessary for shoulder blade coordination and is the next step in the progression from the exercise above.
- Hold a resistance band and secure it around a sturdy surface at navel height.
- Grab each end of the band in one hand with the elbows bend to 90 degrees by your side and palms facing each other.
- Stand at a distance that gives you enough resistance without tensing the neck.
- Keep good posture as you squeeze the shoulder blades together (just like in the exercise above) and pull the elbows back behind the body.
- Hold for 5-6 seconds before returning to the starting position and repeating.
- Continue for 3-4 sets.
- Progress the band resistance as tolerated.
- Plus, the person can use row machines at the gym to complete this move as well.
Prone T
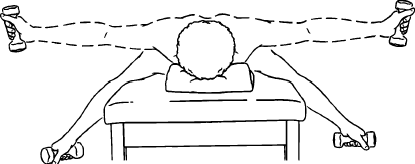
- The patient may support the head with the opposite hand on the forehead.
- While keeping the arm straight, gently lift the arm out to the side and pinch the shoulder blade back towards the spine.
- The person should feel like one-half of the letter “T.”
- Hold this position for 1 to 2 seconds, and then gently lower back to the beginning position.
- Do it further for 10 to 15 repetitions.
- Complete three sets on both arms.
- This exercise can be made more challenging by adding a small weight or dumbbell to the hand.
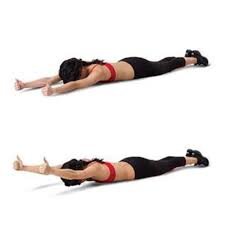
Prone Y

- The prone “Y” is done just like the prone “T” except that the arm forms the letter “Y” during the motion.
- Begin by lying on your stomach on a bed with your arm hanging down.
- Gently lift the arm up in a diagonal direction so that the shoulder blade pinches back behind you.
- The thumb should be facing up toward the ceiling.
- The person should experience one-half of the letter “Y” when they are in the uppermost position.
- Hold this “Y” position for 1 to 2 seconds.
- Slowly lower back down to the initiation position.
- Do 10 to 12 repetitions. Complete three sets on each arm.
- This exercise can be made more challenging by adding a small weight or dumbbell to the hand.
Prone I
- Begin the prone “I” in the same position as all the other scapular stabilization exercises.
- Lie on the belly with the arm hanging straight down.
- Keep the elbow straight and raise the arm up overhead and slowly pinch the shoulder blade back.
- The arm should be next to the ear at the uppermost position.
- Hold the position for two to three seconds.
- Slowly return the arm to the starting position.
- Repeat the exercise 10 to 15 times.
- Complete three sets on each arm.
- This exercise can be made more challenging by adding a small weight or dumbbell to the hand.
Surgical management
Arthroscopic technique
- Remplissage procedure: The defect is filled with soft tissue, usually from the infraspinatus tendon
- Percutaneous humeroplasty- The lesion is filled by using a bone tamp brought into a drilled osseous window 180° from the lesion.
Open technique
- Laterjet procedure.
- Autologous bone plugs.
- Rotational humeral osteotomy.
- The osseus humeral allograft bone plug technique.
FAQ
Most individuals recover from a dislocated shoulder that causes a Hill-Sachs lesion in a month or two with a few months of physical therapy. Generally, only severe Hill-Sachs lesions require surgery to repair.
Bankart and Hill-Sachs lesions are injuries including the glenohumeral joint of the shoulder following one or multiple shoulder dislocations. These injuries affect the glenoid fossa on the scapular side (Bankart lesion) but also harm the head of the humerus (Hill-Sachs lesion).
The Hill-Sachs lesion is an osseous defect of the humeral head that is typically connected with anterior shoulder instability. The incidence of these lesions in the setting of glenohumeral instability is relatively high and approaches 100% in people with recurrent anterior shoulder instability.
Bony Bankartt – a fragment of bone breaks off with the Bankart tear – Bony Bankart at arthroscopy. Hill-Sachs lesion – a dent in the back of the humeral head that takes place during the dislocation as the humeral head impacts against the front of the glenoid. slap tear – a tear at the top of the labrum.
Bankart lesions are up to eleven times more common in patients with a Hill-Sachs defect, with increasing incidence with increasing size.