18 Best Exercises For Hip Dislocation
Table of Contents
Introduction:
One of the most important joints in the human body is the hip joint, which allows us to walk, run, and jump, among other physical activities.
For a full recovery following medical reduction (replacement) of the hip, a systematic and progressive exercise regimen is essential. Your physiotherapist may suggest gentle exercises to maintain circulation and prevent stiffness. Restoring strength, range of motion, and stability in the hip joint while avoiding redislocation are the primary goals of these exercises.
Flexibility and strength Exercises For Hip Dislocation are essential for reducing hip pain. Although some people may feel uncomfortable, these activities shouldn’t exacerbate the pain. Stop exercising if it hurts; if not, try moving more slowly.
Never endure pain. Pain is an indication of a problem. For your recovery to be successful, you must be strict and regular in your exercise schedule.
Causes:
Motor Vehicle Accidents
- The most usual cause.
- The injury frequently happens when a person’s knee hits the dashboard, pushing the hip out of its socket and pushing the thighbone back.
Sports-Related Damage
- Although they are less frequent, hip dislocations can occasionally result from high-impact sports like football or hockey.
Falls
- A hip dislocation may result from falling from a considerable height, such as a roof or a ladder.
Arthritis
- Arthritis is a condition that destroys the joints and is characterized by pain and inflammation.
Joint Replacement
- Joint surgeries like hip replacement surgery may potentially raise the risk of hip dislocation.
- The hip joint is opened during surgery, and the ball is taken out of its socket.
- As the joint heals, it can be more at risk of dislocation.
- To lower the risk of dislocation, patients undergoing joint surgery ought to pay close attention to their physician’s post-operative instructions.
Congenital Disorders
- One congenital disease that may raise the risk of hip dislocation is hip dysplasia.
- This disease, which is often present from birth, can be diagnosed by a physician.
Signs and symptoms:
Since the damage is so severe, the symptoms and indicators are frequently rather obvious.
Here is a thorough explanation:
Severe, Unexpected Pain
- Knee, groin, hip, or even thigh.
- Usually, pain begins as soon as trauma occurs.
- A severe ache that worsens with movement or contact.
Observable Deformity
- The obvious abnormalities of the leg and hip are one of the most obvious symptoms.
- The leg on the side that is impacted may frequently seem shorter and may be bent outward or inward.
Spasms in the muscles
- Movement may be more restricted and pain may increase if the hip muscles spasm.
A “Popping” Feeling
- At the time of the injury, some persons claim to have heard or felt a “popping” or “clunking” sound.
Unable to Support Weight
- On the wounded leg, the person will be incapable of standing or walking.
Bruising and Swelling
- The area surrounding the hip joint may be swollen and discolored.
Feeling numb or tingling
- The person may have tingling or numbness in the leg or foot if the dislocation has injured or destroyed nerves, especially the sciatic nerve.
- This is a significant indication that needs to be treated by a doctor right away.
Exercise’s advantages:
Following a hip dislocation, workouts and physical rehabilitation are essential parts of the healing process. The primary goals of these workouts are to strengthen the hip-supporting muscles, which were probably weakened during the injury, increase range of motion, and restore joint stability.
The specific benefits of exercise for hip dislocation healing are as follows:
Stability and Strength Restoration
- The muscles, ligaments, and tendons that surround the hip are severely damaged in a hip dislocation.
- The joint must be held in place by these soft tissues.
Increasing Flexibility and Range of Motion
- When the hip joint is dislocated, it may become stiff and have a much smaller range of motion.
- Mobility may be safely and progressively restored with exercise.
Increasing the sense of position and Balance
- The body’s awareness of its position and movement is known as proprioception.
- Following a joint injury, it is frequently compromised.
Avoiding Dislocations in the Future
- A direct factor in reducing this risk is exercise.
Reduces Pain and Inflammation
- Low-impact exercise promotes blood flow and lymphatic drainage, which minimizes edema.
- By producing endorphins, which are natural painkillers, exercise increases comfort and enjoyment.
Promotes a Secure Return to Sport
- To handle the stresses of everyday life, sports, or the office, the hip is progressively strengthened.
- Ensures that when the patient moves, they will feel confident again.
Exercises For Hip Dislocation:
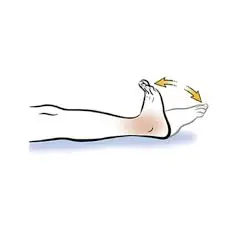
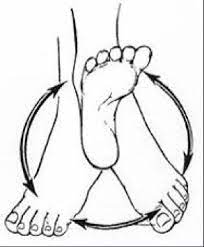
Ankle pump
- To begin, take a seat on the bed.
- Then spread your legs.
- Then do your best to drag them away from you.
- All you have to do is point and bend your feet as much as you can in each direction.
- Keep going for one to three minutes.
- Then return to your neutral position.
- Then relax.
- Repeat these exercises 5 to 10 times.
Ankle rotation
- Maintain a straight back and flat feet while sitting comfortably on a chair.
- Stretch your leg out in front of you a little bit and raise one foot off the ground.
- As if you were painting a circle with your big toe, carefully and patiently, move your ankle
- The circles should be as big as possible without hurting anyone.
- Rotate your ankle counterclockwise after finishing a series of clockwise rotations.
- Then relax.
- Repeat these exercises 5 to 10 times.
Static quadriceps strengthening
- Start with the seating position on the bed.
- Then expand your legs.
- After sitting on the floor, extend your legs.
- Place a little rolled towel under your knee.
- While drawing one foot towards you, shift the other foot slightly to the side.
- Tightening your thigh muscles can be achieved by pressing your leg down firmly.
- Hold this position for a few seconds.
- Then return to your neutral position.
- Then relax.
- Repeat these exercises 5 to 10 times.

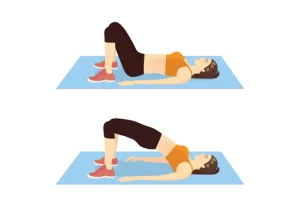
Bridge
- Start in the supine position on the floor.
- You should bend at the knees.
- Set your feet hip-width apart on the floor.
- Your feet should be positioned such that the tips of your fingers may barely touch your heels.
- Before you start lifting, flatten your lower back a little bit into the floor by lightly contracting your abdominal muscles.
- This keeps your back from arching and protects your spine.
- As you push through your feet to lift your hips off the ground, release your breath.
- Lift your hips until your knees and shoulders are level.
- Tightly contract your glutes and maintain this posture for a few seconds.
- After taking a breath, carefully return your hips to the initial position.
- Then return to your neutral position.
- Then relax.
- Repeat these exercises 5 to 10 times.
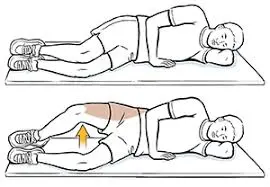
Clamshells
Clamshell steps:
- Start in side-lying position on the floor.
- Arrange your ankles, knees, and hips one over the other.
- Ensure that your knees are 45 degrees from the rest of your body.
- To help support your pelvis and spine, gently tense your abdominal muscles.
- With your feet together and your hips arranged, gradually raise your upper knee toward the sky.
- It must be a thoughtful, controlled action, similar to a clam opening its shell.
- You should feel your hips compress significantly at the top of the exercise.
- Then return to your neutral position.
- Then relax.
- Repeat these exercises 5 to 10 times.
Side-lying hip abduction
- Start with a side-lying position on the floor.
- Bend your lower knee a little bit while keeping your upper leg straight for stability.
- You can keep them by your side for support.
- When you engage your core, your pelvis and spine will be more stable.
- Elevate your upper leg while maintaining it straight and in line with the rest of your body.
- Feel your gluteal muscles squeeze as you hold for a few moments at the highest position.
- Avoiding gravity, carefully drop the leg back down again.
- Then return to your neutral position.
- Then relax.
- Repeat these exercises 5 to 10 times.

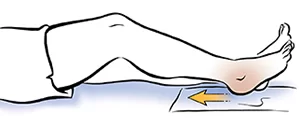
Heel slide
- To start, lie down on the ground. Bend your affected knee carefully.
- Push your heel towards your buttocks.
- While performing the exercise, maintain one foot on the floor or bed.
- Avoid excessive bending and stop at a comfortable distance.
- Hold this position for a few seconds.
- Then return to your neutral position.
- Then relax.
- Repeat these exercises 5 to 10 times.
Gluteal Squeezes
- Begin on the floor in a supine position.
- Next, bend your knees.
- Then slightly engaged core.
- Contract or squeeze your glutes as hard as you can.
- Hold this position for a few seconds.
- Then return to your neutral position.
- Then relax.
- Repeat these exercises 5 to 10 times.

Side-lying leg lift
- Start in side-lying position on the ground.
- With your legs outstretched, place your feet on top of one another.
- To release the breath, carefully raise your left leg off your lower leg.
- Hold this position for a few seconds.
- Gently lower your leg.
- Then return to your neutral position.
- Then relax.
- Repeat these exercises 5 to 10 times.

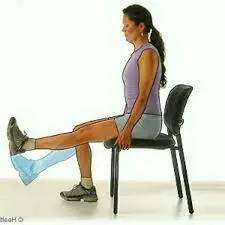
Seated Knee extension
- Start with the seating position on the chair.
- Your knees should bend at a 90-degree angle.
- Slowly stretch one leg in front of you, being careful to keep the knee straight.
- Hold the extended leg for a few seconds to completely engage the quadriceps.
- Use caution when lowering the leg and regulate the motion when getting it back to the starting position.
- Then return to your neutral position.
- Then relax.
- Repeat these exercises 5 to 10 times.
Straight leg raise
- Begin by resting on your back on the bed.
- Bend one knee.
- Ensure that your other leg stays straight and relaxed.
- Support yourself by placing your arms at your sides, palms down.
- Raise the opposite leg carefully to around the height of your bent knee while maintaining the straight line of your first.
- Hold this position for a few seconds.
- Then return to your neutral position.
- Then relax.
- Repeat these exercises 5 to 10 times.

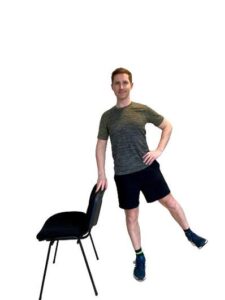
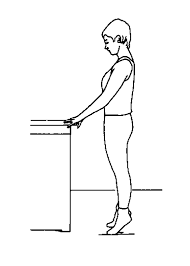
Standing hip extension
- Start in a standing position on the floor.
- Support yourself by using a table or chair in front of you.
- Your abdominal muscles should be squeezed.
- Keep your knees straight and your toes pointing.
- Then kick back your leg slowly.
- Hold this position for a few seconds.
- Then return to your neutral position.
- Then relax.
- Repeat these exercises 5 to 10 times.

Standing hip abduction
- Start in a standing position on the ground.
- Take a chair nearby.
- Keeping a firm grip on a chair will assist you in maintaining your balance.
- Slowly raise the affected leg to the side while keeping your knee straight.
- Rather than tilting your upper body to one side during the workout, keep your body active and functional.
- Only raise your leg as high as it will not cause you any pain, which is often between 30 and 45 degrees.
- Hold this position for a few seconds.
- Then return to your neutral position.
- Then relax.
- Repeat these exercises 5 to 10 times.
Single-leg stand supported
- Place your feet hip- or shoulder-distance apart when standing.
- Grab a chair or counter for support.
- Make your core muscles tighter.
- Raise one leg.
- Then flex it at the knee.
- Hold this position for a few seconds.
- Then return to your neutral position.
- Then relax.
- Repeat these exercises 5 to 10 times.
- Do the opposite.

Standing heel raise
- Start in a standing position on the ground.
- You may use the countertop itself or the back of a chair as support to help you balance better.
- Gently and carefully lift your heels off the ground.
- Your calf muscles should provide the force behind the action.
- After you’ve gotten as high as you can, squeeze your calf muscles and hold this posture for a short amount of time.
- Lower your heels back down to the floor slowly and carefully.
- Then return to your neutral position.
- Then relax.
- Repeat these exercises 5 to 10 times.
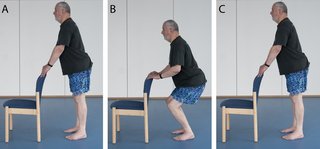
Mini squat (supported)
- Select a chair without wheels that is stable and strong.
- Begin standing in front of the chair.
- Maintain a small outward point with your toes.
- For support and balance, grab the back of the chair.
- Beginning with your legs and hips bent, begin lowering your body gradually and cautiously.
- Consider that you are going to take a seat.
- As you drop, push your hips back.
- This prevents your knees from going too far forward over your toes and helps to activate your hamstrings and glutes.
- Just a little bit of body lowering is necessary, generally to a point where you sense a challenge without experiencing any kind of pain.
- When you’re at your lowest, take some time for yourself.
- Hold this position for a few seconds.
- When you get back to the initial, upright position, squeeze your glutes.
- Then return to your neutral position.
- Then relax.
- Repeat these exercises 5 to 10 times.
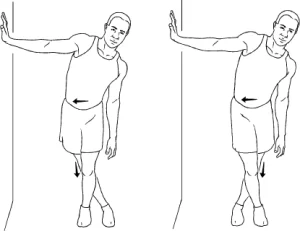
Standing Iliotibial band stretch
- Start with a standing position on the floor.
- Stand near the wall.
- Your right leg should be crossed behind your left.
- The leg in front of you should be extended as best you can.
- To the right, tilt your upper body.
- By extending your left arm toward your right side and above you, you might extend the stretch even more.
- A stretch should be felt down the outside of your left leg and hip.
- Hold this position for a few seconds.
- Then return to your neutral position.
- Then relax.
- Repeat these exercises 5 to 10 times.
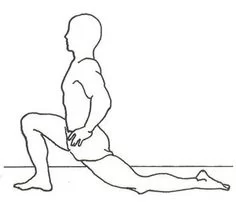
Hip flexor stretch
- Put one foot level on the ground in front of you, then kneel on one knee.
- For comfort, lay a cushion or folded towel behind your back knee.
- On the side of the knee that is on the floor, contract your gluteal muscles while gently pulling your pelvis forward.
- Slowly forward your hips while keeping your body straight until your front hip and thigh start to softly stretch.
- Hold this position for a few seconds.
- Then return to your neutral position.
- Then relax.
- Repeat these exercises 5 to 10 times.
When performing hip dislocation exercises, what safety measures are taken?
First, receive the medical clearance.
- You should only begin exercising with your doctor’s or physiotherapist’s approval.
Start with thoughtful, low-impact motions.
- Avoid hurrying, leaping, twisting, or changing direction quickly.
- Do range-of-motion exercises first.
Slowly make progress.
- Raise the repetitions, resistance, and difficulty gradually.
- Make sure you follow your rehabilitation plan exactly.
Maintain Proper Posture
- Throughout each exercise, maintain a neutral stance for your hips, knees, and feet.
- Use wall support, monitoring, or mirrors to ensure form.
Make use of assistive devices when required.
- Use walkers, crutches, or canes if your balance is off.
- You need a doctor’s approval before you can go full weight-bearing.
- If your balance is compromised, do not stand unsupported.
After exercising, use ice.
- Icing for ten to fifteen minutes after working out may help reduce inflammation or soreness.
At what point did you stop performing this exercise?
Pain
- During exercise, deep, severe hip pain may be a sign of pressure, stiff joints, or bad form.
- Pain may indicate inflammation, muscle strain, or re-injury.
Either swelling or inflammation
- Joint swelling can result from excessive exercise, especially in the early phases.
- Additionally, it could be caused by underlying conditions like arthritis.
The incorrect form or approach
- If patients are not carefully supervised, they may do activities incorrectly.
- Bad posture can lead to compensatory movement and strain in other joints.
Unstable or Unbalanced
- Balance may be impacted by a hip dislocation.
- Patients may experience insecurity when performing exercises that require standing or single-leg support.
Muscle weakness and fatigue
- In the initial phases of recovery, the hip and core muscles become degenerated.
- Muscle exhaustion can happen quickly, especially while doing weight-bearing or resistance training.
Which workouts should you avoid doing if you have a hip dislocation?
Activities with a High Impact
The hip joint is under a lot of stress from activities that require taking a leap, running, or jogging. Wear and tear and the possibility of re-dislocation can result from frequent hitting. Among the examples are:
- High-impact aerobic exercises
- Jogging or running
- Jumping jacks
- High-impact sports such as tennis, basketball, or soccer
Hip Flexion Past 90 Degrees
Following a posterior dislocation, it might result in the femoral head coming out of its socket, which is risky.
- Squats deep
- Knee-to-chest workouts
- Seated on low stools or with both legs crossed
Crossing Your Ankles or Legs
- Particularly in a posterior dislocation, when the leg rotates inward and crosses the body’s midline, this action places a great deal of strain on the hip joint.
Internal Hip Rotation
- Keeping your knee or foot turned inward while standing.
- Turning on one leg, especially in sports.
Heavy Lifting of Weights
- Exercises like leg presses that include large weights may put excessive pressure on the hip joint and the muscles supporting it, potentially resulting in issues.
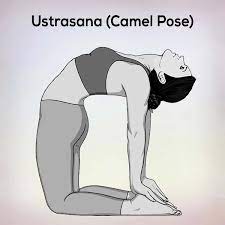
Extreme Yoga Pose or Stretching
- Certain yoga or Pilates poses, such as the seated twist or pigeon position, might be dangerous because they require hip twisting or a very wide range of motion.
Strategies to avoid hip dislocation:
Thankfully, hip dislocation may be avoided, and there are several steps you can take to lower your chance of becoming hurt.
Build Up Your Core and Hip Muscles
- A natural “corset” of support is provided by strong muscles around the hip joint.
- Joint stability can be enhanced with exercises that focus on the core and glutes.
Maintain Proper Posture
- The hip joint may experience unnecessary tension as a result of bad posture.
- By keeping proper posture when walking, standing, and sitting, you may lessen joint stress and distribute weight correctly.
Handle Hip Injuries Right Away
- Hip pain or inflammation should not be ignored.
- Any hip injury should be treated by a physician to avoid extra harm and lower the chance of a more serious injury, such as a dislocation.
Keep Your Weight in Check
- Your hip joints are under more stress when you carry more body weight, which raises the possibility of damage.
Change the environment around you.
Simple adjustments may be made at home to lower the chance of falling or moving in an unsafe way.
- Use high toilet seats and arm-supported high chairs.
- Avoid low furniture.
- If necessary, provide temporary railings.
- Put a pillow between your legs as you sleep.
Be Careful with Your Everyday Tasks
- Do not twist or make forceful rotations on the damaged leg.
- When standing, refrain from reaching to pick up items from the floor.
- Turn your complete body, not just your hips.
Summary:
A major injury that affects not just your mobility but also your entire body’s movement, balance, and quality of life is a dislocated hip. A strong, stable hip can be achieved with targeted exercises and regular rehabilitation, regardless of whether you’re recovering from surgery or a non-surgical reduction.
Recovery from a hip dislocation takes time, patience, and a carefully thought-out exercise program. Whether you’re preparing to return to sports or recovering from basic movement, customized exercises are crucial to your journey to complete mobility.
You can safely regain your hip joint’s strength, mobility, and stability by following a planned and progressive exercise program. You’ll be able to live a full and active life again and restore your freedom thanks to this. Throughout the entire procedure, never forget to put safety first and pay attention to the guidance of your healthcare team.
A normal exercise program can be divided into phases, moving from easy, protective exercises to harder, more useful ones. Exercise regularly is essential for both a speedy recovery and lowering the chance of further dislocation.
Always be alert when performing any activity, pay attention to your body’s signals, and concentrate on gaining strength gradually. Before you know it, your hip ligaments, joints, and muscles will be stronger than before.
FAQ:
What are some ways to prevent hip dislocation?
Wearing seat belts, for instance, can help prevent high-impact injuries.
Take certain precautions following hip replacement surgery.
Work out to strengthen your hip muscles.
When may I resume my exercise regimen following a hip dislocation?
You can typically begin exercising once your doctor or physiotherapist certifies that the joint is stable. This could take a few days to several weeks, depending on the extent of the dislocation and whether there was any associated damage (e.g., labral tears or fractures).
What don’t you do after a hip dislocation?
Don’t spend the entire day on anything that requires close attention to detail. This entails going to and making important choices. It takes time for the medication’s effects to completely go away. For your protection, avoid operating or driving any potentially dangerous machinery.
How often does a hip dislocation happen?
Because the hip joint is so stable, hip dislocations are rather rare. High-impact trauma, including auto accidents or significant falls, is typically the cause of them.
Who is at risk for hip dislocation?
People with deformed or weak joints (hip dysplasia, for example), People with a history of hip replacement surgery, Participants in high-impact athletics, Elderly people who have osteoporosis, and those who have experienced trauma.
What signs and symptoms indicate a dislocated hip?
Intensive groin or hip pain
Unable to move the. The leg seems shorter or twisted outward or inward.
Bruising or swelling
Numbness (if there is injury to the nerves)
Is surgery always necessary?
No, the closed reduction technique can be used to treat a variety of dislocations. Usually severe dislocations, fractures, or repeated dislocations require surgery.
Is walking easy after a hip dislocation?
Not right away. Until the healing process starts, weight-bearing is limited. Strength and mobility are progressively restored via rehabilitation.
Could the hip dislocate once more?
Recurrence is possible, particularly if:
The joint is weak.
You got your hip replaced.
Re-injury happens.
Is it possible to have a regular life following a hip dislocation?
Indeed, a large number of people can recover, particularly with the right care and rehabilitation.
What makes exercising important following a hip dislocation?
Prevents stiff joints
Restores mobility.
Enhances gait and balance.
Increase hip muscle strength to reduce the likelihood of further dislocations.
Should I refrain from certain actions following a hip dislocation?
In particular, in the early stages of recovery. Refrain from:
Crossing legs
Twisting the hip (internal rotation)
Deep squats or bending past 90 degrees
Unexpected motions or turning
When can I start jogging or playing sports again?
This is dependent upon the extent of the damage and your rate of recovery. Although it may take longer (6–12 months), most patients resume modest exercise in 3–6 months. Never overlook your doctor’s or physiotherapist’s advice.
References:
- Bariya, D. July 12, 2025a. The finest 15 hip dislocation activities for physical treatment. Physical therapy and fitness. https://physical-therapy.us/hip-dislocation exercises/
- Admin, and Admin. July 3, 2024. Exercises for safe hip recovery in cases of hip displacement. Health Station, Acibadem Health Company, and ACIBADEM Medical Centres. You can recover from a dislocated hip by engaging in the following safe activities: the https://www.acibademhealthpoint.com webpage.
- Hip dislocation. June 2, 2025. The Cleveland Clinic. Hip dislocation https://my.clevelandclinic.org/health/diseases/22222
- M. J. Boyle (2017). General Guidelines for the Surgical Hip Dislocation Rehabilitation Protocol. Surgical+Hip+Dislocation+PT.pdf https://static1.squarespace.com/static/5626f8dee4b07271cf709382/t/59223fdbe3df28d30856bd4a
- May 29, 2025: Kaselj, R. A hip dislocation? Top Rehab Activities to Quickly Regain Strength & Accelerate Recovery! Activities for Injuries. Here are some hip dislocation exercises: https://exercisesforinjuries.com/
- Prevention of hip dislocation: A Comprehensive Guide, Edward VII’s Hospital, 11 March 2025. Edward VII’s Hospital. https://www.kingedwardvii.co.uk/health-hub/health-hub-what-to-do-to-avoid-hip-dislocation!
- Collins, S. December 3, 2024. How hip replacement surgery workouts can help you heal more quickly. Yale Medical Centre. How exercises can hasten your recuperation following hip replacement surgery https://www.yalemedicine.org/news
- Image 3, A. B. G. Mahalingam (2024, April 12). Six efficient quadriceps strengthening exercises. Best wishes for health. https://www.happiesthealth.com/articles/muscle-bone/6-efficient-quadriceps-strengthening-exercises
- Image 5, Administrator. October 17, 2022. Treatment for hip pain involves side-lying hip abduction. IL chiropractor in Wheaton Speak with (630) 510-0080. This article discusses how to treat hip pain by side-lying with hip abduction.