
Hip joint stiffness
Table of Contents
What is hip stiffness?
Hip joint stiffness is a feeling that the hip joint doesn’t move as easily as it once did, as well as it is generally painful. The patient may feel as if the hip is clicking or even popping as the patient move it. The range of motion may also be affected. Sometimes hip stiffness may make the patient move more slowly than he/she used to.
The hip joint helps the patient to move from the sitting position to a standing, walking, running, or even jumping position. These activities are difficult, if not impossible, with the stiff hip. Each step or motion can trigger severe pain. While some stiff hip symptoms can be temporary, others can result in long-term discomfort if left untreated. Knowing when to seek medical care may mean the difference between daily discomfort as well as pain-free activities.
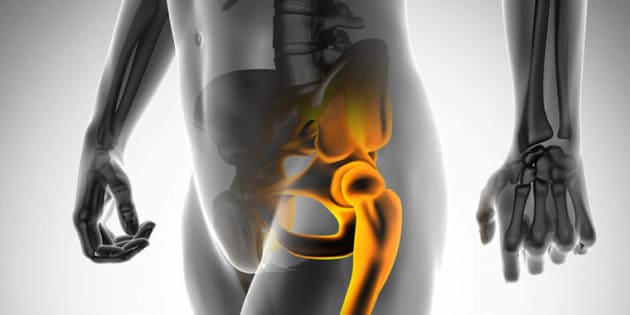
Anatomy of the hip joint
Bones as well as Joints of the hip
- A hip joint is a junction where the hip joins the leg to a trunk of the body. This is comprised of two bones: the thigh bone or femur, & the pelvis, which is made up of three bones called ilium, ischium, and pubis as well.
- The ball of a hip joint is made by the femoral head whereas the socket is formed by the acetabulum.
Ligaments of a hip joint
Ligaments are fibrous structures that connect bones to other bones in that area. A hip joint is encircled with ligaments to provide stability to s hip by forming the dense as well as the fibrous structure around a joint capsule. The ligaments adjoining a hip joint include:
Iliofemoral ligament: It is the Y-shaped ligament that joins the pelvis to a femoral head at the front of the hip joint. It assists in limiting over-extension of the hip motion.
Pubofemoral ligament: It is a triangular-shaped ligament that extends between an upper portion of the pubis & the iliofemoral ligament. This attaches the pubis to the femoral head.
Ischiofemoral ligament: This is the group of strong fibers that arise from an ischium behind an acetabulum as well as merge with the fibers of a joint capsule.
Ligamentum teres: It is the small ligament that extends from the tip of the femoral head to the acetabulum. Even though it has no role in hip movement, it does have a small artery within that supplies blood to the part of a femoral head.
Acetabular labrum: A labrum is the fibrous cartilage ring that lines an acetabular socket. It deepens a cavity increasing the stability as well as strength of the hip joint.
Muscles as well as Tendons of the Hip Joint

The long tendon called an iliotibial band runs along with the femur from a hip to a knee & serves as the attachment site for several hip muscles including the following:
Gluteal muscle: These are muscles that form the buttocks. There are mainly three muscles (gluteus minimus, gluteus maximus, and gluteus medius as well) that attach to the back of a pelvis as well as insert into the greater trochanter of a femur.
Adductors: These muscles are in the thighs that assist in adduction, the action of pulling a leg back towards the midline.
Iliopsoas: It is in front of the hip joint & provides flexion. This muscle is the deep muscle that originates from the lower back as well as the pelvis, & extends up to the inside surface of the upper part of a femur.
Rectus femoris: It is the largest band of muscles located in front of a thigh, which is also called the hip flexors.
Hamstring muscles: These start at the bottom of a pelvis as well as run down the back of the thigh. Due to the fact that they cross the back of the hip joint, they assist in the extension of the hip by pulling it backward.
Nerves and Arteries of a Hip Joint
Nerves of a hip transfer signals from the brain to the muscles to help in hip joint action. They also carry the sensory signals namely touch, pain, and temperature back to the brain as well.
The main nerves in the hip region include a femoral nerve in the front of the femur as well as the sciatic nerve at the back. The hip is also supplied by a smaller nerve famous as the obturator nerve.
Moreover, to these nerves, there are blood vessels that supply blood to the lower limbs. A femoral artery, one of the largest arteries in a body, arises deep in the pelvis as well as can be felt in front of the upper thigh.
What Is the normal hip range of motion?
- A hip range of motion is measured in degrees of movement. Normal movement of the hips allows for three degrees of motion, which means a leg should be able to move freely in six different directions within three planes.
- Abduction: 0 degrees to 45 degrees
- Adduction: 45 degrees to 0 degrees
- Extension: 115 degrees to 0 degrees
- Flexion: 0 degrees to 125 degrees
- External rotation: 0 degrees to 45 degrees
- Internal rotation: 0 degrees to 45 degrees
Pathophysiology of the hip Joint Stiffness
The Four Stages of Stiffness of the hip joint
- Bleeding
- Edema
- Granulation Tissue
- Fibrosis
Stage 1: Bleeding
The first stage, occurring within minutes to hours following articular surgery or trauma, is caused by bleeding, that may result in distension of the joint capsule as well as swelling of the periarticular tissues.
Depending on the single joint, a capsule achieves the maximum potential volume at a certain joint angle. In a knee, the maximum capacity of a joint capsule has been found to occur at approximately 35° of flexion; in the elbow, it happens at 80° of flexion. Any attempt to flex or even extend the hip joint beyond its position of maximum capacity, when the joint and/or periarticular tissues are markedly swollen, originates extremely high hydrostatic pressures within joint & periarticular tissue as well. Associated with these high pressures are severe pain and a marked improvement in resistance to hip movement. Immediately following injury or even surgery to the hip joint, the natural tendency is to hold the joint in the position of maximum articular volume to minimize painful stretching of the joint capsule & the pressure of the intra-articular hematoma as well.
Stage 2:- Edema
The second stage of hip joint stiffness, which occurs while the next few hours or even days, is very similar but progresses less rapidly. It mainly happens due to the edema, caused by inflammatory mediators which are released by the platelets & dead and injured cells as well.
These mediators cause nearby blood vessels to dilate and leak plasma, resulting in swelling of periarticular injured tissues, thereby diminishing their compliance. With swollen & less compliant tissues surrounding a hip joint, it becomes physically more difficult to move as well as motion becomes more painful. Up to this point, stiffness, & loss of periarticular tissue compliance, are simply owing to the accumulation of the fluid. In the next two stages, fluid is replaced by extracellular matrix deposition, marking a significant transition within the area.
Stage 3:- Granulation Tissue
The third stage consists of the formation of the granulation tissue of the affected area. It happens during the first few days or even weeks following trauma or even surgery. Granulation tissue is the highly vascularized, loosely organized tissue with the material properties somewhere between the highly organized blood clot as well as loose areolar fibrous tissue. As this granulation tissue looks within & surrounding the hip joint, the stiffness previously because by fluid accumulation becomes increasingly due to the deposition of the solid extracellular matrix.
Stage 4:- Fibrosis
The fourth or can say the last stage of stiffness represents fibrosis. During this phase, the granulation tissue matures, forming dense, and rigid scar tissue. Scar tissue has a high concentration of collagen type I fibers in the extracellular matrix of the body.
What causes stiff hips?
- Stiffness of the hips may be the result of a short-term injury or part of a chronic, debilitating condition of the body.
One type of injury that may happen is a labral tear. A labrum is a type of cartilage, & it covers the hip socket.
The patient also may experience hip stiffness after exercising owing to tight hip flexor muscles. The flexor muscles are the collection of muscles that may lift the knees while bending at the waist. Tight hip flexor muscles are usually a temporary condition of the stiffness of the hip. - Other very famous chronic conditions associated with hip stiffness include:
- Ankylosing spondylitis, the type of arthritis that causes pain as well as stiffness in the spine
- Juvenile idiopathic arthritis (JIA)
- Osteoarthritis (OA)
- Rheumatoid arthritis (RA)
- Certain types of bursitis (inflammation of the fluid-filled sacs around the joints), namely inflammatory bursitis as well as trochanteric bursitis
- Legg-Calve-Perthes disease, the condition that cuts off blood supply to a top of a femur
- Lyme disease
- Tendinitis
- Avascular necrosis of the hip joint
A hip fracture or even dislocated hip joint will not cause hip stiffness, but they are considered medical emergencies. The patient should seek immediate medical treatment if he or is in intense pain as well as if he/she suspects a fractured or dislocated hip.
A sedentary lifestyle may lead to tight hip flexors as well as hip flexor pain. It is due to the fact that excessive sitting causes the muscles to relax and deactivate as well. It becomes progressively weaker & shorter, sometimes causing the painful condition called adaptive shortening. - Tight hips may also be caused by:
Standing after long periods of sitting,
The tipped pelvis creates a structural imbalance,
Postural habits such as leaning over into one hip or even leaning forward into both hips when standing,
Sleeping all night on the same side of a body,
Having one leg longer as compared to the other,
Tight hips can also flare up when the patient performs lower body exercises, namely squats as well as deadlifts. - Many conditions may cause the symptom of hip joint stiffness.
- Joint damage: Abnormal fusing, as well as stiffening of the joint, may happen because of the body’s attempt to protect it after damage. Injury or even disease processes may cause this to happen in the hip.
- Cartilage wear or destruction: Destruction of cartilage lining a joint may occur owing to,
- Wear-and-tear: It is especially likely if there is some slight malformation of a hip joint that predisposes it to wear.
- Inflammation: It can be caused by any of several types of autoimmune diseases.
- Damage to the hip bursa: A hip joint is formed by a ball at the top of a thigh bone that fits into the socket of the pelvic bone. Outside of the ball has the tendon, the iliotibial band, running down it. There is the bursa, or even cushion, under an iliotibial band.
- Injury: An bursa can become injured through direct trauma, leading to the condition called bursitis.
- Tight iliotibial (IT) band: A bursa is pressed against the bone, causing inflammation, pain, & difficulty moving. Prolonged sitting & the lack of fitness may leave a band short as well as tight instead of stretched and flexible as well. Pain, as well as stiffness, may travel to the knee, where an iliotibial band attaches at its other end.
- Rare and unusual causes
Some rare causes of hip joint stiffness can include the following: - Down syndrome: Tightness, as well as tension in the hips, can be compensated for muscle weakness commonly found elsewhere in the body in individuals with Down syndrome.
- Inflammation from unknown causes: Sudden, severe inflammation of hip joints & muscles may even sometimes spread to the neck & shoulder.
- Tumors: The cancerous growth within the hip joint can cause swelling as well as stiffness.
What are the symptoms of stiff hips?
- Hip stiffness is a feeling that the hip joint does not move as easily as it once did, as well as it is generally painful. The patient may feel as if the hip is clicking or even popping as the patient moves the hip.
The range of motion can also be affected. Sometimes hip stiffness can make the patient move more slowly compared to the patient used to. - Common characteristics of hip joint stiffness
- Difficulty with motion: The patient may have trouble forcing the hip joints to flex or even move, especially after sitting or even lying down for a while.
- Varying pain levels: Pain can range from mild to severe, as well as can be felt in the groin and thigh as well as the hip.
- Inflammation: Heat & swelling in the affected hip joint may happen.
- Spreading symptoms: Other joints, especially the neck as well as back, can also be affected.
- Pain with exercise: The pain can be severe enough to interfere with walking, but it may worsen after resting as well as improve with mild exercise. Even though, heavy exercise usually causes pain as well.
- Hip joint swelling,
Bruising,
Redness,
Numbness or tingling,
Instability,
Burning pain,
Inability to bear weight on the affected hip,
Stiffness,
Weakness.
Duration of the symptoms
- The hip joint stiffness can be short- or long-term depending on the patient’s condition’s causes.
- Acute form: If there is a sudden severe injury, the pain will occur immediately as well as stiffness will continue after healing.
- Chronic form: Symptoms come on gradually, following the minor injury or even the onset of disease, as well as can continue for years with little change even when treated.
Who is most often affected?
- Individuals who are most likely to experience hip stiffness include the following:
- Individuals who have had a hip joint injury or even disease,
- The crowd who have had the total hip replacement,
- Anyone over the age of 50 years,
- The person with Down syndrome.
When is it most likely to happen?
- Hip joint stiffness is more likely to happen in the morning or even after getting up if the patient was seated for a long time.
Stiffness of the hip is a serious condition?
- Hip joint stiffness can vary in severity depending on the cause.
- Not serious: Mild stiffness which happens after heavy exercise. However, going away after a day or even two of rest is not serious.
- Moderately serious: Improving pain as well as stiffness, even with the treatment indicates a moderately serious condition.
- Serious: Any type of suspicion of a hip fracture is considered serious.
How are the stiff hips diagnosed?
- The doctor may diagnose the stiff hip by taking the medical history, performing a physical examination, as well as taking imaging scans.
- The medical history mainly involves the following:
- Various medical conditions a patient has been diagnosed with,
- Any recent falls or even injuries,
- A detailed description of the hip joint stiffness,
- A review of other symptoms,
- While the physical examination, the doctor will perform the following actions:
- Look at the skin surrounding the hip joint,
- Touch a joint to determine tender areas as well as the range of motion of the hips,
- Examine the patient for any difficulties or even deformities while he/she walks.
Diagnostic test:
- X-ray:-During the X-ray, a small amount of radiation passes through the patient’s body to produce images of the bones of the entire hip joint and surrounding areas. This is the best for finding bone fractures.
- Magnetic resonance imaging (MRI):- Magnetic resonance imaging(MRI) uses radio waves and a strong magnetic field to produce detailed cross-sectional or 3-D images of the soft internal tissue of the hip joint, including ligaments, muscle, and bursae.
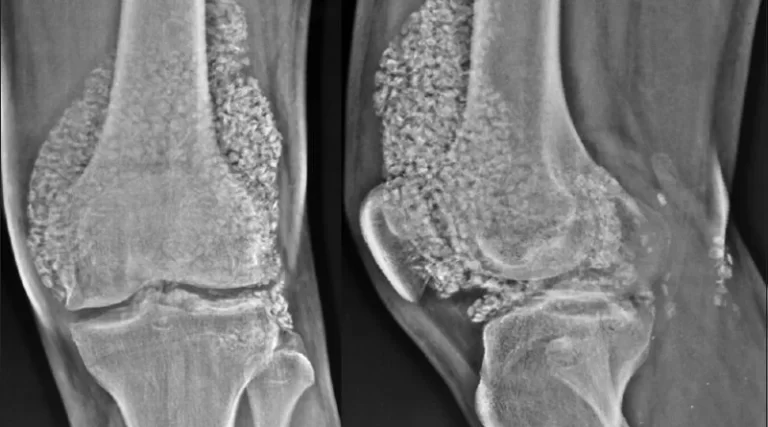
- Computed tomography scan:- Through computed tomography scans(CT SCAN) the doctor can get more detail regarding the bones of the hip joint. CT scan takes X-rays from many angles and mixes them to make cross-sectional or even 3-D images.
- Ultrasound(US):- An ultrasound uses sound waves to produce images of the hip. These images can help the doctor to find out the condition of the ligament/tendon when the hip is in different positions.
Some special tests to determine the stiffness of the hip
When the hip flexors are tight the chances of getting stiffness at the hip may have high, so to check the tightness of the hip flexors,
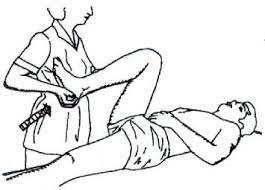
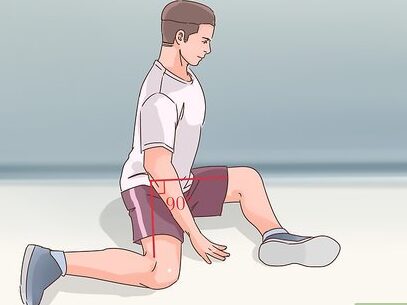
Thomas test:
The simple way to assess flexibility and mobility of the hip flexor muscles is called the Thomas test:
First of all, the therapist should give the instruction to the patient that lies on the back on the ground, a bench, or another stable, flat surface. After that, bring both knees to the chest, and hold the unaffected knee against the chest. Then, straighten the affected leg.
Lower the affected leg as far as possible. Hip flexors are considered tight if either leg cannot completely lower to a surface the patient is lying on.

Treatment
Treatment for the stiff hip mainly depends on the underlying cause.
Arthritis of the hip is typically treated with anti-inflammatory pain medications as well as physical therapy. The doctor can also recommend total hip arthroplasty.
Examples of at-home treatments for the stiff hip include:
Applying heat or ice to the injured hip with the covering to prevent burns or even frostbite, performing physical or/and occupational therapy exercises at home to improve mobility of the affected joint, resting the affected or even painful hip joint, stretching the affected hip muscles to decrease tension.
What can you do to assist, prevent or decrease the risk of tight hips?
- It can not be possible to prevent tight hips, but you may decrease the risk for hip pain: Get up as well as move around every hour or even so if the patient sits at the desk for long periods of time.
- Warm-up properly before doing any heavy workout.
- Stretch meaning do cool down exercise at the end of every workout.
- Stretching as well as massage may also decrease the risk of muscle tightness as well as pain.
Medical treatment
- Taking anti-inflammatory medications, such as naproxen (Aleve, Naprosyn) as well as ibuprofen (Advil, Motrin), may also alleviate pain.
- The doctor may prescribe stronger medications if these managements are not enough to reduce hip stiffness. These include prescription-strength nonsteroidal anti-inflammatory drugs (NSAIDs), painkillers, and steroids to decrease inflammation as well.
- Cortisone shots are also present to reduce hip stiffness.
Physiotherapy treatment
Massage therapy to reduce stiffness
Massage therapy is an age-old method that uses both stretching & pressure in the rhythmic flow. It helps in decreasing tension in specific hip muscles which have built up owing to injury or even stress. Massage therapy assists a patient to get the blood flowing which speeds up the recovery process at any level in the lower back or hip.
Massage assists to relieve tight hips by:
Stretching tissues that cannot be reached by foam rollers, breaking down scar tissue of the affected hip, improving blood flow to tissues,
releasing endorphins to decrease pain, relaxing a muscle through heat generation as well as circulation.
Some benefits of massage:-
Decreasing stress and increasing relaxation as well.
Reducing pain as well as muscle soreness and tension as well.
Increasing circulation, energy, & alertness.
Lowering heart rate as well as blood pressure.
Increasing the immune function of the body.
Effleurage (Stroking) technique
The hands of the therapist are passed rhythmically and continuously over a patient’s affected hip joint part, in one direction as well as straight only, with the aim of improving blood flow in that direction, stretching tissues, relaxing the patient as well as helping the dispersal of waste products. The technique mainly involves the stroking movement of the hands sliding over the skin of the hip & is always the first and last technique applied in the massage session. Effleurage may be used with varying tempo and pressure according to the stage of the situation & whatever the desired effect of the massage is.
Petrissage (Kneading) technique
Affected hip joint skin is lifted up, pressed down and squeezed, pinched, as well as rolled. Alternate squeezing, and relaxation of the tissues, stimulate a local circulation which can have a pain-relief effect with some muscular disorders. A basic movement is to compress, pick up, and after that release soft tissues. It is generally used when the deeper effect as compared to effleurage is wanted, and it is techniques include:
- Squeezing
To begin with, the clinician tells a patient to take a comfortable position, supine or even sitting. After that, a physical therapist applies the squeezing technique, a circular hand stroke is used for the whole hip for this technique uses a circular motion. A physical therapist will bring a tissue between a patient’s two hands lifting it up and away from the body as well. - Picking up
To start with, the therapist gives a command to a patient that takes a comfortable position, after that picking up, the technique applies equal pressure on the sides of the tissue & lifting it away from the body. The hands of a physical therapist are parallel to a limb being treated to avoid hyperextension of the outer hip. - Shaking
A vibration or even shaking massage technique is a fine, gentle, trembling movement performed with hands or even fingers. Shaking can be used to stimulate soft tissues in a body. Vibration motions can assist stimulate nerves, reduce muscular tension, and reduce stress. The technique is performed by the hand, a physical therapist should put one hand on another hand as well as place it on the affected side during stroking gives vibrations. - Rolling
A skin rolling technique is performed using a thumb and fingers to pull the skin away from the tissue. This is then rolled forwards in constant motion to assist separate it from being stuck in muscle. Skin rolling may be used around areas of the scar tissues to assist break them down. - Wringing
The wringing consists of lifting and squeezing the muscle forwards as well as backward movement. Wringing is used to treat tight muscles, for relaxation, and as part of the post-event massage. The benefits of a technique are relief of tight muscles, reduced stiffness, and improved recovery.
Passive range of motion exercise
- Passive hip as well as knee flexion and extension
To embark with, a physical therapist tells the patient to take a comfortable position, like supine. Then, cradle the leg by placing the one hand under the bent knee and, the other hand grasp the heel for stabilization. Lift the knee & bend it toward a chest, with a kneecap pointed toward the ceiling. Do not allow a hip to twist during performing the motion. The foot should stay in a straight line with the hip and not swing in or out. After that, a leg is lowered to the starting position. Do it ten times in a session. Do three sessions in a day.
- Passive hip rotation
To start with, a clinician should tell a patient to take a relaxed position, such as supine. After that, place one hand on a thigh & another hand just below the knee. Next, bend a knee halfway to the chest so that there is a 90-degree angle at the hip and the knee. Then, pull the foot toward a patient & then push it away. However, remember that do not go beyond a point of resistance or even pain. Lower leg to the beginning position.
OR another way to do this exercise
Support a leg under the knee and the heel. Next, bend the knee halfway to the chest so that there is a 90-degree angle of the hip & knee as well. After that, push the foot away from a body, as well as pull the foot toward a patient side. - Passive hip abduction
First of all, the patient can take a relaxed position when the therapist tells him/her, such as supine. Next, a physical therapist cradles a leg by placing the hand under the knee and holding it. After that, place the other strong hand under a heel to stabilize a hip joint. Then, keeping a knee straight, move a leg along a surface of the bed, away from the other leg, to around 45 degrees. After that, bring a leg back to another leg. - Passive hip external rotation
To embark with, a physical therapist should tell a patient to take a relaxed position, namely supine with a back supported. Next, a clinician grasps a knee that is 90 degrees flexed with a hip at 90 degrees flexion. The therapist rotates a leg outside as well as holds that position for five to six seconds. Do ten repetitions in a session. Do three sessions in a day. - Passive hip internal rotation
First of all, a physical therapist tells the patient to take a comfortable position, like supine with a supported back. After that, the therapist grasps a knee that is in 90 degrees of flexion position with a hip at 90 degrees of flexion. The clinician rotates the leg inside as well as holds five to six seconds. Do ten repetitions per session. Do three sessions per day. - Passive hip flexion
To embark with, a physical therapist should tell a patient to take a comfortable position, namely supine. Next, a physical therapist holds the backside of a thigh with one hand as well as an ankle with the other hand. Next, a clinician raises the leg as far as possible with the straight knee. Do it ten times in a session. Do three sessions in a day. - Passive hip extension
To start with, the physical therapist should tell the patient to take a comfortable position, like supine. After that, the physiotherapist holds the backside of a thigh with one hand and the ankle with the other hand. Then, the clinician places the raised leg back with the straight knee on the bed. Do it ten times per session. Do three sessions per day.
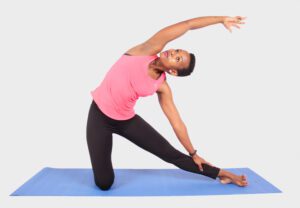
Stretching exercises
How does the patient know if the hips are tight?
- Pain, as well as discomfort from tight hips, is normally felt in the upper groin region. The patient may also experience lower back pain or even hamstring strains. Tight hips often lead to issues in the low back, knees, as well as sacroiliac joints.
- The feeling of tightness across the hips arrives from tension around the hip flexors. The hip flexors are the group of muscles around the top of the thighs which connect the upper leg to a hip. These muscles allow the patient to bend at the waist as well as raise the leg.
Exercises
- Foam roller stretch
The patient may use the foam roller to loosen up tight hips.
First of all, lie face down, with the foam roller beneath as well as slightly below the right hip. After that, place the left leg to the side with the knee bent at a 90-degree angle. Next, rest the forearms on the floor in front of you to take some of the body weight off of the hip. This will make a stretch less painful. Then, stretch the right leg straight out behind you, with the toes pointed backward as well as the front of the foot flat against the floor. Slowly move backward as well as forward over a foam roller. For the extra stretch, add some side-to-side motion as you roll. Continue for up to thirty seconds. As the patient roll, identify any trigger points, or even points that feel extra tight or even painful. The patient can focus on those areas for about ten seconds to reduce some of the tightness. Repeating with the left hip. Do three repetitions per session. Do three sessions per day. - Kneeling hip flexor stretch
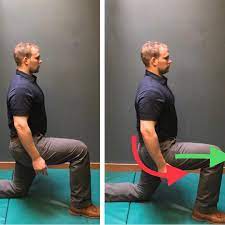
The patient may do this stretch daily to assist loosen the hip flexor.
First of all, kneel on the right knee. After that, put the left foot on the ground with the left knee at a 90-degree angle. Next, drive the hip forward. Maintaining the straight back, lean the torso forward. Hold this position for thirty seconds. Repeat three times with each leg, trying to increase the stretch each time. Do it three times per session. Do three sessions per day.
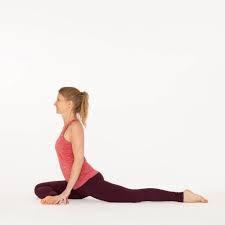
- Pigeon stretch
It can be used daily to increase mobility in the hip flexor.
To begin with, begin on the hands as well as knees in the tabletop position. Then, bring the right knee forward as well as place it behind the right wrist. After that, place the right ankle in front of the left hip. Next, straighten the left leg behind you, making sure the left knee is straight & the toes are pointed. Keep the hips square, and gently lower yourself to the floor.
Stay in this position for up to thirty seconds. Release the position by pushing on the hands, lifting the hips, as well as moving the legs back into the embarking position on all fours. Repeat on the other side too. Do three repetitions per session. Do three sessions per day. - Spiderman stretch
The spiderman stretch may assist warm up the body before the workout, or this can be used on its own or even alongside other hip flexor stretches.
To begin with, the therapist instructs the patient to take a push-up position. Next, step forward with a left foot, bringing it to the outside of the left hand. After that, stretch the hips forward and hold the position for two seconds, then return to the beginning position.
Repeat five times to complete one repetition. After that, repeat with the right leg too. Do three repetitons with each leg per session. Do three sessions in a day.

- Butterfly stretch
It is a great stretch to practice after the workout or if the patient needs a break from sitting in the chair.
To do this exercise, the person may sit on the ground with both legs straight out in front of you. After that, bring the soles of the feet together, & then move the heels as close to the body as the patient can. Next, lean forward with the straight back, as well as push on the thighs with the elbows for a deeper stretch. Hold the position for thirty seconds in one repetition. Do three repetitions per session. Do three sessions per day. - Horizontal squat stretch
This stretch may assist to loosen the back muscles.
To perform the stretch, the therapist instructs the patient to sit on the floor with the elbows as well as the knees 90 degrees flexed. After that, walk the knees as far apart as the patient can as well as lengthen the spine. Next, lower the upper body onto the forearms as you draw the hips back & down. Hold it for up to 30 seconds. Perform three repetitions per session. Do three sessions per day. - Sitting stretch
This is a great stretch to try at the desk if the patient work in the office. The patient may also do this while watching television or riding in a car or even on an airplane. to start with, sit on the chair with the back straight. After that, place the right ankle on the left knee. Next, fold the torso forward until the patient feels a gentle stretch. Hold the position for up to thirty seconds. Repeat on the other side also. Do three repetitons per session. Do three sessions in one day.
- Lying Hip Rotations
This exercise begins the sequence as the easy first motion to warm up as well as build toward the rest of the series.
Key Points:
First of all, lie on the back with both knees bent. After that, cross one ankle over the opposite knee, and move in as well as out of the stretch by rotating the hip in & out. Next, For the hold, use the hand for assistance to press into the knee. Hold for thirty seconds per repetition. Do three repetitions per session. Perform three sessions per day.
Modified Version: Sitting on the chair or bench, elevating the legs onto the stool or even chair (the higher a surface, the more challenging it will be), & externally rotating one leg at a time. Next, play around with crossing one ankle over another leg & externally rotating from the described position. The patient can have the bottom leg bent fully, or straightened a bit more. - Piriformis Stretch
This stretch targets the piriformis (thus the name!), which is a small muscle located deep in a buttock. The muscle tends to get pretty tight from sitting all day.
Key Points:
To embark with, cross one leg fully over an opposite leg, so the knee is crossed over the thigh. After that, pull the crossed knee toward the opposite shoulder, stretching the piriformis muscle. Hold this position for 30 seconds. Do it three times in a session. Perform three sessions per day.
Modified Version: Sit on the chair with the leg bent (as much or as little as needed for the comfort) on the stool or even on the chair, next, cross the other leg over the bent leg. Rotate the chest toward the knee, pulling the body toward the crossed knee. If it is too difficult to do this with one leg crossed over the other, the patient can just elevate one leg onto the stool or even chair and do the same movement.
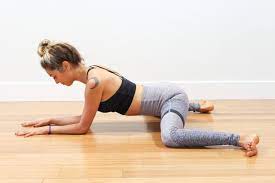
- Frog Hip Stretch
At this point in a sequence, the patient is ready for a bit more intensive stretching for the hips, adding some more weight bearing into the exercise. So, take it slow as well as easy & do not force the range of motion the patient may not be ready to achieve. An action here as the patient move in as well as out of the stretch is squeezing the knees together as the patient rock backward & relaxing as he/she rocks forward. After ten repetitions, the patient can sit back as well as relax into the stretch for upwards of thirty seconds. Do three sessions per day.
Key Points: Start on hands & knees, bringing the knees as far apart as is comfortable. After that, rock back & forth in that position. Next, keep the balls of the feet on the floor, with toes pointed outward.
Modified Version: Similar to a butterfly stretch, the patient will start sitting in the chair with the feet up on the chair with the knees splayed outward. This time, though, the feet will not be touching, & the patient will focus on leaning back so that he/she can open the groins as much as possible. - Kneeling Lunge Stretch
The exercise is somewhat deceptive in terms of how it can affect the hips.
The patient may need some trial & error to find the best front foot positioning, which happens when the shin is upright when the patient leans forward, rather than being angled down or even back. Keep the hips square as well as the upper body tall, & the patient will be in the right position. Do not be afraid to adjust a back leg positioning to get the most out of the stretch to release the hip flexors.
Key Points: Get into the lunge position, with a knee as well as a foot about hip-width apart from the elevated leg. After that, keep the chest tall as well as the hips square. Next, to make the stretch harder, the patient can pull the back knee up off the floor.
Modified Version: Sit with just one leg supported by the chair, with the other leg bent behind the patient’s body, then keep the knee lifted off the floor if he/she can, and try to square up the hips as much as he/she can. Emphasize opening the rear hip flexor by squeezing the rear glute. - Traveling Butterfly
The movement goes from long sitting (on the buttocks with the legs straight out in front) to the butterfly stretch position.
It is meant to be a dynamic movement, and the patient will not hold any position here for more than a few seconds. This is a great way to increase circulation as well as get the hips moving after the stretching the patient did in the last five moves.
Key Points: Sit on the butt with feet straight in front of the patient’s body(long sitting). After that, use the hands to push the hips forward toward the heels, so the patient will wind up in the butterfly position. Next, move between the long sitting & butterfly positions. - Squatting Internal Rotations
This is another dynamic motion such as the traveling butterfly, which puts toward the end to encourage blood flow as well as circulation after all the previous stretches.
Do not hold the end position very long at all. Just keep moving as well as give yourself some time to work through the motion.
Key Points: First of all, start in a deep squat position (as deep as the patient can go). After that, rotate one knee inward, down toward the floor. Next, this stretch can be done sitting on a small stool if the patient cannot get into a comfortable squat position.
Modified Version: For this modified exercise, the patient will use the chair (or any sturdy object that is the right height for you) to support the patient as you lower into the squat. Then go through an internal rotation during holding on for support. This way the patient can adjust the depth as well as a range of motion as much as the patient needs to.
- Pigeon Stretch
The pigeon stretch is another classic stretch that can assist the patient work on, not just the hip mobility, but also the hamstring as well as spine flexibility.
Key Points: First of all, start with the front knee bent to a 90-degree angle. The back knee can be as bent or extended as is comfortable for the patient. Next, rotate the back hip toward the front heel, & then toward the back foot. After that, keep the chest up tall, & only bear as much weight as the patient can comfortably.
If he/she feels comfortable with the knee bent, the patient can work on straightening out the back leg into the full pigeon pose.
Modified Version: Sitting on the chair, lift one leg up onto another chair with a knee bent in front of the patient’s body, allowing the rear leg to fall comfortably to the side. Use as many supports as he/she needs to make the front leg as comfortable as possible. Lift the chest as well as a hinge from the hips to lean forward toward the front leg. - Knee lift
To perform knee lifts:
Lie on the back, extending both legs flat along the ground. After that, keeping the left leg straight, pull the right knee up toward the chest. Next, place both hands on top of the knee to assist pull it in toward the chest. Hold this stretch for thirty seconds.
Let go of the knee as well as gently lower the leg back toward the ground. Repeat the exercise three times on each knee in one session. Do three sessions per day. - External hip rotation
To do external hip rotations:
Sit on the ground with both legs out in front. Next, bend the legs at the knees as well as press the soles of the feet together. After that,
place the hand on top of each knee & gently push them both down toward the ground. Apply pressure to the knees till there is the stretch, but do not push it further than is comfortable. Hold the stretch for thirty seconds. Repeat the stretch three times per session. Do three sessions in a day. - Double hip rotation
To do double hip rotations:
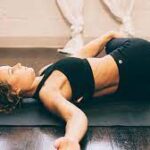
Lie flat on the back. After that, bend the knees & bring them toward the body till the feet are flat on the ground. Next, gently rotate the knees to the left, lowering them toward the ground. Then, rotate the head to face the right during keeping the shoulders against the ground. Hold the position for thirty seconds. Slowly return both the head & knees to the embarking position. Do three repetitions per session. Perform two sessions per day. - Hip as well as lower back stretch
To do hip & lower back stretches:
Lying flat on the back, bend the knees as well as bring them toward the body till the feet are flat on the ground. After that, using the hands, pull both knees in toward a chest. Next, breathe deeply, pulling the knees closer to the shoulders with each exhalation.
Go as far as is comfortable, and then hold it for 30 seconds. Perform three repetitions per session. Do two sessions per day. - Hip flexion in standing
To do hip flexions:
Stand upright first. After that, extend one arm out to the side & hold on to the sturdy surface, namely a wall, table, or even chair, for support. Slowly raise the right knee to the level of the hip or as far as is comfortable during keeping the left leg straight. Only hold the position for thirty seconds before placing the left foot back on the ground. Do three repetitions per session. Perform two sessions in a day. - Hip extension
To do hip extensions:
Stand upright with the legs straight as well as the feet shoulder-width apart. After that, extend both arms out in front as well as hold on to the chair, table, or wall for support. Next, keeping the right leg straight, lift a left leg backward without bending a knee.
Lift the leg as long as possible without causing discomfort, clench the buttock tightly & hold the position for thirty seconds. Repeat the stretching three times on each leg in a session. Do three sessions in a day. - Knee lift
To do knee lifts:
Lie on the back, extending both legs flat along the ground. After that, keeping the left leg straight, pull the right knee up toward the chest. Next, place both hands on top of the knee to assist pull it in toward the chest. Hold this stretch for thirty seconds. Let go of the knee as well as gently lower the leg back toward the ground. Repeat the exercise three times on each knee in one session. Do three sessions per day. - Hip abduction
To do hip abduction exercises:
Stand upright. After that, extend the left arm out to the side as well as hold on to something solid, namely the chair, table, or even wall. Starting with the feet together, lift a right leg out to the right side. Next, keep the left leg straight as well as avoid rotating the hips. Then, hold the position for thirty seconds as well as then slowly return the leg to the embarking position. Do it three times on one leg, then repeat it on the other side in a session. Do three sessions per day. - Heel-to-buttock exercise
To do heel-to-buttock exercises:
First of all, stand upright with the legs straight as well as the feet shoulder-width apart. For support, hold on to the chair, table, or even wall. Next, bending the left knee, bring a heel up toward the left buttock with the top of the foot facing the ground. Be sure to keep the right leg straight as well as align the knees. Slowly lower a leg and return to the beginning position. Do it three times per session. Do three sessions per day. Hold this stretch for 30 seconds.
- 90/90 Stretch
Sit with the right knee bent at 90 degrees in front of the face, calf perpendicular to the body as well as the sole of the foot facing to a left. Keep the right foot flexed. Next, let the leg rest flat on the ground. Place the left knee to the left of the body, as well as bend the knee so that the foot faces behind you. Keep the left foot flexed. Then, keep the right butt cheek on the ground. Try to move a left cheek as close to the floor as possible. It can not be possible if it is super tight. Hold for 30 seconds. Do three repetitons per session. Perform two sessions per day. - Figure Four Stretch
First of all, lie on the back. After that, cross the right foot over the left quad, as well as bend the left knee. Then, hold the back of the left leg as well as gently pull it toward the chest. Next, when the patients feel comfortable stretch, and hold them there. Switch sides as well as repeat. Stretches hips, glutes, lower back, hamstrings. Hold thirty seconds in one repetition. Do three repetitions per session. Do three sessions in a day. - Reclining Angle Bound Pose
Lie on your back. Bring the soles of the feet together as well as allow the knees to open up & move closer to the ground.
Hold for 30 seconds. Stretches inner thighs, hips, and groin. Do it three times per session. Do two sessions per day. - Cow Face Pose
From all fours (tabletop position), cross the right knee in front of the left knee, so the knees are in one line. Widen the knees so that the patient can sit the hips down on the mat in between the feet. If one of the hips is higher as compared to the other, sit on the block or the blanket.
The patient can remain sitting upright if that is enough stretch for the hips. If the patient feels he/she can go deeper, fold the body forward over the thighs & reach the arms out in front of the face, pressing the palms into the mat as pictured. If the patient does fold forward, he/she may want to rest the forehead on the block in front of the knees. Hold for at least 5 breaths as well as then repeat on the other side. Stretches an outer hip (abductor) muscles, including the gluteus medius. Do ten repetitions per session. Do three sessions per day. - Three-Legged Dog
This version of downward facing dog assists activate the hips more, Atkins says. The patient may also bend a knee of an extended leg, bringing the foot to the butt, as well as circle the leg from a hip to make the stretch more active.
To begin with, start in a downward-facing dog with the feet hip-width apart, hands shoulder-width apart, fingers facing forward, as well as the hips pushed up into the air. Then, the head should be between the arms, facing the lower body. Next, lift one leg off the ground as well as extend it high, straightening the knee as much as the patient can. Alternate between pointing as well as flexing the foot to vary the stretch, Atkins suggests. Hold for 30 seconds. Switch legs as well as repeat. Stretches hips, shoulders, hamstrings, back. Do three repetitions per session. Perform three sessions per day. - Kneeling Side Bend Stretch
Kneel on the ground with the legs together, back straight, as well as core tight. After that, extend the left leg out to the side. Keep it perpendicular to the body (not in front or behind the patient herself). Next, extend the right arm overhead, rest the left arm on the left leg, as well as gently bend the torso & right arm to the left side. Keep the hips facing forward. Hold this stretch for 30 seconds.
Repeat on the other side also. Stretches groin, hips, inner thigh, and obliques. Perform three repetitions per session. Do three sessions per day.
- Lunging Hip Flexor Stretch
Kneel on the right knee. Place the left foot flat on the ground in front of you, knee bent. Then, lean forward slightly, stretching the right hip toward the ground. Next, squeeze the butt; this will allow the patient to stretch the hip flexor even more. The patient should feel this in the right hip flexor. Hold for 30 seconds. Do three repetitions per session. Perform two sessions per day. Switch sides and repeat. - Lunging Hip Flexor Stretch With Rotation
Kneel on the left knee. Place the right foot flat on the ground in front of the patient, knee bent. Next, lean forward, stretching the left hip toward the ground. Then, squeeze the butt; this will allow the patient to stretch the hip flexor even more. After that, rotate the torso open to the left. If he/she can reach the hands down to the floor, keeping the chest lifted to deepen the stretch. Hold for 30 seconds. Do three repetitions per session. Do three sessions per day. Stretches hips, quads, and glutes.

- Pretzel Stretch
To embark with, lie on the left side with the head resting on the arm. Next, bend the right knee as well as hip up toward the chest as far as you can, & let it drop to the ground. Then, bend the left knee as well as grab the left foot (use a strap if you can’t reach it) with the right hand. Make sure the leg & torso remain in a straight line as the patient gently brings the top shoulder blade toward the ground. For more of the spinal twist, turn the head to look over the right shoulder. Hold for 30 seconds. Switch sides and repeat as well. Stretches quads, glutes, obliques, hips, as well as back. Perform three repetitions per session. Do three sessions per day. - Twisted Reclined Pigeon
To begin with, lie on the back with the feet flat on the ground as well as arms out to the sides in either the T or even cactus arms. After that, cross the right foot over the left quad. Then, lift the left leg off the ground. Grab onto the back of the left leg as well as gently pull it toward the chest. Next, let the legs fall down to the left side, keeping the right foot just above the left knee. Try to keep the shoulder blades on the ground as well as hips as square to the roof as possible. Hold for 30 seconds. Switch sides and repeat too. Stretches hips, glutes, and lower back. Do three repetitions per session. Do three sessions per day. - Cobra Pose
Lie on the stomach with the hands underneath the shoulders, and elbows pointing straight behind you, palms flat on the floor, and the big toes touching each other. After that, lightly press the feet into the ground. This is the beginning position.
Inhale, then exhale and pull the belly button towards the spine. Next, inhale again as well as press through the palms to lift the chest off the ground. Pause when there is just a slight bend remaining in the elbows; do not straighten the arms completely. Depending on the flexibility, at this point, the patient may feel the stretch through the chest, the front of the shoulders, and/or the front of the hips.
Keep the eyes slightly up at about a 30-degree angle. The shoulders should be pulled down as well as away from the ears.
Hold for thirty seconds, then return to the embarking position. Continue for 30 seconds. Do three repetitions per session. Do three sessions per day. Stretches hip flexor, chest, as well as spinal muscles. - Standing Quad Stretch
Grab the left ankle with the left hand as well as pull it toward the butt. The patient can raise the right hand toward the roof or even keep it to the side. The patient should feel the stretch in the left quad.
Hold for 30 seconds. Repeat on the other side also. Stretches the quads. Do three repetitions per session. Do three sessions per day.
Hip Mobilizations
There are many types of manual techniques used to improve joint play/joint range of motion of the hip complex. Several of these methods are. Hip mobilizations can also be beneficial for people with hip osteoarthritis, stiffness of the hip joint, septic arthritis, and many more.
- Anterior Glide
The patient is positioned prone with the knee bent. Then, the physical therapist supports the knee with one hand, whereas the opposite hand is placed on a posterior portion of the proximal femur on the involved side. A mobilizing hand imparts the glide directly perpendicular to a long axis of the femur bone. A femur can be placed into varying degrees of abduction or even rotation depending on the desired effect. As with other glides, the described glide may be performed in other positions. Anterior glide is used to improve joint play as well as capsular stretch to encourage external rotation and extension range of motion. - Posterior Glide
The patient is positioned supine, the knee is supported by stabilizing the hand as well as the mobilizing hand is placed on the anterior portion of the proximal femur bone. Using the heel of the hand, the posterior glide is imparted directly downward by keeping an arm straight as well as leaning on the trunk. This described technique may be used to improve joint play necessary for internal rotation.
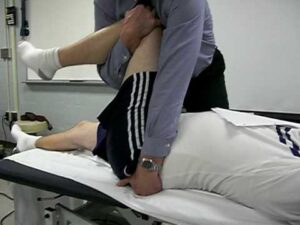
- Inferior Glide
The patient is positioned supine, with hip & knee flexed to 90 degrees. An opposite leg is supported on the clinician’s shoulder in flexion (this described technique can be performed with varying degrees of flexion and/or rotation depending on the desired effect). The inferior glide of a femur is applied through either the hands or the mobilization belt. The technique may be used for capsular stretching as well as to encourage accessory movement necessary for hip flexion and rotation as well. - Hip Distraction with Knee Extended
A patient is positioned supine, with a hip in slight flexion and the knee extended. The belt or even the therapist’s hands are placed firmly around a patient’s ankles (hand position varies depending on the physical therapist’s preference). The distraction of a hip may be produced by a physical therapist leaning backward, producing slight joint gapping at the femoroacetabular joint. This described the technique may be used for reducing muscle spasms or pain, & is also useful to improve accessory joint motion for flexion as well as abduction movements. - Hip Distraction with Knee Flexed
A patient is positioned supine, target leg in “crook lying” hip at a 50-degree flexion, as well as knee at around 100 degrees of flexion. The Sits on the foot, forearm closest to a patient between a thigh as well as the lower leg, hand furthest from the patient rests on the patient’s thigh. Forearm, as well as a hand, pulls towards the physical therapist, distracting a knee. - Lateral glide
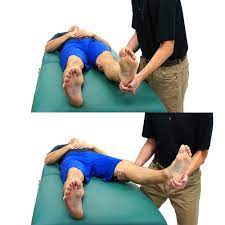
The patient is positioned supine target leg in “crook lying” hip at a 50-degree with Knee in maximal flexion but raised off the plinth. A physical therapist “hugs the target leg” with forearms around a patient’s abductors as well as pulls the leg towards them. - Rotation Oscillations in Crook-Lying
A patient is positioned supine, target leg in “crook lying” hip at a 50-degree flexion, moreover knee at around 100 degrees of flexion position. A clinician places hands around either side of a knee, of the target leg moving into abduction and adduction as well. - Internal Rotation with Knee Flexed
The patient is positioned supine, target leg in “crook lying” hip at a 50-degree. After that, the knee was in maximal flexion but raised off the plinth. A physiotherapist “hugs the target leg” with a caudal forearm around the patient’s abductors, and a ventral hand on the patient’s thigh. Next, internally rotates femur, pulling thigh towards self.
Active-assisted range of motion exercise
- Active-assisted hip extension
Hand placement: A patient lies on a stomach to do a hip extension with straight hands beside the body, the physical therapist supports the patient’s thigh above the knee joint & the ankle. Next, a physiotherapist should give a command to a patient that moves the leg the upside, as well as the therapist, should apply additional support is only needed to assist the patient lift the thigh off of the supporting surface (bed) as well as help the leg back to a bed, in the event the patient fatigues & is unable to independently lower the leg slowly. Next, a clinician should watch for signs of muscle fatigue which includes quivering or shaking muscles around the hip and the increased feeling of weight in an affected limb; additional support may be needed. Do ten repetitions in a session. Do three sessions in a day. - Active-assisted hip abduction
Hand placement: A patient lays on the uninjured hip in a side-lying position, an affected hip is on the top. For comfort, a small pillow can be placed between the two knees. Next, a physical therapist should apply for additional assistance in lifting the affected leg to the side with support above the knee joint and at the ankle, if needed. Remember that, the action is straight up as well as slightly back towards a physical therapist. Then, a physical therapist makes sure that the top hip is rolled forward of the imaginary vertical line drawn straight through both hips, & does not let the patient roll backward at a hip when completing this described exercise.
- Active-assisted hip flexion
Hand placement: The patient lies on a back to perform the hip flexion along with straight knees, then a clinician supports a patient’s thigh above the knee joint & ankle joint. Next, a physical therapist should give a command to a patient that moves the leg upside towards the ceiling, as well as a therapist should apply additional help is only needed for a patient to lift a thigh off the supporting surface & assist the leg back to the bed, in the event a patient fatigues as well as is unable to independently lower the leg slowly. After that, a therapist should watch for signs of muscle fatigue which includes quivering or even shaking muscles around a hip & increased feeling of weight in the affected limb; additional support may be needed. Do three sessions in a day. Do three sessions in a day. - Active-assisted hip internal rotation
Hand placement: The patient lays on a back to perform a hip internal rotation with straight knees, then the therapist supports a patient’s thigh above the knee joint as well as the ankle joint. After that, the operator should give a command to the patient that moves a leg inward towards the other leg side, and the physical therapist should apply for external help, which is only needed to assist the patient to move the thigh inward & help a leg back to the embarking position, in the event the patient fatigues as well as are unable to independently move the leg back slowly. Therefore, a clinician should watch for signs of muscle fatigue which includes quivering or even shaking muscles around the hip and the increased feeling of weight in the affected limb; additional support may be needed. Do three sessions per day. - Active-assisted hip external rotation
Hand placement: A patient lies on a back to do the hip external rotation along with straight knees, next a physical therapist supports the patient’s thigh above the knee joint & ankle joint. After that, the physical therapist should give the command to a patient that moves the leg outward away from another leg, as well as a clinician should apply additional help is only needed for a patient to move the thigh outward & assist a leg back to the starting position, in the event patient fatigue & is unable to independently move a leg back slowly. After that, the physical therapist should watch for signs of muscle fatigue which includes quivering or shaking muscles around a hip & increased feeling of weight in the affected limb; additional help can be needed. Do three sessions in a session. Do three sessions in a day.
Active Hip range of motion exercise
- Active hip flexion with knee flexion
To begin with, the therapist tells a patient to take a supine position. Next, a physical therapist should give a command to a patient that bends the hip as well as knee towards a face side as far as possible without the assistance of a clinician or their own healthy hand. Do ten repetitions in a session. Do three sessions in a day. - Active hip flexion
To start with, a physical therapist should tell the patient to take a relaxed position, namely supine. Then, the therapist gives a command to the patient that raises the hip towards the ceiling side as far as possible without taking the assistance of the therapist or even their own strong hand. Do ten repetitions per session. Do three sessions per day. - Active hip extension
To embark with, a patient takes a relaxed position, namely the prone position. Next, a clinician should tell a patient to raise the leg as far as possible, but without any support from a physical therapist or a patient’s own healthy hand. Do ten repetitions in a session. Do three sessions in a day. - Active hip abduction and adduction
To start with, a physical therapist should give a command to a patient that takes a relaxed position, namely side-lying with the affected leg up. Then, a clinician kindly tells a patient to move the leg up towards the roof as far as possible, but without any external support, and then come back to the beginning position. After that, do ten repetitions in a session. Do three sessions in a day.

- Active hip internal rotation
To begin with, a physical therapist tells a patient to take a relaxed position, namely supine. Next, a physical therapist gives a command to a patient that rotates the leg inward towards the unaffected leg side as far as possible, without any external support. Do ten repetitions in a session. Do three sessions in a day. - Active hip external rotation
To start with, the physiotherapist tells the patient to take a relaxed position, namely supine. After that, the therapist gives a command to the patient that rotates the leg outward away from the unaffected leg as far as possible, as well as without any external support. Do ten repetitions per session. Do three sessions per day.
Strengthening exercise

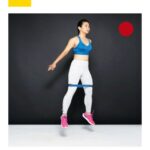
- Frankenstein walk
The exercise works the hips, quads, as well as hamstrings. It also improves the range of motion. Maintain good posture, avoid bending at the waist, & increase the speed as the patient progress.
Instructions:
To begin with, stand with the arms extended in front of the patient, with palms facing down. As a patient moves forward, swing a right leg up to extend it straight out, creating a 90-degree angle with a body. Next, lower the right leg to the ground, then swing the left leg up in the same way. Continue for 10 seconds, changing direction if the space is limited. Once the patient feels comfortable, do the exercise by reaching the arm out to touch the opposite foot, extending the other arm behind you. Do it ten times in a session. Do three sessions per day. - Hip marching
The exercise builds strength as well as flexibility in the hips & thighs.
Instructions:
To embark with, sit toward the front edge of the chair. After that, raise the left leg as high as he/she can, keeping the knee bent. Next, slowly & with control, lower the foot. Then, do the right side. This is one repetition. Do three sets of 12 repetitions in one session. Do three sessions per day. - Sidestep exercise
Keep the hips & toes facing straight ahead. Improve an intensity by lowering the band so it is above the ankles as well as lowering the squat position.
Instructions:
To begin with, stand in a half-squat position with the resistance band around the lower thighs. After that, engage the hip muscles as the patient slowly take small steps to the side. Then, take 8–15 steps in one direction. Do the opposite side as well. Perform ten repetitions with three sets in one session. Do two sessions per day.

- Clamshell exercise
The exercise builds strength in the hips, thighs, & glutes. It stabilizes the pelvic muscles & can relieve tightness in the lower
back, which assists prevent overuse as well as injury. Once the patient becomes mastered the basic pose, check out a few variations.
Instructions:
Lie on the side with bent knees as well as the resistance band around the lower thighs. Next, rotate the top leg up as high as he/she can, then pause for a while. Then, lower to the beginning position. Do 3 sets of 15 repetitions in a session. Do two sessions per day. - Lateral step-up
The exercise works the glutes, quads, as well as hamstrings during stabilizing & strengthening the core. Up the intensity by improving the weight.
Instructions:
To embark, with both hands, hold the dumbbell or even weighted plate in front of the chest. Next, stand with the bench or even box to the right side. After that, bend the knee, as well as place the right foot on the bench. Then, stand up straight, tapping the left foot on the bench. Gradually lower the left foot back down to the floor. Do 3 sets of 15 repetitions in one session. Do three sessions per day. - Single-leg Romanian deadlifts
Improve the balance, hip mobility, as well as core strength with this exercise. It also targets the glutes & hamstrings.
Instructions:
To start with, stand on the right foot with the knee slightly bent. Hold the dumbbell in the patient’s left hand. After that, maintain a normal spine as the patient hinge forward to bring the torso parallel to the ground. Lift the left leg. Next, come back up to standing. Lower the left leg. Do 3 sets of 15 repetitions in one session. Do three sessions per day. - Donkey kicks
Do this exercise to tone as well as strengthen the hips & glutes.
Instructions:
From the tabletop position, lift the right knee, keeping it bent as the patient kicks upward. After that, bring the bottom of the foot toward the roof. Return to the embarking position. Do 3 sets of 12 repetitions in a session. Perform two sessions in a day.

- Side leg raises
The exercise strengthens the glutes as well as thighs. To difficulty, place the weight on the thigh.
Instructions:
To begin with, lie on the right side with the legs stacked. Next, the therapist gives the instruction to the patient to raise the left leg as high as he/she can. Pause here, then return to the embarking position.
Do 2 sets of 12 repetitions in a session. Do three sessions per day. - Single-leg bridge
The exercise works the core, glutes, as well as hamstrings while giving the hips a nice stretch & promoting good posture.
Instructions:
To start with, lie on the back with bent knees as well as the feet in toward the hips. After that, the therapist gives the instruction to a patient that presses the palms into the ground alongside the body. Next, extend the right leg so it is straight. Then, lift the hips up as high as the patient can. Hold this action for ten seconds. Do each side ten times in one session. Do three sessions per day. - Mini squat
Do mini squats:
Forst of all, stand upright with the feet shoulder-width apart. After that, if necessary, hold on to the chair, table, or even wall for support. Next, keeping the back straight, slowly lower a body by bending the knees till they are above the toes. The feet should remain flat on the ground. Hold the position for a few seconds, then slowly straighten the legs to come back to the embarking position. Repeat these mini squats 10 times in a session. Do three sessions per day. - Short-arc quadriceps exercise
To do short-arc quadriceps exercises:
To begin with, lie flat on the back with the pillow or even a rolled-up towel beneath the right knee. After that, slide the left foot back toward the buttock, along with bending the knee. Then, slowly lift the right foot off the ground while keeping the back of a right knee pressed against a pillow or even towel. Hold this action for 5 seconds and then slowly lower the right leg back to the beginning position.
Do 10 lifts on one leg & then switch to the opposite leg. Do two sessions per day. - Quadriceps exercise
To do quadriceps exercises:
Lie flat on the patient’s back & keep the legs straight throughout the exercise. Next, push the backs of both knees toward the ground as well as flex both feet by pulling the toes toward a body. Then, hold this position for ten seconds, then relax. Do 10 repetitions in a session. Perform three sessions per day.

- Bridging
First of all, the patient may lie on the back, bending both legs at a knee & placing the feet flat on the ground. After that, keep the arms by the sides of a body with the palms facing downward. If necessary, place the small pillow underneath a neck as well as head for support. Next, slowly lift the pelvis & lower back upward. Be sure to keep the shoulders as well as the upper body on the ground. Hold the position for ten seconds. Slowly, lower the back as well as pelvis toward the ground, embarking at the top of the spine. Roll down through a spine till the entire back is flat against the ground again.
Repeat this action 10 times in a session. Perform three sessions per day. - Chair stand
Position the chair so that it is back is resting against the wall. Next, sit on the front part of the seat, bend the knees as well as place the feet flat on the ground. Cross the arms, placing each hand on the opposite shoulder. Then, pivoting at the hips, recline back into a chair. After that, lean the patient upper body forward again & then slowly stand up. Keep the patient’s back, shoulders, as well as head straight while doing this. gradually sit back down as well as return to the original position. Repeat it ten times to start with before gradually building up to ten repetitions. Do three sessions of ten repetitions in one session per day. - Abdominal exercise
To do abdominal exercises:
Lie on a back, bending the legs at the knees as well as placing the feet flat on the ground. After that, tuck both hands underneath the lower back. Next, focus on the muscles in the lower abdomen & pull the belly button downward. Hold this for ten seconds & then relax. Repeat this exercise 10 times in a session. Do three sessions per day. - Lunge With Spinal Twist
Begin standing with the feet together. After that, take a big step forward with the left foot, so that the patient is in a staggered stance.
Bend the left knee as well as drop into the lunge, keeping the right leg straight behind the body with the toes on the floor, so the patient feels the stretch at the front of the right thigh. Next, place the right hand on the ground & twist the upper body to the left as the patient extend the left arm toward the roof. Hold for ten seconds. Repeat on the other side as well. Do ten repetitions per session. Do three sessions per day.

- High Crescent Lunge
Take the big step forward with the left foot to start in the staggered stance with the feet almost mat-length apart. After that, bend the front knee & keep the back leg straight as well as the heel lifted off the ground. Try to bend the front leg so that the thigh is parallel to the ground. Square the hips toward the front. Extend the arms toward the roof on either side of the head as well as stretch up as the patient can and also press into the mat & feel the stretch in the hips. Hold for at least 5 breaths & then repeat on the other side. Do ten repetitions per session. Do three sessions per day. - Double Banded Pull Through
Attach a long resistance theraband low to the floor behind the body, he/she can also use the cable. Stand in front of a band with the feet about shoulder-width apart with the looped mini resistance theraband just above the knees. Push the legs apart slightly to actively maintain tension in a theraband & prevent the knees from caving in. Hinge forward at the hips and push the butt back as the patient bend the knees to reach down & grab the long band between the legs. The patient should feel the stretch in the hamstrings as well as glutes.
Keep the chest lifted as well as back flat as the patient stand back up, driving the hips forward & squeezing the glutes at the top. It is one rep. Do 15 reps in one session. Do three sessions per day. - Side Plank With Knee Drive
The dynamic action of a moving leg adds an even greater challenge to a bottom glute working to isometrically hold a body
weight in that solid position. Start in the side plank with the left elbow under the shoulder, legs extended, as well as hips, knees, & ankles stacked. Engage the core, tuck the butt, & make sure the lower back is flat.
Gradually drive the right knee up toward the chest. Pause for a while, & then slowly extend the leg back out to the beginning position. It is one repetition. Do ten repetitions on each leg in a session. Do three sessions per day. - Banded Hip March
Stand upright with the feet about hip-width apart, core engaged, as well as chest lifted, with the looped mini resistance theraband around the balls of both feet. Gradually drive the right knee up & out in front of the patient, stopping when it reaches hip height. (the patient may not be able to lift that high depending on the current mobility.) He/she should feel the hip flexors in the lifted leg working, as well as the glutes on the stabilizing leg working. Focus on keeping the foot directly under the knee, the pelvis level, as well as the standing-leg knee, hip, & ankle in line. Slowly lower the leg back down. That is one repetition. Do ten repetitions on each leg in one session. Do two sessions per day.

- Bulgarian Split Squat
Stand with the back to the bench or even a similar elevated surface. With the left foot on the ground a few feet in front of the bench, place the top of the right foot on the bench, shoelaces down. Hold the dumbbell in each hand by the sides.
Brace the core & bend the knees to lower down into the split squat. The left knee should ideally form a 90-degree angle so that the thigh is parallel to the floor, & the right knee is hovering above the ground. (Quick position check: the left foot should be stepped out far enough that the patient can do this without letting the left knee go past the left toes—if the patient cannot, hop the left foot out a bit farther away from the bench.) Driving through the left heel, stand back up to the embarking position. That is one repetition. Do ten repetitions on each leg in one session. Do three sessions per day. - Step Up to Reverse Lunge
Miranda calls this the “compound combination” move. This is a term as well as a modality that I designed that involves stacking together two distinct multi-joint exercises & combining them into one motion. It is a great way to improve the intensity of the exercise without adding weight, he/she adds. - Stand facing the box, step, bench, or even chair.
Step onto a box with the right foot as well as drive through the right heel & glute to bring the left leg up to meet a right. Let the left foot hover, & keep most of the weight on the right foot. Step back down with the left foot, then step the right foot back about two feet behind the left as well as lower immediately into the reverse lunge. Push through a left foot to stand back up (that is 1 rep) and move right into the next step-up. Do 10 repetitions on each leg. - Dumbbell Sumo Squat
Choose the dumbbell that lets the patient squat with proper form but makes he/she feel fatigued by the end of each set.
Stand with feet wider as compared to shoulder-width apart, toes slightly turned out. Hold a dumbell with both hands at the chest. Bend the knees as well as lower down into the squat. Push through the heels to come back to standing & squeeze the glutes at the top. That is one repetition. Do 10 repetitions in a session. Perform two sessions in a day. - Kickstand Romanian Deadlift
Stand with feet hip-width apart, one foot about six inches in front of another. Place the dumbbell (or kettlebell) next to both feet. A majority of the weight should be in the front leg. Rise onto the toes of the rear foot, using it as the kickstand to assist maintain balance but only putting a little weight on it. Hinge forward at the hips, push the glutes back, & lower the weights toward the ground. Keep the back flat as well as shoulders retracted; don’t round forward or arch the lower back. Press through the front foot to come back to embarking position. That is one repetition. Do ten repetitions on each leg. Do two sessions in a day. - Explosive Sprinters Lunge
Stand tall with the feet hip-width apart. Step the right foot back a few feet into the lunge position. Push through the left foot to explosively jump into the air, driving the right knee toward the chest. Land with a soft knee (it is one repetition) and step back immediately into another lunge. Do ten reps on each leg in a session. Do three sessions per day.
- Banded Jump Squat
Place the looped mini resistance theraband just above the knees. Stand with the feet about shoulder-width apart. Hinge forward at the hips & sit the butt back into a squat. Squat as deep as the mobility will allow, but not further than parallel to the floor. Jump up into the air as high as he/she can & straighten out the legs. Swing the arms down by the sides for momentum, & keep the back straight as well as chest lifted. Land back on the ground with soft knees. It is one repetition. Do 10 repetitions in a session. Do two sessions per day. - Kettlebell Swing
Stand with the feet shoulder-width apart, the kettlebell on the ground in between the legs. Then, hinge forward as well as bend the knees to squat down & grab the kettlebell handle with both hands. Next, swing the kettlebell between the legs, & then stand back up as well as use the momentum from the hips to swing the weight to chest height. Squeeze the butt at the top of the motion. Immediately lower back down as the patient swings the kettlebell between the legs again to embark on the next repetition. Do 12 repetitions in a session. Do three sessions per day. - Lateral Lunge
Stand with the feet together, holding the dumbbell in each hand, arms by the sides. Take a big step (about 2 feet) out to a right. When the foot hits the floor, hinge forward at the hips, push the butt back, & bend the right knee to lower into the lunge. The weights should frame the right knee, as well as the left leg, and should be straight. Pause for a while, & then push off the right leg to come back to starting position. Repeat on the other leg too. That is one repetition.
Do 10 repetitions in a session. Do three sessions per day. - Banded Marching Hip Bridge
Loop the mini resistance theraband around the balls of the feet & lie faceup in front of the bench, chair, or even step. Place the heels on the bench. Push through the heels as well as squeeze the glutes to lift the hips off the ground. Keep the back flat as well as the core engaged. Slowly drive the right knee toward the chest, pause for a while, and then place the foot back on the bench. Repeat with the left leg. That is one repetition. Do 10 repetitions in a session. Do three sessions per day.

3 Comments