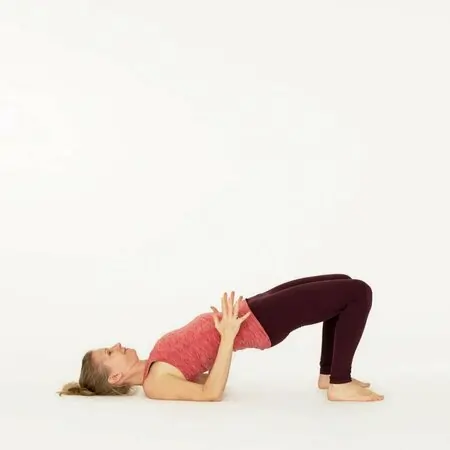
Bridge Exercise Benefits And Correct Technique
Your thigh, core, and glute muscles are worked during the glute bridge exercise. You can keep it enjoyable and engage a variety of muscles by doing it in a new way each time. Common versions of bridge exercises include utilizing only one leg and applying pressure via the toes and heels.
A flexible, difficult, and efficient exercise is the glute bridge. Regardless of your age or level of fitness, it’s a great supplement to any exercise regimen. The posterior chain, or rear of your legs, is the focus of this exercise. Your hamstrings and glutes are the main muscles in your posterior chain.
Most of the force produced by your lower body comes from these strong muscles that run the length of your buttocks. They need a lot of energy to function since they are so strong. Put another way, when you incorporate them with aerobic activities like running and cycling, you burn a significant amount of calories. Those who want to reach physical objectives like getting stronger, lowering weight, or slimming down could find this appealing.
Your lower back strength and core stability can be improved by strengthening your posterior chain. The glute bridge can assist in strengthening the muscles that surround your spinal column when used correctly and with proper form, which enhances your posture.
There is very little room and no equipment needed for this transfer. A place to lie down is all you need. Additionally, it’s a low-impact exercise, which makes it perfect for people who have hip or knee pain.
Table of Contents
Muscles worked:
- Core Muscles (abdominals)
- Glutes (buttocks)
- Hamstrings (back of thighs)
- Lower back Muscles
Benefits:
- Strengthens the core, glutes, and hips.
- Makes it easier to get up from low surfaces like the sofa and move about in bed.
- Promotes good posture and lower back health.
- Improves balance and stability for everyday tasks.
Bridge Exercise Video
Basic Concepts of Bridging
When bridging, one must begin in a supine posture with their feet hip-width apart and their knees bent. After that, the patient raises their pelvis off the ground while keeping their spine in a neutral position and using their abdominal muscles to stabilize their core and spine.
The bridge is very good for improving stability, strength, and flexibility because it stimulates a variety of muscle groups, particularly the trunk muscles and the posterior chain, which includes the glutes, hamstring muscles, and lower back.
There are several advantages to incorporating bridging into your patients’ exercise regimens or treatment plans for a HEP, particularly when it is customized to suit certain functional goals.
The Practical Advantages of Bridging Exercises
Core Strength and Stability:
The basis for functional movement is a robust core. Bridging improves general balance and core stability by activating the deep core muscles, such as the multifidus and transverse abdominis. Maintaining alignment, avoiding falls, and participating in activities requiring controlled movement all depend on this improved core strength.
Hip and Gluteal Muscle Activation:
Bridging works the gluteal muscles, especially the gluteus maximus. Walking, rising up from a seated posture, climbing stairs, and maintaining good alignment throughout various exercises all require strong glutes. Patients can gain more control and power in their lower body by strengthening these muscles, which will improve their functional skills.
Spinal Health:
The erector spinae muscles, which maintain the stability of the spine, are stimulated by bridging. Everyday tasks, such as lifting goods and doing housework, require a sturdy spine. You can encourage a healthy spine and lower the chance of injury while doing daily duties by implementing bridging.
Posture Improvement:
Weak muscles and imbalances cause bad posture in many people. Bridging improves alignment and lowers the risk of musculoskeletal abnormalities by strengthening the muscles that support an upright posture.
Gait and Mobility:
The strength acquired by bridging may improve mobility and gait. A more effective and stable gait pattern can result from strengthening the hip muscles and enhancing core stability, enabling patients to move more confidently and with less effort.
Fall Prevention:
Because bridging improves balance and stability, it is especially beneficial for older individuals. By enhancing movement control and reaction times, strengthening the lower body muscles—particularly the glutes and core—can lessen the risk of falling.
How to Begin the Hip Bridge Exercise
What You Must Start With
All you need is a non-slip mat and enough room to lie flat on your back with your legs bent. A strong bench or a resistance band might provide difficulty if you wish to advance later, but neither is necessary on day one.
Setting Realistic Goals
During the initial session, you should anticipate experiencing glute activation. Gains in strength and endurance are usually seen after four to six weeks of regular exercise. Instead of aiming for daily maximum effort, which raises the risk of injury and hinders recovery, aim for three to four sessions each week. The true force behind advancement is consistency rather than intensity.
Legs pointed outward
You may work the outside of your thighs and glutes with this variant of the classic glute bridge.
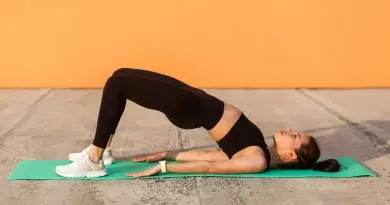
- With your feet level on the floor and your legs bent at a 90-degree angle, begin flat on your back.
- Make sure your knees are facing the same direction as your toes and that your toes are turned outward at a 45-degree angle.
- Push your hips up.
- This variant should cause your outer thighs to become fatigued.
- Throughout the entire exercise, be sure to maintain your knees over your toes. Avoid letting them go over your toes.
- Allow your hips to return to the floor in a deliberate move.
- This concludes one repeat.
- Do three rounds of a 30-second hold or three sets of 15 repetitions.
Legs pointed forward
You may target the inside of your thighs and the glute muscles along your midline by pointing your legs straight forward and keeping your knees close together.
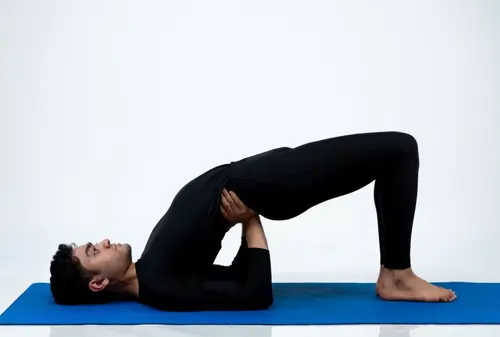
- With your feet level on the floor and your legs bent at a 90-degree angle, begin flat on your back.
- Make sure your thighs are parallel to one another, and your toes are pointing straight ahead.
- Push your hips up.
- The inner thighs should become tired from this version.
- Throughout the entire exercise, be sure to maintain your knees over your toes.
- Allow your hips to return to the floor in a deliberate move.
- This concludes one repeat.
- Do three rounds of a 30-second hold or three sets of 15 repetitions.
Press through the heels
In contrast to pushing down with your toes, concentrating on pressing through your heels as you raise your hips will isolate your hamstring and glute muscles the most.
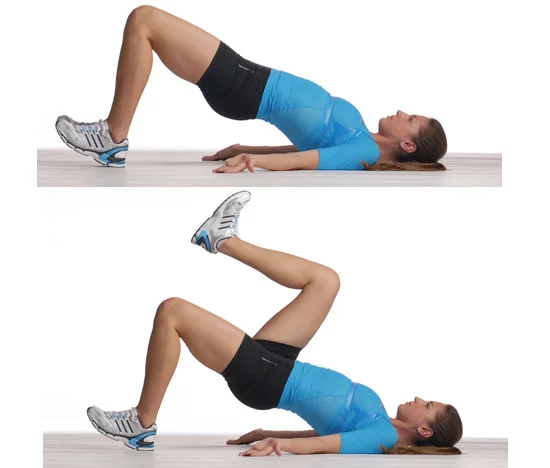
- With your feet level on the floor and your legs bent at a 90-degree angle, begin flat on your back.
- Raise your hips and push your weight down via your heels.
- This version should cause your glutes and the back of your legs to tire.
- As you drive up, lift your toes off the ground to ensure that you are focusing on the back of your thighs.
- Allow your hips to return to the floor in a deliberate move.
- This concludes one repetition.
- Do three rounds of a 30-second hold or three sets of 15 repetitions.
Press through the toes
Your quadriceps muscles will have to work harder if you drive your weight into your toes. To fatigue both the anterior and posterior parts of your thighs, it’s a good idea to alternately drive your weight through your heels and toes.
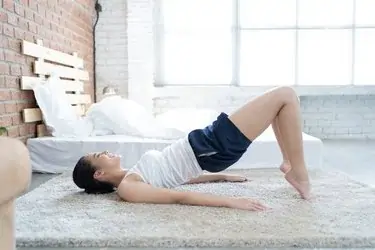
- With your feet level on the floor and your legs bent at a 90-degree angle, begin flat on your back.
- Raise your hips, press your weight into your toes, and lift your heels.
- As you drive up, lift your toes off the ground to ensure that you are focusing on the back of your thighs.
- Allow your hips to return to the floor in a deliberate move.
- This concludes one repetition.
- Do three rounds of a 30-second hold or three sets of 15 repetitions.
One-legged glute bridge
One of the best ways to improve your core stability and the strength of each leg individually is to modify the glute bridge so that you are only training one leg at a time.
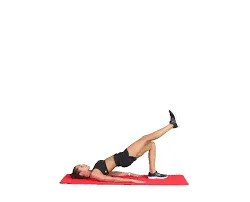
- With your feet level on the floor and your legs bent at a 90-degree angle, begin flat on your back. Lift one leg straight up into the air from the ground.
- Using the leg on the ground, drive your weight downward.
- Make an effort to maintain a square hip position. This version should make your whole thigh and buttocks feel exhausted.
- Allow your hips to return to the floor in a deliberate move.
- This concludes one repeat.
- Do three rounds of a 30-second hold or three sets of 15 repetitions.
Take it to the next level
Any form of the glute bridge may be made more challenging by just adding weight to your hips. This will help you tone and strengthen your hamstrings and glutes.
- With your feet level on the floor and your legs bent at a 90-degree angle, begin flat on your back.
- Hold your weight in place by resting it firmly against your pelvic bones.
- If pressing your hips upward is too difficult, change the weight and repetitions as needed.
Quick pointers for all glute bridge variations
Here are some more tips for those who are unfamiliar with the glute bridge:
- With your feet level on the floor and your legs bent at a 90-degree angle, start the exercise flat on your back.
- Clench your abdominal muscles while maintaining a stable and active core.
- To raise your hips, drive your weight through your feet.
- Your shoulders, hips, and knees should all be in a straight line at the peak of the exercise.
- You can either elevate your hips repeatedly back-to-back or maintain this peak posture for a certain Make sure to maintain a tight core and back during the whole exercise.
- Keep your knees and toes in the same line and concentrate on squeezing your buttocks.
- Take a stop and recover if you feel that your form is faltering so that you may restore your strength and execute it correctly.
- Make sure to maintain a tight core and back during the whole exercise.
- Keep your knees and toes in the same line and concentrate on squeezing your buttocks.
- Take a stop and recover if you feel that your form is faltering so that you may restore your strength and execute it correctly.
Considering Bridging in Treatment Strategies
It’s crucial to take your patients’ individual requirements, objectives, and physical state into account when incorporating bridging into their treatment regimens. Start with a comprehensive evaluation to identify the right degree of difficulty and the particular muscles that need to be worked. To optimize the benefits and reduce the chance of injury, progress the exercises gradually while paying attention to correct form and alignment.
Common Mistakes to Avoid
Insufficient Form at the Top
One of the most common mistakes is hyperextending your lower back to raise your hips. Instead of an arch, you want a straight line from shoulder to knee. Instead of using your spine to propel yourself higher, squeeze your glutes to maintain the position.
Skipping the Warm-Up
The glutes and hip flexors of the cold do not contract effectively. Before your first bridge rep, spend three to five minutes performing dynamic warm-up exercises like bodyweight squats, hip circles, and leg swings. Additionally, this lowers the possibility of lower back pain.
Preventing Internal Bending of the Knees
The knees have a tendency to collapse inward when exhaustion sets in. This causes needless strain on the knee joint and decreases glute activation. During each repetition, intentionally push the knees apart or use a resistance band.
Excessive Training Without Recovery
Between vigorous workouts, the glutes require 48 hours to recuperate. Daily bridge training with a constant load hinders adaptation and raises the risk of damage. Daily maximal effort will always be surpassed by a planned schedule with rest days. Exercises that increase muscle endurance without fatigue can help you establish sustainable capability.
The Bridge Exercise for Hips: Who Should Try It?
Beginnings
There is no technical barrier to admission for the basic glute bridge. The movement pattern is instinctive and natural, and there is no equipment or difficulty with balance. Because it safely develops basic strength, it is one of the first exercises suggested in novice strength programs.
Women
Without adding heft, the hip bridge is particularly useful for strengthening the hips and glutes. Lean, functional muscular tone is developed by progressive bodyweight exercise. It is a mainstay of programs aimed at strengthening and sculpting the lower body at any level of fitness.
Senior Citizens
One of the main causes of falls and a reduction in mobility in older persons is gluteal and hip weakness. The muscles that sustain balance and straight posture are strengthened by the bridge. Proceed cautiously, starting with the ordinary floor version. Before beginning any new fitness regimen, always speak with your doctor, especially if you have osteoporosis or a history of hip replacement.
Working Professionals
Your hip flexors shrink, and your glutes become chronically under-activated if you spend eight or more hours a day at a desk. Bridging for ten minutes in the morning or evening can significantly reduce postural strain. To fully address the effects of a sedentary workweek, combine this practice with mobility-focused activities.
Conclusion
Bridge Exercise, also called Bridge Pose (Setu Bandha Sarvangasana). Bridging helps patients lay the groundwork for better functional well-being and is a useful adjunct to PT and OT therapy regimens. These exercises improve strength, stability, and flexibility by focusing on important muscle areas including the lower back, glutes, and core.
Using different kinds of bridging can help your patients reach their functional objectives and live more independent and active lives, whether they are trying to walk more confidently, carry out everyday chores with ease, or avoid falls.
FAQs
What is the hip bridge exercise?
Lying on your back, the hip bridge is a bodyweight strength exercise. Squeezing your glutes at the top, you raise your hips off the ground by pressing through your heels until your body forms a straight line from shoulders to knees. It works the core as well as the glutes, hamstrings, and hip stabilizers.
Is the bridge exercise suitable for novices?
Indeed, it is among the best exercises to start with when starting a strength program for beginners. The floor posture avoids balance issues, the activity is low-impact, and no equipment is needed. From the first session, the majority of patients experience noticeable glute activation.
How frequently should I perform hip bridge exercises?
A good beginning frequency is three to four times a week. This gives the glutes 48 hours to rest in between workouts so they can adjust and get stronger. Adequate recovery becomes even more crucial as you go to more difficult versions like the bench hip thrust or single-leg bridge.
Can women perform the hip bridge exercise?
Of course. Women are particularly fond of the hip bridge because it strengthens the hips and glutes without adding bulk. Lean, functional muscular tone is developed by progressive bodyweight exercise. It is appropriate for most phases of life and at any level of fitness; however, if you are pregnant or have just given birth, always consult your doctor.
Does the bridge workout require any equipment?
No. To begin with the traditional bridge and most modifications, all you need is a yoga mat and some floor space. A bench or sofa allows for the raised hip thrust for increased range of motion, and a resistance band positioned above the knees challenges the gluteus medius. These are optional, not necessary, progressions.
Reference:
- Ninjas, N. (n.d.-a). Bridging exercise benefits and variations. The Note Ninjas. https://thenoteninjas.com/blog/f/bridging-exercise-benefits-and-variations
- Zehra, S. (2026, August 7). Bridge Exercise for Hips: Benefits, Form & Workout Plan. Habuild Blogs. https://habuild.in/habitology/strength-and-fitness/bridge-exercise-for-hips/
- Salyer, J. (2020, June 27). How to perform 5 variations of the Glute bridge exercise. Healthline. https://www.healthline.com/health/fitness-exercise/glute-bridge-variations#3-Moves-to-Strengthen-Glutes