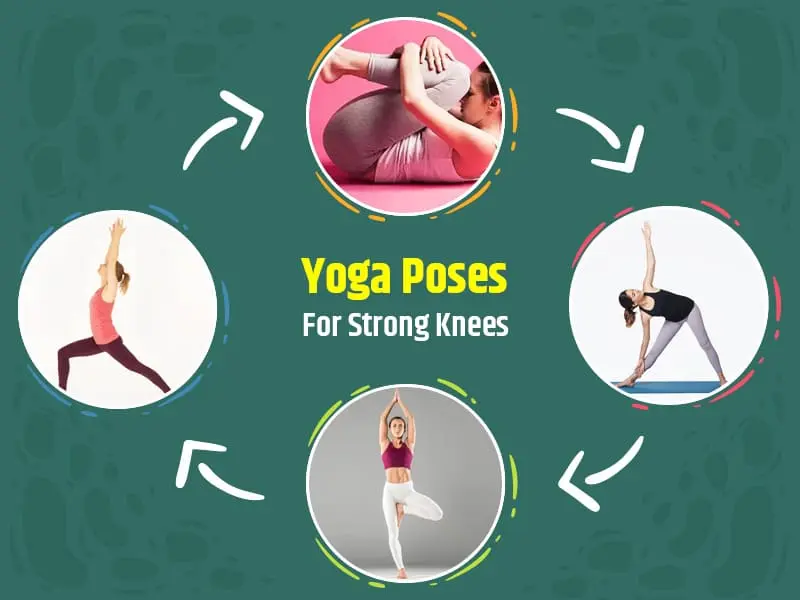
7 Best Yoga Poses for Knee Strengthening
Knee-strengthening yoga poses help build stability, flexibility, and support for the joints. Poses like Chair Pose, Bridge Pose, Warrior Poses, and Bird Dog engage the surrounding muscles, improving strength and mobility while reducing strain on the knees. Regular exercises can improve joint function and relieve joint pain.
Table of Contents
Introduction:
Yoga is an excellent method to improve knee strength and flexibility and reduce stiffness or pain. When done correctly, it strengthens the muscles that surround the knee joint and increases mobility.
Yoga not only improves flexibility but also strengthens and stabilizes the body. Regarding the knees, several yoga postures for knee pain target the muscles that support the knee joints, such as the quadriceps, hamstrings, and glutes. By strengthening these muscles, knee strain can be decreased, and injury resistance increased. Yoga also enhances body awareness and helps maintain proper posture throughout physical activity. This information is necessary to prevent knee issues caused by bad posture or dislocation.
Our knees are vital joints because they support the weight of our bodies whenever we walk, squat, or move. They provide us with stability, mobility, and balance in our daily activities. However, aging, damage, or inactivity can cause knee weakness and soreness, which can limit movement and cause pain. One of the best methods for treating knee stiffness and weakness is yoga.
Advantages of Knee Strengthening Yoga Pose:
Yoga is a gentle yet highly effective method for strengthening the knees. Among the muscles that surround the knee joint are weak quadriceps, hamstrings, and calves, which can lead to some common knee problems. These muscles are strengthened by yoga, which also promotes flexibility, balance, and mobility.
The primary benefits of yoga for knee strengthening are as follows:
- Strengthens the muscles that surround the knee.
Strong muscles provide stability and support to the knee joint, reducing the risk of injury. Many yoga poses engage the quadriceps, hamstrings, calves, and glutes, all of which are crucial for knee stability. By strengthening these muscles, the weight is distributed more uniformly, and there is less chance of knee strain.
- Boosts Joint Mobility
Increases the range of motion of the knee joint, preventing stiffness and maintaining regular movement patterns. Frequent yoga practice preserves or improves the flexibility of the knee joints and surrounding tissues. This greater mobility reduces the pain that comes with limiting movement.
- Aids in the Healing of Injuries
Aids in healing by progressively increasing knee range of motion and strength. Yoga enables a controlled, low-impact recuperation period after a knee injury. In addition to providing a safe rehabilitation environment, gentle strengthening and stretching poses reduce the risk of re-injury.
- Boosts Flexibility
More flexibility in the muscles surrounding the knee reduces tension and discomfort. Tight muscles like the quadriceps, hamstrings, and calves that strain the knee joint can cause pain or dislocation. These muscles are stretched during yoga poses, which improves range of motion and lessens stiffness.
- Enhances balance and stability
Supports knee function by encouraging general stability and balance. By practicing yoga poses that challenge your balance and stability, you can improve joint coordination and strengthen the muscles that support your knees. This can reduce knee pain and help you prevent falls.
- Reduces Knee Pain
Yoga can help improve knee discomfort brought on by injury, overuse, or conditions like arthritis. Yoga decreases the pressure on the knee joint by strengthening the muscles surrounding it and improving its alignment. The calming and relaxing effects of yoga can help with pain management and healing.
- Prevents Knee Problems in the Future
Prevents knee problems and muscle imbalances by maintaining strength and flexibility. Maintaining muscular balance around the knee joint through regular yoga practice keeps each muscle group from weakening or becoming overly stiff. This equilibrium lowers the risk of osteoarthritis, patellar tendinitis, and runner’s knee.
- Encourages Proper Alignment
Fix any alignment problems that might be causing strain or pain in your knees. Many yoga poses emphasize alignment and body awareness. By emphasizing proper knee alignment during practice, yoga helps you avoid negative habits that could lead to imbalances and injury, including letting your knee fold inward.
- Encourages Body Awareness
increases your awareness of your body’s alignment and movement patterns, leading to improved movement habits. Yoga encourages paying attention to movement and being conscious of the body’s movements. This heightened awareness aids in preventing compensations or imbalances that could contribute to knee pain or injury.
- Lessens Stress and Tension
Reduces the overall tension in the body, which may impact the knees. Yoga employs calming poses and breathing techniques known as pranayama to encourage profound relaxation. Reducing stress and tension in the body can help reduce the stiffness in the muscles that would otherwise produce knee discomfort.
Yoga For Knee Strengthening:
Knee discomfort and damage can be reduced by strengthening the hamstrings, quadriceps, glutes, and calves, which support the joint.
Mountain Pose (Tadasana)
Improves posture, strengthens the legs, and engages the glutes and quadriceps to support the knees.
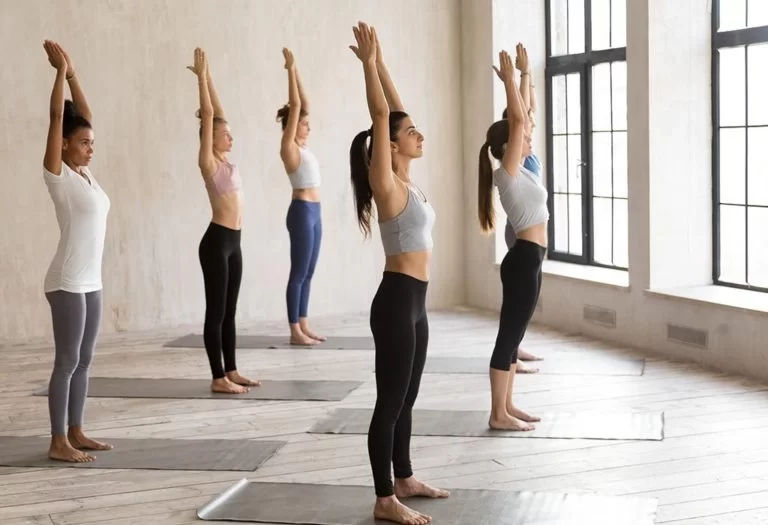
How to do:
- Put your feet together or hip-width apart.
- Make sure your weight is evenly divided between your knees and heels and that your feet are planted firmly on the ground.
- If your feet are together, keep your big toes in contact with each other while keeping your heels slightly apart.
- To activate your leg muscles, slowly lift your kneecaps.
- To lengthen your legs, slightly engage your quadriceps, which are the muscles in front of your thighs.
- While keeping the knees locked, consider drawing the inner thighs together.
- Tuck your tailbone slightly and draw your lower abdomen in (without pushing).
- This aids in the formation of a pelvic position that is neutral.
- Consider that something is pulling you up from the top of your head, lengthening your spine.
- Pull your shoulder blades slowly down your back while letting your shoulders drop away from your ears.
- Keep your arms by your sides and place your hands in front of you or slightly bent toward your body.
- Aim for the ceiling with the top of your head.
- You can look straight ahead while maintaining your chin parallel to the floor.
- Gently tense your abdominal muscles to push your belly button toward your spine.
- You can steady your entire body and maintain proper posture by doing this.
- Breathe deeply and calmly.
- By breathing to stretch your body and exhaling to relax into the position, you can strike a balance between strength and relaxation.
- Then return to your neutral position.
- Then relax.
- Five to ten times, repeat this stance.
Chair Pose (Utkatasana)
Strengthens the quadriceps, glutes, and calves, improving knee stability.
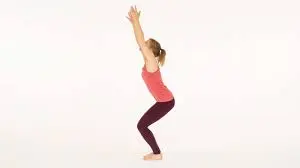
How to do:
- To begin, stand erect with your feet hip-width apart or together.
- Put equal pressure on your feet and your legs.
- Breathe deeply, then begin bending your knees and take your hips back as though you were sitting in a chair.
- Maintain equal distribution of weight on your lower extremities.
- You should avoid putting your knees over your toes.
- Continue to drop your hips until your thighs are at your lowest point.
- can go as parallel to the floor as you feel comfortable doing so.
- Think about sitting in a chair that prevents your knees from crossing your toes.
- Pull your arms together or lift them parallel to your ears as you inhale (palms facing forward or each other).
- Keep your shoulders away from your ears and maintain your composure.
- Pull your belly button in the direction of your spine to engage your core.
- Be careful not to arch or round out your back.
- Keep your chest up.
- If you can, bend your knees deeper with each exhale as you hold for five to ten breaths.
- Go back to your neutral posture.
- Then relax.
- Five to ten times, repeat that position.
Bridge Pose (Setu Bandhasana)
Strengthens the glutes, hamstrings, and lower back, which aids with knee stabilization.
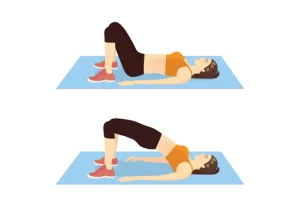
How to do:
- Lying flat on your back, place your feet hip-width apart on the mat and bend your knees.
- Put your hands down and keep your arms at your sides.
- Press your feet onto the mat while keeping them parallel to your hips.
- Make sure your knees are pointing straight ahead instead of sideways.
- As you inhale, thrust your hips toward the ceiling and press your feet into the floor.
- As you elevate your hips, strengthen your core, hamstrings, and thighs.
- You can keep your arms by your sides or join your fingers beneath your back as you raise your hips.
- If your arms are on the floor, keep them moving by pressing them into the mat for support.
- As your hips rise, try to draw your chest toward your chin without putting too much strain on your neck.
- Maintain a relaxed neck and shoulders.
- Maintain your feet, arms, and legs firmly grounded.
- Hold for 5 to 10 seconds, pressing your feet firmly into the mat and lifting your chest with each breath.
- To release, gently drop your hips back down to the mat.
- Then return to your neutral position.
- Then relax.
- Five to ten times, repeat the same position.
Locust Pose (Salabhasana)
Strengthens the lower back, thighs, and glutes, which provides more support for the knees.
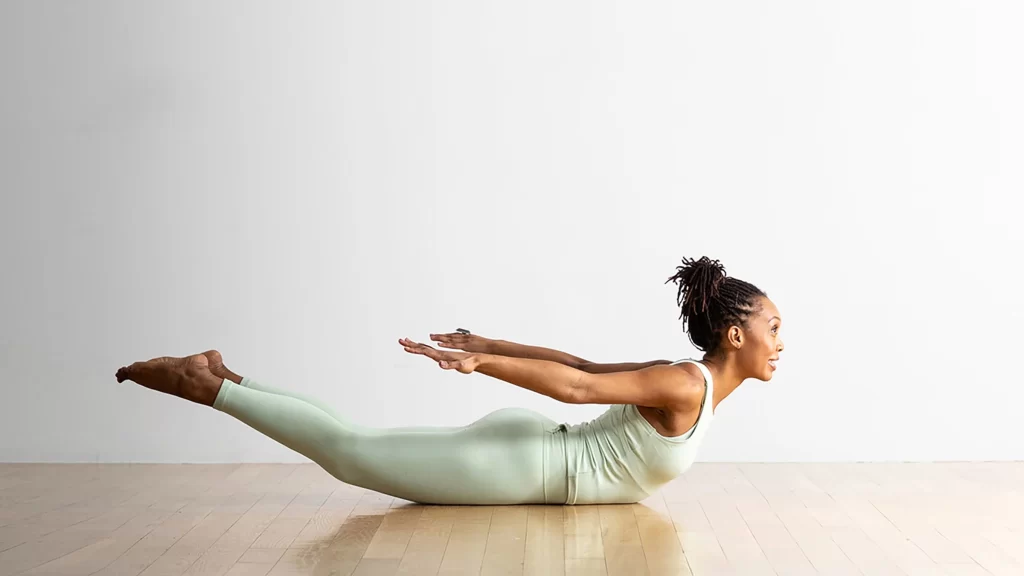
How to do:
- Lie flat on your stomach with your arms at your sides, palms down.
- Keep your legs straight and together while pressing the tops of your feet onto the mat.
- Lower your forehead to the floor while maintaining a relaxed neck that is in line with your spine.
- Using your thighs and glutes and pressing the tops of your feet into the floor will engage your lower body.
- Make your arms outstretched and try reaching your legs up and back, as if you were stretching your body in two separate ways.
- Your neck should be in a neutral position, and your eyes should be down or slightly forward.
- Support your lower back with your inner thighs and core as you continue to elevate your legs and chest.
- As your chest climbs higher, continue to extend your arms toward your feet.
- Maintain this posture for a short while.
- Focus on stretching your body as you increase the weight.
- Control the return of your arms, legs, and torso to the mat to release.
- Then return to your neutral position.
- Then relax.
- Five to ten times, repeat that position.
Warrior I (Virabhadrasana I)
Strengthens the thighs, hips, and calves while improving balance.
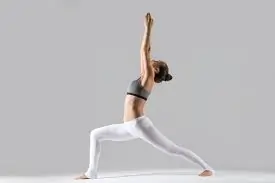
How to do:
- Keep your shoulders relaxed, your feet hip-width apart, and your arms by your sides to maintain a tall posture.
- As you take a deep breath, ground yourself with your feet and lengthen your spine.
- Take a big step back with your left foot while keeping your right foot forward.
- Try to maintain your feet 3–4 feet apart, depending on your height and degree of flexibility.
- Position your right knee precisely over your right ankle while keeping your right thigh parallel to the floor.
- Lean your left foot out to a 45-degree angle while keeping its heel firmly planted on the ground.
- Keep your left leg straight and firm.
- Avoid bending your right knee too far so that it extends past your toes and remains just above your right ankle.
- Use your thigh muscles to extend your tailbone toward the floor.
- As you inhale, raise your arms forward with your palms facing each other, keeping your shoulders relaxed and away from your ears.
- Raise your arms until your wrists and shoulders are apart, and extend your fingers toward the sky.
- Keep your chest open and face forward while keeping your sternum slightly elevated.
- Either look straight ahead or slowly slant your gaze upward toward your hands, depending on how comfortable your neck is.
- Hold for 5–10 breaths, maintaining a strong core and legs.
- To release, slowly lower your arms while straightening your front leg.
- Then return to your neutral position.
- Then relax.
- Five to ten times, repeat this stance.
Warrior II (Virabhadrasana II)
Strengthens the quadriceps and hips, which stabilize the knees.
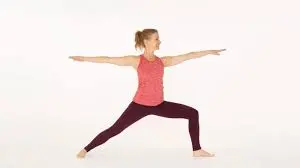
How to do:
- Assume an upright position with your feet hip-width apart, arms by your sides, and shoulders relaxed.
- Place your feet three to four feet apart, depending on your body size and degree of flexibility.
- With your right foot turned out 90 degrees and facing toward the front of your mat, your left foot should be inclined at around 45 degrees.
- Make sure your right knee stays just above your right ankle and does not extend past your toes as you bend it to around a 90-degree angle.
- Keeping your left leg straight and sturdy, press the outside edge of your left foot onto the mat.
- The rest of your body should be facing forward, with your shoulders level over your hips.
- To keep your butt hidden, visualize pulling your hips back gently.
- As you inhale, extend your arms shoulder-high, palms down, out to the sides.
- As you aggressively reach with your fingertips, keep your arms straight and solid.
- As you examine your right hand, maintain a neutral, compassionate look.
- Keep your chest wide and elevated to avoid curving your shoulders and upper back.
- Maintaining a solid stance, hold for five to ten breaths.
- To release, carefully straighten your right leg while taking your arms back to your sides.
- Then return to your neutral position.
- Then relax.
- Five to ten times, repeat that position.
Reclining Hand-to-Big-Toe Pose (Supta Padangusthasana)
Stretches the hamstrings and calves to relieve knee strain.
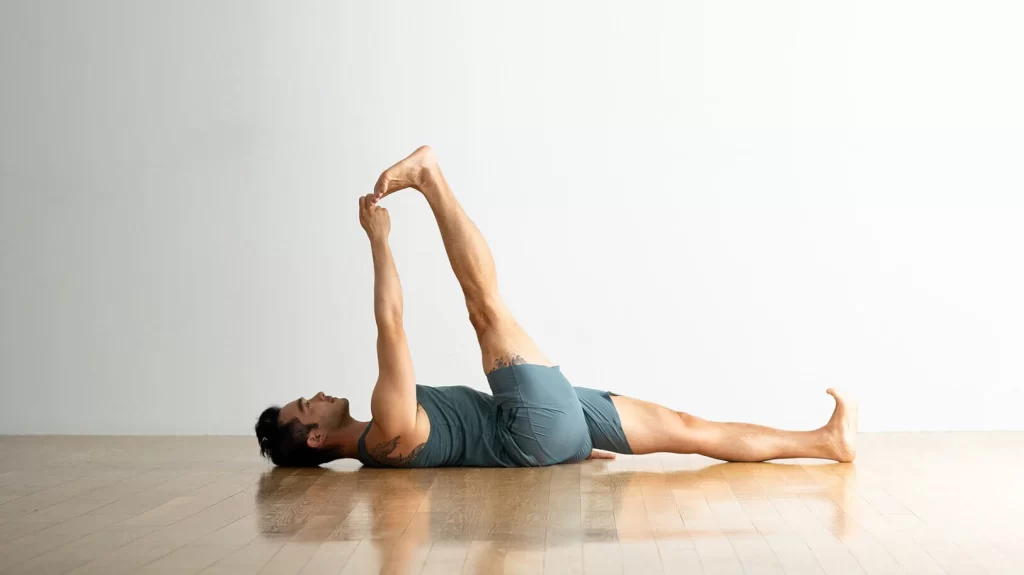
How to do:
- Start by extending your legs and keeping your arms at your sides while lying flat on your back.
- Keep your head, neck, and spine in line with the ground.
- To start, bend your right knee and take it up to your chest.
- Holding the back of your right knee with both hands, take it closer to your chest.
- As you inhale, straighten your right leg while keeping your left leg extended on the floor.
- If you can, grasp your big toe with your right hand. If you need support, tie a yoga strap around the ball of your foot.
- As you strongly press your left leg into the floor, keep its toes pointed straight forward.
- Keep your right foot flexed and your quadriceps contracted while keeping your heel pressed forward.
- Don’t arch your back; instead, keep your lower back pressed into the mat and ensure that both hips are squared and planted.
- For five to ten breaths, hold the pose, lengthening the stretch a little with each exhale.
- Keep your arms moving while maintaining a strong grip on the strap or your foot.
- To get out of the stance, carefully release your right leg and bring it back to the floor.
- Then return to your neutral position.
- Then relax.
- Five to ten times, repeat this position.
What precautions should be taken when performing yoga poses?
When executing poses, it’s critical to be mindful of your body posture, technique, and any underlying medical conditions to avoid injury and get the most out of your yoga practice.
The following are crucial safety precautions to take when practicing yoga:
- Effectively Warm Up and Cool Down
To give your body time to rest and recover, always end with a few minutes of relaxation and cooling-off exercises. Begin with basic motions and stretches to prepare your body for deeper positions.
- Keep Your Body in Mind
If anything doesn’t seem right, back off, shift positions, or take a break.
- Move Slowly
Start with fundamental postures and work your way up. Create challenging or captivating yoga poses at your own pace. Patience and consistency are key to correctly developing strength and flexibility.
- Change Position as Needed
Make modifications to produce yoga poses that are more approachable and comfortable.
- Avoid Excessive Exertion
Aim for a mild stretch or feeling of release rather than forcing your body into excessive positions. Increase your degree of flexibility little by little over time.
- Practice on a Stable Surface
Always practice on a solid, non-slip surface, like a yoga mat, to ensure stability in every pose. Avoid practicing on slick or uneven surfaces.
- Avoid holding your breath
Breathe deeply through your nose and exhale through your mouth while breathing slowly and calmly. A key element of yoga is breath awareness, which promotes serenity and aids in the development of a breathing pattern.
- Support yourself with accessories
For assistance with alignment, balance, and stretching, use yoga blocks, bolsters, blankets, or harnesses. For example, in a seated position, you can place a block under your hips or wrap a strap over your foot to securely deepen a hamstring stretch.
- Recognize Your Boundaries
Avoid comparing yourself to other people and change your stances as needed. Use extras such as blankets, belts, or blocks to make poses more comfortable and attainable.
- Avoid locking your joints
Always keep your knees, elbows, and other joints slightly bent to avoid locking them.
- Be Aware of Proper Alignment
Pay attention to how your knees, hips, and spine line up during each pose.
When is the right time to stop doing yoga poses?
- To maintain safety and avoid injury, it’s critical to know when to quit performing a yoga pose that strengthens the knees.
- When choosing whether to pause or modify a yoga pose, keep an eye out for the following crucial indicators:
- It’s critical to stop right away if you feel any sudden, severe, or sharp pain, especially in or near the knee. While mild discomfort is normal during stretching, intense pain may indicate improper alignment of your body or overexertion.
- If your knee feels weak or unstable during a posture, it may be a sign that you are not using the right muscles or are overtaxing the knee joint.
- Extreme stiffness or strain in the knee area that doesn’t feel like a normal stretch or release could indicate that the muscles or tendons surrounding the knee are overstretched or overworked.
- If you start to feel lightheaded, dizzy, or imbalanced, stop immediately. This could be brought on by holding poses for long periods or breathing erratically.
- Fever
- Headache
- If you still experience knee pain, instability, or pain during or after yoga, it’s critical to consult a physician, physical therapist, or qualified yoga instructor. They can assess your form, make any corrections, and develop a plan for effectively strengthening your knees.
Summary:
Knee discomfort is a common occurrence for many people, especially for those who do high-impact activities like running. Our knees are responsible for the majority of our daily activities, which makes them vulnerable to pain and injury over time. Although there are many therapies for knee pain, yoga is one of the most natural and efficient ways to avoid and treat it.
Yoga can help strengthen your knees and enhance the overall health of your joints. By incorporating these knee-strengthening poses into your practice, you may build a solid foundation that encourages knee stability and flexibility. Whether you want to keep your knees strong and healthy, prevent knee problems, or are recovering from an accident, yoga can be very beneficial.
Yoga is a knee exercise that offers several benefits. Always listen to your body and seek medical assistance if you have persistent aches and pains. If you do yoga regularly, you can keep your knees strong and pain-free for many years to come.
Always pay attention to your body, and get medical attention if you have any pain to make sure you’re functioning properly. Regular yoga practice can turn into a crucial component of your regimen to keep your knees strong and healthy for many years to come.
FAQs
Which yoga poses are best for strengthening the knees?
Warrior I (Virabhadrasana I)
Warrior II (Virabhadrasana II)
Chair Pose (Utkatasana)
Reclining Hand-to-Big-Toe Pose (Supta Padangusthasana)
Mountain Pose (Tadasana)
Does yoga help with knee pain or injuries?
Yoga can ease knee discomfort and aid in the recovery process after an injury. By strengthening and extending the muscles surrounding the knee joint, yoga can reduce knee discomfort and improve mobility and flexibility. Certain postures, such as Cat-Cow (Marjaryasana-Bitilasana), Child’s Pose (Balasana), and Bridge Pose (Setu Bandhasana), can aid in the healing process, improve circulation, and lessen stress. Always seek medical advice if you have suffered a serious injury and are still recovering.
How often should I practice yoga to strengthen my knees?
Your knees may get stronger if you practice yoga two or three times a week. Regularity is vital, but don’t overdo it. Stretching and strengthening exercises are part of a well-rounded program that can help improve knee function over time. If you’re new to yoga, start with shorter sessions and gradually increase them as your strength and flexibility increase.
Does yoga help prevent injury to the knees?
Yes, practicing yoga every day can help prevent knee injuries. By promoting proper alignment, enhancing flexibility, and strengthening the muscles surrounding the knee joint, yoga helps you develop a solid foundation for your knees. Yoga also helps people become more conscious of their body mechanics, which can help them avoid injury-causing improper movement habits.
If I have knee pain, which yoga poses should I avoid?
If you have knee pain, try warrior postures or deep lunges.
Any pose, like Hero Pose (Virasana), that calls for extended sitting with the legs bent.
Postures like deep squats or Goddess Pose (Utkata Konasana) where the knees are bent past their comfort level.
As needed, modify your poses by using props for support or by keeping your knees in more neutral positions.
Is it okay to do yoga if I have osteoarthritis in my knee?
Yoga is safe for those with osteoarthritis in their knees, but it’s crucial to modify poses to avoid putting too much strain on the knee joint. Focus on gentle, low-impact poses like Child’s Pose (Balasana), Legs Up the Wall Pose (Viparita Karani), and Bridge Pose (Setu Bandhasana) that can strengthen the muscles around the knee.
Does yoga help with stiff knees and decreased mobility?
Yes, yoga can be quite beneficial for people with stiff knees and limited mobility. Mild yoga poses that focus on the muscles surrounding the knee increase the range of motion and flexibility. Positions that work the quadriceps and hamstrings, such as Chair Pose and Warrior I & II, can help gradually increase mobility.
Is knee discomfort a common side effect of yoga?
It’s normal to experience some muscle soreness after practicing yoga, particularly if you’re targeting the muscles around your knees. This usually means that those muscles are working. Safety and correct alignment should always come first to prevent damage. You should stop the pose and assess your technique if you feel extreme discomfort or irritation in the knee joint itself.
References
- Mehdi, S. December 12, 2024. STYLECRAZE. https://www.stylecraze.com/articles/effective-baba-ramdev-yoga-asanas-for-knee-pain/?sem_campaign=PMAXDynStylecraze_India&gad_source=1&gclid=CjwKCAiAwaG9BhAREiwAdhv6YyGdXWECT134HQGYmcPnWEYPdPNz25CsbXlbEJynJiwwHmLU3xZmthoCCK8QAvD_BwE#infographic-7-effective-yoga-asanas-to-relieve-knee-pain
- Stevenson, S. (April 5, 2024). Eight yoga exercises to strengthen your knees. BODi. This article describes 8 yoga poses that strengthen the knees.
- Pizer, A. P. (September 27, 2023). Ten knee-strengthening yoga positions. https://liforme.com/blogs/blog/10-yoga-poses-to-strengthen-your-knees Liforme and
- TIMESOFINDIA.COM. January 15, 2023a. Eight yoga positions to improve knee strength. India’s Times. 96972558.cms?picid=96972649 https://timesofindia.indiatimes.com/life-style/health-fitness/fitness/8-yoga-poses-to-strengthen-your-knees
- Yoga15abi. November 11, 2024. Yoga 15. Yoga 15. A quick guide to five yoga poses that will strengthen your knees can be found at https://yoga15.com/ Five simple yoga practices to improve knee strength
- On October 28, 2024, O’Brien, E., and O’Brien, E. Five yoga poses that strengthen your knees to help relieve pain. Yoga Journal. The following is a list of yoga poses for knee pain: https://www.yogajournal.com/poses/anatomy/knees
- B. Allianz (2024, Nov. 28). Ten Yoga Positions That Help Build Stronger, Pain-Free Knees. Allianz, Bajaj. https://www.bajajallianz.com/blog/wellness/best-yoga-poses-for-relieving-pain and strengthening the knees.html
- Singhdeo, A. November 16, 2023. Seven yoga positions to improve knee strength. This is a blog post about yoga poses that strengthen the knees: https://www.shvasa.com/yoga-blog/7
- American Knee Pain Centers. (undated). Unlocking the potential of yoga poses to strengthen the knees to combat knee pain. Yoga poses for strengthening the knees: https://www.kneepaincentersofamerica.com/blog/
- Image 6, Rod. July 5, 2023. Virabhadrasana 2: Develop your strength and concentration by mastering Warrior Pose 2. Yoga Selection. For strength and focus, try this: https://yogaselection.com/virabhadrasana-2-mastering-warrior-pose-2