21 Best Exercise for Sacroilliac Joint Pain
Table of Contents
Introduction
Exercise for Sacroiliac Joint Pain is an important part of your overall treatment program along with Pain medication, and Physiotherapy Treatment.
Sacroiliac joint pain is a painful condition that affects one or both sacroiliac joints. These joints are located at the junction of the spine and pelvis. sacroiliac joint pain becomes the reason for pain and stiffness in the buttocks or lower back, and the pain can feel whole one or both legs. Some activities aggravated (increased the pain) the condition such as standing or sitting for a long time or climbing stairs.
Sacroiliitis can be difficult to diagnose. It can be confused with other causes of lower back pain. It is related to a group of diseases that become the reason for inflammatory arthritis of the spine. Treatment may include exercise with mechanical and manual therapy and medications.
The sacroiliac joint usually has little movement. too little movement in the joint is associated with shock absorption and forward/backward bending movements. The joint is thickened by strong ligaments surrounding it, some of which extend over the joint at the posterior aspect of the hip. This network of soft tissues provides support, limits movement in the joint, and helps absorb pressure. muscles that provide stability to the sacroiliac joint function including the gluteus maximus and piriformis muscles. Doctors don’t know for sure how many people have sacroiliitis. However, it is thought that 10-25% of people suffer from sacroiliac joint pain condition.
The main mechanisms of Sacroiliac joint dysfunction are:
Excessive movement (hypermobility or instability) in the sacroiliac joint can cause pelvic instability and pain. Pain caused by excessive movement is usually felt in the lower back and/or hip and may radiate to the groin area.
Too little movement (hypomobility or fixation) becomes the reason for muscle tension, and pain and hinders mobility. The pain is usually felt on one side of the lower back or buttock and can radiate to the back of the leg (similar to buttock pain.
Most people with sacroiliitis benefit from physical therapy. This treatment helps to strengthen and stabilize the muscles surrounding the sacroiliac joints. Physiotherapy also facilitates the movement of the sacroiliac joints through their full range of motion. In some cases, doctors prescribe medications, such as anti-inflammatory drugs, to help control pain in the early stages of sacroiliitis. In some cases, doctors advised steroid injections into the sacroiliac joint to decrease inflammation and pain. Radiofrequency ablation is considered only if temporary pain relief is achieved after sacroiliac injection. This procedure uses radio waves to heat a small area of nerve tissue to prevent pain signals from being sent, thus reducing pain.
Symptoms of sacroiliac joint pain
Sacroiliac joint pain starts in the lower back and buttock and can radiate to the lower pelvis, groin, or thigh. Sometimes the pain is usually unilateral and can occur on both sides.
Patients may also suffer from numbness or tingling in the leg or a feeling of weakness.
pain may worsen when sitting, standing, sleeping, walking, or climbing stairs. Often, the SI joint is painful when you can perform such activity from the affected side(sitting or sleeping). feeling that the legs can bend and not support the body.
Experience sharp or tingly or dull and painful
Some people have trouble driving or standing, sitting, or walking for too long.
Pain may worsen when transitioning (from sitting to standing), standing on one leg, or climbing stairs.
Causes of sacroiliac joint pain
The ligaments become too loose or too tight. This can happen as the reason for a fall, work injury, car accident, pregnancy, and childbirth.
Spinal surgeries (Spinal fusion reduces the flexibility of the spine, which can increase stress on the SI joint.)
Sacral joint pain can occur when the movement of the pelvis is not the same on both sides.
Unequal movement can occur when one leg is longer or weaker than the other, or if there is arthritis in the hip or knee problems. Autoimmune conditions such as axial spondyloarthritis and biomechanical conditions such as walking shoes after foot/ankle surgery or unsupportive footwear can cause degenerative sacroiliitis.
Pyogenic sacroiliac infection reason by the bacteria Staphylococcus aureus.
Improper movement (walking)
Ankylosing spondylitis
Gout
Exercise for sacroiliac joint pain syndrome
Hamstring muscle strech
The hamstring muscle is located at the posterior aspect of the thigh. the group of hamstrings responsible for bending or flexion of the knee. Because the hamstrings also pass through the hip joint on the back of the thigh, they help the gluteal muscles extend the leg during, for example, running and walking. Stretching your hamstrings improves flexibility, can prevent injury, and help treat lower back pain. Stretching can also improve overall mobility, which can promote athletic performance and daily activities and reduce late-onset muscle soreness. With a towel in hand and a comfortable place to stretch, proceed as follows:
Start the stretch supine lying on your back, wrap a towel around the back of one thigh, and support your thigh by holding both ends of the towel.
If you don’t have a towel, you can use your hands to hold your thigh. Keep one foot on the floor. gradually extend your knee until you feel a stretch in the posterior aspect of your thigh, trying to make your lower leg parallel to the ceiling.
Extend the leg and extend the knee only until the stretch is comfortable. Hold the position initially for around five seconds and gradually increase up to ten or twenty seconds. Try this stretch on each leg, one at a time, 4-5 times for one full set. Aim to do 2 sets a day.
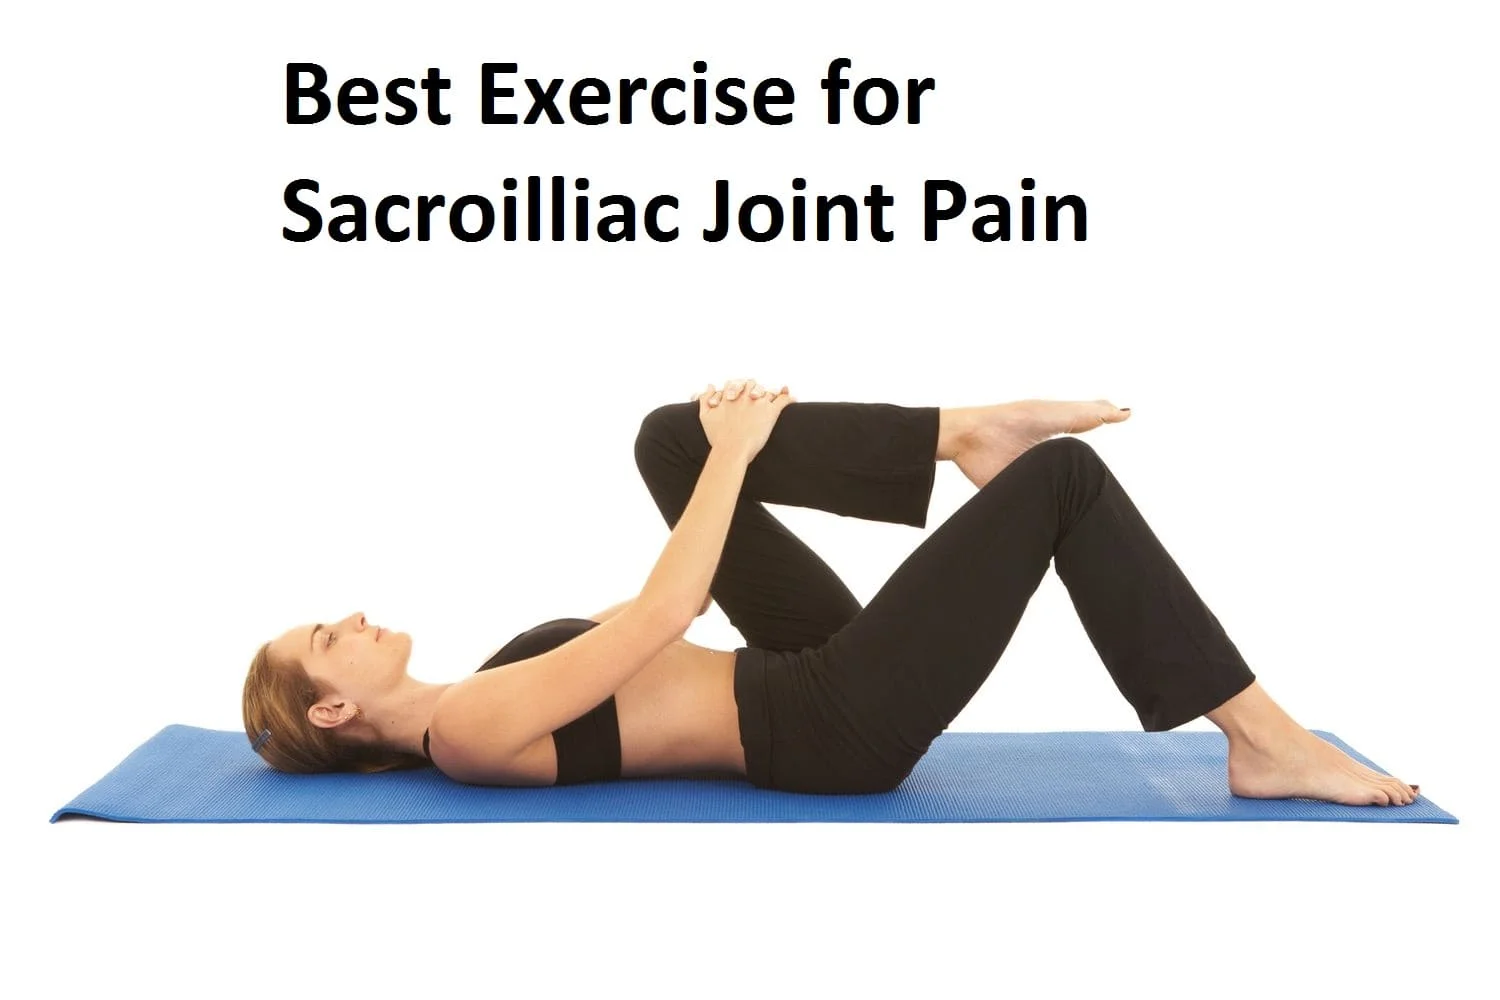
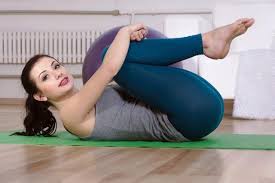
Single knee to chest

These exercises have a significant effect on chronic lower back pain. If pressure is applied to the back of the lumbar spine during stretching, a herniated disc can occur. This is due to increased lumbar lordosis; which would reduce lumbar lordosis by limiting pressure on the back of the lumbar spine. The decrease in pressure would be improved by improving the flexion of the spinal disc, which would lead to a reduction in disc herniation and thus a reduction in the occurrence of chronic low back pain. The exercise opens the space between the vertebrae to give more stability to the lumbar spine.
Starting position: Start the exercise with a supine lying position, hips extended and back straight. Keep your hips horizontal and your lower back on the floor. Action: Extended knee and flexion of hip take these joints towards your chest, placing your hands on your right leg. Then take a deep breath and hold this position or stretch around the five to ten seconds.
Now relax and back to your knee to the original position and repeat on the opposite side.
If patients do exercises regularly.
it reduces pain
improves the stability of the lower part of the pelvis,
and increases the range of motion.
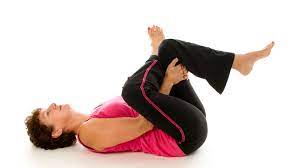
Double knee to chest
Start the exercise with a supine lying position with your knees bent and feet on the floor. This is called lying down. gradually lift one bent knee up enough to grasp the calf with both hands. Interlace your fingers under your knee. If you’re doing the two-legged version, lift one leg up and then the other.
Since taking both at the same time requires a lot of stomach power, it’s probably safer to start with one and then quickly follow up with the other, especially for those with vulnerable backs. Similar to the one-legged version, if you’re lifting both at the same time, curl your fingers or hook your wrists between your shins, just below the knee. Gently pull the bent knee or knees toward your body with your hands. Try to relax your legs, hips, and lower back as much as possible during the pull. Knees to the chest reach the muscles of the lower back better when used passively. Hold for a few seconds. Return your feet to the floor. Repeat on the other side. Do the stretch about 10-15 times, once or twice a day or as needed.
Pelvic rotation or pelvic tilt

Pelvic tilt exercises can stretch and strengthen the abdominal muscles and relieve the tingling symptoms and sciatic pain. Pelvic tilts are safe for almost everyone, even if you’re pregnant. To make inclines as effective as possible, it is useful to understand which muscles they target, how they can affect lower back pain, and the exact points to perform them. Pelvic tilt exercises have a few variations.
The easiest one, which is done supine (lying on your back), is safe for most people, including beginners and people with back pain. Lie on the floor (or a mat on the floor) with your knees bent and feet flat on the floor. keep your shoulder side of your body, palms facing down. The back of the head should touch the mat and the neck should be in line with the spine.
Allow your back to maintain its natural curve, leaving space between your lower back and the mat. Breathe in. As you do expiration, engage your abs by bending your tailbone up and closing the space between your lower back and the plinth. You will feel a little stress in your lower back. do expiration, while the spine and pelvis return to the original position.
repetition should be 15-20 times gradually you can increase the repetition.
Piriformis muscle stretch
The piriformis muscles connect the upper thigh bone to the lower spine on both sides of the pelvis. They sit deep in the buttocks and work with other hip muscles to move and stabilize the thighs. piriformis muscle stretch also reduces lower back pain. There are two ways to stretch the piriformis muscle
Outer Hip Pear Shape Stretch
Start the stretch with the supine lying position, bend the affected leg up, and place the foot near the back of one knee. Press the leg behind the knee and rotate the leg to the opposite side. Your knees should touch the ground (or as close as possible). Place your hand on the opposite thigh and raise the opposite thigh in the air. Hold for 20 seconds. Switch to the other leg.
Lying Piriformis Band Stretch
Start with supine Lying on the plinth while keeping your feet flat and your back straight. Bend the painful leg up, resting the foot on the outside of the opposite leg next to the knee. With the opposite hand, pull the knee of the affected leg through the middle of the body until you feel a stretch, making sure both shoulders and hips stay on the ground. Hold the stretch for around 15- 30 seconds which is the requirement of this exercise, back to the starting position, and switch legs. Repeat the process 2-3 times.
Hip flexor stretch
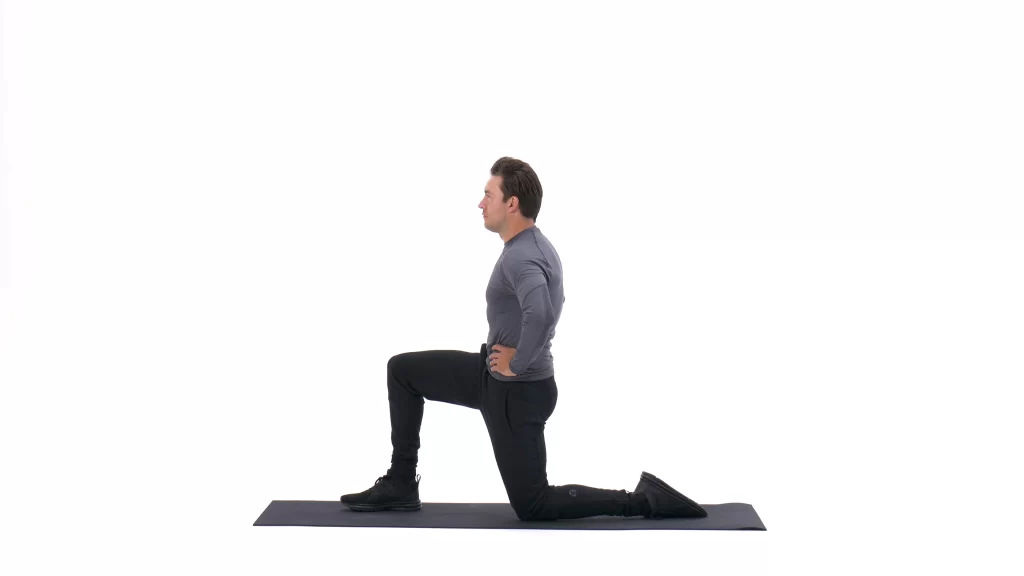
Hip flexor tightness and weakness can lead to lower back pain, hip pain, and injury. Hip flexion exercises, including yoga poses, can help strengthen and relieve tension. This simple movement stretches the hip flexors of the back leg and the glutes of the front leg. For the hip flexor stretch, you require a yoga mat. Kneel on the floor with your left leg in front of you and your right knee on the floor behind you.
Keep your body tall during this exercise. You can keep your hands on your both pelvis for balance. Gently slide your right knee back until you feel a slight stretch in the front of your hip. Squeeze your right glute as if you were pushing forward, bringing your torso and hips toward your left leg. Squeeze the pelvis slightly, causing the pelvis to tilt. hold the flexor stretch for around five to ten secounds. and repetition should be ten to fifteen times per session.
Bridge Pose

Begin with a supine lying position on your yoga mat. flexion of your knees and extension of your hips keep your feet firmly on the plinth, and make sure your hip and knee make proper alignment and your back is in a neutral position. Let your hands rest on the sides of the mat.
This is your starting point. Press your heels into the plinth and raise your hip and knee off the floor and make a bridge from your body, give contraction to your glutes until your body forms one straight line or bridge, resting on your shoulders. It is important to keep your body in a straight line, and not to push your hips as high as possible, which often leads to back arching, pain, or injury. Breathe in. Lower your whole body to the starting position of the exercise.
If you have trouble activating your glutes, placing a resistance band over your knees can help. repeat Glute bridges are a great way to strengthen the largest muscles in the body, such as the glutes and legs (not to mention the chest and back) while helping to improve hip mobility, posture, and core stability.
Strengthening these muscles is very important when you use them every day – we activate them when we walk or carry food, laundry, luggage, children, or pets.
performed 12-15 repetitions per session doing three sets per day.
The Lying Quad Stretch
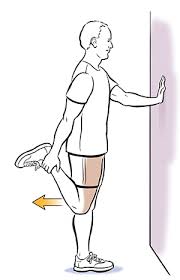
The quadriceps stretch is a simple stretch that targets the quadriceps in the front of the thigh. When stretching, do not force your heel back if it feels uncomfortable. Instead, get it as close as possible. The reclining quad stretch is great for both people who suffer from knee pain and those who want to stand.
start the stretch with a side-lying or supine lying position face down with your head resting on your left hand. Alternatively, you can change your right or left side to perform this stretch. After a few seconds, pull your right leg back and bend your left knee to stabilize yourself. Hold your ankle and hold this position for 30 seconds before returning to the starting position. Switch sides by bringing your left leg back and bending your right knee.
performed three repetitions per session and do three sets per day.
Side leg raise exercise

It is a mobility exercise that activates the muscle groups of the entire body. This mostly involves the hip abductors, glutes, core, hip flexors, hamstrings, and lower back muscles. Lateral leg raises involve abducting or removing the leg from the midline. This is a great and easy exercise to build strength in the outer thighs and hip abductors. Which includes the gluteus medius and minimus.
For this exercise, you should lie on your left side on a mat or floor. while holding these exercises your hip and knee should be in a straight line.
Both legs are straight and the legs are stacked on top of each other. The hand is placed on the ground under the head for support. For additional support, the right hand should be placed on the left leg or hip. As you exhale, gently lift your right leg toward the ceiling. Lift until the lower back and obliques feel slightly bent. Inhale and lower your leg. Do this movement 10-15 times on the same leg. Then switch to the other leg. You should do 2-3 sets.
Doing a side leg raises a challenge:
Add weights (sandbags) above the ankle.
Use resistance bands or tubes for more strength, also use both weights and resistance bands, you should go into a side position.
When you lift your legs, place the weights on your ankles and the resistance bands should be placed on your thighs. The resistance band has different color codes to increase the resistance.
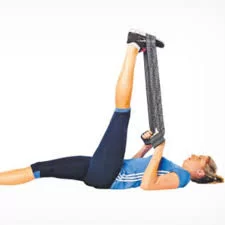
Straight leg raise
For the straight leg raise exercises take a supine Lying position with one leg bent and the other straight. To do this, pull the navel (belly button) to the floor. If you are doing it correctly, your back should be flat against the floor/mat.
The technique can also be checked by placing your hand under the small arch of your back and flattening your back so that your back “crushes” your hand. With your toes pointed toward the ceiling, keep your knee straight and lift your leg up to about 45 degrees.
Do not raise it higher than a bent knee. gradually keep your hips back to the plinth. This step is important! Do not let your feet hit the carpet/floor. Repeat 12-15 times (reps), 3 times in a row (sets). Repeat with the opposite leg.
It is easy to perform this exercise and gives gradual stresses on the hip joint for the ROM is gradually increased. It can be considered by the physical therapist, and after that, you can continue the exercise at your home.
while progressing
Perform the above exercise with a light cuff weight around the ankle. Start with a weight of one and a half kilograms. You are ready to lift a weight when you can easily do three sets of 12 repetitions with two exercises, or you rate the difficulty of the exercise as a 1-2 on a scale of 0-10. The videos below show straight leg lifts without weights and with weights.
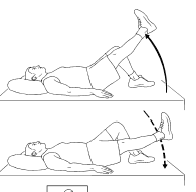
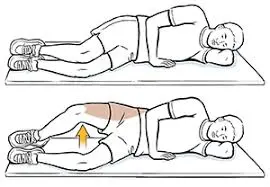
Prone leg raise
Prone leg raise is an exercise that targets the hamstrings, mainly the glutes. This exercise is usually done lying on the floor with your feet in the air. A person does leg lifts by contracting the thigh muscles and raising the legs parallel to the body in the air. This exercise is usually done on a carpet or rug to protect the floor from scratches.
This is a strengthening exercise that uses the glutes, hamstrings, and lower back muscles. This is an important exercise to rehabilitate the spine, hips, or lower limbs. Lower back, hip, or leg pain can be caused by many different factors. If your physical therapist thinks you could benefit from strengthening your glutes and lower back muscles, If you have back or hip pain, you may benefit from physical therapy with strengthening exercises to improve your mobility and reduce symptoms.
Gently tighten the core muscles, keeping the abdominal muscles closed, you should breathe normally. Abdominal muscles should be involved and knees should be horizontal. Then gradually raise your affected hip to the ceiling. when you elevate your hip your knees should be straight while exercising. Hold the hip straight up in the air for five to ten seconds and then gradually raise the hip to the floor.
performed this exercise for 10-20 repetitions in one session do three sets per day and then repeat this exercise on the other leg. Make sure there is at least a three to four-hour break between the next session of this exercise to allow the muscles to recover. Your physical therapist has recommended that you do this exercise with alternating hips, especially if you are doing the exercise for a lower back pain rehabilitation program.
Cat camel exercise

The benefit of the Cat Camel exercise is to improve the mobility of the spine and stretch the back and neck. The camel exercise is an excellent body stretch and mobilization exercise that also stretches and strengthens the core muscles. It helps reduce lower and middle back pain. This makes the lower back move better.
start the cat camel exercise with a quadruped position. Make sure your wrists are aligned so that your shoulders and knees are in line with your hips. Keep your core engaged, back flat, and spine neutral. This is the starting position. Now take a deep breath. Exhale and pull your back to the sky. Or pull your belly against your spine while holding your heart. Release tension from your neck and pull your chin toward your chest. These stretches should look like a cat pose. Inhale, relax your stomach and arch your back. Bring your tailbone up toward the ceiling as you lift your head. Do not squeeze the neck. This is the cow pose of the cat and cow stretch.
Continue back and forth from cat to cow, connecting your soul with each movement. do inspiration while in the cow position and do expiration in the cat position. Repeat this Cat and Cow Pose for at least 10 rounds or until your abs, hips, back, and neck are fully warmed up to reap the full benefits of Cow Cat Pose.
Pillow press exercise(hip adductors strengthening)
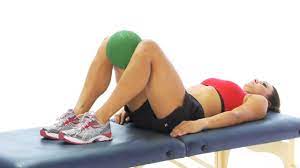
The main benefit of the pillow press exercise strengthens the inner thigh muscles, so it helps strengthen the knees and prevent knee pain. The strong inner thighs, also called adductors, help lock the hip joints into their sockets. All you need is a pillow for the pillow press.
This is a very easy exercise you can do anywhere, you can do it at your home without your personal physiotherapy. It affects the inner thigh muscles, so it helps strengthen the knees and prevent knee pain. Start with the supine lying position with your knees in flexion and keep your feet on the surface. Place your feet at the same level and maintain alignment with your hips. Hands should be placed at the sides of the body, palms down.
Relax your neck and shoulders. Place a hard pillow between your knees. If you need support, place a small pillow under your head. This is your starting point. Press your knees together by pressing a pillow firmly between your knees. Hold for around five to ten seconds. Relax and repeat 10-20 times per session. take care of your back to create an arch or don’t allow tension in your neck, shoulders, or back.
Triangle pose
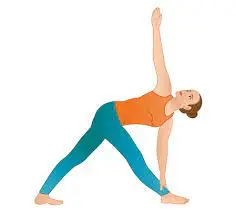
Begin by standing in a mountain pose (tadasana) against the long edge of the yoga mat. Keep your feet 3-4 feet apart, and feel strong in your thighs and hips. Turn your right foot 90 degrees and your left foot 15 degrees, or you can swing your left foot forward. Align the center of your right heel with the center of the arch of your left foot. Brace the right hamstring, keep the knees soft, and gently pull the right kneecap up. Inhale, extend your arms parallel to the floor at shoulder height.
Exhale, and stretch your upper body to the right side. Exhale, bend at the right hip, bend the body to the right, and lower it down. Drop your head, chest, and pelvis forward. Raise your left arm straight up in the air and reach your right arm down to the floor. Keep your left shoulder over your right shoulder. Place your right hand comfortably on the shin, ankle, or knee of your right leg, or next to your right leg on the yoga mat as you do the extended triangle pose. Extend your left arm toward the ceiling along with the top of your shoulders.
Keep your head in a neutral position or turn it to the left and look gently at your left palm. Make sure your body is bent to the side, not back or forward. If necessary, tilt your pelvis back so it doesn’t move forward on your extended side. Open your upper body to the sky. Focus your gaze and stay in the triangle position for 5-10 breaths. As you inhale, stand up and bring your arms to your sides. Repeat the triangle pose on the opposite side, reaching your right arm up and your left arm down.
Follow up poses ideas for tringle pose
Bound Triangle Pose
Revolved Triangle Pose
Half Moon Pose
Pyramid Pose
Wide-Legged Forward Fold
Fallen Triangle Pose
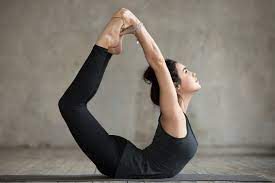
Back extensor exercise(cobra pose)
Lie on your stomach, toes on the floor, soles up; rest your forehead on the ground. Keep your feet close together, with your feet and heels lightly touching each other. Place both hands so that the palms touch the ground under the shoulders, and the elbows are parallel and close to the body.
Take a deep breath, and slowly raise your head, chest, and stomach. Keep your navel on the floor. Using your hands, pull your body back and off the floor. Make sure you apply equal pressure to both palms. Continue to breathe consciously as you arch your vertebra after vertebra.
Maintain the position and breathe evenly for 4-5 breaths.
Now exhale and gently bring your stomach, chest, and head back to the floor and relax. Repeat 4-5 times. The main purpose of this exercise is to reduce lower back pain and maintain posture. Muscles in the cobra pose: muscles, gluteus maximus (however, we recommend not to tighten the glutes, as this can cause compression of the lower back), spinal extensors, especially the erector spinae, upper back muscles such as rhombuses and middle trapezius.
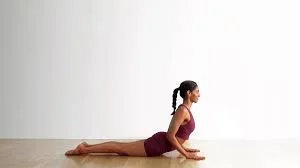
Bow pose
Begin the bow by lying on your stomach. You can either lie on the floor or use a yoga mat. Place your feet about hip-width apart. Bend your legs up so that the soles of your feet are towards your head. Take your hands behind your back on either side and hold your ankles. At this point, your left hand is holding the left ankle while your right hand is holding the right ankle.
As you inhale, lift your chest off the floor and lift your legs into the air with your hands. very When your chest and knees are in the air, your body forms an arc.
Your body is curved, stretched, and tense, chest and knees at the same level. Look straight ahead and keep a soft smile on your face. Breathing in the ideal bent position may take more practice, but the breath should be as long and deep as possible. Just bend as much as you can without overextending.
A good way to understand your limits is to bend over until you feel comfortable in balance while maintaining your posture. Keep taking long, deep breaths. After holding the position for 15-20 seconds, bring your chest and knees to the ground as you exhale. Remove your hands from your ankles and place your hands and feet on the floor. If you are a beginner, you should focus on your breathing while holding the pose. Inhale as you enter the spring position and exhale as you come out.
Clamshell exercise
Lie on your right side with your legs and hips stacked, knees bent 90 degrees, and your head resting on your right arm. Pull your knees toward your body until your feet are in line with your back. Place your left hand on your left hip so it doesn’t lean back.
This is your starting point. Keeping your abs locked and your legs together, lift your left knee as far as you can without turning your hips or lifting your right knee off the floor. Hold for 1 second, squeezing your glutes at the top of the movement before slowly lowering your left knee to the starting position. Continue for a total of 20 repetitions, then repeat on the other side. Make it harder: Attach a resistance band around both thighs, just above the knees.
the clamshell is a general exercise, the clam can increase the strength of medial gluteal muscles, and provide more strength and stability to the hips. Another benefit of the biceps exercise is its effect on muscle shape and development. If you add resistance to the flap, more than 10 reps can set your glutes on fire.
Hip extension with resistance
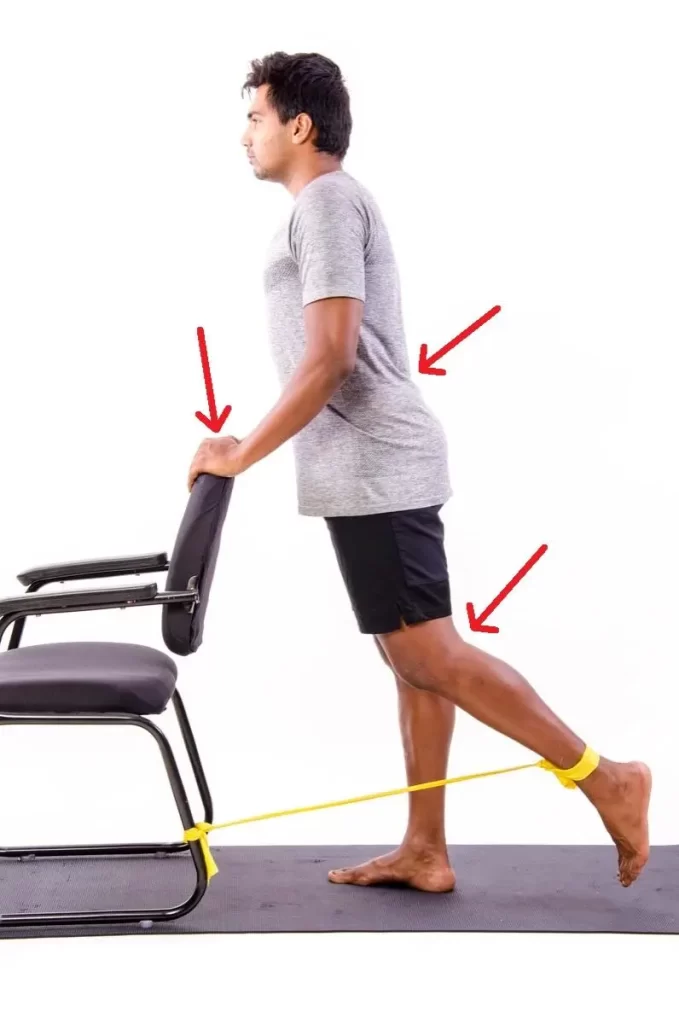
The muscles used in the Gluteus Maximus (butt) exercise and hamstrings are activated to push against the bar. The lower back muscles and core are activated to stabilize the pelvis. The main purpose of this exercise is to encourage the activity of the gluteal muscles during walking, running, squatting, and above.
This is an advanced exercise that involves the core and back muscles. Tie the band around your foot or ankle and hold it in your hand on the same side. Start wedged on the ground and find your neutral back.
Slide your leg back, keeping your back, hips, and pelvis stable.
Lifting the foot off the ground. Be careful not to catch your hips when doing this move.
Return to the starting position and make sure you are in control of the movement.
Band hip abduction
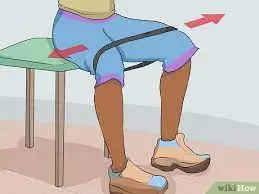
Band hip abduction exercises are a great exercise to increase hip muscle strength and stability. These movements involve moving the legs away from the body by contracting the hip abductors (mainly the gluteus medius, gluteus minimus, and tensor fasciae latae).
All types of striptease should be slow and controlled. Really focus on the outer hips during the exercises and avoid any rocking motion to get the momentum to help you…it defeats the purpose of catching with the band.
The hip abduction exercise is performed by use of a comfortable plinth or chair where the patient can perform the exercises and select an appropriate resistance band(according to the strength). It’s best done at a lower intensity, especially for people who haven’t done a hip abduction before, because the hip abduction is primarily an isolation movement and as such puts a lot of strain on a fairly small and delicate muscle group. all alone, which can increase the risk of injury if the exercise intensity is incorrect.
Once a comfortable location for the chosen resistance band is determined, the exerciser should fasten the band around the ankles and pull it up until it comfortably wraps around the mid-thigh and upper thigh.
Child pose
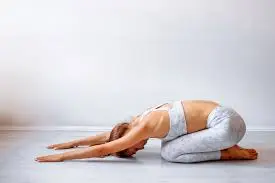
Start with the kneeling position on the yoga mat. It can help to start on a dog yoga mat. Kneel and bring your big toes together so they touch. Move your knees apart so that they are about hip-width apart. Exhale and lower yourself.
Exhale slowly and move your hips toward your thighs so that your bottom rests on your feet or ankles. Bring your forehead to the floor. Keep your hands on the mat in front of you and slowly move them away from your body so that your chest is on or between your thighs. You make sure your forehead touches the surface of the mat. Breathe and hold the position. Rest in the child’s pose while slowly breathing into your belly.
You can hold this position for 30 seconds to a few minutes. Focus on your breathing and notice what happens in your body in the child’s position. The child’s pose is one of the most basic yoga poses and most people can perform this pose successfully. But there are people who shouldn’t make a child’s pose.
You are pregnant
You have diarrhea
You have ankle problems
Any type of knee injury
condition with hypertension, ear, and eye infections
Low-Impact Aerobics
Focus on your pain and only allow yourself to exercise at a level you feel comfortable with. Aerobic exercises that you can easily adapt to your pace and pain level include:
Walking: This is the easiest way to get your heart rate up, either alone or with a friend.
Water aerobics: An example of water aerobics is swimming which is one of the great low-impact exercises for people with chronic pain. If swimming isn’t your thing, try walking in the pool or wading while holding a board.
Stationary cycling: If you don’t have a stationary bike at home, consider joining a class. Go at your own pace and don’t feel pressured to keep up with the people around you.
Tai chi: This gentle exercise uses slow, controlled movements and relaxation techniques to stretch, strengthen, and get the blood flowing.
Diagnosing SI joint problems
SI Joint problems can be difficult to diagnose. Joints are located deep in your body, making it difficult for a doctor to examine or test how they move. Joint damage sometimes does not see these investigations such as X-rays, MRIs, or CT scans. The symptoms of SI joint pain are also very common compression to other back pain conditions such as sciatica, bulging discs, and hip arthritis. Your doctor may use the following strategies to diagnose SI joint problems:
Physical examination. The doctor will ask you to do some movement stretches related to your back muscles. This can help them identify the source of your pain.
Numbing medicines. If an injection of a numbing drug such as lidocaine into the SI joint causes pain after a short time, you probably have a problem with the SI joint.
Imaging tests. Investigations included X-rays, MRIs, and CT scans.
Recovery and prevention
A positive attitude, regular activity, and a quick return to work are all very important factors for recovery. If it is not possible to carry out the usual work tasks for the moment, modified (light or limited) work can be assigned for a specified period.
Prevention is key to preventing recurrence:
Limit prolonged sitting. Prolonged sitting can cause back tension and stiffness, which in turn can worsen SI joint pain. Try to get up and move, stretch, or walk at least once every 50-60 minutes.
Change your sitting position. The best way to sit with SI joint pain is to keep your hips level with each other and your “seat bones” in contact with the chair. This can prevent strain on the ligaments around your SI joint. Keep your knees slightly far while sitting and avoid crossing leg movement. It can often be more comfortable for the SI joint to have your hips higher than your knees to maintain the normal curve of your back.
Strengthen the gluteal muscles. A reliable source found that strengthening the glutes can be beneficial for people with persistent SI joint pain and weak glutes. Alternation of heat and cold. Try alternating heat and ice for 15-20 minutes at a time to help relieve pain and stimulate circulation.
Consult a physical therapist if your pain does not improve. A physical therapist can create a customized program to help you manage your SI joint pain. The best precaution is to keep the weight below your comfort zone.
Correct lifting techniques
Maintain a proper posture while such activities sitting, standing, moving, and sleeping
Regular exercise with stretching/strengthening
Ergonomic work area
Good nutrition, healthy weight, lean mass
Stress management and relaxation techniques
Do not smoke
Sacroiliac joint pain exercises to avoid
Certain sports and movements can make sacroiliac joint pain worse. If you have sacroiliitis, try to minimize or avoid these activities:
sit up
Abdominal crunches
golf
Tennis
Powerlifting
football
basketball
Cycling for a long time
In general, any physical activity that requires pelvic rotation, physical contact, or heavy lifting of weights or objects should be avoided to help the sacrum heal.
A note from Samarpan Physiotherapy Clinic
During this condition you care of pain, you should take care of your aggravated movement. If you suffer from sacroiliac joint pain you can come to our sampan clinic and consult with our physiotherapist who provide you with a brief idea about the condition and an explanation of the treatment. our clinic provides you with manual therapy and mechanical therapy.
In mechanical therapy add some modalities that provide you pain relief. Mechanical therapy included modalities such as short-wave diathermy, transcutaneous nerve stimulation, and heat therapy sessions.in manual therapy including all the back exercises such as mobility exercises and stretching exercises.
FAQ
Avoid standing exercises that shift weight to the hips, such as leg kicks and other movements where only one leg is on the ground at a time. Also, skip vigorous exercises like running or jumping rope, as well as cardio equipment like treadmills and stair climbers.
That depends. For some people, light and easy swimming strokes are beneficial. For others, certain strokes like breaststroke and butterfly can irritate the sacrum. If you find that swimming causes you pain, try lying on your back instead or stick to walking through the water.
SI joint pain is usually centered in the lower back, groin, pelvis, or coccyx. Some people feel a dull, aching pain, while others feel a sharp, stabbing pain that radiates down the thigh, knee, or leg.
sacroiliac joint pain is more common in women than men.5 Risk factors also include age, pregnancy, overweight/obesity, previous back injury, prolonged sitting, exercising more than four times a week, and jobs that require lifting, bending, or heavy lifting.
In addition to pain, symptoms of SI joint instability include:
Numbness or tingling
Weakness
Instability of the leg
Difficulty sleeping due to pain and discomfort
Problems with prolonged sitting
Pain from sitting to standing