
Wrist Drop
Table of Contents
Introduction of the Wrist Drop
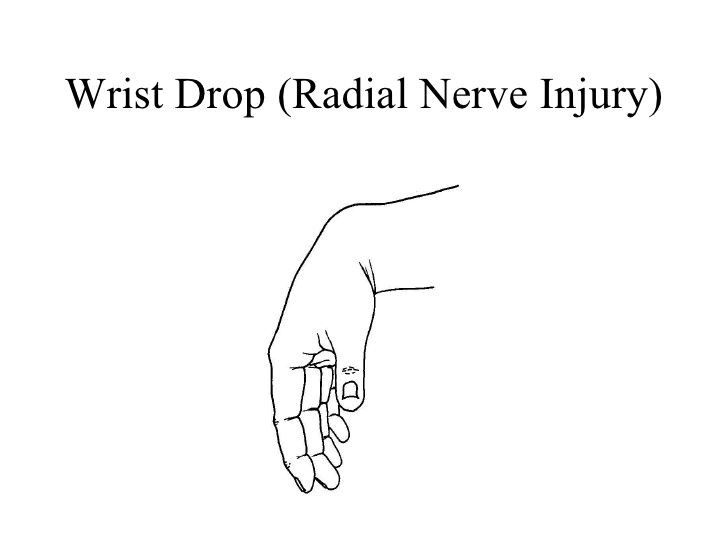
- Wrist drop is a disorder caused by radial nerve palsy. Due to a radial nerve’s innervation of the extensor muscles of a wrist & digits, those whose radial nerve function has been compromised may not actively extend them. As such, a hand hangs flaccidly in the position of flexion when a patient attempts to bring an arm to the horizontal position. A wrist remains partially flexed because of the opposing action of flexor muscles of the forearm. Therefore, the extensor muscles in a posterior compartment remain paralyzed.
- A hand & wrist form the group of complex, delicately balanced joints considered the most active part of the upper extremity. Optimal overall function is essential to so many activities of daily living. The hand, as well as wrist examination, was done in a structured manner, which will assist to facilitate the most appropriate working diagnosis for treatment. Diagnosing hand & wrist conditions is often challenging and for this reason, the bilateral comparison may be useful.
- There are three varying degrees of nerve damage:
Neurapraxia: A first-degree injury, is the least serious classification.
Axonotmesis: This refers to a second-, third or fourth-degree injury.
Neurotmesis: A last meaning fifth-degree injury, which is the most severe form of nerve damage. - Radial nerve injuries rarely happen at sites other than a humeral shaft or even the proximal third of the dorsomedial forearm. Injuries to a radial nerve at the high level typically do not affect triceps function, as well as elbow extension, is preserved; but, in high radial nerve palsy, a pattern of motor paralysis includes loss of wrist extension, thumb extension & abduction, as well as finger metacarpophalangeal joint extension. Wrist extension is essential for proper flexor tendon tensioning, & grasp is profoundly decreased & represents the significant functional deficit after high radial nerve paralysis. More distal nerve injuries affect a posterior interosseous nerve & result in the low radial nerve palsy. Wrist extension is preserved with the tendency toward radial deviation secondary to preserved extensor carpi radialis longus function. But, loss of thumb extension as well as abduction & finger metacarpophalangeal joint extension prevents appropriate grasp posture, & awkwardness and clumsiness of the hand are striking.
- Observation is indicated in most nerve palsies associated with the closed humeral fractures due to the return of normal function may be anticipated at 3 to 6 months after fracture. Early surgical exploration for a Holstein-Lewis fracture pattern (spiral fracture of the middle-distal third junction) can not be indicated. The series of patients with this pattern were noted to have entire recovery regardless of the surgical intervention. Indications for open reduction & fixation of acute closed humeral fractures should mainly rely more on factors other than the status of a radial nerve. The timing for the nerve exploration in closed injuries varies. Surgical exploration in the absence of the nerve recovery or even advancing Tinel sign may be indicated three months after affection. The results of nerve repair seem to be better when done before rather than after six months. Nerve exploration may accompany the treatment of open humeral fractures & lacerations associated with nerve deficit. Radial nerve neurorrhaphy may be performed when possible; outcomes theoretically are favorable owing to a nerve being largely motor, as well as the distances between the sites of injury & reinnervation, are short. When the nerve repair is performed, & suitable recovery is anticipated, tendon transfers generally may be delayed for six months.
- Burkhalter outlined three indications, but, for early tendon transfer:
- To act as the substitute while regrowth of the nerve, avoiding the use of external splints,
- To act as a helper as reinnervation proceeds, and
- To intervene when the results of a nerve repair are considered poor or a nerve is irreparable.
- Burkhalter contended to transfer of the pronator teres to establish wrist extension early origins no disability & that the transferred till functions as a forearm pronator. Radial nerve injuries in a proximal third of the forearm resulting in the low radial nerve palsy in which finger metacarpophalangeal joint extension & thumb extension & radial abduction are lost. Procedures for the low radial nerve palsy are derived from the more common procedures used for high radial nerve palsy.
Forearm anatomy
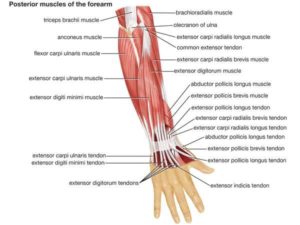
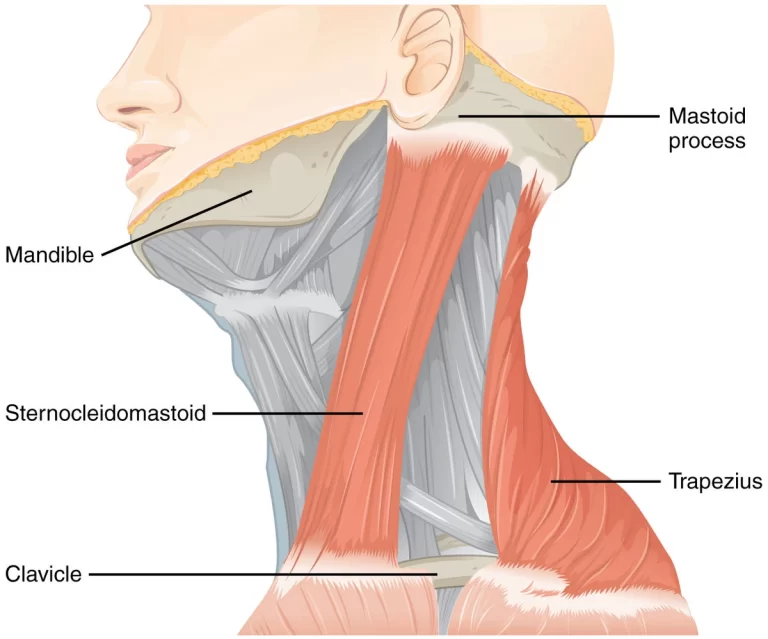
- A forearm is a part of a body that extends from the elbow to a wrist and is not to be confused with an arm, which extends from a shoulder to the elbow. The extensor muscles in a forearm are the extensor carpi ulnaris, extensor digiti minimi, extensor digitorum, extensor indicis, extensor carpi radialis brevis, & extensor carpi radialis longus. These extensor muscles are supplied by a posterior interosseous nerve, the branch of the radial nerve. Other muscles in a forearm that are innervated by this nerve are the supinator, extensor pollicis brevis, extensor pollicis longus as well as abductor pollicis longus. All of these muscles are situated in the posterior half of a forearm (posterior is when it is in its standard anatomical position). In addition, the brachioradialis, anconeus, triceps brachii & extensor carpi radialis longus are all innervated by muscular branches of a radial nerve in the arm.
Pathophysiology
- A radial nerve bifurcates into deep as well as superficial branches along a lateral border of a cubital fossa, just distal to an elbow. A former, also called a posterior interosseous nerve, courses through a supinator muscle & supplies it and the extensor muscles of a wrist as well as digits. Hence, injury proximal to this bifurcation may be expected to manifest not only as of the radial nerve palsy but also as the radial nerve sensory derangement. The radial nerve appears to be vulnerable to entrapment at a level of the supinator muscle. Radial head entrapment may be proximal to an elbow at the head of the triceps muscle, in which case the deficit in the elbow extension can accompany the wrist drop. If wrist drop is the presenting sign of mono neuritis multiplex, after that its pathophysiology may be mediated by immunological, infectious, paraneoplastic, or even other processes that result in damage to the axon, thereby interfering with nerve conduction.
Which are the Causes of Wrist drop?
Wrist extension is achieved by muscles in a forearm contracting, pulling on tendons that attach distally to (beyond) a wrist. If the tendons, muscles, or even nerves supplying these muscles are damaged or otherwise not working as they should be, a wrist drop can occur.
- The following situations can result in wrist drop:
- Stab wounds to a chest at or below a clavicle: The radial nerve is a terminal branch of a posterior cord of a brachial plexus. The stab wound can damage the posterior cord & result in neurological deficits, including the inability to abduct a shoulder beyond the first 15 degrees, the inability to extend a forearm, decreased ability to supinate a hand, decreased ability to abduct a thumb & sensory loss to a posterior surface of an arm & hand.
- Broken humerus: A radial nerve may be damaged if the humerus (the bone of an arm) is broken due to it running through a radial groove on a lateral border of this bone along with a deep brachial artery.
- Lead poisoning: Wrist drop is associated with lead poisoning because of the effect of lead on the radial nerve.
- Persistent injury: Persistent injury to a nerve is the common cause through either repetitive movement or by applying pressure externally along with the route of a radial nerve as in the prolonged use of crutches, extended leaning on the elbows, or even regular upper body rope suspension. The colloquial terms for the radial nerve palsy are derived from the described cause.
- Correcting dislocated shoulders: Radial nerve palsy may result from the now-discredited practice of correcting the dislocated shoulder by putting the foot in a person’s armpit & pulling on the arm in an attempt to slide the humerus back into a glenoid cavity of the scapula.
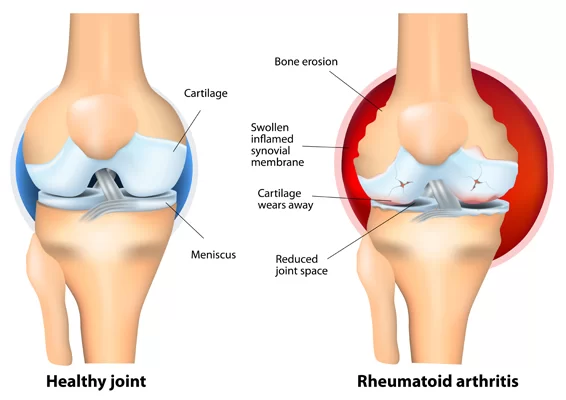
- Neuropathy in the hands and/or arms in patients with rheumatoid arthritis can in rare cases cause wrist drop. “When the joint swells, it may pinch the nerves of the sensation that passes next to it. If the swelling irritates a nerve, either owing to the inflammation or even simply owing to pressure, the nerve may send sensations of pain, numbness, and/or tingling to the brain which is called nerve entrapment. Nerve entrapment most frequently happens at the wrist (carpal tunnel syndrome) & elbow (ulnar nerve entrapment). The rare form of nerve disease in patients with rheumatoid arthritis that causes numbness and/or tingling is neuropathy. Neuropathy is nerve damage that in people with rheumatoid arthritis may result from inflammation of blood vessels (vasculitis).”
Signs and symptoms of Wrist drop:
- Wrist hanging limply
- The patient cannot lift their wrist
- Problems extending or even straightening the wrist or fingers
- Difficulty in making the fist
- Moreover to wrist drop, other symptoms of radial nerve palsy affect the person’s arm, wrist, hand, and/or fingers and may include:
- Pain around wrist joint
- Weakness
- Numbness from the triceps muscle down to the fingers
- Inability to control muscles
- Loss of function
- Pinching and grasping problems
- Weakness or even inability to control muscles from the triceps down to the fingers
- Wrist drop when a wrist hangs limply & the patient cannot lift it.
How to Diagnose the Wrist drop?
- The workup for the wrist drop frequently mainly includes nerve conduction velocity studies to isolate as well as confirm the radial nerve as a source of the problem. Other screening tests include an inability to extend a thumb into a “hitchhiker’s sign”. Plain films may help identify the bone spurs & fractures that may have injured the nerve. Sometimes MRI imaging is needed to differentiate subtle causes. To diagnose foot drop, the physician will perform a physical examination to evaluate weakness, numbness as well as other symptoms in the arm and hand as well.
- The advanced diagnostic procedures as well as technology to effectively diagnose, inform treatment & carefully monitor the condition.
- Diagnostic procedures may include:
- Electromyogram (EMG): The test measures the electrical activity of the muscle in response to stimulation and the nature & speed of the conduction of electrical impulses along with the nerve. Which may confirm the presence of the nerve damage and assess its severity.
- Nerve conduction studies: These tests measure how well specific nerves may send the electrical signal from a spinal cord to the muscles. The physician places the shock-emitting electrode directly over a nerve to be studied, & a recording electrode over the muscles supplied by that nerve. A shock-emitting electrode sends repeated, brief electrical pulses to a nerve, as well as the recording electrode record the time it takes for a muscle to contract in response to an electrical pulse.
Imaging tests
- It is sometimes caused by an overgrowth of the bone in the spinal canal or by a tumor or even a cyst pressing on the nerve in the knee or spine.
- X-rays: Plain X-rays use a low level of radiation to visualize a soft tissue mass or even the bone lesion which may be causing the symptoms.
- Ultrasound: This technology, uses sound waves to create images of internal structures & might check for the cysts or even tumors on the nerve or even show swelling on the nerve from compression.
- CT scan: This combines X-ray images taken from many different angles to form cross-sectional views of the structures within the body.
- Magnetic resonance imaging (MRI): It uses radio waves and a strong magnetic field to create detailed images. MRI is useful in visualizing soft tissue lesions that may be compressing a nerve.
Special tests

- The hitchhike sign
It is used in two conditions to identify the problem: radial nerve or posterior interosseous nerve palsy and dystrophic dwarfism.
Radial nerve or posterior interosseous nerve palsy:
A fracture can cause injury to a radial nerve which results in paralysis of the wrist as well as finger extensors. Examine a patient before & after surgery that is done to fix the fracture. The patient with posterior interosseous nerve injury may perform wrist extension, but no finger extension. A radial nerve gives innervation to a wrist, finger as well as thumb extensors. A posterior interosseous nerve will give finger as well as thumb extension only. Injury at the higher level is probably associated with a radial nerve. Injury at the lower level, usually happening around an elbow, probably is associated with the posterior interosseous nerve.
Ask a patient to “hitchhike”, & if a patient can do this then a radial nerve, as well as posterior interosseous nerve functions, are intact. If the patient cannot perform the hitchhike sign, then a posterior interosseous nerve can be affected as well as the radial nerve may be unaffected. Ask a patient to extend their wrist, If a patient can extend a wrist, then a radial nerve is unaffected up to the level of a posterior interosseous nerve, meaning this nerve is the one that is involved. Remember, sometimes it is hard to distinguish whether a patient has the true wrist drop or not based on the splinting & immobilization and also the examination. A patient can extend the fingers by the intrinsic muscles which predominantly involve the ulnar nerve with some median nerve contribution. If the therapist wants to examine the fingers well, extend a wrist then ask a patient to extend the fingers. This is more complicated than asking a patient to perform the hitchhike sign. - Upper Limb Tension Test (ULTT, Radial nerve)
This test is done on the normal/asymptomatic side first. Traditionally for an upper limb, the order of the joint positioning is shoulder followed by the forearm, wrist, fingers, & lastly elbow. The joint positioning component is added till the pain is provoked or even symptoms are reproduced. To further sensitive the upper limb test, side flexion of the cervical spine can be added. If the pain is provoked in the very starting position, then there is no requirement to add further sensitizers.
If pain or even sensations of tingling or numbness are experienced at any stage while performing the movement into a test position or during the addition of the sensitization maneuvers, particularly reproduction of neck, shoulder, or even arm symptoms, the test is positive; this confirms the degree of mechanical interference affecting neural structures.
The therapist should move thehand step by step starting from shoulder girdle depression and then elbow extension after that medial rotation of the whole arm and wrist, finger, and thumb are inflection.
Treatment of Wrist drop
Treatment for the wrist drop depends on the cause. If the cause is successfully treated, the wrist drop might disappear. If a cause can not be treated, wrist drop can be permanent.
Treatment for wrist drops might include:
Medical treatment for Wrist drop
- If painful paresthesias develop, a condition can sometimes be effectively managed with sympathetic blocks or laparoscopic synovectomy. The second treatments for wrist drops are amitriptyline, nortriptyline, duloxetine, pregabalin, as well as gabapentin.
- Local treatment with transdermal capsaicin or even diclofenac can also reduce symptoms. Even if there is significant pain, narcotic medications can be kept to a minimum. Erythropoietin is the naturally occurring hormone that is approved by the US Food and Drug Administration for anemia but has neuroprotective and, possibly, neurotrophic properties as well. A proposed mechanism of action is antiapoptotic as well as anti-inflammatory, promoting cell survival.
Splinting for wrist drop
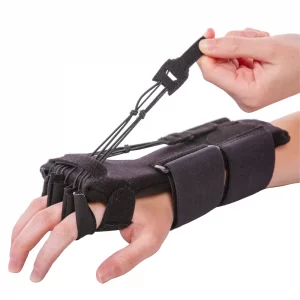
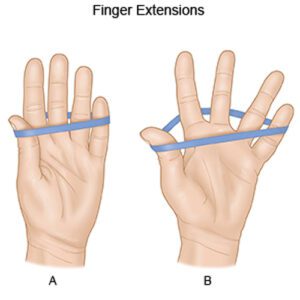
- Radial nerve palsy splint for limp wrist and finger extension
- Very few radial nerve splints for men as well as women with radial nerve palsy, peripheral nerve injury, wrist drop, Saturday night palsy, honeymoon palsy, crutch palsy, or even weak fingers exist on the market. The products that do exist lack affordability, functionality, practicality, comfort, and fit as well. The limp wrist caused by radial nerve injuries is much more common than compared to the patient might expect. For reference, between 2% as well as 17% of people who have experienced a humeral shaft fracture eventually develop radial nerve palsy. For these reasons, the therapist has made it our mission to create a supportive, affordable, effective, as well as comfortable radial nerve brace.
- Our Radial Nerve Palsy Splint positions the wrist as well as fingers into extension (also known as dorsiflexion), allowing movement during providing support after the radial nerve injury. As function returns, the splint facilitates the strengthening of the wrist extensors, assisting speed up the healing process, this splint is also known as the “BraceAbility Radial Nerve Palsy Splint”.
Physical therapy treatment for Wrist drop
- It helps in strengthening the arms, to avoid a risk of radial nerve injury. The therapist teaches proper balance exercises, to avoid falls. A correct posture at the workplace & while sleeping is also taught to a patient. A physiotherapist may assist a patient in managing medical conditions, such as diabetes and kidney stones, hence, preventing the risk of radial nerve injury. The physical therapist uses modalities such as electrical stimulation (TENS), to assist with pain from a radial nerve. Electrical impulses sent from the TENS unit give assistance to desensitizing radial nerve endings. Physical therapy involves the use of massage therapy which can assist decrease any swelling that compresses a radial nerve. This occurs due to massage therapy assists in draining fluids from lymph channels. Most importantly, physical therapy facilitates recovery of the injured radial nerve, by improving blood circulation. This also returns mobility to the wrist as well as fingers through gripping exercises. These gripping exercises may assist with conditions such as wrist drops.
Electrotherapy
- TENS (Transcutaneous electrical nerve stimulation): This is a method of pain relief involving the use of a mild electrical current. A TENS machine is a small, battery-operated device that has leads connected to sticky pads called electrodes. This machine is mainly used to stimulate the nerve in the wrist drop.
- Hot pack: This modality is mainly used for pain relief.
- ES (Electrical stimulation): Electrical stimulation sends mild electrical pulses through the skin to assist stimulate affected muscles or manipulate nerves to decrease pain. This modality may not be appropriate for everyone, but for the people who have painless procedures, it accelerates recovery as well as provides relief from painful or uncomfortable symptoms.
Exercise program for Wrist drop
Stretching exercises
This exercise can improve performance in physical tasks, reduce the risk of injuries, assist the joints to move through their full range of motion, increase muscle blood flow, enable the muscles to work most effectively, as well as increase the ability to do daily tasks.
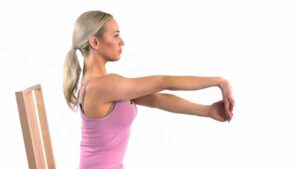
- Praying position stretching
First of all, tell a patient to take the standing or sitting position, and place the palms together in the praying position. Have the elbows touch each other. Patient hands should be in front of the face. Then, the patient’s arms can be touching each other from the tips of the fingers to the elbows. After that, with the palms pressed together, slowly spread the elbows apart. Do it while lowering the hands of a patient to waist height. Next, give the command to a patient to stop when the hands are in front of a belly button or a patient feels the stretch. Hold this stretch for the next thirty seconds, and repeat three times in one session. Do three sessions in one day.

- Wrist flexors Stretch
Equipment required: None
Additional instructions: The stretch should be done throughout the day, especially before the activity. After recovery, the stretching should be included as part of the warm-up to activities that involve
gripping, namely gardening, tennis, and golf.
Step-by-step directions:
First of all, Straighten the arm & bend your wrist back as if signaling someone to “stop.” After that, use the opposite hand to apply gentle pressure across a palm as well as pull it toward the patient’s face side till he/ she feels the stretch on the inside of the forearm. Hold the stretch for 30 seconds. Repeat three times per session. Do three sessions per day. - Clenched fists
To begin with, tell a patient to take a sitting position, & place the open hands on the thighs with palms up. After that, close the hands slowly into fists, but do not clench the fingers too tightly. With the forearms touching the legs, raise the fists off of a patient’s legs & back toward a patient’s body, bending at a wrist. Hold for the next 30 seconds. Lower the fists and slowly open the fingers wide. Repeat three times in one session. Do three sessions in a day. - Hooked stretching exercise
To embark with, to do this stretching exercise, hook an elbow under the other & pull both arms towards the center of a torso. After that, a patient should feel the stretch in the shoulders as well as wrap one arm around another arm so that the palms are touching each other. Hold it for 30 seconds. Do three repetitions per session. Do three sessions per day. - Finger stretching exercise
To start with, to do this stretching exercise, bring a pinky & ring fingers together. Separate the middle and index fingers
to form a ring finger. Hold this position for the next thirty seconds per repetition. Perform three repetitions in one session. Repeat three sessions in a day. - Fist-opener
To embark with, make the fist and hold it for thirty seconds in front of a physical therapist. After that, stretch the fingers till a hand is flat & open, with the fingers together. Repeat this motion five times in one session. Do three sessions in a day.
- Thumb pull
To do this stretching, grab a thumb with another hand. Slowly, pull a thumb backward, mild away from a hand. Hold
this position for the next 30 seconds per repetition. Do three repetitions per session. Do three sessions in one day. Repeat this exercise on the other thumb as well. - Alternate finger stretch
To do this exercise, bring the middle & ring fingers together. Separate a pinky finger as well as index fingers from them. Repeat this stretching exercise three times in one session. Do three sessions in a day. - Side to Side Stretching
To begin with, the therapist should tell a patient to take the tabletop position with the knees & hands-on the ground. After that, move the fingers outwards, and they may be facing away from each other hands. After that, move from side to side, and hold for the next thirty seconds. Do this exercise three times in one session. Do three sessions in one day. - Wrist circle stretching exercise
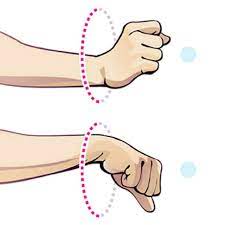
First of all, the therapist tells a patient to take the sitting position with the hands on the table. Let the wrists hang off an edge. After that, make the circle with a wrist going clockwise. Next, make the circle go anticlockwise. Hold this position for thirty seconds. Repeat three times in one session. Do three sessions in a day. - Thumb and upper wrist stretching exercise
The therapist gives a command to a patient to put the right arm out and make a fist around a thumb. After that, bend a fist down toward the ground. Next, a patient will feel a stretch in the top of the wrist and the thumb. Hold this for 30 seconds. Repeat on the other hand as well. Do three repetitions in a session. Do three sessions in one day. - Palm-to-ceiling wrist stretching exercise
To begin with, the therapist gives a command to a patient that extends one arm in front of a patient’s face as well as palm facing toward the ceiling. Bend a wrist so that the fingertips point toward a floor. Using another hand, gradually, pull the fingers toward a body till a patient feels a stretch in the underside of a wrist. After holding for 30 seconds, repeat using another hand too. Repeat it three times in one session. Do three sessions in one day.
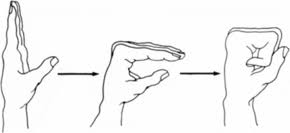
- Finger tendon glide stretch
To begin with, the fingers extended straight out in front of a patient. Make the hook fist first, & return to the straight hand. Make the full fist, then return to the straight hand. Repeat it ten times in one set per session. Do three sessions in one day. - Loosen-up stretching exercise
It is a simple stretching exercise to loosen up the fingers & hands before a patient begins to do exercise. This is also a good break to relax the wrists and hands if a patient is doing repetitive hand movements. Sit comfortably as well as bend an arm at an elbow at the right angle. First make the fist, after that gradually open it spreading and stretching the fingers apart. Repeat three times in one session. Do three sessions in one day. Every time hold for thirty seconds. - Wrist supinators stretching
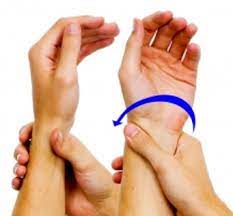
First of all, the therapist tells the patient to take a comfortable position, such as sitting or supine. After that, the therapist grasps the patient’s hand with one hand and places the second hand on the elbow joint. Then, the physical therapist turns the patient’s hand outside meaning the palm will face the ceiling. Hold the action for the next 30 seconds. Do three repetitions per session. Do three sessions per day. - Wrist pronators stretching
To begin with, a physical therapist tells a patient to take a relaxed position, namely sitting or supune. Then, a therapist grasps a patient’s hand with one strong hand and places a second hand on the elbow joint. After that, a therapist turns a patient’s hand inside meaning the palm will face the floor. Hold this action for the next thirty seconds. Do three repetitions in one session. Do three sessions in one day. - Table Stretch
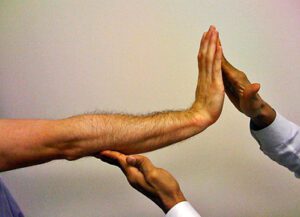
- First of all, take a comfortable position beside the table. Then, keep the back of the hand flat on a table and then rotate the whole body away. Do it three times per session. Do three sessions per day.
Range of motion exercise for Wrist drop
Passive range of motion exercise
- Passive wrist extension
To begin with, take a comfortable position, namely sitting on a chair as well as an affected hand hanging on the edge of a table with full pronation. Moreover, place the rolled towel under an affected hand. In addition, the physiotherapist takes his/her position opposite the patient. A physical therapist tells a patient to try to move a wrist upward, but a patient cannot move the wrist and a physical therapist move the hand in the upward direction until a stretch is felt by the patient. Perform it 10 times per session. Do three sessions in one day. - Passive wrist ulnar deviation
To start with, tell a patient to take a comfortable position, namely sitting on a chair, and an affected hand should be in mid pronation. Furthermore, place a rolled towel under an affected hand. Then, a physical therapist takes his/her position opposite the patient. After that, a physical therapist gives a command to the patient to try to move a wrist down during a therapist performs a movement, and the physiotherapist moves a wrist in the downward direction until a stretch is felt by the patient. Do it ten times per session. Do three sessions in one day. - Passive wrist radial deviation
First of all, ask a patient to take a comfortable position, such as sitting on a chair as well as affected hand should be in mid supination position. After that, place the rolled towel under an affected hand. After that, a physical therapist takes his/her position opposite a patient. Then, a therapist gives a command to a patient to try to move the wrist upward while a physiotherapist performs the radial deviation, and the physiotherapist moves the wrist in the upward direction till the stretch is felt by the patient. Perform it ten times in one session. Do three sessions per day. - Passive supination
To embark with, tell a patient to take a comfortable position, namely sitting on a chair with the injured hand should be in full pronation position, meaning the back of the hand will be facing the roof. In addition, place the rolled towel under an affected hand. Next, the clinician takes his/her position opposite the patient. After that, a physiotherapist gives a command to the patient to try to rotate a wrist during the physiotherapist performs the passive supination and a physical therapist rotates the wrist passively until the stretch should be felt by the patient. Perform this movement ten times per session. Do three sessions in one day.
- Passive pronation
To start with, tell the patient to take a comfortable position, such as sitting on a chair with an affected hand should be in a full supination position, meaning the back of the hand will be facing the ground. Furthermore, place the rolled towel under the affected hand. After that, a physical therapist takes his/her position opposite a patient. Next, a therapist gives a command to a patient to try to rotate the wrist while a therapist performs the passive pronation, and a physical therapist rotates a wrist passively until the stretch should be felt by a patient. Perform this action ten times in one session. Do three sessions per day. - Passive finger flexion
Forst of all, the patient should place a hand with the affected fingers flat on a table, with palm up. Next, a clinician places his/her free hand on the back of the fingers as well as moves the fingers inward like bending the fingers. The affected finger will be free to move. Hold it for about ten seconds. After that, straighten the finger. Repeat it 10 times per session. Do three sessions in one day. - Passive finger extension
First of all, place the affected hand with the affected finger flat on the table, with palm up. After that, a physical therapist places his/her strong hand on the back of the fingers but the fingers are in the flexion motion. Next, move the fingers outward like straightening the fingers. The affected finger will be free to move. Hold for about five to ten seconds. Then, bend the fingers. Repeat it ten times per session. Do three sessions per day. - Passive thumb flexion
To begin with, the therapist should tell a patient to take a comfortable position, namely sitting on the chair as well as the hand should be in mid pronation position. The rolled towel is put under the affected hand. Then, use the strong hand of the physical therapist to bend the thumb down so that the gentle stretch is felt. Hold it five to six seconds per repetition. Repeat ten times in one session. Do three sessions per day. - Passive thumb extension
First of all, the therapist tells the patient to take a comfortable position, such as sitting on the chair & the hand must be in a mid pronation position. After that, the rolled towel is placed under an affected hand. Next, use the strong hand of a physical therapist gently stretch the thumb out. Next, hold for the next five to six seconds. Repeat it ten times per session. Do three sessions in one day. - Passive thumb abduction
To start with, tell a patient to take a comfortable position namely sitting on a chair with the rolled towel under an affected hand, but the hand must be in the mid pronation position. Next, stretch the thumb out from a palm as if a patient is opening it up to hold the large jar. However, remember that stretch at a big thumb knuckle, not a tip. Hold it for five to six seconds. Repeat ten times in one session. Do three sessions per day. - Passive thumb opposition
To begin with, tell a patient to take a comfortable position namely sitting on the chair. Next, touch a thumb to the tip of each finger. When a patient is able to do it easily, then touch further down on each finger until a patient is able to touch the base of each finger. Repeat ten times per session. Do three sessions in one day.
Active-assisted range of motion exercise
- Active-assisted wrist extension
To embark with, the therapist should tell a patient to take a comfortable position, namely sitting on the chair, and the affected hand should be relaxed on the edge of a table with full pronation. Next, a physical therapist takes his/her position opposite the patient. Then, a physical therapist gives a command to a patient to try to move a wrist upward, when a patient is not able to reach the end range while that time the physiotherapist provides assistance to reach a full range. Perform ten times per session. Do three sessions per day. - Active-assisted wrist ulnar deviation
To start with, tell the patient to take a comfortable position, namely sitting in a chair, and the affected hand should be in mid supination. After that, place the rolled towel under the affected hand. Next, the physical therapist takes a position opposite the patient. Then, a physical therapist gives a command to a patient to try to move a wrist down, and when a patient is stopped while performing the motion of wrist ulnar deviation, then a physical therapist helps a patient to reach the end range. Perform it ten times in one session. Do three sessions per day. - Active-assisted wrist radial deviation
First of all, tell a patient to take a comfortable position, such as sitting in a chair, and the affected hand should be in mid supination. After that, place the rolled towel under the injured hand. Then, the physical therapist gives an instruction to a patient to try to move a wrist up, and when a patient is stopped while performing the movement, then the physical therapist helps a patient to reach the end range. Do it ten times per session. Do three sessions per day. - Active-assisted supination
To start with, tell the patient to take a comfortable position, such as sitting in a chair with an injured hand should be in a full pronation position. Meaning the front of a hand will be facing the ground. After that, place the rolled towel under the affected hand. The clinician takes the position opposite the patient. Then, a therapist gives a command to a patient that tries to rotate the wrist as well as when a patient stops the motion, a physical therapist provides outside force to reach the full range of supination. Perform it ten times in one session. Do three sessions per day. - Active-assisted pronation
To embark with, tell a patient to take a comfortable position, like sitting on a chair with the affected hand should be in a full supination position. Meaning a palm of the hand will be facing the ceiling. Next, place the rolled towel under the affected hand. After that, a physical therapist takes the opposite position from the patient. Moreover, a physical therapist gives a command to the patient to try to rotate the wrist and when a patient is unable to reach an end range as well as stops at any point, a physical therapist helps a patient to perform full range. Perform ten times per session. Do three sessions in one day. - Active-assisted thumb flexion
To embark with, ask a patient to take a comfortable position, namely sitting on a chair and a hand should be in mid pronation. After that, the rolled towel is placed under the injured hand. The clinician gives a command to a patient to bend the thumb down so that the gentle stretch is felt. Next, the fingers will cross the palm. Repeat it ten times per session. Do three sessions in one day. - Active-assisted thumb extension
To start with, the therapist should tell a patient to take a comfortable position, namely sitting on a chair as well as a hand should be in mid supination position. After that, the rolled towel is placed under an affected hand. Next, a physical therapist instructs to a patient to stretch a thumb outside means slightly posteriorly to a palm, but when a patient is unable to fulfill the full range, a physiotherapist helps to do the full thumb extension. Repeat it ten times in one session. Do three sessions per day.
Active range of motion exercise
- Wrist supination
Equipment needed: Nothing
Additional instructions: This stretch will assist with activities that require the “palm up” position, gripping the object,
and/or twisting (namely when using a screwdriver).
Step-by-step action: First of all, bend the elbow at the side of the body with the palm facing the
roof. After that, use the opposite hand to hold at the wrist as well as gently turn the forearm further into the palm-up position till the patient feels a stretch. Hold this stretching for 30 seconds. Repeat three times in one session, then perform this stretching exercise on the other arm. Do three sessions per day. - Wrist circles to increase range of motion
To begin with, a physical therapist should give a command to a patient to take a comfortable position like sitting on a chair. After that, bring the hands up with the elbows close to a body, making fists. Then, rotate the wrists in a circular motion and try to keep the palms facing down to maximize a range of motion. Do ten circles in each direction per session. Do it in opposite direction too. Do three sessions in one day.
- Wrists Shakes
To start with, the therapist tells a patient to take a namaste position of a hand. Then, simply shake the wrists out for one minute per session per set. Do three sessions in one day. - Shake It Out
Shaking out a wrist and hands after staying in the same position for the while is a great mode to reintroduce blood flow as well as relieve the stiffness of the joints. To embark with, the hands are out in front of the patient & palms facing the ground. Slowly shake the hands by letting a wrist go limp. Continue for 30 seconds. Repeat up to three times in one set. One set in one session is enough. Do three sessions in one day. - Fist to Fan
To begin with, the hands in front of a patient as well as palms facing downwards. Make a fist with both hands. After that, open a fist halfway so that the fingers are bent at the knuckles. Then, open the hands fully so all five fingers are straight and spread wide apart. Hold for ten seconds per repetition. Do five times in one session and three sessions in a day. Re-make a fist, and repeat the routine once again. - Thumb touches
This exercise assists to improve coordination in the thumb as well as forefingers, & assists to reintroduce blood flow back to the injured area: Hold the hands outwards with the palms facing the ceiling. After that, with the injured hand, slowly bring a thumb to touch the tip of every finger. Repeat on the other hand as well. Next, return to the starting position. Repeat five times with both hands per session. Do three sessions in one day. - Wrist supination
First of all, the therapist should tell a patient to take a comfortable position meaning to stand or sit with an arm at the side with an elbow bent to 90 degrees, with a hand in the mid-range over the edge of a table. After that, the therapist tells the patient to move their hand upward facing the roof without holding it at the endpoint. Do ten times per set per session. Do three sessions in one day. - Wrist pronation
To embark with, the physical therapist should give a command to a patient to take a comfortable position meaning to stand or sit with an arm at the side with an elbow flexed to 90 degrees, with a hand in the mid pronation position over an edge of a table. After that, the therapist tells a patient to move the hand downward facing the ground without holding it at the endpoint. Do it ten times in one session. Do three sessions per day. - Wrist extension range of motion exercise
To start with, place a forearm on a table on a rolled-up towel for padding with a hand hanging off an edge of a stable surface, such as the table with palm down. After that, the physical therapist should give a command to move a hand upward until a patient feel the gentle stretch. Next, return to an embarking position. Do it ten times in one session. Do three sessions in one day.
- Wrist extension in supination position
To start with, give a command to a patient to place a forearm on an edge of a table on the rolled-up towel for padding with
the hand, which is in full supination. After that, a physical therapist should give a command to the patient to move a hand down till a patient feels the gentle stretch. Then, return to the embarking position. Do ten repetitions in one session. Do three sessions per day. - Wrist ulnar deviation
To embark with, it is a responsibility of a physical therapist to give a command to a patient to take a comfortable position with a support of a forearm on a table on the rolled-up towel for padding or on a knee, along with a thumb upward in position. Move a wrist down through the full range of ulnar deviation. Do it ten times per session. Do three sessions in one day. - Wrist radial deviation
To start with, a physical therapist gives a command to a patient that takes a comfortable position with a forearm supported on a table on the rolled-up towel for padding or on the knee, with a thumb upward in position. After that, move a wrist up through the full range of radial deviation movement. Do it ten times in one session. Perform three sessions in one day. - Thumb flexion
First of all, a physical therapist gives a command to the patient that takes a comfortable position with a forearm supported on the table on a rolled-up towel for padding or on the knee. A thumb is positioned outward. After that, move a thumb across a palm as well as back to the starting position. Do it ten times in one session. Do three sessions in one day. - Thumb extension
First of all, a physical therapist should give a command to a patient to take a comfortable position with the forearm supported on a table on a rolled-up towel for padding or on the knees. After that, a thumb is positioned outward direction. Then move a thumb across a palm and come back to the embarking position as well as move slightly backward but not in abduction motion. Do ten repetitions per session. Do three sessions per day. - Hand/finger tendon glide motion
First of all, the fingers extended straight out. After that, make the hook fist & return to the straight hand. Next, make a full fist as well as return to the straight hand. Next, make a straight fist, & return to a straight hand. - The Water Spout
Hold the arm out straight from the body, parallel to a floor. After that, hold the empty cup in the outstretched hand as well as turn it upside down as if pouring out water. Do it ten times per session. Do three sessions per day. - Figure Eight
Stand leaning forward with the injured hand on a worktop/back of the chair for support. Swing the injured arm in a figure-eight motion. When the hand comes closest to the body, face the palm outward. When the hand is farthest from the body, face the palm inward. Do it ten times per session. Perform two sessions per day. - Hide and Seek
Hold the elbow out away from the patient’s side. Hold arm at a 90-degree angle with the palm facing up. Then, rotate the forearm behind the elbow while keeping an elbow in place. After that, the palm should end up facing the roof again, but this time behind an elbow. Turn the head to look at the fingers. Do ten times per session, Perform two sessions in a day. - Don’t Forget to Tip
Look towards an affected side. Then, take the hand behind the back as if to accept a backhanded tip. After that, move fingers up as well as down. Perform this activity ten times per session. Do three sessions per day.
Strengthening exercise
- Rubber Band Stretch
First of all, the therapist tells the patient to take a sitting position. After that, take a rubber band and place it around all five fingers on the affected hand. Then, stretch the fingers out as wide as the patient can, using a rubber band as resistance, then relax them again. Do three sessions of ten repetitions on both hands. Add extra rubber bands to create more resistance as the patient builds up strength in the affected wrist and fingers.
- Hammer Rotation:
The patient will need a hammer, wrench, or even a similar long, thin implement for this exercise. The therapist should make sure it is not too heavy, especially if the wrists are tender or weak. Take the chosen implement in one hand as well as lean forward in the chair to rest that arm on the thigh. The palm should be facing inwards after that slowly turn the wrist downwards so the palm is facing the ground. Turn it back to the embarking position then rotate the palm upwards so it is facing the roof. Do it ten times per session. Do three sessions per day. - Grip strengthening
Grippers come in several types of tensions. A patient can start with the one that is only a little difficult to move. When a low weight becomes easy, enhance the gripper tension. Grippers range in origins from light to ones requiring 365 pounds of pressure to close (move). Tell a patient to sit comfortably with an arm bent at 90 degrees, with palm facing in, holding a gripper in the affected hand. Next, squeeze slowly, and then release it without holding at the endpoint. Repeat 10 times in one session. Do three sessions in one day. Only the hand should be moving, not the entire arm. Switch the hand as well as repeat. When a patient can comfortably do three to four sets, then try the gripper with more tension as well. - Fist to jazz hand
- To begin with, the therapist tells a patient to rest the affected arm on a table, such as if the patient is about to arm-wrestle someone. After that, make the fist. slowly open a fist and stretch the fingers out as wide as a patient can comfortably go (do a jazz hand). Repeat ten times per session. Do three sessions in one day.
- Finger spread-apart with theraband
To embark with, wrap the theraband around each of the fingers. After that, push against resistance from the band, and then spread fingers as far as possible. Hold for around ten seconds, then release it. Continuously do ten times, then switch a theraband to the other hand as well as repeat. Do it ten times in one session. Do three sessions per day. - Dumbbell windshield wipers
To start with, place a forearm on a stable as well as a flat surface like a table or even a chair. After that, hold one end of the lightweight dumbbell (around two to five pounds) in the patient’s hand. Rotating a wrist from right to left, lift and lower the dumbbell in the windshield wiper motion. Do continuously for ten repetitions per session. Do three sessions in one day. - Ball Squeeze
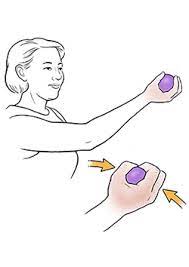
First of all, tell a patient to grasp the ball in one hand meaning the affected hand that has an ability to be squeezed, namely the stress ball, tennis ball, or racquetball. Squeeze the ball with all the patient’s fingers for ten seconds and after that relax it. Repeat 10 times in one session. Do three sessions in a day. After 5 to 6 days enhance the repetition of the number from 10 to 20, according to a patient’s ability.
- Wrist extensors strengthening with a dumbbell in pronation
First of all, on this wrist strengthening exercise, tell a patient to sit in the chair with a forearm resting on the table. After that, hang a wrist as well as hand over an edge of a table. Hold the 2 or 3-pound dumbbell in an affected hand. Then, with a palm facing down, slowly lift a hand, so the back of a hand moves towards the ceiling. A patient’s forearm should remain on a table. Next, a physical therapist should give a command to move a hand in the upward direction as far as the can and after that come back to the starting position. Do it ten times in one session. Do three sessions in one day. After 5 to 6 days, a physical therapist must apply hold at an endpoint for ten seconds per repetition.
- Wrist extensors strengthening with a dumbbell in supination
To begin with, this wrist strengthening exercise in full supination, tells a patient to take a sitting position in the chair with a forearm resting on the table. Then, hang a wrist and hand over an edge of a table. Hold the 2 or 3-pound dumbbell in the affected hand. After that, with a palm facing up, slowly move a hand down, so the back of the hand moves towards the floor. A patient’s forearm must remain on A table. Next, a physical therapist should give a command to move their hand in the downward direction as far as the patient can and then come back to the starting position. Do it ten times per session. Do three sessions per day. After 5 days, the physical therapist must give a command to a patient to hold at the endpoint for ten seconds in one repetition. Do two sessions in one day. - Wrist supination with dumbbell
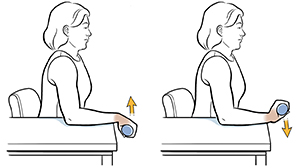
To do this exercise, tell a patient to take a sitting position on the chair with a forearm resting on the table. The physical therapist makes sure that a wrist, and hand, are over an edge of a table. After that, hold the end of the small 1- to 3-pound dumbbell in a hand, like a patient would hold the hammer. Next, slowly allow a hand as well as wrist to rotate over so a palm is facing up towards the ceiling, then slowly rotate a hand back up, so a dumbbell is straight up again. Do ten repetitions in one session, but without hold at an endpoint. Do three sessions in one day. After 5 to 6 days of this exercise, tell a patient to take hold at an endpoint for ten seconds per repetition. - Wrist pronation with dumbbell
To strengthen the wrist pronators, tell a patient to sit on the chair with a forearm supported on the table as well as a wrist and hand over an edge. After that, hold the dumbbell with a weight pointing up towards the roof. Next, slowly rotate a hand, so a wrist and palm are facing down towards the floor, then slowly turn a hand back to the starting position with the weight pointing up towards the ceiling. Do it ten times per session. Do three sessions in one day. - Rotation
First of all, sit with the arms bent to 90 degrees and the forearms out in front of a patient with palms facing down. After that, hold the light resistance band or dumbbells, or go weight-free as well as pretend a patient is holding something. After that, slowly rotate the hands so the palms are facing up. Then, slowly rotate the palms back to a starting position. Repeat it ten times per session. Do around three sessions in one day. - Wrist curl
To begin with, the therapist tells a patient to take a sitting position as well as hold an arm at 90 degrees, with a palm facing up. After that, an arm can rest on a leg, a bench, or a table. Curl a wrist up. Return wrist to the starting position. Repeat it ten times per session. - Pronated wrist curl
To start with, to do this exercise, a patient should sit as well as hold an arm at 90 degrees, with a palm facing down. Then, curl a wrist up. Return wrist to the starting position. Repeat it ten times per session. Do three sessions in one day. - Squeeze
While standing or even sitting position, hold a ball (or squeezable thing of choice) with a palm facing up. Then, squeeze a squeezy thing as hard as a patient can for 10 seconds. Slowly release a grip. Repeat ten times in the beginning then upgrade a repetition with the time. - Wrist ulnar deviators strengthening with dumbbell
To start this wrist strengthening exercise, the therapist tells a patient to sit on the chair with a forearm resting on a table. Then, give a command to a patient to put the hand in mid-range of supination as well as pronation over an edge of the table. Hold the 2 or 3-pound dumbbell in the affected hand. Next, with a palm facing the side, slowly move a hand down. A patient’s forearm must remain on the table. After that, a physical therapist should give a command to move a hand in the downward direction as far as they can and then come back to the normal position. Do it ten times in one session. Do three sessions in one day. After 5 days, a physical therapist must give the command to a patient to hold at the endpoint for ten seconds in one repetition. - Wrist radial deviators strengthening with dumbbell
To start the wrist strengthening exercises, to begin with, tell a patient to sit on the chair with the forearm resting on the table. After that, give a command to a patient to place a hand in mid-range of pronation and supination over an edge of the table. Hold the 2 or 3-pound dumbbell in the affected hand. Next, with a palm facing the side, slowly move a hand up. A patient’s forearm should remain on the table. Then, a physical therapist should give a command to move a hand in the upward direction as far as a patient can and then come back to the normal position. Do it ten times per session. Do three sessions per day. After 5 to 6 days, a physical therapist should give the command to a patient to hold at the endpoint for five seconds in one repetition. - Wrist ulnar deviators strengthening with theraband
Firstly, the clinician tells a patient to take a comfortable position meaning to sit on a chair with the hand in mid-pronation position at an edge of a table as well as hand should be put over a rolled towel. After that, wrap the one end of a theraband in the patient’s hand, as well as the second end in a therapist’s hand. Ask a patient to move the hand in the downward direction agaist a theraband. Do it ten times per session. Around three sessions should be done by a patient per day. After 5 to 6 days hold at the end position for ten in one per repetition. Slowly return to the neutral position. When the patient is adapted with a light-weighted band, then upgrade the color of the theraband for strengthening. - Wrist radial deviators strengthening with the theraband
To start with, tell a patient to take a comfortable position, such as sitting on a chair with a hand in a mid-supination position at the edge of a table as well a hand should be placed over a rolled towel. Next, wrap the one end of a band on a patient’s hand, and the second end on a therapist’s hand. Ask a patient to move the hand in the upward direction agaist a theraband. Do it ten times in one session. Around three sessions should be done by a patient per day. After 5 days of the exercise, hold this position at the endpoint for ten seconds in one repetition. Slowly come back to the neutral position. When the patient is adapted with a light-weighted band, upgrade the color of a band for strengthening.
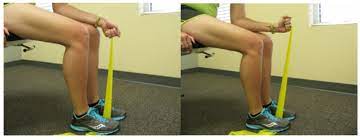
- Wrist extensors strengthen with the use of a theraband with a pronated hand
To begin with, the therapist should tell a patient to take a comfortable position, which means sitting on a stable surface(chair) with a hand hanging on a rolled pillow at the edge of a table, and a palm should be facing the ground. After that, wrap the one end of a theraband on a patient’s hand, during the second end on a physical therapist’s strong hand. Give a command to a patient to move the hand in the upward direction against a band. Next, do it ten times per session. Around three sessions should be done by a patient per day. After 5 days hold a position at the endpoint for nearly ten seconds in one repetition. Slowly come back to the normal position. When the patient is adapted to light-weighted bands, upgrade a color of a band for strengthening. - Wrist extensors strengthen with theraband with supinated hand
First of all, ask a patient to take a comfortable position, such as sitting on a stable surface(chair or table) with the hand hanging on a rolled towel at the edge of a table, a palm should be facing the ceiling. After that, wrap the one end of a theraband on a patient’s hand, and the second end on a physical therapist’s strong hand. Tell a patient to move their hand in a downward direction agaist a theraband. After that, do it 10 times per session. Nearly two sessions should be done by a patient per day. After 5 days of holding this position at the endpoint for around five to ten seconds in one repetition. Slowly return to the neutral position. When a patient is adapted to a light-weighted band, upgrade a color of a theraband for strengthening. - Supinators strengthen with the theraband
To embark with, the therapist gives a command to a patient to take a comfortable position, such as sitting on a stable surface(chair) with a hand neutral on a rolled towel at the edge of the table. After that, wrap the one end of a band in a patient’s hand, while the second end is in the physical therapist’s strong hand. Give a command to a patient to rotate their hand against a theraband, a palm will face the ceiling. Then, do this strengthening exercise ten times in one session. Around two sessions should be done by a patient per day. After 5 days hold this position at the endpoint for nearly five seconds per repetition. Slowly return to the embarking position. When a patient is adapted to a light-weighted theraband, upgrade the color of the band for strengthening. - Pronators strengthen with the theraband
To begin with, the therapist tells a patient to take a comfortable position, such as sitting on a stable surface(chair) with the hand in the full pronation meaning the palm will face the floor and should be on a rolled towel at the edge of a table. After that, wrap the one end of a theraband in a patient’s hand, while the second end in a physical therapist’s strong hand. Give a command to a patient to rotate their hand against a theraband, so the hand should be facing the floor. Next, do this strengthening exercise ten times in one session. Around three sessions should be done by a patient per day. After 5 days hold this position at the endpoint for around ten seconds per repetition. Slowly return to a starting position. When a patient is adapted to a light-weighted theraband, upgrade the color of the band for strengthening.
Massage Techniques
- Massage therapy is an age-old technique that uses both stretching and pressure in the rhythmic flow. Massage therapy assists in decreasing tension in specific muscles that have built up because of the injury or even stress. Massage therapy assists the patient to get the blood flowing which speeds up the recovery process at any level.
Some benefits of massage therapy
- Decreasing stress and increasing relaxation.
- Reducing pain as well as muscle soreness and tension.
- Increasing circulation, energy as well as alertness.
- Lowering heart rate and blood pressure.
- Increasing the immune function of the body.
Effleurage (Stroking) technique
The hands are passed rhythmically and continuously over a patient’s affected part, in one direction as well as straight only, with the aim of improving blood flow in that direction, stretching tissues, relaxing a patient as well as aiding a dispersal of waste products. This technique involves the stroking movement of the hands sliding over the skin of a wrist as well as is always the first and last technique applied in the massage session. Effleurage may be used with varying tempo and pressure according to the stage of a situation as well as whatever the desired effect of the massage is.
Petrissage (Kneading) technique
The affected skin is lifted up, pressed down and squeezed, pinched, as well as rolled. Alternate squeezing and relaxation of the tissues stimulate a local circulation which may have a pain-relief effect with some muscular disorders. The basic movement is to compress, pick up, as well as after that release the soft tissues. It is generally used when the deeper effect as compared to effleurage is wanted, and it is techniques include:
- Squeezing
- To begin with, The therapist tells a patient to take a comfortable position, supine or even sitting. After that, a physical therapist applies the squeezing technique, a circular hand stroke is used for the whole wrist for this technique using the circular movement. A physical therapist will bring a tissue between a patient’s two hands lifting it up and away from the body.
- Picking up
To start with, the therapist gives a command to a patient that takes a comfortable position, and after that pickup technique applies equal pressure on the sides of the tissue and lifts it away from the body. The hands of a physical therapist are parallel to a limb being treated to avoid hyperextension of an outer wrist. - Shaking
The vibration or even shaking massage technique is the fine, gentle, trembling movement performed with hands or even fingers. Shaking may be used to stimulate soft tissues in a body. Vibration motions may assist stimulate nerves, relieve muscular tension and reduce stress. This technique is performed by hands, a physical therapist should put one hand on another hand as well as place it on the affected side while stroking to give vibrations. - Rolling
A skin rolling technique is performed using a thumb and fingers to pull the skin away from the tissue. It is then rolled forwards in constant motion to assist separate it from being stuck in muscle. Skin rolling may be used around areas of scar tissues to assist break them down. - Wringing
The wringing consists of lifting and squeezing the muscle forwards as well as backward motion. Wringing is used to treat tight muscles, for relaxation, and as part of a post-event massage. The benefits of this technique are relief of tight muscles, decreased DOMS as well as improved recovery.


4 Comments