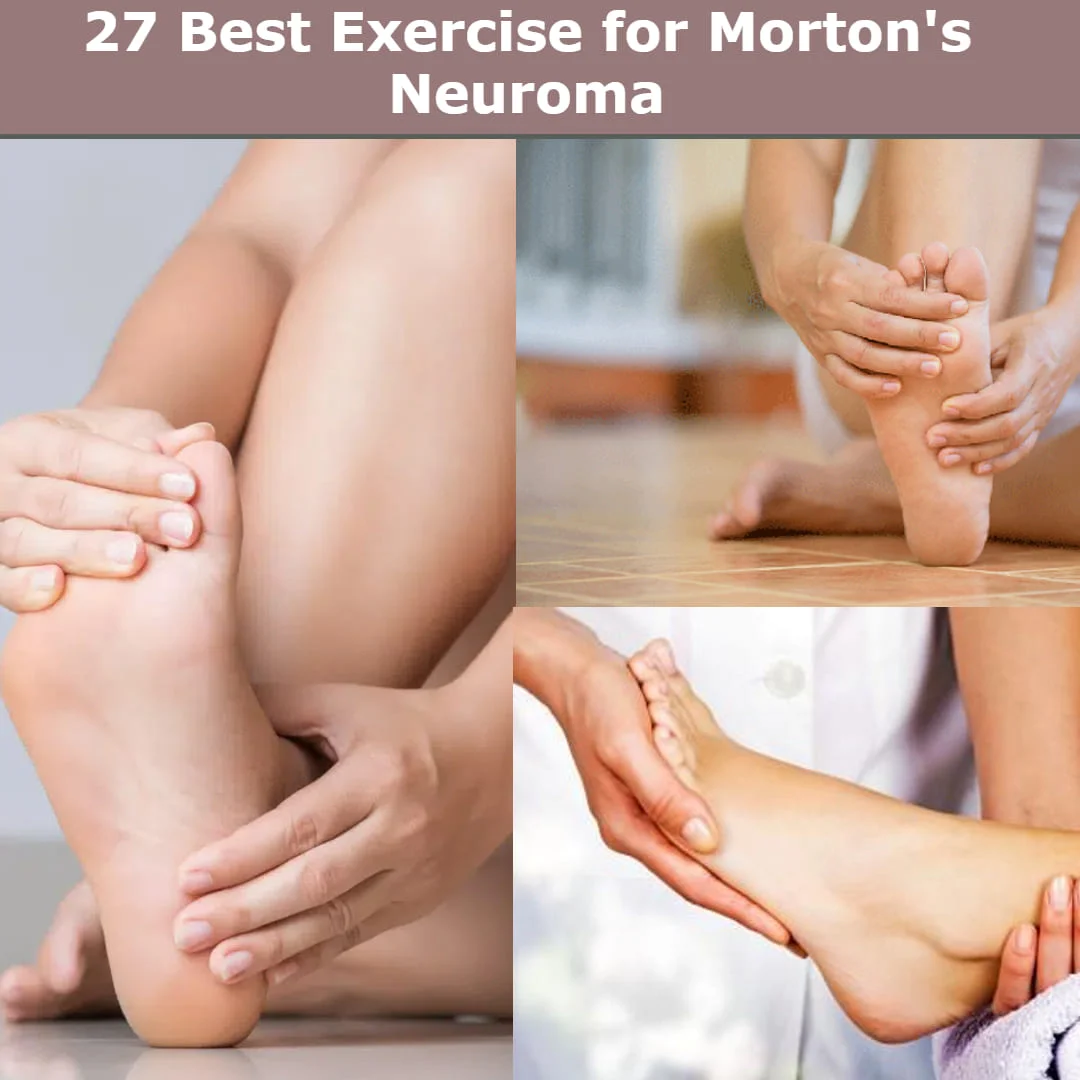
27 Best Exercise for Morton’s Neuroma
Table of Contents
Why Exercise is important in Morton’s Neuroma?
The best exercises for Morton’s neuroma typically focus on stretching and strengthening the foot and ankle muscles. These exercises aim to reduce pressure on the affected nerve and improve overall foot mechanics. While exercise alone may not completely cure Morton’s neuroma, it can help alleviate symptoms and improve foot function. Before starting any exercise program for Morton’s neuroma, it is essential to consult a healthcare professional, such as a podiatrist or physical therapist, to get a proper diagnosis and personalized exercise recommendations. Proper guidance is crucial to ensure exercises are performed correctly and safely.
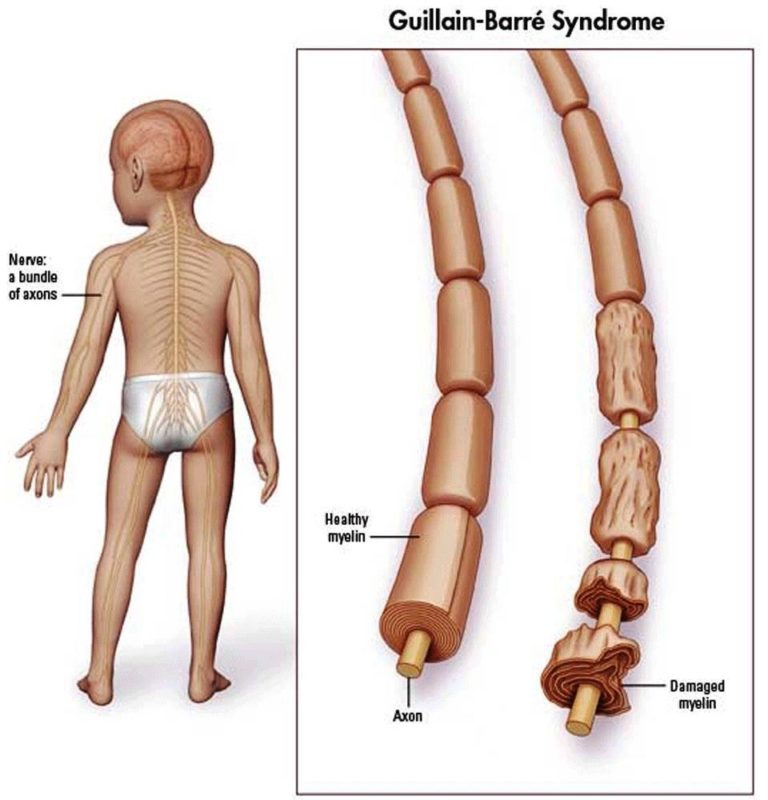
Morton’s neuroma is a painful condition that affects the ball of the foot, usually occurring between the third and fourth toes. It is characterized by the thickening of the tissue surrounding one of the nerves leading to the toes. The condition often causes a sharp, burning pain, tingling, or numbness in the affected area.
Introduction
A disorder known as Morton’s neuroma (MN) affects the common plantar digital nerves and is brought on by repeated pressure on the nerve under the deep transverse metatarsal ligament, which causes epineural and perineural fibrous outgrowth.
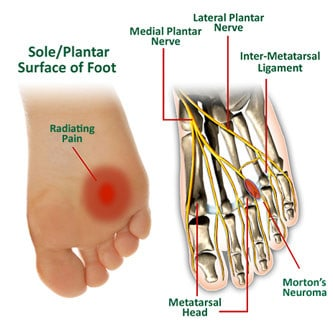
The region between your third and fourth toes is the most typical location for Morton’s neuroma, a painful ailment that affects the ball of your foot. You could get the sensation of stepping on a pebble in your shoe or a fold in your sock if you have Morton’s neuroma.
The benign neuroma or perineural neuroma, also known as Morton neuroma, Morton’s metatarsalgia, Intermetatarsal neuroma, and Intermetatarsal space neuroma, most frequently affects the intermetatarsal plantar nerve of the second and third intermetatarsal spaces (between the second, third, and third, fourth metatarsal heads), which causes the affected nerve to become entrapped.
The major symptoms are discomfort and/or numbness, which can occasionally be eased by taking off shoes.
Morton’s neuroma, a benign yet unpleasant condition, affects the ball of the foot. It is also known as an intermetatarsal neuroma since it is located between the metatarsal bones on the ball of your foot. You can feel a sharp ache in the ball of your foot as a result. Your afflicted toes might be numb, hot, or sting.
When a nerve that passes to the toe is irritated or compressed, the tissue around the nerve thickens. It usually happens between the third and fourth toes, although it can also happen between the second and third toes. Middle-aged individuals are more likely to experience it, particularly middle-aged women.
High-heeled or restrictive footwear has been linked to Morton’s neuroma development. Changing to shoes with smaller heels and wider toe boxes often makes the wearer more comfortable. In some circumstances, corticosteroid injections or surgery may be necessary.
What are the symptoms?
Pain and stiffness in the forefoot, particularly between the third and fourth toes, are frequent signs of Morton’s neuroma. The following are some of the typical Morton’s neuroma symptoms:
- Pain: Localised foot pain, frequently reported as being intense, burning, or tingling, is the main symptom. The nearby toes or the foot arch may also experience pain.
- Tingling or numbness: Numbness or tingling in the afflicted region or the toes may be felt by some people.
- The feeling of a lump: Even though there isn’t anything there, people with Morton’s neuroma may experience a little, pebble-like lump or a foreign object beneath the foot.
- Pain tends to get worse with weight-bearing activities that place strain on the forefoot, such as walking, jogging, or standing still for long periods of time.
- Temporary pain relief may be obtained by resting the foot and relieving pressure on the injured region.
- discomfort relief by rubbing the foot: For some people, exerting pressure or gently massaging the foot might momentarily reduce discomfort.
- You have the impression that something is in your shoe: Some individuals may experience discomfort from what they perceive to be a fold in their sock or an item in their shoe.
What causes Morton’s neuroma?
The irritation and compression of a nerve in the foot result in Morton’s neuroma. Most typically, Morton’s neuroma appears between the third and fourth toes. Although the precise cause isn’t usually obvious, a number of things can contribute to its growth:
- Footwear Wearing shoes with close-fitting toe boxes or those with high heels might put more strain on the forefoot and cause nerve compression.
- Foot deformities: Some foot abnormalities, such as bunions, hammertoes, or flat feet, can change how weight is distributed on the foot and cause discomfort to the nerves.
- Repetitive stress: Exercises that subject the forefoot to repeated stress, including jogging or sports that require push-off motions, might raise the risk of Morton’s neuroma.
- Foot trauma: A foot injury or trauma in the past may have caused inflammation around the nerve, which then resulted in the growth of a neuroma.
- Biomechanical problems: Improper foot mechanics, such as excessive pronation (inward foot rolling), can put more strain on the forefoot nerves.
- High-impact activities: Engaging in high-impact sports or other activities that require continuous foot pounding may be a concern. Sports that need tight shoes, like skiing or ballet, or that are repetitious, like racquet sports or running, put more pressure on the foot’s ball.
- Unsupportive footwear: Wearing footwear that lacks proper cushioning or arch support increases the risk of neuromas and contributes to foot issues.
- Gender: Morton’s neuroma is more common in women than in males, presumably as a result of the frequent wear of high-heeled, tight shoes.
- Morton’s neuroma is frequently linked to high arches, hammertoes, bunions, and flat feet.
Clinically Relevant Anatomy:
The forefoot’s plantar aspect. specifically the gaps between the metatarsals. In the third planter webspace, the common digital nerve and its branches are frequently impacted.
How is Morton’s neuroma treated?
Usually, your doctor will take a gradual approach. This suggests that more severe therapy will be used if your pain persists despite undergoing conservative treatment.
Injections:
If your pain doesn’t go away, your doctor could try injecting corticosteroids or anti-inflammatory medications directly into the painful spot. The afflicted nerve may potentially be numbed with an injection of local anesthetic. That could provide you with short-term pain relief.
Surgery:
Your doctor could recommend surgery if all other therapies have failed to relieve your symptoms. Surgical options might consist of:
Neurectomy, which involves removing some of the nerve tissue.
Cryogenic surgery, also known as cryogenic neuro ablation, uses extremely low temperatures to destroy neurons and the myelin sheath that covers them.
Decompression surgery releases pressure on the nerve by severing ligaments and other supporting tissues.
Conservative and at-home remedies:
The first step in conservative therapy is to wear footbeds or arch supports in your shoes. These aid in releasing pressure from the impacted nerve. They can be custom-made via prescription or over-the-counter (OTC) inserts that fit your foot. Aspirin or ibuprofen (Advil, Motrin) are examples of nonsteroidal anti-inflammatory medicines (NSAIDs) that your doctor could also advise.
Additional conservative therapies include:
Stretching activities for tendons and ligaments
Physiotherapy
Exercising your toes and ankles to get stronger
Resting your foot
Massaging the ball of your foot
Applying ice to uncomfortable spots
Morton’s neuroma Exercises:
The ball of the foot is affected by the painful condition known as Morton’s neuroma, which most frequently develops between the third and fourth toes. One of the nerves supplying the toes is affected, and the tissue surrounding it thickens. The condition can cause discomfort, burning sensations, numbness, and a feeling as if there’s a small pebble or lump under the foot.
While exercise cannot cure Morton’s neuroma, it can help manage the symptoms and improve foot health by strengthening muscles, increasing flexibility, and relieving pressure on the affected area. Additionally, proper exercises can help maintain mobility and prevent the condition from worsening.
Although Morton’s neuroma responds well to rest, a variety of stretches and strengthening activities may help maintain and improve strength in the foot arch if the amount of discomfort permits.
Stretching exercises for the calf and lower leg muscles, the Achilles tendon, and the plantar fascia at the sole of the foot are just a few examples.
It is necessary to start exercising the foot gradually in order to avoid nerve inflaming once more.
Several easy workouts are:
Toe squeeze:
Using your toes to hold and release an item, such as a little softball or towel, is a straightforward exercise known as a toe squeeze. If you have a disease like Morton’s neuroma, this exercise may help strengthen the muscles in your toes and the bottom of your feet. The toe squeeze exercise should be done as follows:
With your feet flat on the ground and your back straight, take a comfortable seat on a chair or the floor.
Put a stress ball-sized softball or a towel folded up between your feet.
To gently squeeze the ball or towel, use your toes. Consider using your toes to grip or raise the thing.
Hold the squeeze for a short period of time (approximately 5 to 10 seconds) while keeping hold of the target.
Release the pressure and uncurl your toes.
Repeat the workout 10 to 15 times in total.
Tips:
Make sure you’re performing the squeeze with only your toes and not your full foot.
Keep your composure and accuracy throughout the workout.
Consistently breathe and refrain from unduly tensing your leg muscles.
You may perform this exercise without a ball or towel by pushing your toes against a resistance band or using your fingers as a form of resistance.
Exercises that strengthen and coordinate the muscles in your toes and feet, such as toe squeezes, may help you have greater foot stability and relieve pressure on the afflicted area if you have Morton’s neuroma.
Toe stretches:
For those with Morton’s neuroma, toe stretches can be helpful since they can increase flexibility, ease muscular tension, and lessen some of the discomfort related to the disease. You can attempt the toe stretches listed below:
Toe Extension Stretch:
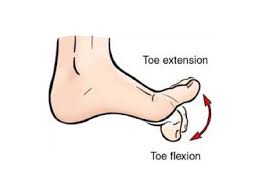
- Place your feet flat on the ground while comfortably seated in a chair.
- Raise all of your toes off the floor, keeping your heels firmly planted.
- Focus on lengthening your toes while you hold this posture for 5 to 10 seconds.
- Reset your toes to the ground.
- Ten to fifteen times, repeat this stretch.
Flexion Stretch:
- Sit or stand with your feet flat on the ground for the toe flexor stretch.
- Gently curl your toes downward, as though you were attempting to form a fist.
- Keep your foot in this posture for 5–10 seconds to feel the bottom of your foot stretch.
- Let go and unwind your toes.
- Ten to fifteen times, repeat this stretch.
Toe abduction stretch:
- Place your foot on the floor while sitting on a chair.
- Extend your toes as widely apart as is comfortable.
- While in this posture, feel the stretch between your toes for 5–10 seconds.
- Repetition the stretch 10–15 times while relaxing your toes.
Big toe stretch:
A straightforward exercise known as the “big toe stretch” targets the tendons and muscles surrounding the big toe joint. This practice may be helpful for those with illnesses like Morton’s neuroma and can help the toe become more flexible. The big toe stretch should be done as follows:
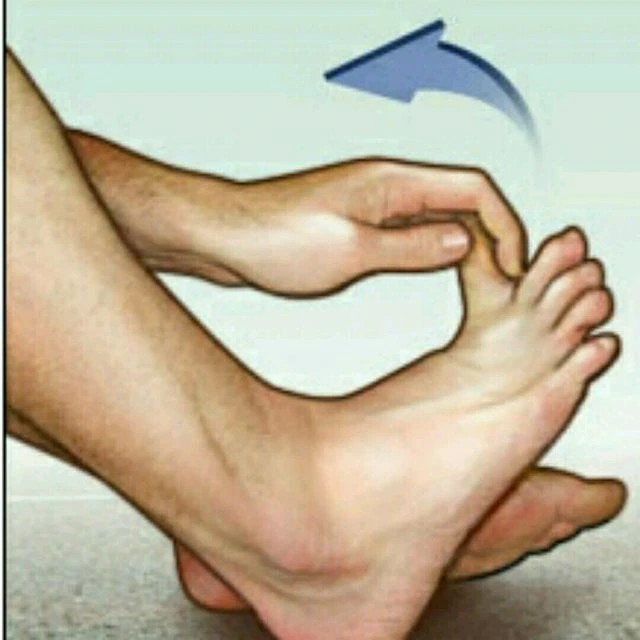
Straighten your back while you sit or stand comfortably.
firmly put the heel of one foot on the ground.
While maintaining the big toe in touch with the floor, raise the toes of the same foot.
As far as you can comfortably do so, slowly and gently bend your big toe upward (towards the top of your foot). Your foot’s bottom should experience a little stretch.
Hold the stretch for 10 to 15 seconds while keeping your breathing steady.
Lower the big toe back to the floor after releasing the stretch.
For each foot, carry out the stretch 5–10 times.
Tips:
Be careful when stretching; stay away from putting your toe into an uncomfortable or painful posture.
Use your fingers to support and guide the big toe throughout the stretch if you are having difficulties isolating it.
Even if Morton’s neuroma only affects one foot, make sure to extend both of them. This maintains both feet’s suppleness and balance.
The big toe stretch can help maintain or increase your big toe joint’s range of motion, which is good for the health of your feet and may lessen some of the pressure that Morton’s neuroma places on your forefoot.
Toe curls:
Exercises that target strengthening the muscles in your toes and the bottoms of your feet include toe curls, often known as toe gripping exercises. For people who suffer from illnesses like Morton’s neuroma, these exercises can be beneficial since they can enhance foot stability and support the injured region. How to do toe curls exercise:
Place your feet flat on the floor or in a comfortable chair with your back straight.
Only the balls of your feet should make contact with the floor; keep your heels on the floor and elevate your toes off the surface.
Curl your toes slowly downward, as though you’re attempting to grip the ground with them.
Maintain the contraction in your toes while holding the curled position for a short period of time (approximately 5 to 10 seconds).
Let go of the curl and let your toes relax, then stand back up.
Carry out the workout between 10 and 15 times.
Observe the following advice: Curl all of your toes, not just one or two.
- Attempt to curl your toes in a firm, controlled manner.
- Throughout the exercise, keep the remainder of your foot and leg muscles relaxed.
- You can concentrate on one foot at a time if you find it difficult to complete the curls on both feet at once.
Toe curls can enhance the strength and flexibility of the toe and foot muscles, which may lead to better foot function and less discomfort from disorders like Morton’s neuroma.
Calf stretches:
The calf muscles, which are found in the rear of your lower legs, may be stretched and made more flexible with calf stretches. By easing stress and enhancing general foot and ankle mobility, these exercises can be helpful for those with disorders like Morton’s neuroma. Following are a few typical calf stretches:
Wall Calf Stretch:
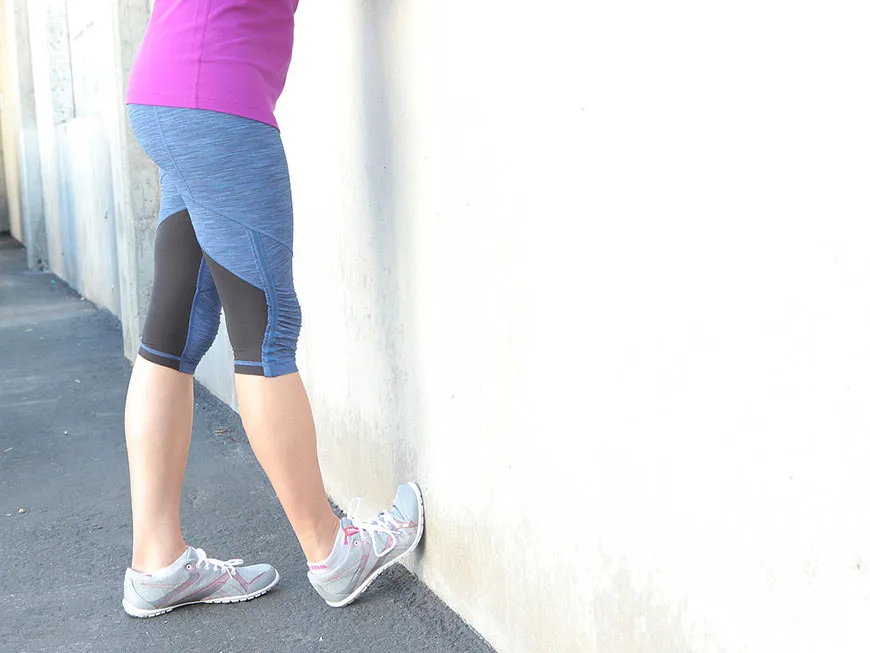
Stand facing a wall and lay your hands flat on it at shoulder height to perform a wall calf stretch.
Step back with one foot, keeping it straight and the heel firmly on the ground.
While maintaining the rear leg straight, bend the front knee slightly and lean in the direction of the wall.
The calf of the rear leg should extend out.
Hold the stretch for between 30 and 60 seconds.
With the opposite leg, repeat the stretch.
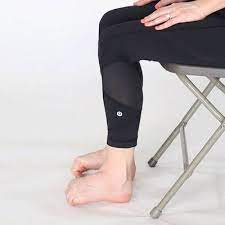
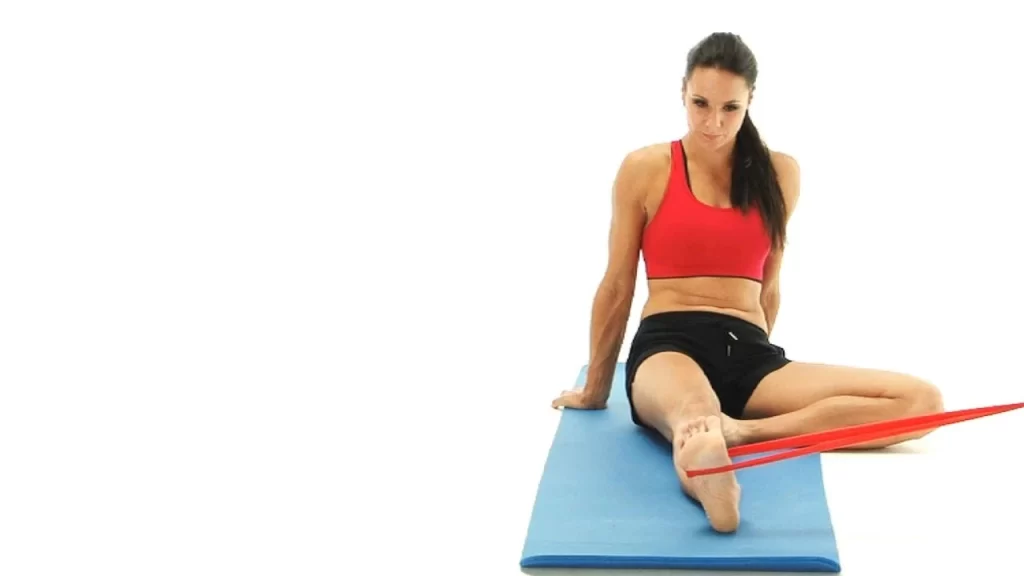
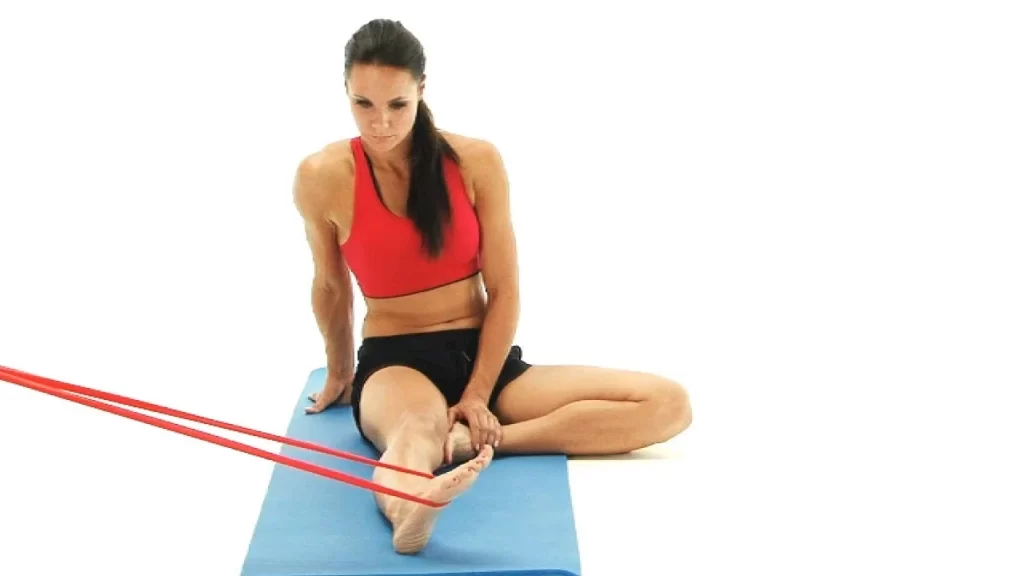
Calf Stretch with Towel:
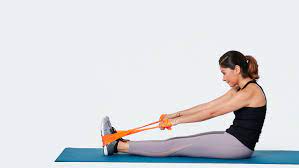
Take a long Sitting position on the floor while keeping your legs straight out before you. Calf stretch using the towel.
Wrap a resistance band or a towel around the ball of one foot.
Keep your knee straight and gently pull the towel in your direction.
Your calf ought to feel stretched.
Hold the stretch for between 30 and 60 seconds.
With the opposite leg, repeat the stretch.
Stair Calf Stretch:
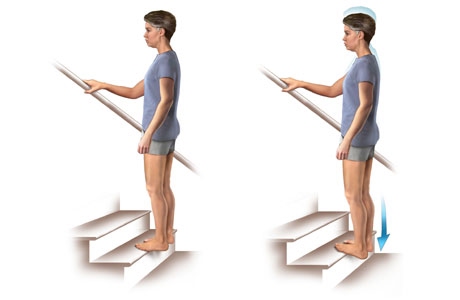
When standing, hang your heels over the edge of a step or a solid platform.
Hold on to a railing or a wall for support if required.
Feel your calves expand as you bring your heels closer to the ground.
Hold the stretch for between 30 and 60 seconds.
Returning slowly to the beginning posture, raise your heels.
Several times, repeat the stretch.
Tips:
Throughout the stretches, maintain a straight back and refrain from arching it.
As you stretch, be careful to relax and breathe slowly.
During the stretches, try to avoid jumping or jerking motions since this might lead to damage.
Regular calf stretches can enhance flexibility, ease calf muscle tension, and promote improved foot and ankle function. For those who have Morton’s neuroma, these stretches can be very beneficial since they can ease some of the pressure and discomfort in the foot.
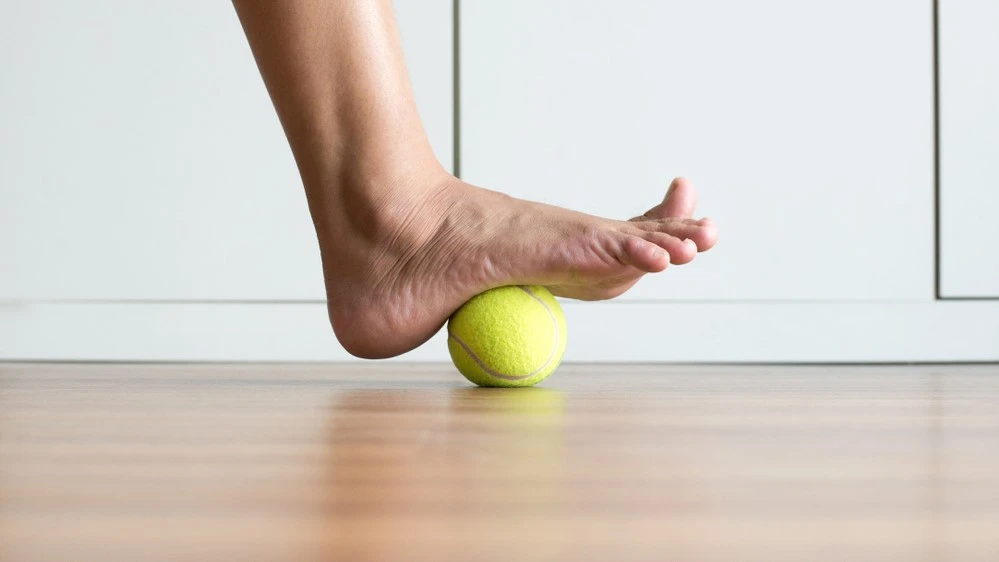
Foot rolling with a frozen water bottle:
Foot rolling is a method for massaging and releasing tension in the muscles, fascia, and connective tissues of the foot. It is sometimes referred to as self-massage or self-myofascial release. Individuals who suffer from a variety of foot diseases, such as Morton’s neuroma, may find this practice to be beneficial. You may apply pressure to particular parts of the foot by rolling an item like a tennis ball or a frozen water bottle under your foot. This encourages relaxation, improved circulation, and less muscular rigidity. Here’s how to roll your feet:
Your feet should be out in front of you while you sit on a chair or the floor.
Put a tennis ball or a frozen water bottle on the ground.
Your body weight should be used to gently push the thing as you roll your foot over it. From the ball of your foot to the heel, as well as from side to side, move the object.
Pay close attention to any sore regions or uncomfortable locations, and spend more time massaging those areas to reduce tension.
Roll your feet for one to two minutes on each foot.
You may also try rotating your entire foot, paying special attention to the arch and the region near your toes.
Applying extra pressure to a tight or painful area will help, but avoid employing too much pressure or inflicting agony.
To preserve foot health and ease stress, repeat the foot rolling as often as necessary.
Foot rolling is a useful technique for increasing foot flexibility, easing muscular tension, and relieving pain brought on by disorders like Morton’s neuroma. In order to avoid further problems or injuries, foot rolling must be done carefully and without exerting too much pressure.
Ankle circles:
Simple exercises called ankle circles are designed to increase the flexibility and mobility of the ankle. They entail circling your ankles, which can be helpful for people who suffer from Morton’s neuroma and other foot and ankle disorders. Ankle circles improve ankle joint range of motion, preserve joint health, and minimize stiffness. This exercise are performed as follows:
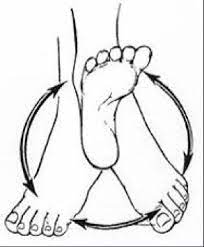
Extend your legs out in front of you while you sit comfortably on a chair or the floor.
Raise one foot off the ground, pointing your toes ahead while maintaining your knee straight.
Start rotating your foot in a clockwise manner while rotating your ankle joint.
Rotate your ankle 10-15 times in a calm, controlled clockwise motion.
Once the clockwise circles have been completed, turn to the anticlockwise direction and make 10-15 circles there.
Return your foot to the floor, then move the other foot around the ankle circles.
Tips:
- Maintain steady, soft strokes; refrain from quick or abrupt movements.
- Pay attention to the circular movement emanating from your ankle joint rather than your complete leg.
- To keep your ankles flexible, you can execute ankle circles many times a day.
As they can assist preserve ankle flexibility and lessen some of the strain on the forefoot, ankle circles can be a helpful exercise for those with Morton’s neuroma.
Calf raises with toe squeeze:
A compound exercise called calf rises with toe squeeze combines calf raises with an additional toe squeeze to work the muscles in the feet and calves more. This exercise improves foot stability and balance by strengthening the intrinsic muscles of the foot and the calf muscles. How to do calf raises with toe squeezes is as follows:
Instructions:
- Make sure your toes are pointed forward and that your feet are hip-width apart.
- To maintain balance, keep your hands at your sides or rest them on a wall or other firm surface.
- Push through the balls of your feet and raise yourself as high as you can on your toes to lift your heels off the ground.
- Actively pinch your toes and the ball of your foot together at the peak of the calf raise to give yourself a gripping sensation.
- Maintain the calf lift position while holding the toe squeeze for a short period of time.
- Let go of the toe squeeze, then gradually bring your heels back to their original position.
- Carry out multiple repetitions of the calf lift with toe squeeze.
Tips:
- Keep your core active to improve your stability and balance throughout the activity.
- Use control when doing the calf raise and toe squeeze to maximize muscle engagement.
- Keep your breath even while you perform the activity.
Benefits:
Calf raises with toe squeezes have the combined advantage of developing the intrinsic foot muscles as well as the calf muscles. By strengthening these muscles, you may increase foot stability, and support for the arch, and lower your chance of developing foot conditions including flat feet and plantar fasciitis. The exercise also helps with balance and ankle strength.
Variations:
You can execute the calf raises on one leg at a time, if necessary holding onto a support for balance, to intensify the workout. Additionally, when executing the calf raises with toe squeeze, you can increase the difficulty by donning ankle weights or holding dumbbells in your hands.
Precautions:
- Before performing calf rises with toe squeezes, speak with a healthcare provider or physical therapist if you have any foot, ankle, or calf issues or injuries.
- Start with a comfortable range of motion and as your muscles get stronger, progressively increase the depth of the calf raise and the force of the toe squeeze.
To build your calf muscles and promote general foot health, add calf rises with toe squeezes to your normal lower body training regimen. For the best results, make sure to carry out the exercise with perfect form and control.
Calf Raises on a Step:
Calf raises on a step, sometimes referred to as calf raises on stairs, are a quick and efficient workout for calf muscle development. The gastrocnemius and soleus muscles, which make up the calf and are necessary for motions like walking, running, and jumping, are the focus of this workout. How to do calf raises on a step is as follows:
A step or a stable raised platform (such as a stair) is required equipment.
Instructions:
- Place the balls of your feet firmly on the step while standing on the edge of it with your heels dangling off the back. Your toes should be pointed forward, and your feet should be hip-width apart.
- If necessary, cling to a neighboring wall or railing for support.
- Push through the balls of your feet to slowly elevate your heels as high as you can.
- After pausing at the peak of the action, stretch your calves by lowering your heels back down to the step’s level.
- Ten to fifteen times, alternate between the upward and downward movements.
Tips:
- Throughout the workout, maintain control of your movements.
- Focus on your core for improved stability and balance.
- For best results, perform the exercise slowly and steadily.
Benefits:
Step calf raises are a good way to develop the calf muscles, which also strengthens the lower leg and increases ankle stability. Injury risk is decreased by improved balance and support provided by strong calf muscles when engaging in varied activities.
Variations:
By lifting one foot off the step and elevating just the other leg, you may execute calf raises on one leg to make them more challenging. You may also elevate your legs while carrying a dumbbell or other weighted item in each hand and execute calf raises that way.
Precautions:
- Before performing calf raises on a step, speak with a healthcare provider or physical therapist if you have any existing foot, ankle, or calf issues.
- To prevent damage, try to avoid utilizing too much momentum or bouncing when performing the exercise.
- To reduce accidents, carry out the activity on a firm surface.
Arch Strengthening Towel Curl:
A little towel is required.
Instructions:
- Place your feet flat on the ground while seated on a chair.
- Lay the little towel out in front of your feet on the floor.
- Fold the towel up towards you using only your toes. Consider using your toes to try to curl the towel.
- While maintaining the scrunched-up position, squeeze the muscles in your arch.
- Let go of the pressure and extend the towel straight out with your feet.
- Aim for at least 10 to 15 curls every repetition when repeating this action.
Tips:
- Pay attention to pulling the towel with your foot’s arch muscles rather than just your toes. Take on the entire arch area.
- During the exercise, keep your foot relaxed and breathe steadily while maintaining good posture.
Benefits:
The intrinsic foot muscles that are crucial for supporting your gait and preserving the integrity of the arch are the focus of this workout. Enhancing these muscles can aid with balance, foot stability, and the avoidance of problems like flat feet.
Towel Scrunches:
A quick and efficient foot workout that helps tonify the muscles in your toes and the arch of your foot is towel scrunches. It’s a fantastic foot workout for increasing support, stability, and dexterity. Here is how to scrunch a towel:
A little towel is required equipment.
Instructions:
- Place your feet flat on the ground while seated on a chair.
- Lay the little towel out in front of your feet on the floor.
- Fold the towel up towards you using your toes. Imagine grabbing the towel with your toes and lifting it.
- While holding the scrunched-up stance, squeeze the towel firmly with your toes.
- Let go of the pressure and extend the towel straight out with your feet.
- Carry out this action repeatedly, aiming for at least 10 to 15 scrunches each time.
Tips:
- Concentrate on scrunching your toes and the muscles in the arch of your foot.
- Throughout the exercise, keep the rest of your foot and leg relaxed.
- Continue to breathe steadily and stand up straight.
Benefits:
Towel scrunches target your foot’s intrinsic muscles, which are internal to the foot and essential for preserving the arch and supplying stability throughout the movement. The support of the foot, balance, and general foot health can all be improved by strengthening these muscles.
Variations:
By using a thicker or larger towel or by adding a modest weight (like a light dumbbell) to the towel before scrunching it up with your toes, you may make towel scrunches more difficult.
Achilles Tendon Stretch:
For the calf and Achilles tendon to remain flexible and mobile, the Achilles tendon stretch is a crucial exercise. Additionally, it might lessen discomfort brought on by ailments like Achilles tendonitis and aid in injury prevention. The stretch for the Achilles tendon is demonstrated here:

Equipment required: None
Instructions:
- Locate a level, stable area on which to stand, such as a step, a curb, or a solid platform. You may also utilise the edge of a step, but make sure there is something nearby you can grab onto if you need to maintain your balance.
- Stand towards the edge of the surface with your feet shoulder-width apart and your heels falling off the back.
- If required, cling to a nearby object for balance.
- Gently lower your heels toward the ground until they are below the step and your ankles are able to bend.
- Keep your stretch for between 15 and 30 seconds. Your calves and Achilles tendon should feel a little pull or stretch.
- Carefully return to the beginning posture by lifting your heels.
- Carry out the stretch three to four times more.
Tips:
- As you stretch, maintain a straight back and a balanced posture.
- Try to avoid jumping or jerking throughout the stretch since this might injure you.
- Even if only one leg feels stiff or unpleasant, extend both legs.
Variations:
- You can put your toes on the step’s edge and let your heels sink below the step’s level for a more strenuous stretch.
- You may execute the stretch with your feet slightly turned outward (duck-footed) or inward (pigeon-toed) to target various areas of your calf muscles.
Benefits:
The calf muscles and Achilles tendon are made more elastic and flexible by the Achilles tendon stretch. This exercise can help avoid stiffness, minimize the likelihood of Achilles tendon injuries, and enhance general lower leg function when performed regularly.
Precautions:
Before performing this stretch, speak to a doctor or physical therapist if you have a history of Achilles tendon problems or any other foot or lower leg disorders.
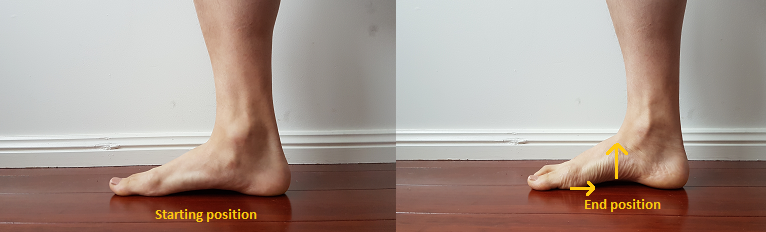
Short Foot Exercise (Arch Support Exercise):
A well-known exercise for strengthening the arch and enhancing foot stability, the brief foot exercise concentrates on the intrinsic foot muscles. It’s a straightforward workout that doesn’t require any special equipment and can be done practically any place. The quick foot exercise is performed as follows:
Exercise: Exercises for supporting the arch with the short foot
Instructions:
- Place your feet flat on the ground as you sit or stand in a comfortable posture.
- Without curling your toes, gently tense the muscles in your foot’s arch to draw the ball of your foot back toward your heel. You should aim to shorten your foot with this action.
- Continue to compress the arch while maintaining a comfortable, neutral position for the toes.
- Continue to breathe normally while holding the contraction for 5 to 10 seconds.
- Relax your foot after releasing the contraction.
- Perform the exercise a total of 10-15 times.
Tips:
- The movement needs to be regulated and subdued. Keep your toes from curling or grabbing the ground.
- During the rest intervals in between repetitions, keep your foot relaxed.
Benefits:
Quick foot exercise aids in building the intrinsic foot muscles, which are essential for supporting the arch and preserving good foot alignment. This exercise can help with balance and foot stability while lowering your chance of developing common foot issues like flat feet or overpronation.
Variations:
When you are confident with the fundamental short foot exercise, you may advance it by standing or by completing it while standing on one foot for an added challenge. Use a tiny ball put in between your feet to squeeze throughout the workout or a resistance band wrapped around your toes to create more resistance.
Precautions:
If you have any previous foot ailments or injuries, or if you feel any of the following.
Toe spacers:
Toe spacers are tools that spread the toes apart to encourage good alignment and relieve pressure on the foot. They are often inserted between the toes to gently separate them and are frequently composed of soft silicone or gel material. Toe spacers can be helpful for a range of foot issues and can enhance foot health. For further details on toe spacers, see:
Benefits and Uses:
- Toe alignment: If your toes are crowded or overlapping, toe spacers might assist correct them. They can encourage more natural placement and keep the toes from grinding against one another by allowing space between them.
- Bunions: By relieving pressure on the problematic area and promoting healthy toe alignment, toe spacers can be used to relieve the discomfort associated with bunions.
- Morton’s neuroma: For those who have Morton’s neuroma, the space that toe spacers give might lessen compression on the afflicted nerve, thus reducing discomfort.
- Hammer toes: Toe spacers can assist in stretching and straightening hammer toes, increasing their flexibility and easing pain.
- Corns and calluses: By minimizing friction between the toes, toe spacers can stop corns and calluses from growing or worsening.
Utilizing Toe Spacers:
Toe spacer use is rather easy:
- Pick the correct size: Make sure the toe spacers you choose fit properly in between your toes. To minimize adding to the pressure, they should be snug but not too tight.
- Wash your feet: Make sure your feet are dry and clean before placing the toe spacers.
- Insert the toe spacers: Place the toe spacers between the toes gently, working your way inwards from the outermost toe.
- Wear as necessary: Toe spacers can be worn when you’re at rest or while doing certain activities, including walking or wearing tight shoes.
Precautions:
- Before using toe spacers, it is recommended to speak with a healthcare provider or podiatrist if you have any foot ailments or concerns.
- Use caution while using toe spacers that are excessively tight since they could be uncomfortable or limit blood flow. Start with brief amounts of time and progressively extend the duration if necessary. For some people, using toe spacers may take some getting accustomed to.
Toe spacers can relieve pain and aid with some foot disorders, but they shouldn’t be used instead of seeking expert medical advice or treatment.
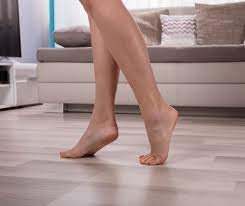
Toe raise, point, and curl:
Your toes and feet will begin to move as a result of this three-part workout.
Lie back in a chair with a straight back, your feet flat on the floor.
Raise your heels until only the balls of your feet and toes are in contact with the ground while keeping your toes level on the floor. Take a five-second hold.
Only the tips of your big and second toes should contact the ground when you point your toes. Take a five-second hold.
Roll your toes under such that the tops of your toes contact the ground while keeping your heel off the floor. Take a five-second hold.
Ten repetitions in each position, repeat.
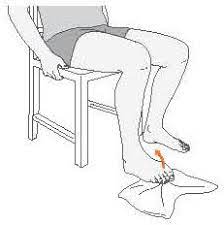
Ankle Eversion with Resistance Band:
Morton’s neuroma patients may benefit from resistance band workouts since they strengthen the muscles that support and stabilize the foot and ankle. But it’s crucial to pick workouts that don’t put pressure directly on the afflicted area. Here is a risk-free and efficient Morton’s neuroma resistance band exercise:
Materials required: a tension band
Instructions:
- Place your feet flat on the ground while seated on a chair.
- Hold the other end of the resistance band in your palm and loop one end around the ball of your foot.
- While keeping your heel on the ground, slowly evert your foot (move your foot outward) against the band’s resistance.
- Remain in the position for a little while before going back to the beginning position.
- Perform each foot’s repetitions 10 to 15 times.
Benefits:
The peroneal muscles on the outside of your lower leg, which aid in stabilizing the foot and ankle, are the focus of ankle eversion with a resistance band. These muscles can be strengthened to help with ankle support and alignment, which may ease pressure on the region affected by Morton’s neuroma.
Precautions:
- If you feel any pain or discomfort while performing the workout, stop immediately and seek medical advice before continuing.
- To avoid damage, regulate your movements during the activity and steer clear of jerky ones.
- As your strength develops, start with a low resistance band and progressively raise the intensity.
Ankle inversion with Resistance Band:
An exercise that targets the muscles that bend your foot inward is ankle inversion using a resistance band. For stability and balance to be maintained across a variety of tasks, this motion is crucial. People who have particular ankle disorders or those who want to avoid injuries may find that performing ankle inversion exercises with a resistance band can help strengthen the muscles surrounding your ankle and improve ankle stability.
Ankle inversion using a resistance band instructions are as follows:
An elastic resistance band, such as a TheraBand, is required. Make sure the band is the right resistance for you—not too easy or difficult.
Instructions:
- Place your legs out in front of you while seated on a chair or flat surface.
- Wrap the resistance band’s one end around the ball of your foot.
- To make the band more taut, hold the other end in your palm.
- Maintain a comfortable gait while pointing your toes straight forward.
- Against the band’s resistance, slowly and gradually move your foot inside (inversion).
- While holding the inward posture, feel the muscles in your ankle’s surrounding area contract.
- Controllably and gradually bring your foot back to the beginning position.
- After performing the exercise on one foot for the required number of repetitions (for example, 10-15 reps), move to the other foot.
Tips:
- Keep your motions moderate and steer clear of jerky or rapid movements.
- To properly engage the targeted muscles, carry out the exercise slowly and deliberately.
- Refrain from ignoring suffering. Stop performing the activity right away and seek medical advice if you feel any discomfort or pain.
Resistance Band Arch Exercise:
Strengthening the muscles in your foot’s arch using resistance bands can increase its stability and support. The intrinsic foot muscles, which are important for maintaining normal foot alignment and avoiding problems like flat feet or overpronation, are the focus of this exercise. How to do the resistance band arch workout is as follows:
Materials required: a tension band
Instructions:
- Place your legs out in front of you while sitting on a chair or the floor.
- Wrap the resistance band twice around your feet’s balls.
- Hold the resistance band’s ends firmly in your palms while maintaining tension.
- Extend the resistance band while pointing your toes away from you.
- Next, stretch your toes back towards you while buckling the band’s pull.
- Perform the pointing and flexing action repeatedly.
Tips:
- Throughout the exercise, keep the rest of your foot and leg relaxed.
- To properly activate the arch muscles, move gently and deliberately.
- Keep your breath even while you perform the activity.
Benefits:
The intrinsic foot muscles, which are crucial for preserving the integrity of the arch and providing support during motion, are the focus of the resistance band arch workout. By completing this exercise on a regular basis, you may help avoid common foot issues caused by weak arches and improve foot stability and balance.
Variations:
Use a thicker or stronger resistance band to enhance the resistance. Additionally, you may experiment with different foot postures by flexing and pointing your toes while sitting or lying down.
Precautions:
- Before performing this exercise, speak with a healthcare provider or physical therapist if you have any foot issues, injuries, or concerns.
- Keep your foot from being forced or overstretched. As your foot muscles become stronger, perform the exercise with a little stretch and progressively increase the intensity.
Foot Arch Lifts:
A quick and efficient workout to tone the muscles in your foot’s arch is lifting your foot. It can aid in enhancing foot stability, balance, and avoiding problems brought on by weak arches. Foot arch lifts are performed as follows:
Materials required: None
Instructions:
- Place your feet flat on the ground as you sit or stand in a comfortable posture.
- Lift the arches of your feet to make room beneath the arch while keeping your heels and toes on the ground.
- Focus on tightening the muscles in the arch of your foot while you hold the raised posture for a few seconds.
- Calm down and put your foot back in a flat position.
- Perform 10 to 15 repetitions of the foot arch raises.
Tips:
- Throughout the workout, maintain ground contact with your heels and toes.
- Maintain good posture and refrain from tensing your feet or other leg muscles.
- Keep your breath even while you perform the activity.
Benefits:
The intrinsic foot muscles, which are essential for preserving normal foot alignment and providing support, are the focus of foot arch lifts. These muscles may be strengthened to increase foot stability, support the arch, and lessen the likelihood of overpronation or flat feet.
Variations:
Perform the foot arch raises while standing on one foot at a time for a more difficult exercise. By actively contracting your arch muscles with each stride, you may also include foot arch lifts into your usual walking or jogging regimen.
Precautions:
- Before performing foot arch lifts, speak with a healthcare provider or physical therapist if you have any current foot issues, injuries, or concerns.
- Avoid overexerting yourself or putting your foot in an awkward posture. Exercise should be done steadily and within a comfortable range of motion.
Marble pick up:
The activity known as “marble pick-up” can be beneficial for those who have Morton’s neuroma. It is a straightforward foot exercise used to increase flexibility and foot muscle strength. This exercise may assist in enhancing foot functionality and easing certain Morton’s neuroma symptoms.
How to do the marble pick-up exercise is as follows:

A small bowl or container loaded with marbles or other small balls should be placed on the floor in front of you while you are sitting in a chair.
Remove your shoes and socks to guarantee a firm grasp on the marbles while you are barefoot.
Pick up marbles: Place another bowl or container next to the one containing the marbles and use your toes to pick up each marble one at a time.
Repeat the picking up and moving of the marbles for 5 to 10 minutes, or for as long as you feel comfortable.
After you’ve finished the workout, unwind by stretching and relaxing your feet.
The intrinsic muscles of the foot, which are essential for maintaining healthy foot arches and support, may be strengthened with the use of this exercise. Additionally, it could help with control and coordination.
Walking in the sand:
This will help to strengthen your feet, calves, and toes. Do it for 5 to 10 minutes at the start because it might be exhausting, and then increase the time as tolerated.
Go barefoot in a sand-filled area, such as a beach or sandbox.
Walking on the sand can be dangerous for people with Morton’s neuroma. On the one hand, walking on soft sand helps soften the impact on the foot and lessen pain for certain persons who have Morton’s neuroma. For other people, though, walking on uneven and shaky surfaces like sand might make their symptoms worse.
The precise status of each person’s Morton’s neuroma will determine if walking on the sand is safe for them.
Alphabet Toes (Toe Alphabet):
The easy and entertaining foot exercise known as alphabet toes, often referred to as the alphabet or toe writing, can help increase toe dexterity and flexibility. In this practice, you will “write” the letters of the alphabet in the air using your toes. It’s a terrific technique to exercise and build up the muscles in your toes, which will improve foot mobility and function. The alphabet toes exercise should be done as follows:
Exercise: Toe alphabet (alphabet).
Materials required: None
Instructions:
- Stretch your legs out in front of you while you sit comfortably on a chair or the floor.
- Raise one foot off the ground while supporting yourself with the other flat on the floor.
- Begin “writing” the letters of the alphabet in the air with your big toe as if it were a pen.
- Using only your toes, make each letter as distinct and huge as you can.
- Once you’ve finished the alphabet with one foot, turn to the other foot and go through the motions again.
- To maximize the activation of the toe muscles, try to do the exercise gently and under control.
Tips:
- Pay attention to forming the letters just with your toes, minimizing movement with the rest of your foot.
- Throughout the activity, keep your breathing calm and regular.
- Exercise should be done on a soft surface to prevent stress or pain in the toes.
Benefits:
The alphabet toes exercise improves the flexibility, strength, and coordination of the toe and arch muscles of your feet. Regularly performing this exercise can help promote general foot health and proprioception, which is the knowledge of your foot’s location in space.
Variations:
By attempting to write the letters in cursive, or by including numerals or other forms in the exercise, you may make it harder.
Precautions:
- Before performing alphabet toes or other foot exercises, speak with a healthcare provider or physical therapist if you have any current foot issues, injuries, or concerns.
- If you suffer any pain or discomfort in your toes or feet, stop the activity right once.
Eccentric Calf Raise (Heel Drop):
Exercises for the calf muscles that extend them under strain are known as eccentric exercises. These exercises can help strengthen and repair the calf muscles and increase their resilience, which is especially helpful for problems like Achilles tendinopathy or tendinitis. The “heel drop” or “eccentric calf raise” is a typical eccentric calf workout. How to do this:
Eccentric Calf Raise (Heel Drop) exercise
A step or a stable raised platform (such as a stair) is required equipment.
Instructions:
- Place your heels off the back of the step and the balls of your feet on the step while you stand there. Your toes should be pointed forward, and your feet should be hip-width apart.
- If necessary, cling to a neighboring wall or railing for support.
- Lean forward into the balls of your feet while lifting both heels.
- Next, gradually bring your heels down to the step’s level. It is important to lower yourself slowly and deliberately.
- Let your heels descend as much as they can without hurting or becoming uncomfortable. Your calf muscles ought to stretch.
- After lowering your heels as far as they will go, use the opposite foot to gently lift them back up to the beginning position.
- Perform 10 to 15 repetitions of the eccentric lowering action slowly and deliberately.
Tips:
- Throughout the workout, keep your movements moderate and controlled.
- Focus on your core for improved stability and balance.
- Raise your heels back up with the help of your non-working foot.
Benefits:
Eccentric calf raises to strengthen the calf muscles while they are stretched, which is particularly advantageous for ailments like Achilles tendinopathy. They increase the calf muscles’ ability to diffuse force and absorb it, which lowers the risk of injury and enhances performance in activities that require frequent leaping or running.
Precautions:
- Before performing eccentric calf raises, speak with a doctor or physical therapist if you have any existing foot, ankle, or calf issues.
- As your calf muscles get stronger, start with a limited range of motion and progressively increase the depth of the heel drop.
- To prevent injury, refrain from utilizing too much momentum or bouncing when performing the exercise.
Ball massage:
Ball massage, often referred to as self-myofascial release, is a type of self-massage that includes applying pressure to certain body parts using a ball. The aim is to loosen up the muscles and fascia, the connective tissue that covers tendons, ligaments, and muscles. When it comes to releasing muscular knots, increasing flexibility, and easing pain in the muscles, ball massage can be especially helpful. Here’s how to provide a massage using a ball:
A massage ball, such as a tennis ball, lacrosse ball, or foam roller ball, is required.
Instructions:
- Pick a massage ball: Decide which ball is most comfortable for you and the area you wish to target. Use a smaller, denser ball, such as a lacrosse ball, for more severe pressure. Choose a bigger, softer ball, like a tennis ball, for milder pressure.
- Locate the region: Determine the part of your body that is stiff, tight, or sore. The back, neck, shoulders, hips, glutes, and feet are typical locations for ball massages.
- Apply pressure: Place the ball in the desired location and gently push your body weight against the ball. Laying on the ground or leaning against a wall can work for this.
- Roll or hold: Once the ball is in position, you have the option of rolling it back and forth or holding it in a particular area that feels particularly stiff or sensitive. Spend a few seconds allowing the pressure to penetrate the muscle.
- Take a deep breath and attempt to relax your muscles as you apply pressure. Avoid holding your breath.
- Modify pressure: If the ball is being supported by too much body weight, lessen the intensity. Learn a little more about the ball if you need extra pressure.
- Keep going for a few minutes: Give each region 1-2 minutes, gently moving the ball to various locations to massage the entire area you wish to.
Benefits:
Numerous advantages of ball massage include:
- The release of stiff and tense muscles.
- Increased circulation in the region being targeted.
- Reduction of trigger points and muscular knots.
- Increased range of motion and flexibility.
- Relieving pain and stiffness in the muscles.
- Stress reduction and relaxation promotion.
Precautions:
- Refrain from exerting too much pressure, especially on tender or protruding bone parts.
- Before conducting a ball massage, speak with a medical expert if you have an injury or a medical condition.
- Stop the massage right once and seek medical advice if you feel any pain or discomfort while receiving it.
The inclusion of ball massage in your self-care regimen can help you relieve muscular stress and enhance your general well-being. For optimal effects, include it in your normal stretching or workout program.
Toe Spreading or splay:
A simple foot workout called “toe spreading” is actively spreading your toes apart. Your feet’s intrinsic muscles need to be strengthened in order to maintain good foot alignment, stability, and balance. Here’s how to spread your toes:
Exercise: Spreading the toes
Instructions:

- Place your feet flat on the ground as you sit or stand comfortably.
- Let your feet and toes loosen up and assume their natural positions.
- Start the toe-spreading motion by deliberately spreading your toes apart, as though you’re attempting to leave as much space as you can between them.
- While holding the spread posture, feel the muscles between your toes extend and contract.
- Let go of the spread and put your toes back in their natural state.
- Carry out the toe-spreading action repeatedly.
Tips:
- Pay close attention to spreading your toes by concentrating on utilizing the muscles in your foot, especially the little muscles there.
- Throughout the exercise, keep the rest of your foot and leg relaxed.
- Continue to breathe steadily.
Benefits:
The intrinsic foot muscles, which are essential for preserving the arch, supplying stability, and avoiding foot issues, are the focus of toe spreading. By performing this exercise on a regular basis, you may strengthen, stretch, and support your feet, which lowers your chance of developing conditions like bunions, hammertoes, and foot fatigue.
Variations:
By physically spreading your toes apart with your fingers, you may increase the difficulty of the exercise. Encourage the muscles in each toe to contract against the resistance by gently pushing them apart from one another.
Precautions:
- Before performing toe spreading or other foot exercises, speak with a healthcare provider or physical therapist if you have any foot issues, injuries, or concerns.
- When extending your toes out, be careful, especially if you’re not used to this kind of workout.
Toe Tapping:
Toe-tapping is a quick and efficient foot workout that may enhance ankle mobility, boost blood flow, and work your lower leg and foot muscles. It is a low-impact workout that doesn’t require any special equipment and can be performed in practically any place. The proper way to toe tap is as follows:
Activity: Toe-tapping
Instructions:
- Place your feet flat on the ground while comfortably seated in a chair.
- Lift your toes off the ground while maintaining a solid heel position.
- Quickly start tapping your toes on the ground.
- Keep tapping your toes for 30 to 60 seconds.
- After a little break, carry out another round of toe-tapping.
Tips:
- Throughout the exercise, keep your heel planted firmly on the floor.
- Concentrate on tapping the floor just with your toes while keeping the rest of your foot and leg at ease.
- When tapping, keep your breathing even and regulated.
Benefits:
Toe-tapping is a quick workout with a number of advantages:
- Increases flexibility and mobility of the ankle.
- Exercises the ankle, lower leg, and foot muscles.
- Improves blood flow to the lower legs and feet.
- Aids in preventing soreness and stiffness in the ankles and feet.
Variations:
In accordance with your demands and degree of fitness, you may adjust the toe-tapping exercise:
- improves the duration: As your foot strength and endurance improve, gradually lengthen the toe-tapping sessions.
- Alternate feet: Try tapping one foot at a time instead of tapping both feet at once.
Precautions:
- Before attempting toe tapping or other foot exercises, speak with a healthcare provider or physical therapist if you have any foot or ankle issues or injuries.
- Do not over-exert yourself, especially if this is your first time doing this exercise. Start at a relaxed speed and increase it over time.
You may add toe-tapping as a quick and simple exercise into your everyday routine. People who spend a lot of time sitting down or those trying to increase foot and ankle strength may find it particularly helpful.
Single-Leg Balance Eyes Open:
A balancing exercise that helps increase stability, proprioception, and strength in the muscles that support the ankles, knees, and hips is single-leg balance with eyes open. Athletes, those who are healing from injuries, or anybody else trying to improve their balance and coordination, in general, can all benefit from this workout. Here’s how to balance on one leg while keeping your eyes open:
Instructions:
- Place your arms at your sides and stand straight with your feet together.
- Lift one leg off the ground, bending the knee just a little bit.
- Locate a point of concentration in front of you.
- Lift your chosen foot slowly off the ground while maintaining a focused stare on the main subject.
- Remain in the single-leg posture for 20 to 30 seconds, or for as long as your balance and form allow.
- To stabilize your body, contract the muscles in the standing leg and your core.
- To further test your balance, if you feel stable, try extending your arms to the sides or holding them up above your head.
- Return your foot to the floor and do the exercise with your other leg.
Tips:
- Maintain an upright posture and abstain from tilting or leaning to one side.
- To keep your balance, contract the muscles in your foot and ankle.
- To aid in maintaining equilibrium, concentrate on a stationary object.
Benefits:
The single-leg balancing while keeping your eyes open has various advantages:
- Better balance and stability: By challenging the muscles that keep your body in alignment, this exercise improves your general balance and lowers your chance of falling or getting hurt.
- Improved proprioception: Your body’s capacity to perceive its location in space is known as proprioception. This exercise sharpens this perception and increases your awareness of the position and motion of your body.
- Leg and ankle muscle strengthening: By cooperating to maintain stability throughout the workout, your calf, hip, and ankle muscles are strengthened.
Variations:
You can increase the difficulty of the workout as you advance:
- Try the single-leg balancing while closing your eyes. As a result, the challenge is substantially increased because you can only use your proprioception.
- To further test your balance, stand on a soft, shaky surface, such as a balance pad or a folded towel.
Precautions:
Perform this exercise adjacent to a sturdy surface, such as a wall or a chair, to which you may hold on for support if necessary if you have any balance concerns or injuries.
- Start with a little period and progressively extend it as you get more accustomed to the activity.
Improve your balance, stability, and general lower body strength by adding single-leg balancing with eyes open to your normal training regimen.
FAQs
A disorder known as Morton’s neuroma (MN) affects the common plantar digital nerves and is brought on by repeated pressure on the nerve under the deep transverse metatarsal ligament, which causes epineural and perineural fibrous outgrowth.
The region between your third and fourth toes is the most typical location for Morton’s neuroma, a painful ailment that affects the ball of your foot. You could get the sensation of stepping on a pebble in your shoe or a fold in your sock if you have Morton’s neuroma.
The benign neuroma or perineural neuroma, also known as Morton neuroma, Morton’s metatarsalgia, Intermetatarsal neuroma, and Intermetatarsal space neuroma, most frequently affects the intermetatarsal plantar nerve of the second and third intermetatarsal spaces (between the second, third, and third, fourth metatarsal heads), which causes the affected nerve to become entrapped.
The exact cause of Morton’s neuroma is not always clear, but it is often associated with irritation, pressure, or compression of the nerve due to factors such as wearing tight or ill-fitting footwear, repetitive stress, or certain foot deformities. Morton’s neuroma is frequently linked to high arches, hammertoes, bunions, and flat feet.
Common symptoms include sharp or burning pain in the ball of the foot, tingling or numbness in the toes, feeling like you’re standing on a pebble, and pain that worsens with walking or wearing tight shoes. It occurs when the tissue around one of the nerves thickens and causes compression or irritation. Symptoms may worsen with activities that put pressure on the foot, such as walking or standing for extended periods.
Diagnosis is typically made through a physical examination of the foot and a review of your symptoms and medical history. To rule out other medical conditions, your doctor may also prescribe imaging tests like X-rays or an MRI.
Treatment may include:
– Changing footwear to accommodate wider shoes and lower heels.
– Using orthotics or arch supports to alleviate pressure on the nerve.
– Using painkillers and anti-inflammatory drugs to lessen inflammation and discomfort.
– Injecting corticosteroids to reduce inflammation around the affected nerve.
– Physical therapy to strengthen foot muscles and improve foot mechanics.
– If conservative treatments fail, surgical removal of the neuroma may considered.
You can reduce the risk of developing Morton’s neuroma by wearing comfortable and properly fitting shoes with enough room for your toes to move freely. Avoid wearing high heels or tight shoes for extended periods and take regular breaks from activities that put pressure on your feet.
Morton’s neuroma is not typically life-threatening, but it can cause significant discomfort and impact your quality of life. Effective symptom management can be aided with early diagnosis and proper medication.
Some exercises that can help with Morton’s neuroma include toe spreading, toe flexion, and extension, short foot exercise, marble pickup, calf raises with toe squeeze, and toe-tapping. These exercises can strengthen the foot muscles, increase flexibility, and improve foot stability.
Yes, it’s essential to consider some precautions before starting Morton’s neuroma exercises. If you are diagnosed with Morton’s neuroma or suspect you may have the condition, it’s crucial to consult with a healthcare professional, such as a podiatrist or physical therapist, before attempting any exercises. They can provide a proper diagnosis, assess your specific condition, and recommend appropriate exercises tailored to your needs.
The frequency of exercises for Morton’s neuroma may vary depending on individual circumstances. Generally, it’s best to start with a few times per week and gradually increase the frequency as your foot muscles become stronger and more accustomed to the exercises. If you experience pain or discomfort during or after the exercises, reduce the frequency or intensity and consult with a healthcare professional.
Exercise can be a valuable component of a comprehensive treatment plan for Morton’s neuroma, but they are unlikely to cure the condition on its own. The management of Morton’s neuroma may also involve other interventions, such as proper footwear, orthotics, ice therapy, anti-inflammatory medications, and in severe cases, corticosteroid injections or surgery. A healthcare professional can create a personalized treatment plan based on the severity of your condition.
The time it takes to see improvements with Morton’s neuroma exercises can vary from person to person. Some individuals may experience relief and improvement in symptoms relatively quickly, while others may require several weeks or months of consistent exercise to notice significant changes. The key is to be patient, stay consistent with the exercises, and follow the guidance of a healthcare professional.
Yes, making certain lifestyle modifications can complement the effects of exercises and aid in managing Morton’s neuroma. These may include wearing supportive and properly fitting footwear, avoiding high heels and tight shoes, using orthotic inserts, applying ice to reduce inflammation, and taking breaks to rest the feet during activities that may worsen symptoms.
Yes, exercises can be beneficial for Morton’s neuroma. Certain exercises can help strengthen the foot muscles, improve flexibility, and promote better foot mechanics, which may reduce pressure on the affected nerves and alleviate symptoms.
While home remedies cannot cure Morton’s neuroma, they may help alleviate symptoms. RICE therapy (Rest, Ice, Compression, Elevation) can reduce inflammation. Wearing comfortable footwear with proper arch support can also provide relief.