
Low Back Core Muscles Strengthening Exercise
Table of Contents
Introduction
Low Back Core Muscles Strengthening Exercise is an important exercise to make your lower back powerful enough to do all your daily activity with ease and also have many health benefits.
- A Lumbar/Core Strength, as well as Stability exercise, are also useful as a preventative rehabilitation program if you are recovering from Low Back Pain.
- A “core muscle” includes several groups of muscles mainly transverse abdominals, multifidus, diaphragm & pelvic floor muscles.
- These muscles act together to make the spine stable in the abdominal as well as lumbar lower back region, & also coordinate the movement of the arms, legs, and spine as well.
Lower back muscles
- Front abdominal muscles — the rectus abdominis.
- Muscles along a side of the body — the internal as well as external obliques.
- The deep muscle that wraps around the front — a transverse abdominal.
- Muscles in the back that are located between the spine bones as well as run along your spine — the erector spina & multifidus.
- Diaphragm, Pelvic floor muscles, hip flexors, as well as gluteal muscles.
Description
- If the muscles of the low back are weak, your body will depend more on the skeleton (passive) structures for stability, including ligaments — a tissue that bridges bone to bone & the spinal bones or even discs which lie between the spinal bones. It may cause extra pressure over low back structures & it can improve low Back pain symptoms.
- Therefore, strengthening weak muscles as well as stretching tight muscles are useful in relieving chronic Back pain.
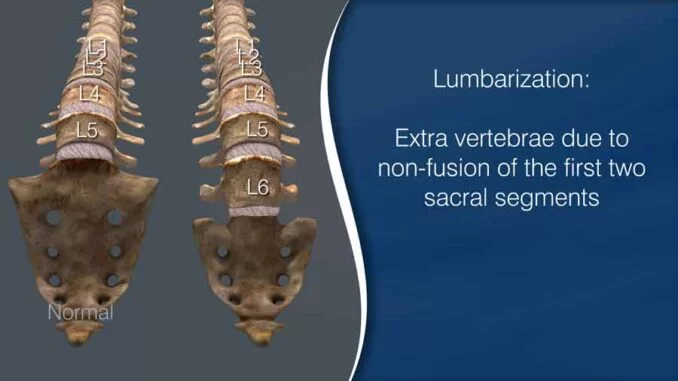
- A lower back area, also called a lumbar region, is an area of the back that embarks below a rib cage.
- Lumbar Spine (lower back) has Five vertebrae (L1 to L5) that make up a lower part of the spine. The lumbar spine supports the upper parts of the spine & This also bridges to the pelvis & takes most of your body’s weight, as well as the stress of lifting & carrying items. Many low back pain-related conditions happen in the lumbar spine, for example, Disc Prolapse.
Health Benefits of Core Low Back Core Muscles Strengthening Exercise
- Improved Balance as well as Stability of Spine :
- Core exercises strengthen the muscles in your pelvis, lower back, hips as well as abdomen. This helps to increase balance as well as stability in building daily activities namely, walking, running, as well as sitting effortlessly. The strong core muscles will consist of muscles that work together to support the body in day-to-day activity. It will make you less susceptible to injuries, keeping you in good shape as well as minimizing strain on the muscles & joints.
- Maintain Good Posture :
- Good posture decreased the wear as well as tear on a spine & allows you to breathe deeply making this easier for oxygen to travel through the muscles so they are able to contract. The upright posture may help you survive sitting or even standing for long periods of time. This is essential to have a strengthened core due to it keeps your body straight, Reduces lower back pain and increases your overall posture & keeps you physically fit.
- Relieve Back Pain:
- A body that is in good posture as well as upright will make you decreased the risk of lower back pain. Your core is at the center of the body are fully strengthened which assists your entire body, especially lifting a heavy upper half, neck & back. If your core muscles are weak then other structures of the back will have to work harder to support the body. This leads to muscle strains as well as prone to back pain.
Some Core Muscles Strengthening Exercises
- Starting(1st)Phase ( Light Core Strengthening Exercises ) :
Bridging
Crunch
Plank
Supine Toe Tap
Panther shoulder tap
Half kneeling wood chop
Rolling like a ball
- After Few Days(2nd)(Medium Core Strengthening Exercises) :
Bird dog
Mountain climber
Warrior crunch
Leg raise
Butterfly sit up
Dead bug
Side blend
C-curve
Plank tap
- Advanced Core Strengthening exercises :
Side plank with rotation
Bird dog with an elbow to knee
Bicycle crunch
High boat to low boat
Body saw
Jackknife
Hollow hold to jackknife
Hollow body rock
Wheelbarrow
Tabletop leg press
Row your boat
Single leg jackknife
Hip dip
Starting Phase(Light Core Strengthening Exercises)
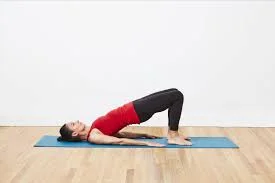
Bridging Exercise
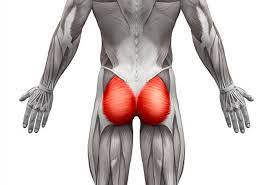
- The exercise assists to increase the strength of the Glutes muscle with other muscles are hamstrings, lower back muscles as well as abdominal.
- This bridging exercise is also essential for increasing the strength of the Core muscles of the Back. With many of the benefits similar to that of the squat, another plus for the glute bridge is that this does not place any pressure on a lower back. It is also an important exercise for individuals who are unable to squat owing to back, hip, or even knee pain.
- How to do this strengthening (which is mild)exercise:
- First of all, take a supine Lie position on your back on the mat with your knees bent, after that elevate your hips off the ground until your hips are aligned with your knees as well as shoulders.
- Next, hold for ten to fifteen seconds, and then return to the embarking position & repeat. First Day 6 to 7 repetitions & 2nd day 10 to 11 repetitions & slowly increase the numbers of repetitions as per stamina.
Crunch Exercise
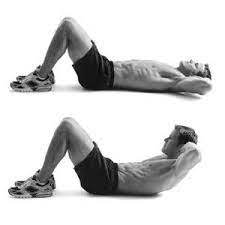
- A crunch exercise is the Best example of core strengthening. This mainly trains the abdominal muscles, which are part of the core muscles.
- The exercise also strengthens the oblique muscles on the sides of your trunk, as well as the muscles in your pelvis, lower back, and hips. Overall, these muscle groups assist stabilize the lower back.
- How to perform this Crunch Exercise:
- First of all, start on the Soft MAT, supine lie down position on the back. After that, place your feet on the ground, hip-width apart. Next, bend your knees as well as place the arms behind your heads. Then, raise the Head & Shoulder towards the Left Knees as well as inhale.
- Exhale & come back to a normal position. Again lift the upper body towards the right knee, keeping the head as well as neck in normal position.
- Relax & again and return to embarking position.
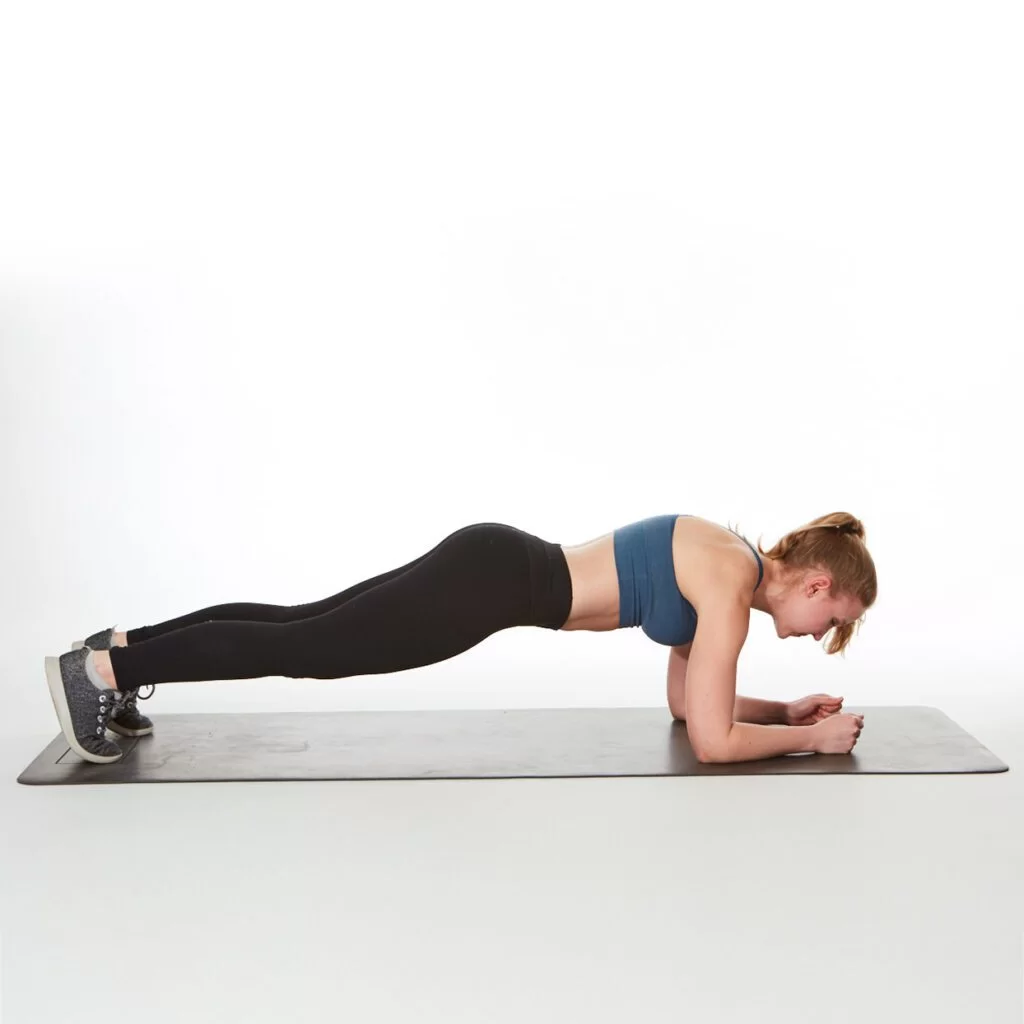
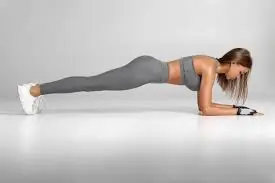
Plank Exercise
- Plank Exercise assists to stabilize, balance, as well as improve the strength of the body while just about every other action. A plank exercise may also be used as the basis for the core muscle strength as well as a stability test. A plank is more of a strength-building exercise of Back.
- How to Do Plank Strengthening Exercise:
- First of all, you may start by taking a plank position on a soft mat, face down with the forearms & toes on the ground. The elbows are directly under your shoulders and your forearms are facing forward. The head is relaxed & you may be looking at the floor.
- Contact the abdominal muscles, drawing your navel toward the spine. After that, keep your torso straight & rigid and your body in a straight line from the ears to the toes with no sagging or even bending. It is the neutral spine position. Ensure the shoulders are down, not creeping up toward the ears. The heels may be over the balls of your feet.
- Hold the action for seven to ten seconds on the first day as well as gradually increase the time up to thirty to forty seconds. Exercise may be pain-free most of the time.
Supine Toe Tap

- Supine Toe Taps exercise gives assistance to strengthen the abdominal muscles gradually rectus abdominis & transverse abdominis, & the other core muscles, mainly including the obliques & hips muscles with pelvic floor muscles. This improves stability in the low back area, they are contracted throughout a leg raise flow.
- How to perform supine Toe Tap exercise:
- On the soft MAT, supine Lie down position with the knees bent & arms at the sides.
- First of all, bring the legs up to the tabletop one leg at a time, knees bent, thighs perpendicular to the ground. Maintain a normal back position as well as avoid arching or even pressing the back into the ground.
- Then, start by lowering the right foot & tapping this on the ground during the left leg remains in the tabletop position.
- Come back the right leg to the tabletop as well as repeat with the left leg.
- Repeat for ten taps on each side. Embark with one set & progress to two sets of ten taps on each leg.
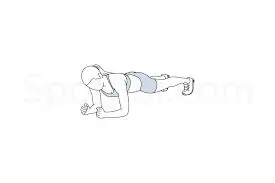
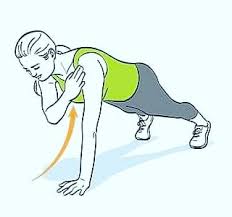
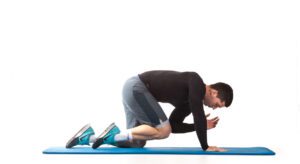
Panther shoulder tap
- Panther Shoulder tap exercises strengthen plenty of core muscles, mainly the transverse abdominals, and deep core muscles that wrap around the spine like the corset as well as obliques. Regular Exercise will assist you to strengthen the core & gain more stability in the spine at the same time.
- How to perform the Panther Shoulder Tap exercise :
- Start in on all fours, Quadruped Position.
- Contract the core muscles during keeping the back straight & the Hip as well as Knees down perpendicular to each other, lift the knees off the ground about 1-3 inches. See at the ground a few inches in front of the hands to keep the neck in the neutral position.
- After that, tap your right hand on your left shoulder, & then your left hand on the right shoulder, during contracting the core muscles to keep the hips as still as you may.
- Repeating with alternating sides as well.
Half kneeling wood chop Exercise
- This exercise is to increase the stability of the spine, primarily targeting the obliques & to a lesser degree also targeting the abs as well as the lower back. It is a great anti-rotational core stability exercise for strengthening the musculature of the anterior core. This also increases hip mobility as well as stability.
- How to perform this half-kneeling wood chop exercise:
- In the half kneeling lunge position. The knees must be in line with the hips, & your body in a normal position.
- Hold the medicine ball, start from the high diagonal position, & “chop” this down towards the hip (next to the pocket) without losing a tall straight position of the spine.
- You chop kind of down towards the hip then up towards the other knee as well.
Rolling like a ball
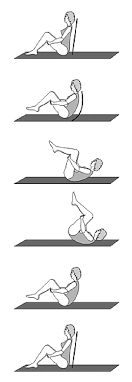
- Rolling exercises stimulate the spine, deeply work the abdominals, as well as tune you into an inner flow of motion & breath in the body. You will learn to be in control of your motion & find the natural balance point. You will be giving yourself a back massage, which may relieve tension.
- How to perform this strengthening exercise:
- First of all, sit on the mat as well as clasp the hands over the shins, just above the ankle.
- Next, drop your shoulders, widen your back, deepen your abdominals & build a nice curve of your spine. But, do not tuck your head; your neck is part of the long curve, and do duck the chin slightly as well as keep your eyes on the navel.
- Then, lift the feet off the mat and balance on or just behind your sit bones.
- Inhale: You may pull the lower abs in & up to get yourself going as well as roll back on the inhale. Then, roll only to the shoulders. Do not roll onto a neck.
- Pause.
- Exhale: You may stay deeply scooped with the spine curved. Use the exhale as well as the abdominals to come back upright.
- Repeat five to six times in one session. Do nearly two to three sessions per day.
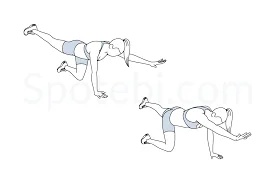
Bird dog
- Target Muscle Group: Erector Spinae
- Type: strengthening
- Mechanics: Compound
- Equipment: Exercise mat
- Difficulty: Beginner/intermediate
- How to do this strengthening Bird Dog Exercise
- Now for the fun part. Here are step-by-step instructions for how to do this strengthening exercise.
- First of all, get on the hands as well as knees so that your hands are underneath the shoulders & your knees are under the hips.
- Then, maintain a normal spine by lengthening the torso in each direction during keeping a head neutral, looking down at the ground.
- Next, press firmly into the floor as well as feel the shoulder blades move away from each other & downward. Make sure the core is tight.
- Lift one arm straight out in front of you with the palms facing inward as well as the thumbs uppermost.
- Then, lift the other side leg behind you & flex the toes so that they are pointed at the floor. You have the desire to form a straight line from the fingers to the toes. It will not form a perfectly straight line but you get a picture.
- Hold the position for five to six seconds & repeat using the opposite hand and leg. Do this strengthening exercise ten times in a session. Perform this exercise in two to three sessions a day.
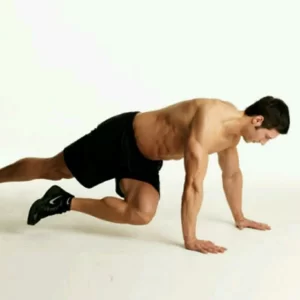
Mountain climber
- When you are just starting out, try a classic variation of the exercise:
- How to do this strengthening exercise:
- First of all, get into the plank position, making sure to distribute the weight evenly between your hands as well as your toes.
- Then, check your form your hands may be about shoulder-width apart, your back flat, your abs engaged, as well as your head in alignment.
- Next, pull your right knee into your chest as far as you may.
- Switch legs, pulling one knee out as well as bringing the other knee in.
- Keep the hips down & run the knees in as well as out as far & as fast as you can.
- Do seven to eight repetitions in a session. Do two to three sessions in a day.
Warrior crunch
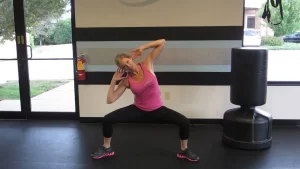
- How to do this strengthening exercise:
- A crunch variation works your core as well as your lower body, including your thighs, your glutes, as well as your quads.
- First of all, stand with the feet slightly wider than shoulder width as well as the toes turned outward. Next, put your hands behind your head & open your chest.
- Then, tighten your core and your glutes. Next, bend your knees until your thighs are parallel to the ground.
- Bend your torso to a side, moving your right elbow toward the right thigh. Repeat on the left side as well.
- Start with one set of five to six repetitions. When you are adapted to this number of repetitions, try to increase the repetitions to twenty, and sets also.
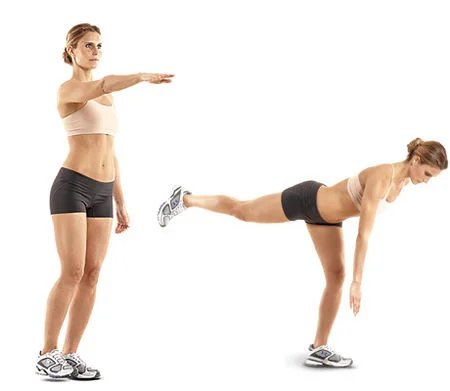
Straight Leg raise
- How to do this strengthening exercise:
- First of all, lie down on the back with your one leg bent as well as one leg straight.
- After that, do a posterior pelvic tilt to protect your back from injury.
- Next, with your toes pointed to the roof, keep your knee straight as well as lift your leg up to about 45 degrees.
- Gradually, lower your leg back to the ground.
- Repeat ten to fifteen times (repetitions), two to three times in a set.
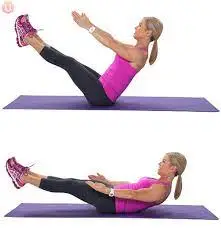
Butterfly sit up
- How to do this strengthening exercise:
- To start with, sit on the ground as well as press your feet together. Next, find a comfortable place where you may sit as well as work out, like a yoga mat or even padded gym ground. Then, press the soles of your feet together, keeping your knees bent to the sides, such as butterfly wings.
- Next, with traditional sit-ups or even crunches, your feet are usually planted on the ground to embark. With the use of butterfly sit-ups, the feet are pressed together at the soles.
- Then, your heels will be at least 1 foot (12 in) or therefore in front of your hips.
- If you are not able to press your feet together quite yet, practice stretching & opening up your hips every day so you become more flexible. The more flexible you are, the easier an exercise will be.
- Do this strengthening exercise ten times per session. Try to do 2 to 3 sessions per day.

Dead bug
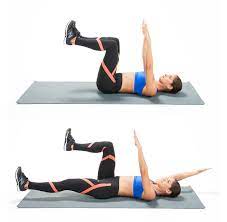
- A dead bug exercise is done on the floor, so you require roughly the same amount of space as a yoga mat. And, you may want to use the yoga mat or even another type of exercise mat for comfort.
- How to perform this strengthening exercise:
- First of all, lie on a mat with your arms extended straight over your chest thus they form a perpendicular angle with your torso. Next, bend your hips as well as knees 90 degrees, lifting your feet from the floor. Your torso and your thighs should form a right angle, as should your thighs and your shins. It is the embarking position.
- Engage your core, maintaining contact between the lower back as well as a mat. You can require to make sure the spine maintains a steady as well as neutral position throughout an exercise.
- Then, keep your right arm and your left leg exactly where they are, and then gradually reach your left arm backward, over your head & toward the ground as you simultaneously extend your right knee and your hip, reaching your right heel toward the ground. Move gradually as well as steadily, breathing in as you do the extensions, avoiding any twisting or motion of your hips and your abs. Stop the motion just before your arm and your leg touch the floor.
- Reverse the motion as well as come back to your left arm and your right leg to their embarking positions. Move slowly & steadily, exhaling as you go.
- Do ten repetitions on each side per session. When you complete a full set, simply come back your feet to the floor & sit up.
Side blend
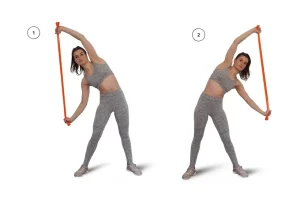
- How to do this strengthening exercise:
- To start with, hold the dumbbell in one hand. A side bend trains one side at a time, so you only require one dumbbell. Hold a weight on the side you have the desire to embark on.
- This does not matter from which side you may start. You will be training both sides by the end of the workout.
- If you are just starting out, use the light dumbbell for around 5–10 lb (2.3–4.5 kg). A side bend may put stress on your back & you may get hurt if you use too much weight before you get a form right.
- Most commonly individuals try to use a dumbbell in each hand as well as train both sides at once, but it is not as great of a workout because the second weight takes the problem away from the side you are working.
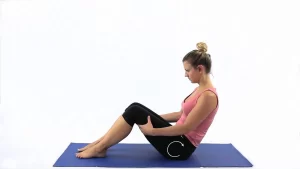
C-curve
- Step-by-Step Instructions:
- First of all, sit with your knees bent as well as your feet flat on the ground. Initiate with the tall straight spine as well as draw your abdominals in & up. The top of the head is reaching for the sky as well as the shoulders are relaxed.
- After that, place your hands behind your knees with your elbows lifted up as well as out. Take a few deep breaths here to feel what is occurring in your abdominals. As you inhale a breath will lightly expand your abdominal wall. As you exhale draw a waistline in & up growing even taller.
- Then, take another inhale & on an exhale, pull your abs in so that they form the deep scoop. Pretend that someone has the string attached to your belly button from behind.
- As you exhale, feel a string pulling your belly button right back through the spine as well as up towards the top of a wall behind you. As the abdominals deepen in toward the spine, keep a neck long, as well as the shoulders relaxed & let your hips curl below you to open up the lower back. As you deepen the curl, resist any collapsing. Instead, lengthen up as well as out to create a high hollow C-curve rather than a low shallow one.
- At the deepest lowest point, hold a position. Lower the gaze to the abdominals & watch what occurs as you breathe. Take two to three deep breaths in & out as well as pull even more deeply into a curve. With each exhale pull your abs in strongly.
- After the 3rd breath, round up as well as over your legs to come back to sitting. Repeat a sequence at least twice more before rolling up & returning to your upright starting posture.
Plank tap
- How to Perform Plank with Shoulder Taps strengthening exercise:
- First of all, embark in the high plank position (it is the same as the push-up position). Arms straight hands firmly on the floor under your shoulders, and your feet in line with your hips.
- Then, flatten your back to keep your body in a straight line from your head to the heels.
- Next, use the toes to dig into the floor to assist stabilize your lower body and your core.
- Go carefully lift one arm & tap an opposite shoulder, without rotating or even twisting your hips. Remember to keep your back flat with a tight core.
- Alternate arms as well as repeat, making sure to keep your body as still as possible. The number of repetitions will vary significantly depending on the current strength. Always embark small as well as build these up gradually.
Side plank with rotation
- This exercise is the advanced version of a basic plank. This strengthens your arms, your shoulders, as well as your obliques by combining the side plank with arm actions.
- First of all, you may lie on your right side with your right forearm below the shoulder. Then, extend your legs, and left foot on the top of the right. Tighten the core.
- Then, lift your hips to form a straight line with your body, and raise your left arm straight up.
- Next, rotate your torso toward the ground as well as bring your left arm under your body.
- Rotate your torso again to straighten your left arm to come back to the embarking position.
- Initiate with one to two sets of ten to eleven repetitions.
- Repeat on the other side as well.
- When you just adjust with this number of repetitions then increase the numbers of repetitions as well as sets.
Bird dog with an elbow to knee
- This variation on a basic bird dog incorporates fluid motion to engage your abs and your back during increasing core mobility.
- Embark on all fours, your hands below your shoulders and your knees below your hips.
- Then, tighten your core. Lift as well as straighten your right leg to your hip level. Simultaneously lift & extend your left arm to your shoulder level, your palm down.
- Next, bring your right knee and your left elbow toward each other. Come back to the embarking position.
- Perform this strengthening exercise ten times in a session. Do nearly one to two sessions in one day.
Bicycle crunch
- This variation on a regular crunch works your obliques, your rectus abdominals, as well as your hips.
- Embark with your back on the ground, with your left knee bent & drawn toward your chest. Keep your right leg straight as well as slightly lifted off the ground. Next, place your hands behind your neck or a lower part of your head, and be careful not to pull on your neck during you perform this move.
- With your left knee bent & your right leg straight, lift the right shoulder off the ground & move your right elbow toward the left knee.
- As a person bring the right shoulder back to the floor, extend the left leg while bending the right knee as well as bring this near the chest.
- As the right knee(affected) moves farther in, lift your left shoulder off the ground as well as move the left elbow near your right knee.
- Initiate with one to two sets of ten to fifteen alternate repetitions. When you are comfortable with fifteen repetitions, you can increase the repetitions to thirty with three sets.
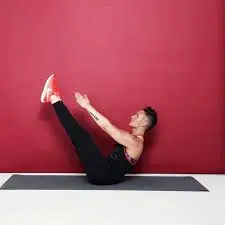
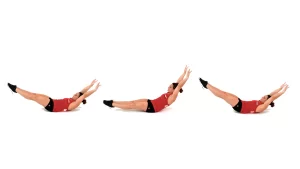
High boat to low boat
- Here are the steps for performing the exercise:
- First of all, you can seat on the mat with bent knees & feet flat on a mat. After that, the palms are faced up on a side of the knees. Next, take lean back until the spine is at a 45-degree angle & straighten your legs moreover, arms up in front of the face so you are in the v-shape.
- After that, with the very tight core lower the back & the legs some inches so a person is shaped more like a canoe.
- On the upcoming means next breath, exhale to pull back up to the v-shape. Try to do this exercise again ten times per session. Next, do around 2 to 3 sessions per day.
Body saw
- How to do a body saw strengthening exercise:
- To start with, on the smooth area of the ground, get down & into a plank position. Your body should be straight with your weight resting on your toes as well as forearms.
- After that, place your feet on the small towel so that they may slide. You may also use a specially designed glider pad. Alternatively, take the shoes off as well as work out in just your socks.
- Next, brace your abs, your glutes, your quads, your shoulders, as well as your arms, so that your entire body feels tense. Do not try to hold your breath however take shallow, diaphragmatic breaths instead.
- A person should maintain tension throughout the body and move the elbows forward as well as back, therefore your feet slide out & in. It should resemble the sawing movement that gives the exercise its name. Keep your motions slow, smooth, & deliberate to maintain constant tension on your abs.
- The further you extend the arms out in front of you, the harder the exercise will become, so adjust your range of movement accordingly.
- Keep going until your hips embark to drop & you have to stop, or even do 2 to 3 sets of ten to fifteen repetitions resting ten to fifteen seconds between each one.
Jackknife
- How to do this strengthening exercise:
- First of all, lie flat on the ground with your arms and your legs extended. The arms must be lifted so that they are above your head. Make sure your spine is in the neutral position so your lower back is not arched or rounded.
- If you will be exercising on the hard floor, lay down the exercise mat before you begin.
- After that, take a deep breath before you start. Breathing properly is an important part of the exercise. By remembering to inhale as you release & exhale as you contract, you will ensure that your muscles are getting plenty of oxygen as you lift weights. It is essential to assist to prevent muscle cramping as well as hernias.
- Next, exhale as well as contract your abs, raising both your arms and your legs. Try to keep the legs straight as well as bring them up so they are at about a 35-45 degree angle to the ground. At the same time, bring your arms up & over your head so that they are parallel to your legs. Your upper body may be raised slightly off the ground.
- Then, bring your head off the ground at the same angle as your torso. Do not tuck your chin into your chest or let your head fall back, as it can cause a neck injury.
- Use slow, controlled movements so you do not injure your back.
- Try to hold yourself in the jack knife position for about three to five seconds. By counting to three to five during you hold the pose, your abdominal muscles will get the full benefit of the workout. Static workouts such as these may increase your strength as well as stability.
- Inhale as you lower the arms and your legs gradually to the embarking position. Take a deep breath, and then gradually come back your arms, legs, as well as torso to a mat. Try to keep your arms and your legs as straight as you may as you lower them, even though this might be hard to not bend your knees slightly.
- Repeat ten to fifteen repetitions per set & aim to complete one or two sets. After the first set of six to ten repetitions, allow yourself to rest for about thirty to forty seconds. It will give the muscles some recovery time, but this will not be so long that they fully relax.
- Maximally try to work up to doing one to two sets four to five days a week for at least four weeks to get the maximum benefit of this exercise.
Hollow hold to jackknife
- How to perform Hollow Holds to jackknife strengthening exercise:
- Get more from hollow holds during keeping the risk of injury to a minimum by following these guidelines:
- First of all, lie on your back as well as extend your arms overhead, so your biceps are next to your ears. Then, straighten your legs & point your toes, your knees, and your feet pressed together.
- Then, brace your core by drawing your ribs toward your pelvis and flexing the abs. Inhale as well as draw air down into the abdomen. You may feel your entire midsection solidify & become rigid.
- Next, lift your feet, your legs, your shoulders, & your arms off of the ground & press your lower back into the floor. The only point of contact may be your lumbar spine region, which is roughly a lower third of your spine, from the tailbone to a mid-back area. Look down the body to your feet; do not tuck the chin into the chest.
- Hold for just a few seconds & then relax, working up to longer holds as you get stronger.
Hollow body rock
- How to do this strengthening exercise:
- First of all, you may lie on the back with your arms stretched overhead. After that, find a relaxing spot on the ground where you may spread out. Extend the legs straight out & point the toes. Keep the arms overhead so the biceps are near the ears.
- Lay the exercise mat down if you are on the hard ground therefore it is more relaxed on your back.
- Press the lower back against the ground to engage the core. The lower back normally arches when you may lie down, but that position will not give you a great workout. Flex the abdominals and gradually push the lower back down so it is flat on the ground. Keep the hips as well as shoulders against the ground as well.
- The exercise works great for engaging the lower abdominals.
- Lift the hands & feet about 6 inches (15 cm) off the ground. Contract the core to raise the arms & legs off of the ground. Hold the shoulder blades about 1 inch (2.5 cm) off of the floor. Keep the arms & legs straight so the body stays rigid. The body may look like the bottom of the rocking chair.
- To make this exercise a little effortless, lift the hands & feet 1 foot (30 cm) off the ground instead.
- Do not lift the lower back off of the floor as you raise the arms & legs, or else you will not do the exercise properly. Have a partner check the form when you get into the position.
- Rock the body forward as well as backward while maintaining a form. Keep the body rigid so you maintain the form & lean the weight forward. Lift the shoulders off of the floor so you lower the legs. Shift the weight back so the shoulders touch the ground & the hips lift up. Keep shifting the weight back & forth to maintain the momentum.
- It is okay if you teeter from side to side when you first embark on this exercise.
- Try to rock for one to two minutes while your routine. While this may be really intense, power through to do this for the full time. You will feel the burn throughout the core but mostly in the lower abdominals. Incorporate hollow body rocks into any of the workouts.
- If you ever feel too tired or even get a sharp pain, stop rocking & relax immediately so you do not strain the muscles.
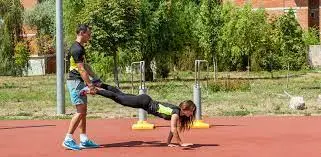
Wheelbarrow
- A wheelbarrow exercise is a compound motion that works for multiple muscle groups simultaneously. This is an excellent exercise for full-body conditioning & may be done with a partner or even alone.
- How to do the wheelbarrow strengthening exercise: embark in the push-up position with the feet on the elevated surface & the hands on the floor. Keeping the back straight, lower the hips until the thighs are parallel to the floor.
- From here, have a partner pick up the feet as well as hold them while you walk forward on your hands. If you are performing the exercise alone, place the feet on the weight plate or even another object that may be easily moved. As you walk forward, keep your back straight & hips low to maintain tension on the muscles.
Tabletop leg press
- How to perform this tabletop Legs strengthening exercise:
- All you need is a yoga mat to start. Place the yoga mat on the ground & lay down on the back with your arms at your sides.
- Start with the back on a mat with your knees bent & feet flat on the ground. The spine may be neutral & shoulders relaxed. Inhale.
- Raise one leg as you exhale, deepening the ribs & contracting the abdomen. You desire the thigh to be straight up with the knee over the hip with the knee bent, so the shins are at 90 degrees with the ankle & in line with the knee.
- Lift the other leg into the same position.
- Inhale & exhale during holding this position for five to ten seconds or more.
- Lower the legs one at a time back to the ground as you exhale.
Row your boat

- How to do this strengthening exercise:
- First of all, you just take a V sit position with legs lifted at 45 degrees to the torso. Then after, legs bent or even straighten for a challenge. Next, reach with your arms straight out in front.
- Clasp your hands, twist at your waist towards one side, swinging the arms as if you had the oar. Immediately twist to another side repeating a row five to seven times.
Single arm-leg jackknife
- How to do this strengthening exercise:
- To do this exercise, you just take a supine lying position on the back on the soft mat with the left arm extended above the head & the right arm out to the side so that this creates a 90-degree angle with the torso. It is the embarking position.
- Inhale and Exhale. Raise the right leg of a mat to create a 90-degree angle at the hips. At the same time, bring the left hand towards the right foot – gradually lifting the head, your shoulder blades & your torso off the ground, ensuring that the right shoulder remains pressed into a mat.
- Inhale. Gradually lower the leg & your arm to come back to the initial position, but without resting them on a mat. Try to do this exercise seven to ten times in one session. Perform two to four sessions per day. Next, try to do this exercise on the other side as well.
Guidelines
- Pay attention to the proper sprinting form.
- Keep the core engaged as well as the back flat.
- Embark slowly & slowly pick up speed as the control improves.
- Improve the loads gradually; remember, technique comes first.
- Tighten the grip to improve tension.
FAQ
The deep core muscles mainly include a transversus abdominis, lumbar multifidus, and internal oblique muscle, as well as quadratus lumborum. These muscles primarily work to provide spine segmental stability, precise motor control & keep a spine in the neutral position.
Back pain may be caused by too many reason. If a person has a weak core, that may be one of the contributors to back pain. The abdominals assist support as well as stabilize the spine so if they are weakened or not as strong then this may lead to an increased risk for low back pain.
Dancing, swimming, cycling, running, brisk walking, skipping rope, stair climbing, hula hoops, yoga as well as planks may all assist you to build core muscles.
When you are talking specifically about strengthening & building the abdominals muscles — not necessarily seeing them – “it may take anywhere from four to eight weeks, depending on what exercises you are doing & also depends on the eating habits.
To get lower back strength, especially for the core squat is the best one. The muscles commonly include a rectus abdominis muscle, obliques muscle, transverse abdominal muscle, as well as erector spinae muscle. If an individual does the back squat or even overhead squat, he will work the muscles in the shoulders, arms, chest, & back.

One Comment