Hip Examination
Table of Contents
Introduction
The hip examination is an important part of Diagnosing a Hip joint-related condition, During an examination, Doctor will ask about the Patient’s Medical History with a Subjective examination as well as a Physical examination to rule out the diagnosis. If needed Special test is also performed by a Doctor to differentiate other related conditions.
- A Hip joint is one of the most essential joints in a body owing to the important role it plays in locomotion. This is the second largest weight-bearing joint in our body, next to the knee joint. This is our ball-and-socket type synovial joint formed between an os coxa (hip bone) as well as a femur. A rounded head of a femur forms a ball, which fits into an acetabulum (socket in a pelvic bone) as well as ligaments connect a ball to a socket, thereby providing tremendous stability to a hip joint. Functionally, our hip joint enjoys a very high range of movement.
- All of the different components of a hip mechanism help in the mobility of our joint. Damage to any single component may negatively affect the range of movement as well as the ability to bear weight on a hip joint. In hip injury, as with other traumatic presentations, the age distribution is bimodal along with high-energy trauma in the younger population as well as potentially trivial mechanisms of injury in an older population, for instance, the simple fall.
Subjective Examination
- Patient Intake
- The first step while an examination is a patient interview, during which a clinician gets the description of the presenting symptoms from a patient. Research suggests that patient history plays an essential role in the differential diagnosis of hip pain & in some cases, may be superior to objective tests as well as measures.
- Taking the history is an important component of a subjective examination as this assists a clinician to develop the hypothesis about the mechanism of injury, type of injured structures as well as the extent of an injury or even damage. Details such as the location of the pain, the nature of the pain, the 24-hour pattern of the pain, activities that trigger the pain, pain aggravating as well as relieving factors, etc., are gotten from a patient while the interview.
- According to a new systematic review published in the Archives of Physical Medicine as well as Rehabilitation, thigh/groin pain as well as constant back/buttock pain are better indicators of hip OA than stand-alone tests & reported hip crepitus is the strong indicator of intra-articular hip pathology.
- A patient’s past medical history, & social/family history is also essential as this assists a clinician rule out hereditary conditions. Any surgical histories that are specific to a hip region are also essential, for instance, the patient who had the hip joint replacement surgery & is currently complaining of pain at a hip joint.
- A patient’s drug history as well as current medications they are on may also be documented as well as any allergies they might have. The effects of the situation on the patient’s functional status along with Activities of Daily Living (ADLs) may be well assessed as well as documented.
- In the elderly, this is also worth considering whether the fall was the result of a simple trip, or secondary to another reason, for example, seizure, cardiovascular trigger, stroke, or loss of consciousness. Relevant assessment of a cardiovascular or neurological system should be required with additional tests, for instance, ECG, and CT brain.
Special Considerations
Red Flags
- Sudden onset of the pain.
- A history of the trauma
- Any swelling
- Any deformity
- An inability to bear weight
- Any lumps or even bumps felt in a groin
- Night pain
- Any noticeable groin pulsations
- Constipation or even vomiting
- Haematuria
- Fever
- Lower limb neurological symptoms: weakness, numbness, or even tingling
- History of steroid use
- Testicular swelling
- Night sweats, unintentional weight loss, appetite loss
- History of malignancy
- High risk of sexual activity
Other Flags
- This is also vital to screen for other (yellow, orange, blue as well as black) flags as these can interfere with the physiotherapy interventions.
Investigations
- The first investigation of choice of the patient with hip pain following trauma is the hip x-ray. It may be an AP radiograph of a pelvis as well as the lateral radiograph of a painful hip. Fractures are not always identified on the starting x-ray imaging.
- If there is a clinical concern for the hip fracture, but the x-ray is normal, further imaging is needed. Both CT as well as MRI may be used to look for the radiographically occult fracture – MRI is more sensitive, however, CT is mainly easier to organize & in many labs, hospitals are the second-line investigation of choice.
- In complex fractures, CT may be helpful to get additional preoperative information that should be used to plan surgery as well as aid discussion about consent as well as prognosis.
- This is also worthwhile considering that interpretation of the hip x-ray may be complicated in the elderly by the presence of other conditions, for instance, secondary osteoarthritis.
Objective Examination
Observation
- Upon conclusion of a patient interview, a physician proceeds to an objective examination. The Pain VAS(visual analog scale) is administered to determine a patient’s baseline pain level as well as then an examiner observes & documents the following:
- The bony deformity / Bony alignment
- Gait pattern: There are many types of abnormal gait patterns associated with hip pathologies that a clinician requires to look out for such as Antalgic gait, Trendelenburg gait, Arthrogenic gait as well as Lurching gait.
- Weight Bearing.
- Balance and Posture as well.
- In Standing: Lumbar spine, Level of the iliac crests (To rule out pelvic/SIJ dysfunction)
- Lying Supine: Leg length (apparent as well as real leg lengths), External rotation of the leg.
- Color changes, for instance, bruising, inflammation, infection, as well as a rash.
- Muscle wasting, muscle spasms as well as muscle bulk.
- Swelling, scarring, and skin changes (wounds).
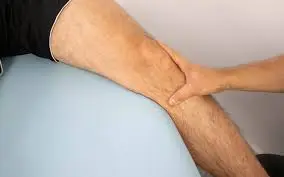
Palpation
- While palpation, the examiner checks:
- Vascular System: Distal pulses, and capillary refill.
- Sensation (Neurological Examination): Peripheral nerve skin sensation as well as power.
- Temperature: Infection/Inflammation
- Swelling: Effusion, Synovial thickening, & Extracapsular
- Tenderness
- Lumbar spine
- Pelvis: Iliac crest, ASIS, Pubic rami, Symphysis pubis, PSIS, SIJ, Ischial tuberosity, Sacrum, and Coccyx.
- Greater trochanter
- Inguinal ligament
- Femoral triangle (hip joint)
- Knee.
Special test
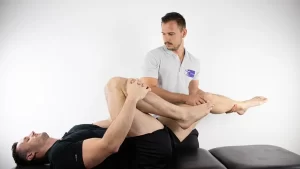
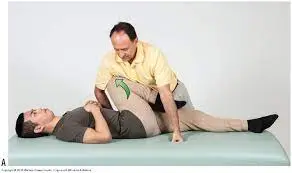
Thomas Test
- Purpose
A purpose of the Thomas Test is mainly utilized to measure the flexibility of the hip flexors.
Impaired range of movement of a hip joint can be an underlying cause of other conditions namely: psoas syndrome; patellofemoral pain syndrome: lower back pain, osteoarthritis; as well as rheumatoid arthritis.
Often associated with runners, dancers, along with gymnasts who complain of hip joint “stiffness” as well as reported “snapping” feeling when flexing at the waist. - Relevant Anatomy
Hip flexors do various functions, as well as some cross over more than one joint. It consists of an iliopsoas (psoas as well as iliac), rectus femoris, sartorius, tensor fasciae latae, pectineus, gracious, and adductors along with the gluteus muscles.
An iliopsoas muscle that has the strongest pull & compressive effect on our spine. This is attached to L1-L5 as well as T1 vertebrae. The tight psoas often compresses the spine as well as the discs associated.
The chronic state of shortening may lead to low back pain. - Technique
The patient is in the supine position, along with lower gluteal folds at the end of a table as well as their hips & their knees flexed. (Patient can hold the legs in flexion with the hands).
A physical therapist makes sure that a patient’s lower back is in a neutral pelvic tilt.
The Patient keeps an unaffected leg flexed, as well as gradually lowers an affected leg as well as lets this extends as far as it can. - Interpretation
- Thomas test: A following structures can be considered while the positive test.
| Sign | Structures affected |
| Extended knee | Quadriceps, rectus femoris |
| Flexed hip | Psoas muscles |
| Abducted hip | Tensor fascia lata, iliotibial band |
| Tibia lateral rotation | Biceps femoris |
- The modified version of this test is one in which a patient lies down on the back, at the very edge of a table, with both legs hanging freely. Patients may after that flex their knee as well as pull this back to their chest as close as they may, using both arms during doing so.
- Another leg may hang a lumbar spine may remain flat & in contact with a table while this test. The second video below shows the technique.

Trendelenburg Sign
- Description
A Trendelenburg sign is a quick physical examination that may help a physiotherapist assess for any hip dysfunction. - It is mainly referred to as a Trendelenburg test. However, this should not be confused with a Brodie–Trendelenburg test that is mainly utilized to determine the competency of the valves in superficial as well as deep veins of patients with varicose veins.
- The positive Trendelenburg sign mainly indicates weakness in hip abductor muscles: gluteus medius as well as gluteus minimus. These findings may be associated with various hip abnormalities namely congenital hip dislocation, rheumatic arthritis, and osteoarthritis as well.
- The positive test is one in which a pelvis drops on a contralateral side while a single leg stands on an affected side. It should be identified while gait: compensation happens by side flexing a trunk towards the involved side while the stance phase on an affected extremity.
- Clinically relevant anatomy
The Gluteus medius, as well as minimus, are primary abductors of a hip joint. When fully weight bearing they act to abduct a femur away from the mid-line of our body as well as provide stability of the hip joint as well as pelvis. - Purpose
The purpose of this test is to identify the weakness of the hip abductors. - Besides the identification of weakness in the hip abductors of a standing leg, this Trendelenburg sign may be utilized to assess other mechanical, neurological, or even spinal disorders, namely a Congenital dislocation of a hip or hip subluxation.
- Technique
A patient is mainly asked to stand on one leg for 30 seconds without leaning to one side a patient may hold onto something if balance is a problem. A physiotherapist observes a patient to see if the pelvis stays level while in a single-leg stance. - The positive of this Trendelenburg Test is indicated if while unilateral weight bearing a pelvis drops toward an unsupported side.
- Clinical relevance
Several dysfunctions may produce the positive Trendelenburg Test:
Weakness of a gluteus medius.
Hip instability as well as subluxation.
Hip osteoarthritis.
Initially post Total Hip Replacement.
Superior Gluteal Nerve Palsy
Lower back pain.
Legg-Calvé-Perthes Disease.
Congenital hip dislocation.
The Trendelenburg gait may also be observed as caused by the abductor insufficiency & is characterized by:
Pelvic drop in the swing phase
Trunk side flexion towards a stance limb
Hip adduction while stance phase.
Faber Test
- Description
A Faber (Patrick’s) Test stands for Flexion, Abduction as well as External Rotation. These 3 motions combined result in the clinical pain provocation test to help in the diagnosis of pathologies at the hip, lumbar as well as sacroiliac region. - Clinically Relevant Anatomy
Hip articulation is a true diarthrodial ball as well as a socket-style joint. - Formed from a head of a femur as this articulates with an acetabulum of a pelvis. This joint serves as the chief connection between a lower extremity as well as a trunk, & typically works in the closed kinematic chain. Hence is designed for stability & weight-bearing – rather than a large range of motion.
- Motions available at a hip joint are flexion, extension, abduction, adduction, internal rotation as well as external rotation. The ligaments of a hip joint act to increase stability. It may be divided into two groups – intracapsular & extracapsular as well.
For more detailed information on the anatomy of the hip, lumbar spine as well as Sacroiliac Joint. - Purpose
- A purpose of the faber test is chiefly utilized to identify the presence of hip pathology by attempting to reproduce pain in a hip, lumbar spine, or sacroiliac region. This test is the passive screening tool for musculoskeletal pathologies, namely hip, lumbar spine, sacroiliac joint dysfunction, or the iliopsoas spasm.
- This test also assesses a hip, because of forces being transferred through a joint. A position of flexion, abduction, as well as external rotation, when combined with overpressure, stresses a femoral-acetabular joint & produces pain if irritated.
- In conjunction with other tests like the range of motion as well as the hip quadrant test, fabers may be a useful tool to guide practitioners on when to refer for further imaging in patients with persistent hip or groin pain.
- When the faber test is clustered, this can provide highly useful information in identifying those suffering from sacroiliac joint dysfunction. The tests a sacroiliac joint, as a horizontal abduction force goes through a femur, soft tissues under tension transfer the forces to a sacroiliac joint. Therefore, the test may indicate pathology located in a hip or sacroiliac joint.
- Technique
A patient is positioned in the supine position. A leg is placed in the figure-4 position (hip flexed as well as abducted with a lateral ankle resting on a contralateral thigh proximal to a knee. During stabilizing an opposite side of a pelvis at an anterior superior iliac spine, the external rotation, abduction as well as posterior force is then lightly applied to an ipsilateral knee until an end range of movement is achieved. A further few small amplitude oscillations may be applied to check for pain provocation at the end range of movement. The positive test is one that reproduces a patient’s pain or even limits the range of motion. - Interpretation
- The following findings of the positive faber test can assist to guide the clinical diagnosis;
- Sacroiliac Joint Pain on external hip rotation motion,
- Sacroiliac Joint Dysfunction,
- Sacroiliitis,
- Groin Pain on external hip rotation motion,
- Iliopsoas Strain or Iliopsoas Bursitis,
- Intraarticular Hip Disorder,
- Hip Impingement (femoral acetabular impingement),
- Hip Labral Tear,
- Hip loose bodies,
- A hip chondral lesion,
- Hip Osteoarthritis,
- Posterior Hip Pain on external hip rotation action,
- Posterior Hip Impingement.

Faddir Test
- What Is Faddir Test?
- Faddir Test (Flexion adduction Internal Rotation test) or as this test is also called an anterior apprehension test of a hip joint is used to examine the:
Femoroacetabular impingement syndrome. - Anterior labral tear.
Iliopsoas tendinitis. - This test is called Femoroacetabular Impingement Test.
- How does the physiotherapist Perform the faddir Test?
A patient is in the lying supine position. - An examiner grasps the affected leg near the heel with one hand as well as at the knee with the other & passively flexes the hip and knee as well.
After that, a hip is hyper-flexed, internally rotated, as well as adducted. - What does the Positive faddir Test Mean?
- The faddir Test is positive if the groin pain with limitation of the flexion as well as internal rotation is elected.
- A forced motion combining flexion, adduction, as well as internal rotation brings a femoral neck into contact with an anterolateral acetabular rim.
Impingement happens when bony prominences at a junction of a femoral head as well as neck (cam impingement) and/or at an anterior rim of an acetabulum (pincer impingement) cause a femoral neck to contact an anterior rim of an acetabulum earlier than normal. The same happens also in the case of deep acetabular sockets. - The impingement causes lesions of an acetabular labrum as well as joint cartilage, especially in young & physically active individuals, who clinically experience groin pain when sitting as well as when involved in sports activities.
- The symptoms are mainly partially or even completely relieved by a motion combining flexion as well as external rotation, during which a femoral neck moves laterally by an anterior acetabular roof without impingement.
- Restrictions of internal rotation & flexion happen in multiple other disorders that may be considered in a differential diagnosis, including Legg Calvé Perthes disease, epiphysiodesis, as well as reduced anteversion.
- Notes
- Forced passive hyperextension as well as external rotation may cause a painful anterior subluxation of a femoral head, in which a femoral head contacts a labrum, which is partially or completely torn (in hip dysplasia).
- Deep-seated joint pains suggest posterior as well as inferior impingement.
Reducing a femoral offset (cam impingement) and extending the ceiling may cause structural changes leading to the development of osteoarthritis of the hip. - If the labral lesion is present, forcing the motion combination of hip flexion, abduction, as well as internal rotation may lead to pain owing to contact of a femoral neck with an anterolateral acetabular rim (impingement test).
Ober’s Test
- Purpose
The purpose of this Ober’s test is mainly evaluation of the tight, contracted, or even inflamed Tensor Fasciae Latae (TFL) as well as the Iliotibial band (ITB). An Ober’s test may not be confounded with Noble’s test & the Renne test, two other tests which are commonly used to detect iliotibial band syndrome. - Clinically Relevant Anatomy
Anatomically, the iliotibial band is a continuation of a tendinous portion of the tensor fascia latae muscle with some contributions from the gluteal muscles. TFL/ITB is the synergist of a gluteus medius muscle in the hip abduction. - Origin:
Tensor Fasciae Latae originates from an anterior part of an external lip of the iliac crest, an outer surface of the anterior superior iliac spine, as well as the deep surface of the fascia latae. - The iliotibial band (ITB) or tract is the lateral thickening of a fascia latae in a thigh. Proximally this splits into superficial as well as deep layers, enclosing tensor fasciae latae & anchoring the muscle to an iliac crest. This also receives most of the tendon of the gluteus maximus.
- Insertion:
- Tensor Fasciae Latae inserts into an iliotibial track at an anterolateral thigh at a junction of the proximal as well as middle thirds of a thigh.
ITB is generally viewed as the band of dense fibrous connective tissue which passes over a lateral femoral epicondyle as well as attaches to Gerdy’s tubercle on an anterolateral aspect of a tibia. - Action:
- Tensor Fasciae Latae flexes, medially rotates, and abducts a hip joint; tenses the fascia lata; and can help in knee extension. The Gluteus medius, gluteus minimus, as well as upper fibers of a gluteus maximus, are the primary synergistic muscles of the hip abductors.
The iliotibial track permits the Tensor Fasciae Latae as well as Gluteus maximus to influence the stability of an extended knee joint, owing to the insertion of these muscles into the ITB. - Technique
- Frank Ober described a test for tightness of TFL as well as ITB in the article entitled “Back Strain & Sciatica”, wherein he discussed the relationship of the contracted TFL as well as ITB to low backache (May 1935). It was later revised in the year 1937 which cautioned on avoiding hip internal rotation & flexion during carrying out the test.
- Test position:
- How to perform this test:
First of all, a patient should be in a side-lying position with an affected side up.
Next, the bottom knee as well as the hip may be flexed to flatten a lumbar curve. - Then, stand behind a patient as well as firmly stabilize a pelvis/greater trochanter to prevent motion in any direction.
Grasp a distal end of a patient’s affected leg with the other hand as well as flex a leg to the right angle at a knee - Test:
- Extend as well as abduct a hip joint.
- Gradually, lower a leg toward the table -adduct hip- until movement is restricted.
Ensure that a hip does not internally rotate as well as flex while a test & a pelvis may be stabilized. Allowing a thigh to drop in flexion as well as internal rotation would ‘give in’ to a tight TFL & not accurately test the length. - Results:
- If an iliotibial band is normal, a leg may adduct with a thigh dropping down slightly below a horizontal as well as a patient will not experience any pain; in this case, a test is called negative.
- If the iliotibial track is tight, a leg would remain in an abducted position as well as a patient would experience lateral knee pain, in this case, the test is called positive.

Modified Ober Test
- A modification of an Ober test was first recommended by Kendalls in Posture as well as Pain. In this described test, there is less strain on the medial aspect of your knee joint, less tension on your patella, and less interference by a tight Rectus Femoris as well as this provides the complete stretch on tensor fascia latae.
- Test position:
First of all, the patient is in the side-lying position with the underneath leg flexed at the hip as well as the knee to flatten the low back.
Next, an examiner stabilizes a pelvis as well as keeps a lateral trunk in contact with a table. - Note: Downward lateral tilt is equivalent to a hip abduction as well as that would “give in ” to the tight TFL.
- Test:
An examiner extends a leg. Must ensure that the leg is not internally rotated on any side. - Results:
With a knee straight as well as a pelvis in the normal position, a thigh drops about 10 degrees below a horizontal. This is suggestive of normal length.
A leg failure to drop indicates a tight iliotibial track as well as tensiofascia latae.
Log Roll Test
- A log roll test assesses for pathology within a hip joint, & may be utilized to isolate a patient’s pathology to a hip instead of outside of a hip joint.
How to do this with a patient in the supine position, is to place one hand over a mid-thigh as well as passively externally & internally rotate a hip to the ends of its range of movement. Compare a range of movement on both sides. - Abnormal If
- Pain: Intra-articular pathology.
- Clicking: Acetabular labral tear.
- Increased range of movement: Ligamentous laxity.
- A log roll is the single most specific test for hip pain. This moves the articular surface of a femoral head in relation to an acetabulum, with minimal stress on the surrounding muscle or nerve.
Renne test
- Purpose
- Renne’s test was actually developed in 1975 to test for iliotibial band syndrome (ITB). It test may be performed instead of or in addition to a Noble Compression Test when a patient complains of lateral knee pain as well as sometimes crepitus when running.
- Clinical Relevance
- Iliotibial band friction syndrome, first described by Renne in 1975 is commonly found in the middle as well as long-distance runners & in those athletes whose sports need repetitive knee flexion. This is also found in skiers, cyclists, weightlifters, as well as soccer athletes. This is an overuse condition caused by excessive friction between the ITB as well as a lateral femoral epicondyle which results in either bursitis over a lateral femoral epicondyle and/or inflammation of the ITB and periosteum as well.
- Technique
- Procedure: A patient is standing during weight bearing on an involved side. It may be performed with a non-involved side weight bearing or non-weight bearing knee flexed.
- Palpation
- The Patient sits or even kneels while you palpate the iliotibial band (ITB) on or just above a lateral femoral epicondyle. A patient is instructed to place one hand on an examiner’s shoulder for balance as well as gradually squat (one-legged) to 60-90 degrees flexion & then rise back up. First, palpate the iliotibial track just above a lateral femoral epicondyle,
- Compression
- Then have a patient squat as well as rise a second time during this time applying firm pressure.
- Interpretation:
- Palpation is intended to feel for the crepitus. Palpatory crepitus, snapping, and/or pain at a lateral epicondyle are positive signs of iliotibial band syndrome.
Firm pressure is intended to provoke lateral knee pain as well as increase crepitus. - Both the Nobel/Rene’s tests are usually the most provocative; expect provocation to be greatest when a knee is about 20-30˚flexed.
- Common Procedural Errors: The examiner does not instruct a patient to place the hand on the examiner’s shoulder to maintain balance. Those with balance problems or who are unable to do the squat on one leg may perform the test with both lower limbs bearing weight be careful to watch out for compensation where a patient shifts most of the weight to the opposite side.

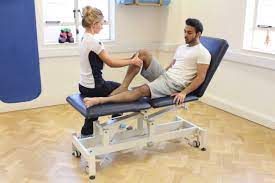
Stinchfield Test
- Examination type
- Ligamentous as well as boney stability.`
- Patient as well as Body Segment Positioning
- A patient takes a lying supine position on an examination table with both his hip, knee, as well as ankle joints in neutral positions.
- Examiner Position
- An examiner may be positioned on a side of a table beside the patient’s injured hip.
- Tissues Being Tested
- A test of the femur’s integrity. This will also test the strength as well as flexibility of the hip extensors as well as the integrity of their tendons.
- Performing the Test
- The patient flexes his hip with her knee straight as well as hip in 30 degrees of flexion first against gravity and then with an examiner applying resistance. An examiner may also do a test passively.
- Positive Test
- If the groin or even thigh pain is elicited while either of the exercises a test is positive. A test done passively may elicit pain in a sacroiliac region.
- Interpretation
- The positive test may possibly indicate that there is a fracture to the proximal femur. Iliopsoas tendonitis or even abscess may also be found in the positive test.
- Common errors in doing the exam
- Improper positioning of a patient. An examiner’s positioning may also be incorrect. Misinterpretation of where the pain is felt may also mislead an examiner in her findings
- Factors possibly resulting in misinterpretation
- The patient’s own tolerance of pain. Muscular inflexibility of a hamstring muscle group. Muscular strength in a quadriceps muscle group may be insufficient to lift a leg. It is when age could become a factor.
Ely’s test
- Purpose
- Ely’s test or Duncan-Ely test is used to assess rectus femoris spasticity or even tightness.
- Technique
- A patient is in lies prone in a relaxed state. A physiotherapist is standing next to a patient, at a side of a leg that will be tested. One hand can be on a lower back, another holding a leg at a heel. Passively flex a knee in a rapid fashion. Then, the heel may touch the buttocks. Test both sides for comparison. Next, a test is positive when a heel cannot touch the buttocks, a hip of a tested side rises up from a table, or a patient feels pain or even tingling in the back or even legs.

Kendall test
- A Kendall Test aka modified Thomas Test is a common orthopedic test to assess a length of a rectus femoris muscle of the quadriceps.
- To do a test, have the patient in the supine position with both legs off a table. After that, ask the patient to bring one knee to a chest as well as hold it.
Adductor Squeeze Test
- Introduction
- Groin injuries are common sports injuries especially in sports that involve running, kicking, side-to-side motions, repetitive twisting as well as changes in direction.
- A groin injury is more likely to happen in individuals with adductor muscle weakness, especially adductor muscle strain.
- Purpose
- An adductor squeeze test is helpful in the diagnosis of groin injuries as well as for the measurement of adductor muscle strength.
This is essential to assess the strength of the adductor muscles, as adductor muscle weakness is the intrinsic risk factor of groin injuries as well as people with adductor muscle weakness are more occurs to sustain groin injuries.
Hence, the adductor squeeze test may be used as a screening tool to detect adductor muscle weakness along with reducing the risk of groin injuries. - Technique
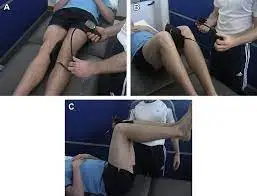
- This test is done in three positions which are 0°, 45° & 90° of hip flexion, with a patient lying supine.
Several angles are used owing to the multi-factorial role of hip adductor muscles. - An examiner places his fist between a patient’s knees as well as a patient is instructed to squeeze an examiner’s fist, contracting adductor muscles maximally.
- Moreover, the strength of the hip adductors may be measured objectively by repeating the same maneuver with the handheld dynamometer or sphygmomanometer placed between the patient’s knees as she squeezes them in.
- This test is positive if a patient complains of pain in adductor muscles or bone pain at an anterior as well as medial pelvic ring.
Anterior Labral Tear Test (Flexion, Adduction, as well as Internal Rotation)
- Purpose
- Flexion, adduction, and internal, rotation is mainly utilized for an examination of femoroacetabular impingement syndrome, anterior labral tear as well as iliopsoas tendinitis.
- A premise of the test is that flexion, as well as adduction movements, approximates a femoral head with an acetabular rim. After that, internally rotating a hip places a shearing force on a labrum.
- The test is also called the Anterior apprehension test.
- How to perform this test:
- First of all, a patient is mainly in the supine position.
- Step 2. An Affected hip is fully flexed or even 90-degree flexion.
- Step 3. Adduct a hip with combined Internal rotation of a hip joint.
- Step 4. The positive test is indicated by a production of the pain in the groin, a reproduction of a patient’s symptoms with or without the click, or apprehension.
- Pain in a groin area is considered indicative of labral pathology, including degeneration, fraying, or even tearing.
Bowstring Sign
- Purpose
- The purpose of this Bowstring sign is a passive provocative clinical test that is done in patients presenting with low back pain to determine lumbosacral nerve tension. This is also famous as the popliteal compression test or even the Posterior Tibial Nerve stretch sign.
- How to perform this test
- A Patient Position
The patient is in the supine lying position without the pillow. - The physiotherapist Position
An Examiner stands at the tested side with the face facing towards the patient’s face. - Procedure
- Initially, the physiotherapist performs Straight Leg Raise ( SLR) test in which an examiner lifts a leg with an extended knee. The examiner raises the leg to a point where he perceives pain along with the distribution lumbosacral dermatomal level or even when maximum flexion is got.
- During performing the SLR test, at the point of maximum pain (positive SLR) an examiner may slightly flex a patient’s knee approximately 20 degrees thereby decreasing pain.
- After that, the examiner applies pressure (via thumb) on a popliteal fossa on the sciatic nerve (Posterior Tibial Nerve).
If this elicits the same pain as a patient experiences while SLR, after that Bowstring sign is said to be positive.SSS - This test may be done in both legs, the normal side being the first and then on the unaffected side.
Craig’s Test
- Purpose
- Craig’s test is the passive test that is utilized to measure femoral anteversion or even forward torsion of a femoral neck. This is also famous as the ‘Trochanteric Prominence Angle Test (TPAT)’.
- Femoral anteversion is an angle between a femoral neck as well as a femoral shaft, indicating the degree of torsion of a femur. This is also famous as the Femoral neck anteversion.
- There are various ways via which femoral anteversion may be measured. These are some methods used: imaging using radiography, fluoroscopy, computed tomography (CT), ultrasound (US), as well as magnetic resonance imaging (MRI) & functional assessments.
- How to perform this test
- A patient position
A patient was placed in a prone position with hip in neutral as well as a knee flexion of 90° of tested side on the examination table. - The physiotherapist position
- An examiner stood on the contralateral side of a subject’s hip being examined. During stabilizing a sacrum with a forearm, the greater trochanter was palpated with a hand that was more cranial.
- Procedure
- An Examiner with a caudal hand palpated the greater trochanter of a tested side during passively internally rotating a hip until the most prominent portion of the greater trochanter reached its most lateral position.
- One examiner holds a position of a leg in a position where the greater trochanter is the most prominent. Another examiner measures an angle between a shaft of a tibia (a line bisecting a medial as well as lateral malleoli) & the line perpendicular to a table (an imaginary vertical line extending from a table) using either a goniometer or even inclinometer. And hence records the angle of the femoral anteversion.
- Interpretation
- Normal: At birth, the mean anteversion angle is 30 degrees which reduce to 8-15 degrees in adults (angle of the internal rotation).
Angle >15 degrees: Increased anteversion leads to squinting patellae as well as pigeon-toed walking (in-toeing) which is twice as common in girls.
Angle <8 degrees: Retroversion.
Fair test
- Description
- The fair test is the sensitive as well as specific test for the detection of irritation of a sciatic nerve by a piriformis. Fair stands for flexion, adduction as well as internal rotation. Also famous as the piriformis test.
- Clinically Relevant Anatomy
- A piriformis is a flat muscle as well as the most superficial muscle of the deep gluteal muscles. This is part of a lateral rotators of a hip (obturator internus, superior as well as inferior gemelli, quadratus femoris, obturator externus, & gluteus maximus). This leaves a pelvis through the greater sciatic notch, till it is fixation reaches a superior margin of the greater trochanter. This has a pyramidal shape that lies almost parallel to the posterior margin of the gluteus medius.
- A piriformis muscle may be utilized to locate a sciatic nerve. It nerve enters a gluteal region inferiorly to a piriformis. If the lateral rotators of a hip are tight they can exert pressure on a sciatic nerve, producing pain radiating into the lower extremity. It is famous as Piriformis Syndrome.
For more detailed information on the anatomy of a piriformis muscle - Background
- A: Usual relationships with a sciatic nerve passing from a pelvis beneath muscle piriformis.
- B: Muscle piriformis divided into two parts with a peroneal division of a sciatic nerve passing between the two parts of the piriformis.
- C: A peroneal division of a sciatic nerve passes over muscle piriformis as well as a tibial division passes beneath an undivided muscle.
- D: In these cases, an entire nerve passes through the divided muscle piriformis.
- Technique
- Position a patient in a side-lying with the tested hip on top. After that, passively move a patient’s lower extremity into flexion (90 degrees), adduction, as well as internal rotation. An examiner stabilizes a hip as well as applies downward pressure to a knee to internally rotate as well as adduct the hip, hence placing a piriformis on the stretch that compresses a sciatic nerve. The positive test happens when pain is produced in a sciatic/gluteal area. Because of the position of the test, pain can be produced in an anterior thigh & as a result of femoral acetabular impingement, so this is essential to ask where they are feeling the pain.
- Variation
- The fair test may be done with a patient supine or even seated, knee as well as hip flexed, & hip medially rotated, during a patient resists the examiner’s attempts to externally rotate as well as abduct a hip.
- The fair test result is positive if sciatic symptoms are recreated.
- Interpretation
- Sciatic nerve pain may originate from several factors which include; disc herniation, sacroiliac joint dysfunction, degenerative joint disease, tight piriformis, as well as many more. If you suspect the patient’s neural symptoms to be originating from the tightness of a piriformis muscle, the fair test can be used to assist strengthen the hypothesis.
- According to Neumann, a piriformis originates at a ventral surface of a sacrum as well as runs through the greater sciatic foramen to insert on a superior part of the greater trochanter, leading to the actions of hip external rotation, abduction, potentially mild extension (owing to a posterior to the anterior line of pull).
- A position of flexion, adduction, as well as internal rotation places the stretch on a piriformis muscle and, theoretically, compresses a sciatic nerve. In addition, a range of motion assessment, palpation skills, as well as motion analysis may be very beneficial in the physical examination to assist to confirm the hypothesis.
Femoral Nerve Tension Test
- Definition
- A Femoral Nerve Tension Test, also famous as a Femoral Nerve StretchTest (FNST) is the test to utilized to screen for sensitivity to stretch soft tissue at a dorsal aspect of the leg, related to nerve root impingements. This was first described by Wasserman in 1919.
- Literature suggests that the test is not used as commonly as a Straight Leg Raise (SLR) test due to less frequent upper lumbar radiculopathies as compared to lower lumbar radiculopathies. This is considered as the anterior corollary of straight leg raise as well as assesses the mobility of upper lumbar nerve segments.
- Purpose
- A prone knee bending test is the normal tension test which is mainly utilized to stress a femoral nerve as well as a mid-lumbar (L2-L4) nerve root. A femoral nerve tension test is main commonly utilized to screen for sensitivity to stretch soft tissue at a dorsal aspect of a leg, possibly related to root impingements.
- Clinically Relevant Anatomy
- A Femoral Nerve comes from a Lumbar plexus. A femoral nerve lies within a femoral triangle that is bounded by an inguinal ligament (superiorly), a medial border of a Sartorius’s muscle as well as a lateral border of an Adductor Longus muscle (The muscles Pectineus, as well as Iliacus and Psoas, lie within this triangle as well).
- A femoral nerve lies (most laterally) next to a femoral artery as well as a femoral vein (medially).
- How to perform this test
- A patient mainly lies prone, as well as a physiotherapist stands on an affected side & stabilizes the pelvis to prevent anterior rotation with one hand. With another hand, a physiotherapist after that maximally flexes a knee to the end range.
- If no positive signs are noted in this described position, a physical therapist proceeds to extend a hip during maintaining knee flexion. A physiotherapist may add a few alterations to a test position to identify a nerve involved.
- A Lateral Femoral Cutaneous Nerve bias test includes prone lying with passive hip extension adduction as well as knee flexion while the Saphenous Nerve bias test includes prone-lying hip extension, abduction as well as external rotation with knee flexion, ankle dorsiflexion, & eversion.
- Normal response
- The Knee flexion allows a heel to touch the buttocks. The pull or the stretch is felt in the quadriceps.
- If unilateral pain is produced in a lumbar region, buttocks, or posterior thigh, between the ranges of 80-100 degrees of knee flexion in the combination of these regions, a test is considered positive.
- A dura is tensioned between 80 as well as100 degrees & positive findings in this range may be indicative of the disk herniation affecting the L2, L3, or L4 nerve root.
- Positive findings secondary to the disc herniation may be differentiated from quadriceps issues based upon a range in which pain is reproduced.
- If the pain is produced before 80 degrees of knee flexion, quadricep tightness and/or injury can be the cause. Also, if tightness exists, the pelvis rises on that side as the hip flexes in response to passive knee flexion. As tight rectus femoris may produce pain in an anterior thigh, hence this is essential to do the test on both sides as well as compare the symptoms.

Fulcrum Test
- Description
- Fulcrum Test is the clinical test that is utilized to diagnose Femoral Shaft Stress Fracture. Stress fractures of a femoral shaft are uncommon as well as mostly happen at a proximal third of a femur.
- Clinically Relevant Anatomy
A Femur is the longest bone in our body as well as extends from the hip to the knee.
A head of a femur articulates with an acetabulum in a pelvic bone forming a hip joint, whereas a distal part of a femur articulates with a tibia as well as a kneecap, forming a knee joint. This serves as a site of origin as well as insertion for many muscles & ligaments. - Purpose
- A fulcrum test is commonly utilized to help diagnose femoral shaft stress fractures. This is helpful in assessing the healing response.
- If a clinical test is positive while a physical examination, a diagnosis is confirmed by the bone scan or a Magnetic Resonance Imaging scan(MRI). MRI assists to differentiate stress fractures from other pathological processes, especially neoplastic ones.
- How to perform this test
A patient is in a sitting position on an examination table with her/his lower legs dangling. - An examiner places one of his arms under a symptomatic thigh. An examiner’s arm is used as the fulcrum under a thigh as well as is moved from the distal to the proximal thigh as gentle pressure is applied to a dorsum of a knee with an opposite hand.
- At this point, while checking the fulcrum under the stress fracture, gentle pressure on the knee produced increased discomfort that was mainly described as a sharp pain as well as accompanied by apprehension.
- A contralateral leg served as the negative control. The level at which the fulcrum test is considered positive has always corresponded to the site of the stress fracture in the femoral shaft as seen in the scintigram or radiograph.
Gaenslen Test
- Purpose
- The purpose of Gaenslen’s Test (Gaenslen’s maneuver) is one of the five provocation tests that may be utilized to detect musculoskeletal abnormalities as well as primary-chronic inflammation of lumbar vertebrae & Sacroiliac joint (SIJ). Subsequent tests include; the Distraction Test, Thigh Thrust Test,
- Compression Test as well as the Sacral Thrust Test.
- A clinical prediction rule of three or more positive provocation tests which provoke familiar back pain as well as non-centralization of pain is a useful tool to identify patients that are more likely to have SIJ pain as compared to some other painful condition.
- Diagnostic accuracy of composites of SIJ tests improves when interpretation is confined to the back pain patients whose symptoms may not be made to ‘centralize’ with repetitive motion testing. Centralization is highly specific to the discogenic pain as well as positive SIJ tests in these patients may be ignored.
- Especially, Gaenslen’s test may indicate a presence or absence of an SIJ lesion, pubic symphysis instability, hip pathology, or the L4 nerve root lesion. This may also stress a femoral nerve. The test is most of the time used to test for spondyloarthritis, sciatica, or other forms of rheumatism in SIJ.
- How to do this test
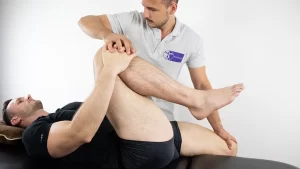
- First of all, a patient starts positioned supine with a painful leg resting on an edge of a treatment table. An examiner sagitally flexes a non-symptomatic hip, during a knee also flexed (up to 90 degrees).
- A patient may hold a non-tested (asymptomatic) leg with both arms during a physical therapist stabilizes a pelvis as well as applies passive pressure to a leg being tested (symptomatic) to hold this in the hyperextended position. A downward force is applied to a lower leg (symptomatic side) putting this into hyperextension at the hip, during the flexion-based counterforce is applied to a flexed leg pushing this in the cephalad direction causing torque to the pelvis.
- If a patient’s normal pain is reproduced, then this test is considered positive for an SIJ lesion, hip pathology, pubic synthesis instability, or the L4 nerve root lesion. However, a femoral nerve can also be stressed by the described test.
- This is recommended to test both sides if a patient complains of pain bilaterally. Importantly, at least 3 positive signs of the SIJ provocation tests are needed before the possible diagnosis of SIJ pathology.
Hip Quadrant Test
- Description
A Hip Quadrant test is the passive test that is most commonly utilized to assess if a hip is a source of the patient’s symptoms. A hip quadrant test is also famous as a quadrant scour test. The described below test is not to be confused with a quadrant test for a lumbar spine. - Clinically Relevant Anatomy
- A hip articulation is a true diarthrodial ball & socket style joint, formed from a head of a femur as this articulates with an acetabulum of a pelvis.
- The joint serves as the main connection between a lower extremity as well as a trunk, & typically works in the closed kinematic chain. Hence this is designed for stability as well as weight-bearing – rather than a large range of motion. Actions available at a hip joint are flexion, extension, abduction, adduction, internal rotation as well as external rotation. The ligaments of a hip joint act to increase stability.
- This may be divided into two groups – intracapsular as well as extracapsular.
- For more detailed information on the anatomy of the hip, lumbar spine as well as Sacroiliac Joint.
- The most essential structures of art. coxae are a fossa acetabuli, facies lunata, labrum acetabula, ligament transversum acetabula, caput femoris, ligament ischiofemorale, ligament iliofemoral as well as ligament pubofemorale. The Coxae is the articulation spheroidal.
- Purpose
- The purpose of a Hip Quadrant test is to determine if there is a nonspecific hip pathology as well as a change in range of motion. The test does so by completing the range of motion from flexion & adduction to flexion as well as abduction. The test is also capable to detect early hip degeneration.
- Technique
- A patient is positioned supine on a plinth. The physical therapist stands on the side of the leg to be tested. The affected limb is placed in adduction as well as the compression force is applied & maintained through the femur through the range of 70-140 degrees of the hip flexion. The test is repeated in an abduction. A positive test is a reproduction of the patient’s worst pain that they came with into the clinic.
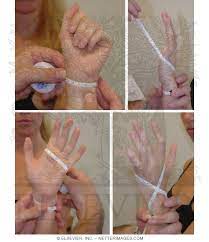
Leg Length Test
- Purpose
- The main purpose of this length test mainly assesses the leg length difference of leg length discrepancy (LLD).
The leg length discrepancies are usually classified into two groups: True as well as functional. - True LLD are those in which the actual bony asymmetry exists somewhere between a head of a femur as well as a mortise of an ankle.
- Functional LLD are those which happen as the physiological response to altered mechanics along a kinetic chain anywhere from the foot to a lumbar spine giving an appearance of the short leg when the bony asymmetry in the length of bones might not actually exist.
- Technique
- Direct Method:
- The direct method involves measuring limb length with a tape measure between two defined points, in the stand. Two common points are an anterior iliac spine as well as a medial malleolus or an anterior inferior iliac spine & lateral malleolus also.
- Be careful, however, due to there being a great deal of criticism & debate surroundings the accuracy of tape measure methods. If you choose the described method, keep the following topics as well as possible errors in mind:
- Always use a mean of at least 2 or 3 measures.
If this is possible, compare measures between two or more physical therapists.
Iliac asymmetries can mask or even accentuate limb length inequality. - Unilateral deviations in a long axis of a lower limb (For instance genu valgum) can mask or accentuate the limb length inequality
Asymmetrical position of an umbilicus.
Joint contractures. - Indirect Method
- In the indirect method the palpation of the bony landmarks, which are most commonly the iliac crests or even anterior iliac spines, in a standing position. The described methods consist of detecting if the bony landmarks are at (the horizontal) level or if limb length inequality is incredibly available.
- Palpation & visual estimation of the iliac crest (or ASIS) in the combination with the utilization of blocks or book pages of famous thickness under the shorter limb to adjust the level of the iliac crests (or ASIS) happens to be the best (most accurate & precise) clinical method to asses limb inequality.
- You may keep in mind that asymmetric pelvic rotations in planes other than a frontal plane can be associated with limb length inequality. The review of the literature suggests, therefore, that the greater trochanter major as well as as many pelvic landmarks may be palpated & compared (left trochanter with right trochanter) when a block correction method is utilized.
A PALM (Palpation Meter)
- A PALM is a reliable as well as valid instrument for measuring pelvic height difference. This is convenient, cost-effective, as well as is a good alternative to radiographic measurement.
- Measurement Procedure: Two tape strips were placed on the floor, 15cm apart. Tape strips mark a location on the ground where patients have to place their feet. The patients are sometimes asked to walk for 10 steps as well as align the medial borders of their feet with the outside of the tape strips. Patients must stand fully erect (no knee, hip, or even spine bending). PALM is placed on the superior aspect of the iliac crest.
- The distance between caliper heads is measured to the nearest mm as well as an angle of inclination to the nearest half degree. The inclinometer ball is mainly styled to move towards the side of the shorter limb.
- Standing on Blocks
- A patient is standing with feet 10 cm apart, knees extended as well as equal weight on both feet.
The clinician places his hands on a bilateral anatomical structure: the Spina iliaca posterior superior, Spina iliaca anterior superior, or crista iliaca left and right as well. Now the physical therapist visually assesses if there is a length inequality, & if so, places the wooden board of 0,5 cm under the foot of the shorter side. - Keep placing thicker planks under the shorter side till an equal length is reached, the thickness of a plank is equal to a leg length difference.
Even though reliability is highly dependent on accurate measurements of a clinician, the method has shown excellent results in inter-examination results between highly trained clinicians as well as medical students. - Confounding variables articles by the literature are pelvic asymmetry, incorrect positioning of the feet, obesity, joint contractures, scoliosis, and inaccurate measurement as well.
- Imaging Method :
- A wide range of imaging methods may be used, including:
- Plain Radiography:
Orthoroentogenogram
Scanogram
Teleoroentgenogram: the full-length standing anteroposterior radiograph of a lower extremity.
Computed Radiography. - Micro-dose Digital Radiography: Another form of computer-aided imaging that substantially decreases radiation exposure to patients in comparison with conventional radiographic techniques.
- Ultrasound: In the technique, an ultrasound transducer is utilized to identify bony landmarks at the hip, knee, as well as ankle joints.
- CT Scanogram: Anteroposterior (AP) scout view of a bilateral femur as well as tibias are obtained.
- MRI Scan: MRI images were obtained using the T1 weighted spin echo sequence as well as the best coronal images were selected for standardized assessment of femoral length using classic bony landmarks of a femoral head as well as medial femoral condyle.
McCarthy test
- Description
A McCarthy Test is the clinical test that is mainly utilized in a diagnosis of a hip labral tear. A shearing force-producing painful popping, clicking, or catching during the test indicates a possible hip labrum tear. - Clinically Relevant Anatomy
- An acetabulofemoral (hip) joint is the largest as well as most stable joint in the human body. An acetabular labrum is a soft-tissue structure that lines an acetabular rim of a hip joint. This joint is surrounded by ligaments that work to keep the articulation intact. Motions of this joint are facilitated by an articulation of an acetabulum as well as a labrum. In normal hip joint biomechanics, a labrum is crucial in retaining the layer of pressurized intra-articular fluid for joint lubrication as well as load support/distribution. This seal around a femoral head is further regarded as contributing to hip stability through its suction effect.
- How to do this test
- First of all, a patient may be lying supine with the head supported as well as both arms rested to the side in a comfortable position.
- After that, an examiner may then passively flex an affected hip to the end range.
- Next, a clinician may then externally rotate a hip as a leg is moved back into extension.
- Then, Repeat steps one as well as two but internally rotate the hip as a leg is moved back into the extended position.
Patellar-Pubic Percussion Test
- Purpose
For identification of occult hip fractures. - How to do this test
A Patellar-Pubic Percussion Test is a form of Osteophony or even auscultatory percussion which is most commonly utilized in an assessment of bone integrity by analyzing its vibrations through the use of the stethoscope as well as bony prominence percussion.
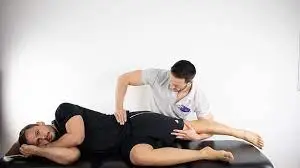
Piriformis Test
- Description
A Piriformis test is used to evaluate an impact of a piriformis muscle on a sciatic nerve. - Clinically Relevant Anatomy
- Piriformis is the flat muscle as well as one of the hip lateral rotators. An origin is on an anterior side of a sacrum as well as has the insertion at a superior aspect of the greater trochanter of a femur. A piriformis muscle is running over the top of a sciatic nerve.
- The described piriformis muscle has a function of external rotation, abduction, as well as extension in a hip & this also plays the essential role to stabilize a hip joint. A piriformis muscle is innervated by a direct branch from the sacral plexus (L5-S2).
- The sciatic nerve or also called N. Ishiadicus passes behind a hip joint to the muscles lying underneath. Above a knee joint, a sciatic nerve splits into 2 branches: the Tibialis nerve as well as the Common Peroneal nerve. A sciatic nerve passes over or even under a piriformis muscle but this is also possible that a sciatic nerve passes, partially or whole, through a piriformis muscle. It depends from person to person.
- Purpose
A piriformis test is mainly helpful to screen a piriformis muscle as well as to detect tightness of a muscle or other discomforts of a sciatic nerve as this passes through or under a Piriformis muscle. Due to it being a muscle as well as a neurological test. - Technique
A Piriformis test may be performed in 2 methods: - Piriformis test in the side-lying position: For doing this test, a patient is positioned side-lying on an unaffected side. The asymptomatic leg is positioned with 60 to 90 degrees of flexion in the hip as well as 90 degrees of flexion in the knee joint.
- A patient may be lying with a face directed towards an examiner, an examiner’s hand is placed on the pelvis to stabilize it, and Another hand is placed on a lateral side of a knee. An examiner gives hand pressure on a lateral side of a knee as well as tries to stretch it apart as far as possible. An examiner does horizontal adduction while putting pressure on a knee in a direction of a table. While a stretch, a patient can feel pain or even discomfort. This described test is also called the fair test (Flexion Adduction as well as Internal Rotation).
- Seated Piriformis Test: A piriformis test may also be examined in the seated position on a chair with the back upright as well as feet resting on the floor. A test is done by crossing an affected leg as well as placing an ankle of an affected leg on an unaffected knee. One hand of an examiner is at the ankle to stabilize the part whereas the other hand is placed on the lateral side of the knee. A patient is after that asked to bend forwards o feel a stretch in a gluteal region or an examiner pulls a knee.
FAQ
The general examination of a hip joint includes gait analysis, visual inspection, palpation, assessment of a range of movements, as well as the performance of various maneuvers & diagnostic tests as well. Assessment of both the affected hip as well as the unaffected hip for the purpose of comparison.
Assessment of the Hip Abnormalities
Medical imaging, including X-rays as well as magnetic resonance imaging (MRI), is important in diagnosing hip pain. The X-ray may reveal the excess of bone on a femoral head or even neck as well as an acetabular rim. The MRI may reveal fraying or even tears of the cartilage and labrum as well.
Other red flags of concern with respect to a patient presenting with hip & groin pain include a history of trauma, fever, unexplained weight loss, burning with urination, night pain, as well as prolonged corticosteroid use.
Arthritis, osteoarthritis as well as rheumatoid arthritis are among the most common causes of hip pain, especially in older adults. Arthritis leads to the inflammation of a hip joint as well as the breakdown of the cartilage that cushions the hip bones. The pain gradually gets worse.
All anatomical parts of a hip work together to enable various motions. Hip motions include flexion, extension, abduction, adduction, circumduction, as well as hip rotation.
Plain radiographs are the most commonly utilized method for diagnosing hip osteoarthritis. The modality does not directly visualize articular cartilage but may reveal features of the disease, namely joint space narrowing, osteophytes, subchondral sclerosis, as well as subchondral cysts,14 & excluding alternative causes of the pain.
Stand on One Leg Test: Finally, if the patient is concerned about the hips, try a one-legged test. Try standing on one leg for at least a minute, & if you cannot do so, even when supporting yourself, this is time to consider hip replacement.