Foot as well as Ankle Assessment
Foot, as well as Ankle Assessment, is of crucial importance for the clinical diagnosis of painful conditions of the foot and ankle.
Table of Contents
Assessment Aim
- The aim of an assessment is to:
- Determine an extent of an injury.
- Identify what has been injured.
- Establish the framework that may be negotiated with a patient regarding:
- Timeline
- Further referral
- Treatment plan
- Treatment strategy.
Subjective
- Patient Intake
- Gathering information while history provides the physical therapist with clues as to what structure is likely affected, further guiding a physical examination. For instance, a mechanism of the injury is essential as this provides information on what forces went through what structure, as well as in what direction. It will further provide information on what tissues and/or structures are likely stretched or even damaged.
- Instance: The valgus force can indicate the deltoid ligament sprain, while the varus force should be suggestive of injury to an anterior talofibular ligament (ATFL) and/or calcaneofibular ligament (CFL).
- A patient’s history may include questions related to:
- The time of an injury (acute vs subacute vs chronic)
- A mechanism of an injury as well as forces involved in an injury (loose vs locked position)
- An activity that leads to the injury (the athletic event vs recreational activity vs activity of daily living)
- Contributing factors (shoes, terrain, medical history, medications, as well as general health).
Training history
- Any Previous treatment (successes vs failures)
- The results from an interview may help with establishing risk factors as well as precautions while the objective assessment.
Special Questions
- Red flags are signs as well as symptoms that are found in a patient history & clinical examination that can be suggestive of serious pathology. If serious pathology is suspected, immediate referral to the medical doctor is indicated as well as the physical therapist’s concerns may be noted.
- Red Flags specific to foot as well as ankle assessment:
- Unable to bear weight: Rule out the fracture (Ottawa Rule).
- Bilateral pins as well as needles or numbness in the lower limbs
- Bowel & bladder dysfunction (for instance, a patient is unable to feel themselves going to a toilet)
- Urinary Incontinence.
- Paraesthesia in the groin region.
- Loss of pulses in the lower leg (vascular compromise).
- Obvious deformity.
- Joint dislocation.
- Positive Babinski sign.
- The patient is not able to calf raise: rule out Achilles tendon rupture.
- Yellow Flags specific to foot & ankle assessment:
- The severity of symptoms does not match subjective information. More tests.
- Pain-preventing objective assessment? Detailed assessment delayed.
Objective
observation
- Do this with a patient in supine, sitting, or even standing.
- Watch for the presence of swelling.
- Assess skin color.
- Check skin temperature.
- Watch for signs of muscle wasting.
- Notice foot as well as toe deformities: Bunions, hammertoes, claw toes, as well as calluses.
Posture assessment
- If a patient is able to stand: Observe in a quiet stance as well as assess weight-bearing distribution; pay attention to the foot arches; observe walking with or even without an assistive device: Watch for back deformity: scoliosis, lordosis, kyphosis; observe gait pathology, for example, Trendelenburg; notice any changes in a lower leg alignment: knee valgus or even varus, foot pronation or supination; observe the gait cycle: heel strike, toe-off.
- If a patient is not stable to stand: observe in sitting, with feet flat on the ground, and assess the weight-bearing distribution as well as a patient’s ability to take a load during preparing for the sit-to-stand transition.
Palpation
- Palpation may be performed in the supine, prone or sitting position. The physical therapist checks for points of tenderness:
- On the medial, lateral, posterior as well as anterior part of the lower leg & the around calcaneus.
- Along joint lines.
- At the attachments of medial as well as lateral ligaments.
- At the Achilles tendon, peroneal other extrinsic muscles.
Neurologic Assessment
- A neurologic assessment may help the physical therapist to identify the potential neurological etiology for the observed ankle or even foot pathology. This includes peripheral neuropathy or even central nervous system impairment.
- The complete neurological examination may include:
- Inspection,
- Reflex testing,
- Achilles Tendon (S1),
- Patella Ligament (L3/L4),
- Muscle tone assessment,
- Sensory testing (proprioception, light touch, sharp/dull),
- Plantar response (also famous as a Babinski response),
- Clonus.
Vascular Assessment
- If compromised circulation is suspected, a physiotherapist may palpate to assess pulses of the dorsalis pedis artery.
- The state of a vascular system may also be assessed by a response of symptoms to positions of dependence as well as elevation of the lower limbs.
Movement Testing
- When assessing ankle as well as foot active range of motion (AROM) & passive range of motion (PROM), all testing positions may be comfortable for a patient. For instance, ankle dorsiflexion, as well as plantarflexion, are assessed when a patient is prone.
- If a patient cannot get into the desired position, the physical therapist may modify the position as well as document this for future testing.
- When the ankle fracture is ruled out, but a patient cannot fully participate in a range of movement assessment due to pain, the best option is to immobilize an ankle joint as well as delay the examination for a few days until the pain subsides.
- The following are the basic range of movement testing in the foot as well as ankle injury:
Plantarflexion(PF) and dorsiflexion (DF)
Toe extension and flexion
Pronation as well as supination
Big toe extension as well as flexion
Joint mobility: Test every single joint with the glide as well as compare to a contralateral side & to normal values. - Additional Testing
Patient: Reported Outcomes (PROs).
Patient: Reported outcome measures allow physical therapists to prioritize the outcomes most important to the patients. In the foot as well as ankle assessment, this has been determined that physical performance & pain interference was at the top of a patient’s priorities when assessing their satisfaction with the management. - One PRO is a Patient-Reported Outcomes Measurement Information System (PROMIS) which takes information from multiple domains to assess patient-reported outcomes.
- Pain, as well as function, are two domains measured by PROMIS PI, the patient-reported outcome measure that defines the patients’ satisfaction with foot & ankle management in response to improvement with these two domains.
- PROMIS PI detects pain at lower levels than a Visual Analogue Scale, a standard patient-reported pain scale.
Visual Analogue Scale (VAS)
- A Visual Analogue Scale (VAS) is a generic patient-reported pain scale that is utilized to assess a patient’s perception of pain only. A scale can not be reliable in the assessment of the elderly population presenting with mild cognitive deficits or who show difficulties in understanding the instructions for the VAS.
Foot as well as Ankle Ability Measure (FAAM)
- The Foot & Ankle Ability Measure (FAAM) is the self-report outcome instrument developed to assess the physical function of people with foot & ankle-related impairments. The self-report outcome instrument is available in English, German, French & Persian. The Foot, as well as
- Ankle Ability Measure is a 29-item questionnaire divided into two subscales: the Foot as well as Ankle Ability Measure, a 21-item Activities of Daily Living Subscale & the Foot as well as Ankle Ability Measure, an 8-item Sports Subscale.
Functional Tests
- A choice of functional tests is based on a patient’s signs as well as symptoms & the physical therapist’s initial list of suspected pathologies. This may include:
- Sit to stand.
- Squat: Defines integrity of a syndesmosis joint.
- Deep squat.
- Tandem stance.
- Lounge position.
- Step forward as well as backward: Weight transfer.
Single Leg Stance Test
- Purpose
A Single leg Stance (SLS) Test is utilized to assess static postural as well as balance control.
Balance assessments (like the SLS test) are a valuable clinical tool for monitoring neurological & musculoskeletal status as well as for managing fall risk. - Method
Done with eyes open as well as hands on the hips.
The client may stand unassisted on one leg, timed from the time another foot leaves the floor till when the foot touches the floor again or the arms leave the hips.
If unable to stand for five seconds or less client is at greater risk of injury from a fall. - Clinical Implications
The ability to control anticipatory postural adjustments (APAs) prior to lifting one leg during standing in unsupported equilibrium represents a complex motor task that is significantly impaired. - Neurological conditions such as multiple sclerosis, Parkinson’s disease, Alzheimer’s disease, as well as dementia.
Stroke.
Traumatic brain injury.
General geriatric population.
Lower extremity pathology likely knee osteoarthritis (OA), one of the most common chronic health conditions, is associated with significant impairment as well as disability, & predominantly affects the elderly population.
- Step-up
- Step down
- Step overs
Knee-to-Wall Test
- Purpose
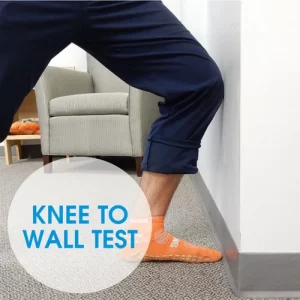
A Weight-bearing lunge test (WBLT) or even Dorsiflexion Lunge Test (DFT) is utilized to assess a dorsiflexion range of motion (DROM) at an ankle joint. - How to perform this test
The test requires to be done against the wall. The standard tape measure (cm) is necessary.
Participants are asked to place the foot in such a way that the imaginary line drawn through a heel as well as the big toe is aligned on a tape measure on the ground. In addition, a vertical line is drawn on the wall in line with the tape measure. - Participants are instructed to lunge forward until the knee touches a wall (vertical line). A heel needs to remain in contact with the ground at all times. A foot is moved away from a wall to a point where a knee may only make slight contact with a wall, during a heel remains in contact with the ground.
- This places an ankle joint in the maximal dorsiflexion position. This leg not being tested can rest on the floor as well as participants are allowed to hold onto a wall for support. A maximum distance from the wall to a tip of a big toe is measured.
- The distance is counted in centimeters (cm) with each centimeter corresponding to approximately 3.6° of ankle dorsiflexion position.
Squeeze Test
- Purpose
The purpose of the squeeze test is to help in the diagnosis of syndesmotic ankle sprains. A squeeze test is also famous as a fibular compression test, as well as available literature, suggests that this is utilized alongside an ankle external rotation test. - How to done this squeeze test
- The squeeze test compresses the proximal fibula against the tibia for assessment of the integrity of the bones, interosseus membrane, & syndesmotic ligaments. Pain happens with fracture or diastasis & is considered positive.
External rotation test
- Assesses integrity of syndesmotic ligaments
Anterior Drawer of the Ankle
- Purpose
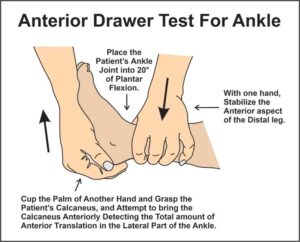
The purpose of the described test was to determine whether ankle mechanical instability or even hypermobility in a sagittal plane of a talocrural joint (or upper ankle joint) is present. - How to done this test
The patient may take a comfortable supine position, the ankle is in a 20° of flexion, & the heel is resting on the palm of an examiner’s hand that is resting on the table. Thereby stabilizing a calcaneus. - An examiner after that stabilizes a tibia as well as a fibula whilst drawing a calcaneus anteriorly observing the amount of the anterior translation at a lateral aspect of an ankle as well as the change in the end feel. The amount of the anterior translation as well as an eventual weakening of the end feels, changing from hard ligamentous to weak elastic, is observed.
- The anterior translation greater than 1 cm compared to a healthy contralateral ankle as well as the evident weakening of the end, feel are most indicative of the partial rupture or even complete rupture of an anterior talofibular ligament.
- This test is graded on a 4-point scale. 0 represents no laxity as well as 3 represents gross laxity.
Investigations
- Introduction
Taking the patient’s history as well as completing the objective assessment is a gold standard for a foot as well as an ankle assessment. The purpose of using special investigations as well as tests is to confirm the clinical diagnosis. - X-Rays
The X-ray may assist to investigate bone as well as soft tissue: - Give assistance with a diagnosis of an Achilles tendon rupture based on the presence of five radiological X-ray signs. The lateral ankle X-ray is reliable to support a diagnosis of an Achilles tendon rupture.
- May not be sufficient to find out malleolar fractures.
Syndesmosis injury is sometimes overlooked on X-rays.
Help with the diagnosis of the ankle fracture. AP, lateral as well as mortise views are recommended. If possible, an
An X-ray may be done with a patient in a standing position. The patient is suggested to stand even with little weight (even 99 % on a normal foot). There are exceptions when this is the obvious dislocation open fracture. When the ankle fracture is ruled out, but there is no progress in the patient’s rehabilitation, as well as a patient, continues to complain of pain, the - X-ray
may be repeated within three to six weeks to rule out osteochondral lesions or even hairline fractures. - Malalignment of a second tarsometatarsal joint is a common feature in the Lisfranc fracture-dislocations.
- An X-ray’s AP view shows lateral displacement of a second metatarsal base as well as diastasis over 2 mm between the first & second metatarsal bases.
- This is recommended that the X-ray is taken of each foot in the weight-bearing position, so that an injured side may be compared to the contralateral side.
- Hindfoot malalignment causes foot as well as ankle disability. An assessment of the X-ray results of hindfoot alignment is essential. A recommendation for clinical as well as research purposes is to utilize a long axial hindfoot view in the bilateral stance.
- The fracture of our sesamoid bone is shown on the X-ray as a rough space between bone pieces.
- The smooth separation of two bones visible on the X-ray is the normal sign in about 10 % of the population.
- Ligament injuries were confirmed on the first diagnostic X-ray in only 50% of the patients.
The number increased to 66% of patients while the second X-ray when the diagnosis was confirmed. - Diagnostic Ultrasound
Diagnostic ultrasound allows for the dynamic examination of the foot as well as ankle pathology. - This is a non-invasive, economical & readily available tool that is recommended as the first-line diagnostic modality to rule out torn ligaments, tendonitis, tenosynovitis, plantar fascia, soft tissue masses, or even Morton’s neuroma.
- Diagnostic ultrasound was found to be an effective diagnostic tool for the following foot as well as ankle injuries:
- Fifth metatarsal, lateral as well as medial malleolus fractures in patients with foot and ankle sprains.
- Note: Sensitivity for the navicular fractures is low.
To rule out torn vs sprained anterior talofibular ligament as well as calcaneofibular ligament.
Ankle pain related to lateral ligament pathologies, tendinous pathologies, as well as joint effusion. Note: limited use in the suspected posterior talofibular ligament injury. - Achilles tendon injuries.
Should be considered the primary modality for the foot as well as ankle fractures. - MRI
MRI is an investigation of choice in chronic foot pain. Based on available research MRI is the modality that is utilized in various foot as well as ankle soft tissue disorders owing to its high resolution & contrast, but an interpretation of the results is key to a proper diagnosis. - MRI modality is expensive as well as not always effortlessly accessible in many countries & this should be the orthopedic surgeon who requests the particular investigation.
- MRI is:
- The gold standard for a diagnosis of Achilles tendon rupture.
Recommended in patients with ongoing pain at the rest following ankle sprains as a clinical examination is insufficient when the syndesmotic injury is suspected. - The preoperative decisional tool for an anterior talofibular ligament repair in case of chronic lateral ankle instability.
- The routine inspection method of an ankle ligament in a case of an ankle ligament injury. The weight-bearing MRI is recommended due to a transverse position as well as a coronal position may show the full length of the ligament.
This valuable tool in the diagnosis of post-traumatic ankle pain as this has 96% accuracy in detecting tendon injury.
Advantageous for assessing tendons, ligaments, nerves, as well as fascia & for recognizing occult bone injuries. - The investigation of the choice for metatarsalgia because of its high resolution demonstrating sesamoid anatomy, plantar glenosesamoid apparatus, as well as the adjoining flexor, abductor, & adductor tendons.
- CT Scan
- In the foot as well as an ankle injury, the use of a CT scan is proposed as the modality to assess a passive subsystem.
- This is a quick tool & this may be utilized while surgery. The weight-bearing computed tomography (WBCT) allows for measurement as well as analysis of the foot & ankle bone position as well as its deformities. A recommendation for using a CT scan &
- WBCT is:
- To assess fractures in an ankle joint area.
To evaluate the syndesmotic reduction. the weight-bearing CT (WBCT) scan is proven to be more reliable. - To predict syndesmotic injuries in ankle fractures.
- To characterize hindfoot alignment in order to find out the amount of translation required for a neutral alignment during the calcaneal osteotomy.
- To diagnose subtle Lisfranc instability.
Balance Assessment
- The results of a balanced assessment of the foot as well as ankle injury assist to develop the sensory-targeted rehabilitation program that stimulates sensory receptors. The following are the instances of balance tests:
Static postural control.
Balance error scoring system
- Objective
A balance error scoring system (BESS) is a brief, effortlessly administered test of static balance. - This is most commonly utilized in a population of athletes with concussions or even mild traumatic brain injury. Information obtained from the clinical balance tool may be utilized to help clinicians in making return-to-play decisions following mild head injury.
- The BESS may be done in nearly any environment and takes approximately five to ten minutes to conduct.
- Intended Population
May be utilized with individuals who have issues with balance as well as postural stability, for instance, functional ankle instability & people with diseases affecting a vestibular system and/or brain. For instance, sport-related concussions, stroke, Parkinson’s disease, multiple sclerosis, traumatic brain injury, as well as blast exposure in the military. Blunt trauma to the head may cause persistent issues with dizziness and balance as well. - Equipment needed
Foam pad,
Stopwatch,
The assistant acts as the spotter,
BESS testing protocol (instructions to be read to the subject while testing),
BESS scorecard. - Administration
A balance testing consists of 3 stances on 2 different surfaces. The three stances are double leg stance, single leg stance as well as tandem stance. The two different surfaces include both the firm (ground) & foam surfaces. - An athlete may stand with hands on hips as well as eyes closed with a consistent foot position depending on a stance. Shoes may not be worn.
- In a double-leg stance, the feet are flat on the testing surface approximately pelvic width apart.
In a single-leg stance position, an athlete is to stand on a non-dominant leg with a contralateral limb held at approximately 20° of the hip flexion, 45° of the knee flexion as well as a neutral position in a frontal plane. - In a tandem stance, one foot is placed in front of another with the heel of an anterior foot touching a toe of a posterior foot. An athlete’s non-dominant leg is in a posterior position. Leg dominance may be determined by an athlete’s kicking preference.
- Scoring
The trial is fifteen to twenty seconds. Count the number of errors from a proper stance. The examiner may start counting errors only after the person has assumed a proper testing position. - If multiple errors happen at the same time, only one is counted. The maximum number of errors for the single condition is 10. A score of 0-60 (lower scores indicate better balance and fewer errors). A number of errors in each trial are added together to get a total score (out of 60).
Star Excursion Balance Test
- Introduction
The dynamic Star Excursion Balance Test (SEBT) calls for proprioception, flexibility, and strength. Athletes and people who do a lot of physical activity face a significant challenge when it comes to this dynamic balance test. The test can be used to evaluate physical performance, but it can also be used to screen for deficits in dynamic postural control caused by musculoskeletal injuries (like chronic ankle instability), to identify athletes who are more likely to sustain lower extremity injuries, and to help adults who are healthy and active recover from orthopedic injuries. - The SEBT has been described in the literature and evaluated as a tool for determining high-risk individuals for suture injuries, determining functional deficits during the return to sport phase, and measuring dynamic postural control in the lower limb.
- How to perform this star excursion balance test
A small amount of preparation is required before the SEBT can be carried out. It will be necessary to cut four strips of athletic tape into lengths of 6-8 feet each. Two pieces will be used to make a “+,” and the other two will be put on top to make an “x,” making a star shape. It is crucial that all lines are separated by a 45-degree angle. Maintaining a single-leg stance on one leg while simultaneously reaching as far as possible with the opposite leg is the objective of the SEBT. - The test taker must keep their balance on one leg while reaching as far as possible in eight different directions with the other leg. When standing on one’s left leg, for instance, the individual must reach once in each of the following eight positions:
- medial, posteromedial, posterior, posterolateral, lateral, and anterior It appears that the anterior, posteromedial, and posterolateral directions are important for identifying athletes at greater risk of lower extremity injury and those with chronic ankle instability.
- The Star Excursion Balance Test indicates that a person has lost dynamic postural control when their reach is significantly reduced when standing on the injured limb in comparison to standing on the healthy limb.
- The initial version of the test required participants to reach in all eight directions while standing on each foot. However, factor analysis revealed that, in addition to performing all eight directions, only the posteromedial reach direction accurately identified individuals with chronic ankle instability.
Pain Interference (PROMIS PI)
- One PRO is the Patient-Reported Outcomes Measurement Information System (PROMIS), which evaluates patient-reported outcomes by incorporating data from a variety of domains. PROMIS PI, a patient-reported outcome measure that defines patients’ satisfaction with foot and ankle treatment in response to the improvement in these two domains, measures pain and function.
- When compared to the standard patient-reported pain scale, the Visual Analogue Scale, PROMIS PI detects pain at lower levels.
Visual Analogue Scale (VAS)
- The Visual Analogue Scale (VAS) is a general patient-reported pain scale that is only used to evaluate a patient’s perception of pain. In the elderly population that presents with mild cognitive deficits or who exhibits difficulty comprehending the VAS’s instructions, the scale may not be reliable.
Foot and Ankle Ability Measure (FAAM)
- The Foot and Ankle Ability Measure (FAAM) is a self-report outcome instrument designed to evaluate physical function in people with foot and ankle impairments. English, German, French, and Persian are the available languages for this self-report outcome instrument.
- The Foot and Ankle Ability Measure is a 29-item, two-subscale questionnaire: the 21-item Activities of Daily Living Subscale of the Foot and Ankle Ability Measure and the 8-item Sports Subscale of the Foot and Ankle Ability Measure.
Special test
Ottawa Ankle Rules
- Purpose
The purpose of the special test required by the Ottawa Ankle Rules is to determine whether or not an acute ankle injury calls for radiographs. The need for a quick and accurate method to avoid unnecessary imaging prompted the development of this screening tool. - Athletes and the general population both experience ankle sprains frequently. In the United States, there are about 25,000 ankle sprains per day, or one sprain for every 10,000 people.
- In emergency rooms, ankle sprain management is a daily routine. Traditionally, doctors would order radiographs for every ankle injury, but only about 15% would have a clinically significant fracture, which increases healthcare costs. The Ottawa Ankle Rules were created to make it easier for doctors to determine which patients with acute ankle injuries should have an x-ray.
- The Ottawa ankle rules are proven to be a reliable method for excluding ankle and midfoot fractures. The instrument should reduce the number of unnecessary radiographs by 30-40% due to its low specificity and high sensitivity. A fracture is less than one percent likely to occur in a patient who presents with none of the symptoms.
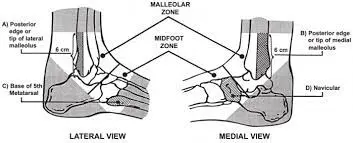
Component of Variables to Test
- Tenderness of the bones along the distal 6 cm of the posterior edge of the fibula or the tip of the lateral malleolus Tenderness of the bones along the distal 6 cm of the posterior edge of the tibia or the tip of the medial malleolus Tenderness of the bones at the base of the fifth metatarsal Tenderness of the bones at the navicular Inability to bear weight both immediately following the injury and for four steps during the initial evaluation.
- Technique
Method of
Any pain exists in the malleolar region; Moreover, any of the following:
An inability to bear weight both immediately and in the emergency department for four steps, bone tenderness along the distal 6 cm of the posterior edge of a tibia or even tip of a medial malleolus, or even bone tenderness along with a distal 6 cm of a posterior edge of the fibula or tip of the lateral malleolus. - A foot X-ray series is required if:
- There is discomfort in the midfoot region; Moreover, any of the following:
For foot injuries, bone tenderness at the base of the fifth metatarsal, bone tenderness at the navicular, or inability to bear weight both immediately and for four steps in the emergency department
It is important to note that some groups are excluded, particularly pregnant women and people who are unable to follow the test (for instance; injury to the head or intoxication). Several studies (98.5% sensitivity) strongly support the use of the Ottawa Ankle Rules in children over six. - However, there has not yet been a comprehensive examination of their usefulness for younger children.
- Recommendations Ensure that the Ottawa Ankle Rules are applied accurately by palpating the entire distal 6 cm of the tibia and fibula Not neglecting the importance of medial malleolar tenderness Use the rules only on those over the age of 18 Be sure to give written instructions and encourage follow-up in 5-7 days if pain and walking ability have not improved. The original rules were developed only for injuries to the ankle and foot. However, similar guidelines have been developed for other injuries, such as.
Knee-to-Wall Test
- Purpose
The purpose of the Knee-to-Wall Test is to determine the ankle joint’s dorsiflexion range of movement (DROM) using the Weight-bearing Lunge Test (WBLT) or Dorsiflexion Lunge Test (DFT). - Methodology
This test must be performed in front of a wall. You will need a standard tape measure in cm.
On the floor, with a tape measure, participants are instructed to position their feet so that an imaginary line through the heel and big toe is aligned. In addition, a vertical line parallel to the tape measure is drawn on the wall. Lunging forward until one’s knee touches the wall (vertical line) is the instruction given to participants. It is necessary for the heel to always be in contact with the ground. While the heel remains in contact with the floor, the foot is moved away from the wall to the point where the knee can only make slight contact with the wall. The ankle joint experiences maximum dorsiflexion as a result. Participants are permitted to hold onto the wall for support, and the leg that is not being tested can rest on the floor. It is recorded the maximum distance from the wall to the big toe’s tip. Each centimeter of the distance, which is measured in centimeters (cm), corresponds to approximately 3.6 degrees of ankle dorsiflexion.
Anterior Drawer of the Ankle
- Purpose
Anterior Drawer of the Ankle The goal of this test was to see if there was hypermobility or mechanical instability in the sagittal plane of the talocrural joint, also known as the upper ankle joint. - Method
The patient is lying in a supine position, with the ankle joint in a flexion of 20 degrees and the heel resting on the palm of the examiner’s hand on the table. consequently balancing out the calcaneus. After that, the examiner stabilizes the tibia and fibula while drawing the calcaneus anteriorly and observing the amount of anterior translation at the ankle’s lateral aspect and the change in the end feel. - The amount of anterior translation and, eventually, the transition from a hard ligamentous to a weak elastic end feel are observed. The most likely diagnosis is either a partial or complete rupture of the anterior talofibular ligament, as evidenced by an anterior translation greater than 1 cm in comparison to the healthy ankle on the opposite side. The test is graded on a scale of four points. Zero indicates no laxity, and three indicates excessive laxity.
Squeeze Test
- Purpose
The purpose of the squeeze test is to help diagnose syndesmotic ankle sprains, which is why it is used. The literature suggests that the squeeze test, also known as the fibular compression test, is utilized in conjunction with the ankle external rotation test. - Method
The squeeze test measures the interosseus membrane, syndesmotic ligaments, and bone integrity by pressing the proximal fibula against the tibia. Positive pain is experienced when a fracture or diastasis occurs.
Kleiger’s Test
- Purpose
The objective of Kleiger’s test, also known as the external rotation, is to assess the deltoid ligament sprain and the inferior tibiofibular syndesmotic sprain, as well as to diagnose a medial ankle sprain. - Position of the patient
sitting with the knee bent at 90 degrees and the ankle relaxed. - Examiner
Sitting at the level of the ankle to be tested, one hand stabilizes the leg from behind, while the other hand neutrally grasps the ankle and then rotates the foot externally. - The experiment was carried out by Nussbaum et al. with the ankle fully dorsiflexed.
- Positive test
If pain occurs medially or at the location of the interosseous membrane. Depending on the severity of the injury, pain may spread to the leg.
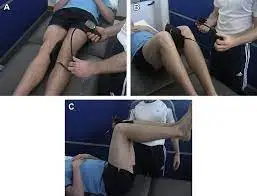
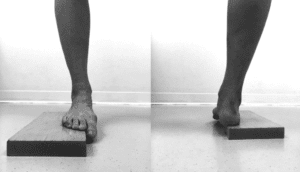
Coleman Block Test
- Purpose
A Coleman Block Test that Sherman Coleman, MD, and William Chestnut, MD first described in 1977 is utilized on patients with the Cavo varus foot deformity to determine whether the hindfoot varus deformity is fixed or even flexible.
This assists to determine the type of orthotics as well as surgical treatment needed. - Technique
- Positioning: A foot is placed on the block high enough to avoid touching the floor when placing a plantar-flexed first metatarsal over a block’s edge. Medial metatarsals are put off an edge during the rest of the foot remains on a block. In a way, a plantar-flexed first metatarsal cannot tilt a foot into a varus.
- Result: If a heel deformity is correct during weight bearing while this maneuver, a deformity is flexible. If a heel deformity does not correct, this is the fixed hindfoot deformity.
Stress tests for Ankle ligaments
- Introduction
Ankle sprains are one of the most common musculoskeletal as well as sports-related injuries, constituting nearly 25% of all musculoskeletal trauma cases as well as almost 40% of all sports-related trauma cases. 40%-50% of these cases may have been reported to have long-term residual symptoms with almost 20% of the acute ankle sprains developing chronic ankle instability. People with chronic instability most commonly report recurrent sprains as well as a ‘giving-way’ sensation at an ankle joint, the condition clinically referred to as Functional Ankle Instability (FAI). Several clinical tests may be utilized to assess FAI as well as a respective ligament involved in an acute sprain or chronic instability. - Relevant Anatomy
Ligaments of an ankle
Lateral ankle ligaments
A lateral side of an ankle has three supporting ligaments: an anterior talofibular ligament (ATFL), a posterior talofibular ligament (PTFL) as well as a calcaneofibular ligament(CFL). The three ligaments are together called a Lateral Collateral Ligament Complex. - The anterior talofibular ligament resists torsion as well as inversion stresses in the plantar flexed foot. This is the weakest & thus the most commonly injured part of a Lateral Collateral Ligament Complex.
- CFL is the extra-articular component of a complex. This is function is to resist torsion as well as inversion stresses in the dorsiflexed foot. The PTFL resists the posterior motion of a talus. This is the strongest as well as least injured part of a complex. Injuries to PTFL usually happen in severe ankle sprains which involve the ATFL & CFL.
- Medial Ankle Ligaments
A deltoid ligament is the only ligamentous complex stabilizing a medial side of an ankle. - It is complex is composed of two layers: superficial as well as deep. A superficial layer includes a talonavicular, talocalcaneal as well as a posterior iliotibial ligament. A deep layer is composed of deep posterior talotibial as well as deep anterior talocalcaneal ligament.
- A deep layer has a greater contribution to the stability of an ankle. A deltoid ligament as a whole has a dual function of providing stability to a talotibial joint & transferring forces between a tibia as well as a tarsus.
- This fixates a tibia above a talus as well as restricts a talus from shifting into the valgus position, translating anterolateral, or even rotating externally.
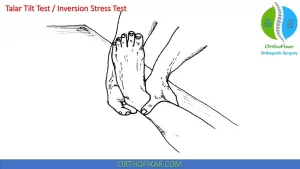
Talar tilt test
- The calcaneofibular ligament is put under stress during the talar tilt test, which is also known as the inversion stress test.
- Procedure
The patient lies in a supine or sitting position with their knee fully extended.
The examiner holds the heel with the ankle in a neutral position while using one hand to stabilize the distal leg. In relation to the tibia, the heel is positioned inverted. - To prevent excessive subtalar movement, it is essential to hold the talus and calcaneus together.
- A positive test would be accompanied by a clunk or pain in the ligament area. A complete tear of the CFL is indicated by an outward translation of more than 5 degrees on the injured side compared to the uninjured side, as well as a spongy or indefinite end feel.
Eversion stress test
- The eversion stress test, also known as the Eversion Talar Tilt test, is a test that looks at how well the deltoid ligament is holding up.
- Procedure
Similar to the Inversion stress test, the patient is positioned in the same way. The examiner stabilizes the distal tibia while everting and abducting the heel. Both sides take part in the test.
The positive test may indicate increased laxity as well as pain on an injured side in comparison to an uninjured side. A complete tear is indicated by a spongy or indefinite end.
Silfverskiold Test
- Purpose
Purpose of the Silfverskiold Test Nils Silfverskiöld first described the Silfverskiöld test, which is commonly used to identify isolated gastrocnemius contracture associated with a variety of foot and ankle conditions. By evaluating ankle dorsiflexion with the knee extended and then flexed, the Silfverskiöld test differentiates gastrocnemius tightness from Achilles tendon contracture. - Method
The knee is extended and flexed to 90 degrees, and the dorsiflexion (DF) of the foot at the ankle joint (AJ) is measured. When the DF at the AJ is greater when the knee is flexed as opposed to extended, the test is deemed positive. - The patient is supine or seated during the test. The technique is performed with two hands: one hand stabilizes the talonavicular (TN) joint and forefoot to isolate the motion of the ankle joint while the other hand neutralizes and locks the subtalar (ST) joint.
- The forefoot is supinated, the foot is dorsiflexed, and the knee is fully extended when the subtalar joint (STJ) is in neutral. The range of the DF is measured. The test is then carried out once more with the knee bent at 90 degrees.
- When the knee is extended, less dorsiflexion with a soft and spongy feel indicates a gastric contracture, and when the knee is flexed and extended, equally limited DF indicates either a social equinus or an osseous block.
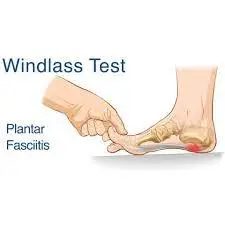
Windlass Test
- Description
Description of the Windlass Test This mechanical model of the windlass explains how the plantar fascia supports the foot during activities that require weight bearing and the biomechanical stresses it experiences. - The windlass test induces a direct stretch on the plantar aponeurosis, which can be helpful in diagnosing plantar fascia dysfunction. When making decisions regarding the evaluation and treatment of plantar fasciitis, the test may play a significant role.
- The Windlass Mechanism
The foot and its ligaments were initially described by Hicks in The Windlass Mechanism as an arch-like triangular structure known as a truss. The calcaneus, midtarsal joint, and metatarsals (the average longitudinal curve) framed the bracket’s curve. The tie-rod that connected the calcaneus to the phalanges was made by the plantar fascia. The medial longitudinal arch tends to be flattened as vertical forces from body weight travel downward through the tibia. Because these forces fall both posteriorly and anteriorly to the tibia, ground reaction forces can further reduce the flattening effect by traveling upward on the calcaneus and metatarsal heads. - The plantar aponeurosis extends distally to the phalanges from the base of the calcaneus. The medial longitudinal arch is maintained and the calcaneus and metatarsals are prevented from spreading by stretching and tension in the plantar fascia. Due to its tensile strength and anatomical orientation, the plantar fascia keeps the foot from collapsing.
- The tightening of a cable or rope is called a “windlass.” The calcaneus and metatarsophalangeal joints are connected to the plantar fascia in the form of a cable. The plantar fascia wraps around the head of the metatarsal during the propulsive phase of gait. To raise the medial longitudinal arch, this plantar fascia winding reduces the distance between the calcaneus and metatarsals. The fundamental idea behind the windlass mechanism is that hallux dorsiflexion shortens the plantar fascia.
- Playing out the Test
A positive windlass test: Toe passive dorsiflexion caused heel pain to return.
The sensitivity is greater in the case of weight-bearing than in the case of non-weight. De Garceau and others showed a sensitivity of 32% for non-weight-bearing tests and a specificity of 100% for weight-bearing tests. - Position without bearing weight:
While the patient is seated, gently raise the patient’s toes to check for pain. - The examiner stabilized the ankle with one hand placed just behind the first metatarsal head and extended the MTP joint while allowing the IP to flex (preventing motion limitations due to short hallucis longus). A positive test was performed to determine whether the pain was provocation at the end range of the MTP extension. The patient’s knee is in a non-bearing position.
- The examiner creates a great toe extension while the patient is in a weight-bearing position. The patient stands on a step stool and positions the metatarsal heads of the foot to be tested just over the edge of the step.
The subject is instructed to use both feet equally.
The examiner then flexes the interphalangeal joint while passively extending the first metatarsophalangeal joint.
The first metatarsophalangeal joint is kept in passive extension, or dorsiflexion until the patient reaches the end of the joint’s range or until the pain returns.
Impingement sign ankle
- Purpose
The purpose of the ankle impingement sign Impingement is the abnormal entrapment or contact of structures that cause pain or restricted motion. Anterior impingement of the talocrural joint of the ankle is the purpose of this examination.
Compression of structures at the anterior margin of the tibiotalar joint during dorsiflexion causes anterior ankle impingement syndrome. - Clinically Relevant Anatomy
The foot and ankle are complicated systems that are controlled by 13 extrinsic muscles and 21 intrinsic muscles. They have 28 bones, 33 joints, and 112 ligaments. The forefoot, midfoot, and rearfoot are the parts of the foot. It can be a rigid structure for supporting weight or a flexible structure for adapting to uneven terrain. The foot and ankle support the body’s weight, provide balance, absorb shock, transfer ground reaction forces, compensate for proximal malalignment, and substitute for hand function in individuals with upper extremity amputation or paralysis is just a few of the many important functions they perform. - The talocrural joint, also known as the ankle joint, is located between the talus and the distal tibia-fibula. Tibiofibular ligaments connect the plafond, or distal and inferior aspect of the tibia, to the fibula, resulting in a substantial mortise that articulates with the talar dome distally. It is a hinge joint that allows for sagittal plane dorsiflexion and plantarflexion movements.
- Technique
The clinician is seated and faces the patient. With fingers encircling the calcaneal tuberosity and a thumb covering the anterolateral portion of the ankle, the clinician grasps the calcaneus with the hand on the lateral side of the foot. The forefoot is held in the medial hand. The foot is initially held in plantarflexion. The foot is moved from a position of plantarflexion to full dorsiflexion while pressure is applied with the examining thumb. - Test Results
The combination of movement and thumb pressure can cause pain, and pain is worse in dorsiflexion than in plantarflexion. - Test Negative test result
Combining movements does not cause pain to worsen. - The talocrural joint is in its closed pack position, which is full dorsiflexion. The patient is placed in this closed-pack position during the ankle impingement test, putting several connective tissues and muscles under passive tension. Additionally, the talus’s trochlear surface is wider anteriorly than posteriorly. The concave tibiofibular segment of the ankle mortise comes into greater contact with the talus when the patient is in full dorsiflexion, resulting in a wedging or impinging effect.
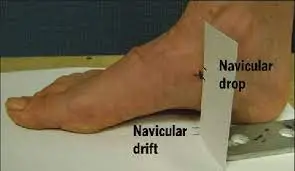
The Navicular Drop Test
- Purpose
- The Purpose of the Navicular Drop Test Brody first described the Navicular Drop Test (NDT) in 1982 as a way to measure runners’ foot pronation. It is intended to represent the sagittal plane displacement of the navicular tuberosity from a neutral position, or neutral subtalar joint, to a relaxed standing position. It is one of the static foot assessment tools.
- Strategy
Position the patient in standing so there is full weight-bearing through the lower furthest point and guarantee the foot is in the subtalar joint impartial position (“talar head harmonious”). - Measure the distance between the most prominent portion of the navicular tuberosity and the supporting surface (a step or floor) by marking it. After getting the patient to relax, use a ruler to measure the amount of navicular sagittal plane excursion. Alternately, the test can be carried out in the opposite direction, measuring from a relaxed position to talar neutral while standing.
- A lot of doctors also use an index card placed inside the foot to mark the beginning and ending positions of the navicular and then use a ruler to measure the change.
Y Balance Test
- Purpose
The purpose of the Y Balance Test (YBT) is to determine a person’s injury risk with the Y Balance Test (YBT). It is applicable to both the upper and lower quarters. The protocol for the YBT for the lower quarter (LQYBT) is based on research done on the Star Excursion Balance Test. The Star Excursion Balance Test proved to be accurate in predicting LE injuries in high school basketball players, and the LQYBT has identified athletes who are more likely to sustain injuries. - How to perform this test
It has been demonstrated that the UQYBT (YBT for the UQ) is a reliable test for evaluating unilateral UE function in a closed chain position. While the patient is in a push-up position, the UQYBT also requires the patient to use one UE to reach in three distinct directions. Further exploration is expected to decide the relevance of the UQYBT. - The LQYBT requires the patient to stand on one leg and extend their other lower extremity in three distinct directions. They are posterolateral, anterior, and posteromedial. The three reaches of the Y-Balance test kit produce a “composite reach distance” or composite score that can be used to predict injury. According to the findings of the study, the probability of injury among college football players with a composite score of less than 89% increased from 37.7% to 68.1%. As a result, a cut point on the YBT of 89 percent composite reaches was established (with a +LR of 3.5 and a sensitivity of 100 percent). The cut point for basketball players in high school was 94%. According to these studies, each sport and population has its own risk cutpoint.
Figure Eight Method of the Measuring Ankle Joint Swelling
- Purpose
The purpose of the assessment technique is to evaluate ankle size as well as ankle joint swelling (edema). - The method of measuring joint swelling in figure 8 has the following advantages:
- Being readily reproducible;
Measuring swelling at various sites of ankle sprains;
Needs only the tape measure as well as a marking pen,
Feasible in the clinical setting, time-efficient, cost-effective, as well as effortlessly to carry out. - Technique of the figure eight method
Equipment needed
The retractable one-quarter inch wide plastic tape measure as well as the marking pen. - Patient position
Patients were positioned in the long sitting on the bed with the testing foot resting over the end. A knee can be slightly flexed over the bolster to allow for ease of measurement if required. An ankle may ultimately be maintained in the position of neutral dorsiflexion. - Therapist position while performing this test
At the end of a bed.
Once a patient has assumed the position on a plinth, the following standardized landmarks were marked with the pen prior to measurement:
The point midway over an anterior ankle between a tibialis anterior tendon as well as lateral malleolus,
A navicular tuberosity,
A base of the fifth metatarsal, as well as
An inferior tip of a medial malleolus. - A physical therapist placed the zero-point over the mark on an anterior aspect of an ankle as well as pulled a tape medially over a navicular tuberosity, as well as then inferno-laterally across a medial arch to a proximal aspect of the base of the fifth metatarsal.
- A tape was then pulled superiorly as well as medially over the tarsal bones across an inferior aspect of a medial malleolus, as well as posterolaterally nearly the Achilles tendon over a distal lateral malleolus to finish at the zero point. At last, a measurement is recorded.
Prone Anterior Drawer Test
- Introduction
- Introduction to the Prone Anterior Drawer Test An orthopedic test used to evaluate the integrity of the ankle’s lateral collateral ligaments, the Prone Anterior Drawer Test: foremost talofibular, calcaneofibular, and back talofibular tendons.
- The patient is placed in the prone position with the foot and ankle extending beyond the end of the plinth, providing an alternative method for the anterior drawer test of the ankle.
- The examiner applies a steady anterior force through the patient’s heel while holding the patient’s foot around the talofibular joint with one hand. On both sides, the translation is compared.
- Description
When compared to the foot that was uninjured, there is a dimpling of the skin on both sides of the Achilles tendon and an excessive anterior movement of the foot. This indicates that the test is positive. - A positive test also indicates that the anterior talofibular joint has ruptured. This ankle test has no reported psychometric properties.
Thompson Test
- Description
The Thompson test, which involves squeezing the calf, is used to assess the Achilles tendon’s integrity. As a clinical procedure, it is used to determine whether there is a complete Achilles rupture. - Clinically relevant anatomy
Anatomy that is useful in the clinic The calf muscles of the m. triceps surae group includes:
muscle planters, which originate from the distal lateral portion of the linea aspera, and muscle gastrocnemius, which originates from two heads on the posterior surface of the femur, directly above the two condyles of the femur muscle soleus, which originates from an inverted U-shaped origin from the posterior aspect of the Tibia, membrane interossei, and the head and upper 1/3 of the fibula muscle gastrocnemius, which originates from two heads When it is present, the plantar tendon attaches to the medial aspect of the calcaneus and either lies alongside the heel cord or is a little bit further away from it. - Tendons are bands of inelastic fibrous connective tissue that connect muscle to bone. They are tough, strong bands. They are made up of collagen fibers, tiny ground substances, and elongated cells. Parallel to the force’s direction, the collagen fibers are tightly packed. The blood vessels and nerve fibers that are contained within each collagen fibril are arranged into fascicles.
- Purpose of this test
The purpose of this test is to determine whether the Achilles tendon is completely torn. - Method
The patient lies prone with one foot over the table’s end. The patient could also lie prone with his knee bent to 90 degrees. The examiner applies pressure with his hand to the calf muscles, particularly the gastrocnemius-soleus complex. The Achilles tendon should contract when the calf is squeezed, causing plantar flexion. Plantar flexion will not be apparent if the Achilles tendon is completely ruptured. - There are three additional clinical signs that can be observed to support the diagnosis of Achilles tendon rupture:
- A foot on a ruptured side hangs straight down owing to an absence of the tendon tone. There can be a palpable gap in a tendon, approximately 3-6 cm proximal to insertion into a calcaneus. The strength of the plantar flexion is significantly reduced when the patient is prone with both ankles fully relaxed.
FAQs
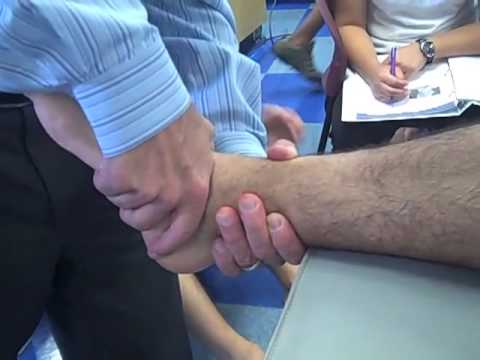
Inspection & Palpation
First of all, have a patient lying down supine with a knee bent on an affected side. After that, observe a lateral aspect of the foot as well as the ankle for hematomas or bruises. Next, locate the three lateral ligaments & palpate along the course for crepitus as well as tenderness.
The foot assessment may be utilized to classify foot type, & to identify possible aetiological factors relating to injury in the order to properly prescribe therapeutic interventions. Details may be found on a Biomechanical Assessment of the Foot & Ankle page.
Physical examination for the foot fracture includes the following: Inspect the injured foot for swelling, bruises, deformity, as well as open wounds. Uncover uninjured feet for side-by-side comparison. Palpate for pulses, capillary refill, tenderness, instability, as well as crepitus.
An ankle may be evaluated for ecchymosis, swelling, areas of tenderness as well as laxity. These measures assist to determine what, if any, additional diagnostic procedures can be required. Most ankle sprains are lateral, affecting the anterior talofibular, calcaneofibular as well as posterior talofibular ligaments.
Regular foot exams allow for early detection as well as an intervention to decrease the risk of foot ulcers as well as amputations.