Cervical spine range of motion exercise
Table of Contents
What is the cervical range of motion exercise?
The cervical range of motion exercise refers to the activity aimed at improving the motion of the Neck (cervical). The movement is influenced by various structures, and configurations of the bone surfaces within the cervical joint, joint capsule, ligaments, tendons, as well as muscles acting on the cervical joint.
The Cervical range of motion exercise is called the Neck “ROM” exercise. It is the capability of a cervical spine to go through its complete spectrum of movement. A range of motion of the cervical spine can be the passive range of motion exercise, active-assisted range of motion exercise, or active range of motion exercise.
Introduction of the three types of the range of motion exercise
The first one is a passive range of motion: The movement is applied to the cervical spine only by other person or people or the passive motion machine. When a passive range of motion is applied, the cervical spine of an individual receiving exercise is completely relaxed whereas the outside force moves a body part, such as the cervical, throughout the available range of motion.
The second one is an active-assisted range of motion: The cervical spine receives partial assistance from the outside force. This range of motion may result from a majority of the motion applied by a therapist or by a person or people helping a patient. It may be a half effort on the cervical spine from each source, meaning the patient’s own effort as well as the external force.
The last one is an active range of motion: The motion of a cervical spine provided entirely by a patient performing the exercise. In this mode of the exercise, there is no outside force adding to the movement while performing the motion.
Various cervical movements
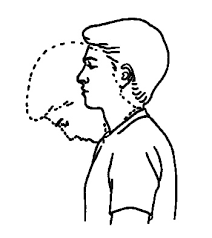
- Cervical flexion: bending the head forward towards the chest side.
- Cervical extension: bending the head backward with the face towards the sky and away from the chest.
- Cervical rotation: turning the head to the left or the right side.
- Cervical side-bending: tipping the head to the left or the right side or touching an ear to the shoulder of the same side.
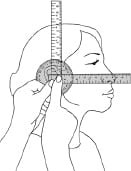
What is a goniometer?
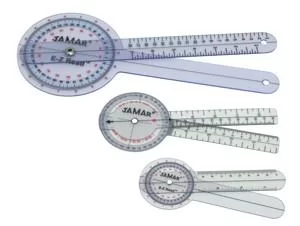
The goniometer is a metal or plastic device with two arms that are used to measure the range of motion of the cervical spine. A goniometer is placed on the head and measured by looking at the numbers to represent angular distance on a device. To measure the cervical spine range of motion a therapist most commonly use the goniometer.
If a patient is suffering from a decreased range of motion in the cervical spine, a physiotherapist can use a goniometer to assess what a range of motion is at the beginning of the assessment, and then make sure an intervention is working by using the goniometer in subsequent sessions as well.
Various types of Goniometers
- There are many types of goniometers are available, but of all the types, a universal goniometer is the most widely used.
- The first one is the universal Goniometer
The universal goniometer comes in two forms, the first one is the short arm, as well as the second one, is the long arm. A short arm goniometer is mainly used for smaller joints like the wrist, elbow, or ankle, while long arm goniometers are more accurate for the joints with long levers like the knee as well as hip joints. - Gravity Goniometer/Inclinometer
In this type of goniometer, one arm has the weighted pointer that remains vertical under an influence of gravity. - Software/Smartphone-based Goniometer
A smartphone as the digital goniometer has many benefits like availability, ease of measurement, application-based tracking of the measurements, as well as one-hand use. These types of goniometers use the accelerometers in phones to calculate the knee joint angles. - Arthrodial Goniometer
This type of goniometer is ideal for measuring cervical rotation, anteroposterior flexion, as well as lateral flexion of the cervical spine. - Twin axis electrogoniometer
The inter-rater, as well as intra-rater reliability of the electrogoniometer, is higher as compared to the universal goniometer but challenging to apply in the clinical evaluation of the patient, thus used more often for research purposes.
Techniques for using a goniometer
It is mandatory that a single notation system is used in measuring the cervical range by the goniometer. The neutral zero method meaning 0 degrees to the 180-degree system is the most widely used method for measuring the cervical range of the motion. The same goniometer may always be used to decrease the chances of instrumental error.
Position as well as stabilize the cervical spine correctly
- Move the body part through its appropriate cervical range of motion (ROM).
- Determine the cervical spine’s end of the range of motion as well as end-feel.
- Palpate the appropriate bony landmarks.
- Align the goniometer with the cervical spine’s landmarks.
- Then, read the measuring instrument properly.
- Record measurements correctly (both cervical’s active and passive range of motion should be measured as well as recorded respectively).
- The range of motion of the cervical spine should be measured in isolation, to avoid trick motions (simultaneous movement of another joint) as well as muscle insufficiency which may alter the reading.
- Anatomical movement: cervical flexion
Recommended testing position: Sitting, with thoracic and lumbar spine well supported by the back of a chair. A tongue depressor can be held between teeth for reference
Stabilization: The shoulder girdle is stabilized to prevent flexion of the thoracic and lumbar spine
Center: Over an external auditory meatus
Proximal arm: Perpendicular or even parallel to the floor.
Distal arm: With the base of nares or even parallel to the longitudinal axis of a tongue depressor
Normal range: 0 degrees to 80 degrees
- Anatomical movement: cervical extension
Recommended testing position: Sitting, with thoracic and lumbar spine well supported by the back of a chair. A tongue depressor may be held between teeth for reference
Stabilization: The shoulder girdle is stabilized to prevent flexion of the thoracic and lumbar spine
Center: Over an external auditory meatus
Proximal arm: Perpendicular or even parallel to the floor.
Distal arm: With a base of nares or even parallel to the longitudinal axis of a tongue depressor
Normal range: 0 degrees to 70 degrees - Anatomical movement: Lateral flexion
Recommended testing position: Sitting, with thoracic and lumbar spine well supported by a back of a chair. The cervical spine is 0 degrees of flexion, extension, and rotation. A tongue depressor may be held between teeth for reference.
Stabilization: The shoulder girdle is stabilized to prevent lateral flexion of the thoracic and lumbar spine
Center: Over the spinous process of C7
Proximal arm: Spinous processes of thoracic vertebrae thus that arm is perpendicular to the floor.
Distal arm: Dorsal midline of the head. Reference occipital protuberance.
Normal range: 0 degrees to 45 degrees - Anatomical movement: Cervical rotation
Recommended testing position: Sitting, with thoracic and lumbar spine well supported by the back of a chair. A cervical spine in 0 degrees of flexion, 0 degrees of extension, and 0degree of the lateral flexion. A tongue depressor may be held between teeth for reference.
Stabilization: The shoulder girdle is stabilized to prevent rotation of the thoracic and lumbar spine.
Center: Over the center of the cranial aspect of the head
Proximal arm: Parallel to the imaginary line between the two acromial processes
Distal arm: With the tip of a nose. If using a tongue depressor, then parallel to a longitudinal axis of the tongue depressor.
Normal range: 0degrees to 90 degrees
Passive Cervical range of motion exercise
The passive range of motion exercise is very useful for the cervical spine that has become inactive due to an injury or a paralysis attack. In the passive range of motion exercises, a patient does not perform any type of motion themselves; instead, the physiotherapist or caretaker moves the stiff cervical joint, gently stretching muscles and reminding them how to move correctly. In most cases, therapeutic stretching exercises are also combined with a passive range of movement exercises to promote faster recovery of a stiff or flaccid cervical spine. Here, a physical therapist stretches the soft tissue of the cervical to relax the surrounding muscles and relieve tension. A passive range of motion exercises also helps in minimizing stiffness, rigidity, or flaccidity in the cervical spine that has been immobilized.
The most common as well as safest passive range of motion(PROM)exercises are related to stretching the surrounding muscles with the goal to increase muscle flexibility. A most common way to do this exercise is with the use of a tool, such as the stretching strap. This will help a patient to hold the stretch for a more sustained period of time, but having a physical therapist who assists with the stretch is a more beneficial way to practice passive range of motion(PROM) exercises. With this type of exercise, a trained professional moves the body into the stretch and holds it, with the intent to increase muscle flexibility.
This is superior for a few reasons.
The first one is the physical therapist understands proper limits as well as knows how far to go.
The second one is the physical therapist knows how long to hold the stretch.
The last one is clinicians are also trained to know if it is targeting proper areas to achieve more benefits. With that in the mind.
In which conditions the therapist should apply a passive range of motion exercise
Passive range of motion exercises is mainly used when there is a paralysis attack, when the patient is comatose, in a presence of a healing fracture, or if the pain is elicited during the active muscle contraction. One of the chief goals of the passive range of motion exercise is to counteract the negative effects of immobilization. However, this is mandatory to remember that the passive range of motion exercise cannot prevent muscle atrophy.
Some benefits of a passive range of motion exercise
Passive range of motion exercise not only assists in promoting healthy joint functionality but also benefits a patient in reducing pain, improving healing, restoring and maintaining range of motion in the cervical spine, and building muscle mass, allowing for great blood flow and assisting in improving oxygen levels as well.
Some guidelines for passive range of motion exercise for the cervical spine
- Passive range of motion may be done in a supine or in the sitting position.
- Support the weight of a leg at all times while performing the cervical spine movement.
- Support above as well as below the cervical spine a patient is moving.
- Keep the motion slow as well as smooth.
- Do not force the motion if the cervical muscle or cervical joint is stiff.
- The physical therapist should move only as much as the cervical muscle or cervical joint will allow.
- The passive range of motion should be pain-free, if cervical motions cause pain, stop and let the therapist know.
Cervical Range of Motion Exercises
Passive cervical flexion
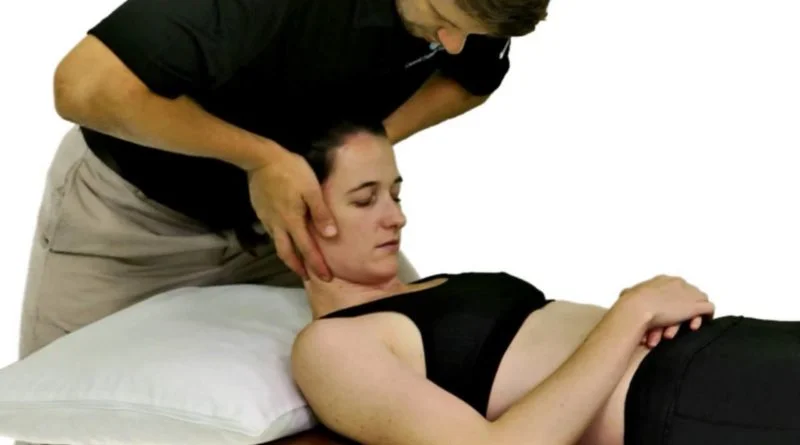
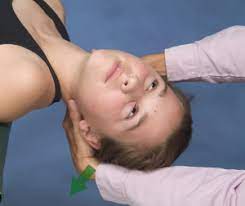
First of all, the therapist tells the patient to take a relaxed position, such as supine. After that, the therapist grasps the cervical spine with one hand, and with the second-hand place on the head. Then, the therapist moves the neck towards the chest side. Next, do this exercise ten times per session. Do three sessions in one day.
Passive cervical extension
To begin with, a physical therapist should tell a patient to take a comfortable position, such as supine. Then, a physical therapist grasps the cervical spine with one strong hand, and the second hand placed on the head. After that, a physical therapist moves the neck away from the chest side. Next, do it ten times in one session. Do three sessions per day.
Passive cervical left side lateral flexion
To embark with, the physical therapist should tell the patient to take a relaxed position, such as supine. After that, the therapist grasps the cervical spine with one hand, and the second hand is placed on the head. Next, the therapist moves the neck towards the left shoulder side. Then, perform this exercise ten times per session. Do it in three sessions in one day.
Passive cervical right-side lateral flexion
First of all, a therapist should tell a patient to take a comfortable position, such as supine. Then, a physical therapist grasps the cervical spine with one strong hand and the second-hand place on the head. After that, a physical therapist moves the neck towards the right shoulder side. Next, do it ten times in one session. Do three sessions per day.
Passive cervical right-side rotation
To embark with, the physical therapist should tell the patient to take a relaxed position, such as supine. Next, the therapist grasps the cervical spine with one hand, and the second hand is placed on the head. Then, the physical therapist rotates the neck right side meaning towards the right shoulder side. After that, do it ten times per session. Do three sessions in one day.
Passive cervical left side rotation
To start with, a therapist should tell a patient to take a comfortable position, such as supine. After that, a physical therapist grasps the cervical spine with one hand, and a second hand is placed on the head. Next, a therapist rotates the neck left side meaning towards the right shoulder side. Do it ten times in one session. Do three sessions per day.
Active-assisted range of motion exercise
- As the name suggests, these exercises mainly involve partial assistance from the therapist or from the patient himself/herself or with the use of a tool, namely a band or a strap. A patient does most of the movements, but he/she gets little assistance to complete the cervical motion correctly. Commonly in the major cases, these restricted cervical movements are the result of the weakness or even pain caused because of falls, bruises, or even accidents, up to severe injuries. A physical therapist mostly uses the strap or the band to secure the cervical spine before helping in the movement. In the beginning, the patient can suffer a great deal of pain and weakness when performing these cervical spine exercises, but with time, the patient has a great scope for gradual and lasting improvement in the range of motion around the cervical joint.
Some benefits of the cervical active-assisted range of motion exercise
- Increase movement of the cervical spine.
- Improve the function of the cervical spine.
- Increase cervical spine movement efficiency.
- Increase independence.
- Decrease neck pain.
- Improve and maintain Neck integrity.
How does the patient get started?
Learn an active-assisted range of motion exercises for the cervical spine from the patient’s home health care. Practice exercises with the assistance of a patient’s home-health therapist. The physiotherapist can instruct the patient on correct handholds as well as help the needs of a patient. A physical therapist can also show the easiest way to do all these exercises so the patient does not get hurt or tired. Find a comfortable position for the patient. Most of the patients prefer to use a bed for exercising with support.
Do all cervical range of motion exercises slowly, smoothly, as well as gently. Never force jerk or even over-stretch the muscles of the cervical. This may hurt the muscle or the joint instead of helping. Move the cervical joint only to the point of resistance. This is the point where the patient cannot bend the joint any further. Stop cervical range of motion exercises if the patient feels pain while performing the movement. Ask a physiotherapist to tell the patient right away if he/she feels increased pain and soreness that does not stop after ceasing any exercise. Cervical range of motion exercises can cause mild symptoms, but again, should subside quickly. Try to do these exercises again by modifying the physiotherapist’s assistance level; this can reduce the soreness noted with the exercise.
Active Assisted Cervical Range of motion Exercises
Active-assisted cervical flexion
To begin with, a physical therapist should tell a patient to take a comfortable position, such as supine or sitting with a supported back. Then, a physical therapist grasps the cervical spine with one strong hand and the second-hand place on the head. After that, the therapist should give the command to the patient to move the head towards the chest side, when the patient stops performing this movement, then the therapist assists in completing the full range of the cervical spine. Do it ten times per session. Do this exercise three sessions per day.
Active-assisted cervical extension
To embark, the therapist should tell the patient to take a relaxed position, such as supine or sitting with a supported back. After that, the therapist grasps the cervical spine with one hand, and the second hand is placed on the head. Then, a physical therapist should give the command to a patient to move the head away from the chest, meaning move the head towards the sky, when a patient stops doing cervical extension movement, then a physiotherapist aids in completing the full range of the cervical extension motion. Do it ten times in one session. Do this exercise in three sessions in one day.
Active-assisted cervical left side lateral flexion
First of all, the therapist should tell the patient to take a relaxed position, such as supine or sitting with a supported back. After that, the physiotherapist grasps the cervical spine with one hand, and the second hand is placed on the head. Next, a physical therapist should give the command to a patient to move the head left shoulder side, when a patient stops to perform the cervical side flexion movement, then the physical therapist helps in completing the full range of the cervical side flexion. Do it ten times in one session. Do three sessions in one day.
Active-assisted cervical right-side lateral flexion
To begin with, the physiotherapist should tell the patient to take a relaxed position, such as supine or sitting with the back supported. After that, a physical therapist grasps a cervical spine with one hand, and the second hand is placed on the head. Then, the therapist should give a command to the patient to move the head right shoulder side, when the patient stops to do the cervical right side flexion motion, then a therapist assists in completing the full range of the cervical right side flexion. Do it ten times per session. Do three sessions per day.
Active-assisted cervical left side rotation
First of all, the physiotherapist should tell the patient to take a relaxed position, such as supine or sitting with a supported back. After that, the therapist grasps the cervical spine region with one hand, and the second hand is placed on the head. Next, the therapist should give the command to the patient to rotate the head towards the left shoulder, when the patient stops doing the cervical left side rotation motion, then the therapist assists in completing the full range of the cervical left side rotation. Do it ten times per session. Do three sessions per day.
Active-assisted cervical right-side rotation
To begin with, the therapist should tell a patient to take a comfortable position, such as supine or sitting with the back supported. Next, a physical therapist grasps the cervical spine region with a strong hand, and the second hand is placed on the head. After that, a physical therapist should give a command to a patient to rotate the head right shoulder side, when a patient stops to perform the cervical right-side rotation motion, then a physical therapist helps in completing the full range of the cervical right-side rotation. Do it ten times in one session. Do three sessions in one day.
Active Cervical Range of motion exercise
What is an active range of motion exercises?
This type of exercise assists in increasing joint function. The range of motion is how far the patient can move the joints in various directions. These exercises assist the patient in moving the cervical through its full range of motion. Motion can help to keep the cervical joints flexible, decrease pain, and increase balance as well as strength.
What does the patient need to know about active range of motion exercises?
Do these exercises the physical therapist teaches a patient about active range of motion exercise. Practice these exercises with a healthcare provider before the patient tries them by himself. Cervical ROM exercises do every day, or as often as directed by the healthcare provider. Do cervical joint exercises in the same order every day. Go from flexion to extension to side flexion on both sides to rotation on both sides to help a patient to remember the series of moves. Move slowly, gently, as well as smoothly. Avoid fast or even jerky movements. Stop if the patient feels pain. It is absolutely normal to feel some discomfort during the movement at first. Regular exercise may help to decrease discomfort over time.
Some benefits and instruction of active range of motion exercise
- The patient has been provided with these exercises to assist in improving the neck stiffness as well as pain condition.
- These exercises are intended as a guide as well as prior to embarking the patient should have had some instruction from the physiotherapist or medical professional.
- If the patient experiences worsening symptoms while completing these exercises the patient may want to seek guidance from the physiotherapist.
- Progress at the patient’s own pace, as the pain or stiffness, allows, under the supervision or guidance of a physical therapist or medical professional.
Cervical Range of motion Exercises
The cervical extension(looking up)
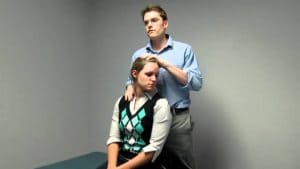
First of all, the patient should sit upright with the shoulder blades squeezed together. After that, the therapist should give the instruction to the patient that looks up towards the roof and stretch the head backward. Go as far as comfortable then return to the embarking position. Remember to perform this at a relatively moderate pace (the patient is trying to get the joints/muscles moving). If the patient feels severe pain then the therapist has gone too far; a mild to moderate dull ache is normally felt initially. Gradually pain as well as a range of motion should improve the more the patient does the exercise over the coming days or weeks. Repeat 10 times in one session. Do three sessions per day.
Cervical flexion(looking down)
To begin with, the p-patient should sit upright with the shoulder blades squeezed together. Then, the therapist should give the instruction to the patient that bends the head forward until he/she feels the stretch behind the neck. Go as far as comfortable after that and return to the beginning position. Remember to perform this at a relatively moderate pace the patient is trying to get the joints/muscles moving). If the patient is feeling severe pain then the therapist has gone too far; a mild to moderate dull ache is normal in the starting. Do ten repetitions per session. Do three-session per day.
Cervical right-side rotation(looking over the shoulder)
To embark with, the therapist should tell the patient to sit upright with the shoulder blades squeezed together and hold onto the chair with both hands to fix the shoulders down. Then, the therapist instructs the patient to rotate the neck towards the right side so the patient is looking over the right shoulder. Go as far as comfortable and then return to the beginning position. Remember to perform this at a relatively moderate pace (the patient is trying to get the joints/muscles moving). If the patient feels severe pain the therapist has gone too far; a mild to moderate dull ache is normal at the beginning. Do ten repetitions. Do three sessions in one day.
Cervical left side rotation(looking over the shoulder)
First of all, a physical therapist should tell a patient to sit upright with shoulder blades squeezed together and hold onto a chair with both hands to fix the shoulders down. After that, a physical therapist instructs a patient to rotate the left side to the neck towards the left side so a patient is looking over the left shoulder. Go as far as comfortable and after that return to the starting position. Remember to perform this at a relatively moderate pace (a patient is trying to get joints/muscles moving). If a patient feels severe pain a therapist has gone too far; a mild to moderate dull pain is normal at the starting. Do ten repetitions in one session. Do three sessions per day.
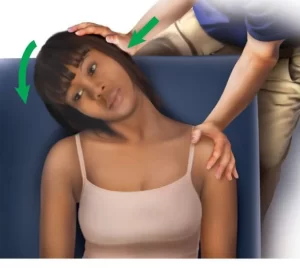
Cervical left side lateral flexion(ear to shoulder)
To begin with, the therapist tells the patient to sit upright with the shoulder blades squeezed together and hold onto the chair with both hands to fix the shoulders down. Then, the therapist gives the command to the patient that bends the neck to the side bringing the left ear towards the left shoulder. Go as far as comfortable, and after that return to the embarking position. Remember to perform this at a relatively moderate pace (the patient is trying to get the joints or muscles moving). If the patient feels severe pain the therapist may have gone too far; a mild to moderate dull pain is normal at the starting phase. Do ten repetitions per session. Do three sessions per day.
Cervical right-side lateral flexion(ear to shoulder)
To embark with, a physical therapist tells a patient to sit upright with shoulder blades squeezed together and hold onto a chair with both hands to fix the shoulders down. After that, a physical therapist gives a command to a patient that bends the neck to the side bringing the right ear towards the right shoulder. The patient should go as far as comfortable, then return to the starting position. Remember to do this at a relatively moderate pace (a patient is trying to get the joints or muscles moving). If a patient feels severe pain, the therapist may have gone too far; a mild to moderate dull pain is normal at the initial phase. Do ten repetitions in one session. Do three sessions in one day.