Bulbar palsy
Table of Contents
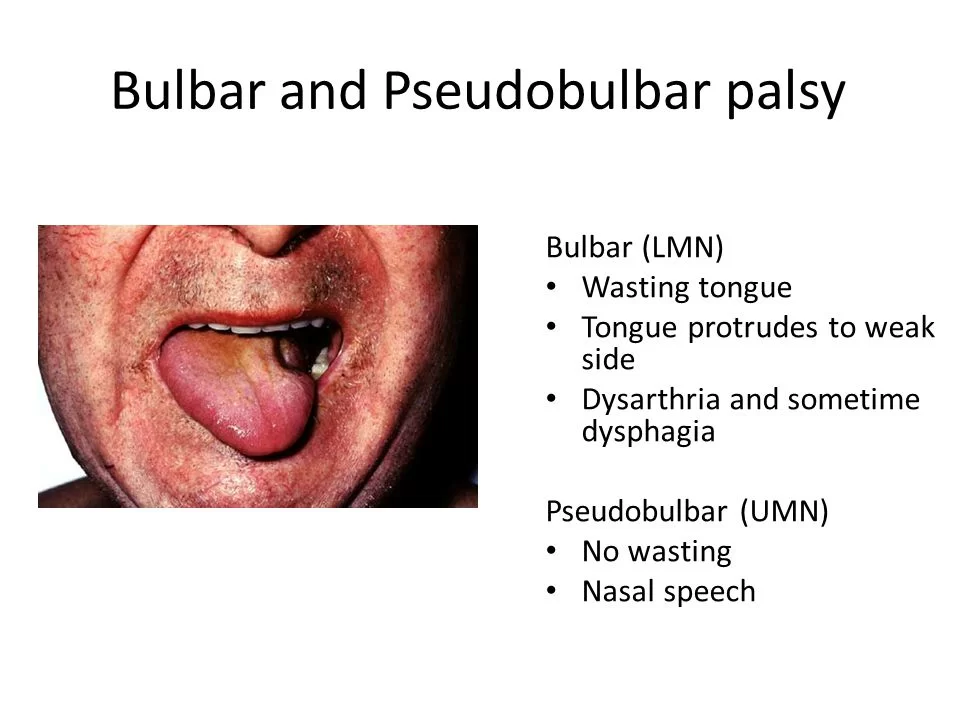
What is Bulbar palsy?
- Bulbar palsy (or bulbar weakness) tends to bilateral impairment of the function of the lower cranial nerves 9,10,11,12. which occurs due to lower motor neuron lesions either at a nuclear or/and fascicular level in the medulla or from bilateral contusion of the lower cranial nerves outside the brainstem.
- Bulbar weakness is usually affixed with difficulty in chewing, weakness of the facial muscles, dysarthria, palatal weakness and regurgitation of fluids, dysphagia, and dysphonia.
- Damage to lower motor neurons can result in a large collection of symptoms based on the cranial nerve that is damaged. cranial nerve 9 the glossopharyngeal nerve is included in salivation, swallowing, and the gag reflex. If cranial nerve 9 is injured, it can lead to difficulty swallowing also termed dysphagia, and a reduced gag reflex. Common signs and symptoms of damage to the other cranial nerves involve difficulty chewing, nasal regurgitation, slurred speech, difficulty in handling secretions, aspiration of secretions, altered vocal ability termed as dysphonia, and difficulty articulating words dysarthria.
- Other signs connected with bulbar palsy involve nasal speech that lacks modulation controlling or adjusting one’s speech, difficulty with all consonants, an atrophic wasting tongue, drooling of saliva, weakness of the jaw and facial muscles, a normal or absent jaw jerk upward jerk of the jaw upon fascinating the chin and an absent gag reflex.
Sign of Bulbar palsy
- dysphagia– difficulty in swallowing
- difficulty in chewing.
- nasal regurgitation.
- difficulty in handling secretions, including the aspiration of liquids.
- difficulty breathing airway obstruction
- dysphonia defective use of the voice, and not able to produce sound due to laryngeal weakness.
- dysarthria is difficulty in articulating words due to a CNS problem, such as slurred speech
- choking on liquids
Symptoms of Bulbar palsy
- flaccid paralysis, similarly soft palate weakness
- muscle atrophy, such as tongue atrophy with fasciculations.
- nasal speech lacking in modulation and difficulty with all affricate.
- drooling of saliva.
- normal or absent jaw jerk.
- decrease or absent gag reflex.
- there may be lower motor neuron lesions in the extremity.
- The ocular muscles are spared
Causes of Bulbar palsy
- Genetic: Kennedy’s disease, acute intermittent porphyria.
- Vascular causes: medullary infarction, like lateral or medial medullary infarction.
- Degenerative diseases: amyotrophic lateral sclerosis, syringobulbia, and, Wolfram syndrome.
- Inflammatory/infective: Guillain–Barré syndrome, poliomyelitis, Lyme disease.
- Cancer: brainstem glioma, malignant meningitis.
- Toxic: botulism, the venom of bark scorpion species Centruroides, some neurotoxic snake venoms.
- Autoimmune: myasthenia gravis.
Mechanism of the bulbar palsy
- Bulbar palsy includes problems with the function of the glossopharyngeal nerve, the vagus nerve, the accessory nerve, and the hypoglossal nerve. These all appear from pathways in the medulla oblongata.
- A lower motor neuron lesion can diminish their function
Diagnosis of bulbar palsy
- Diagnosis of bulbar palsy is done by examining the glossopharyngeal, vagus, accessory, hypoglossal nerve
- glossopharyngeal nerve: The glossopharyngeal nerve provides a sensory supply to the palate. It can be examined with the gag reflex by touching the pharynx with a tongue depressor or by touching the arches of the pharynx.
- vagus nerve: The vagus nerve gives motor supply to the pharynx. To examine the vagus nerve, ask the patient to say “AH,” which will create the pharynx to elevate, and observe the position of the uvula. When the palatal muscles work properly, the “AH,” sound should be listen clearly and the uvula should not move to one side either right or left.
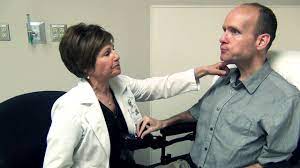
- accessory nerve: The accessory nerve provides motor supply to the sternocleidomastoid and trapezius muscles. Ask the patient to shrug their shoulders and turn their head in opposition to resistance. The common abnormalities include lower motor neuron lesions which produce weakness of both muscles on the same side and upper motor neuron lesions which produce ipsilateral sternocleidomastoid weakness and contralateral trapezius weakness, because of different sources of cerebral innervation.
- hypoglossal nerve: The hypoglossal nerve gives motor supply to the muscles of the tongue. Examine for fasciculation at rest, and ask the patient to stick their tongue out. side If the tongue deviates to either side right or left, it suggests a weakening of the muscles on that appropriate side.
- When the tongue deviates on protrusion either right or left, this indicates peripheral nerve damage on the side where the tongue is deviated either right or left. The common abnormalities involve peripheral lesions that affect the nerve, brain metastases, and motor nerve damage from cancer or/and trauma
Exercise of bulbar palsy
Dysphagia ( difficulty in swallowing )
Effortful Swallow

- Step 1: Gather the saliva in the mouth in the middle of the tongue.
- Step 2: Keep the lips pressed together.
- Step 3: Swallow all the salivary secretion at once like you’re swallowing a grape or/and a pill.
Dynamic Shaker
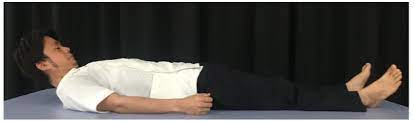
- Step 1: Lie on your back on a flat surface or treatment table. Make sure the shoulders have opposed the surface and do not use a pillow or/and headrest.
- Step 2: To manage the shoulders on the surface, lift the chin as if you’re trying to look at your feet.
- Step 3: Lower the head back down to the surface.
- Step 4: Repeat 30 times. Then rest for 2 minutes. Repeat as many times as indicated by a therapist.
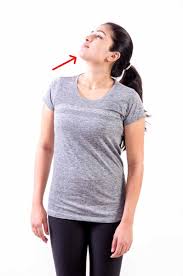
Jaw Thrust
- Step 1: Push the lower jaw as far front side as possible, placing the lower teeth in front of your upper teeth.
- Step 2: Hold the position for the amount of time determined by the doctor or/and physical therapist.
- Step 3: Repeat as many times as indicated by the doctor or physical therapist.
Masako Maneuver

- Step 1: Stick your tongue out of the mouth.
- Step 2: Bite down slightly on the tongue to keep it in place.
- Step 3: Swallow while holding the tongue in the middle of the teeth.
- Step 4: Release your tongue. Then, repeat as many times as indicated by a doctor or therapist.
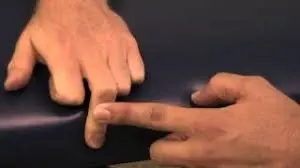
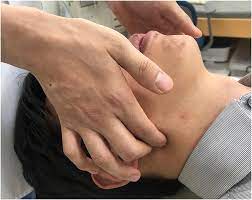
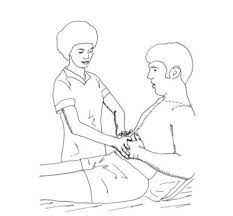
Mendelsohn Maneuver
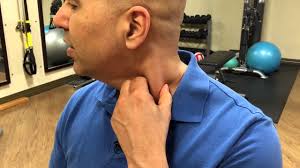
- Step 1: Press the index, middle, and ring finger of one hand on the neck to locate your apple—the small bump or/and simply the skin on the front of the neck beneath the chin.
- Step 2: Swallow once, noticing how the apple moves upward and downward when you swallow.
- Step 3: Swallow again, but this time, squeeze the throat muscles to hold the apple at its highest point.
- Step 4: Hold it for as long as indicated by the therapist, or as long as you can if you can’t yet hold it for that long.
Supraglottic Maneuver
- Step 1: Collect a bit of saliva in the mouth.
- Step 2: Take a deep breath like inhalation and hold that inhalation.
- Step 3: Swallow while holding your breath.
- Step 4: Immediately after swallowing, cough.
- Step 5: Once you have swallowed down with saliva, you can try the food or drink, at the direction of a therapist.
Hyoid Lift Maneuver

- Step 1: collect materials like a drinking straw, pieces of paper towel, and a cup. You can start with 3 to 5 pieces of paper and work up to ten times as your strength accelerate.
- Step 2: Place the straw in the mouth.
- Step 3: Suck with the straw, picking up a piece of paper with the suction that hammers.
- Step 4: Keep the suction strong enough to obtain each piece of paper over to a cup.
- Step 5: Stop sucking and let the paper fall down into the cup.
- Step 6: Repeat until all pieces of paper fall down in the cup.
Dysarthria
- Postural adjustments, such as sitting upright enhance breath support for speech.
- Inhaling deeply prior onset of speech vocalization is named preparatory inhalation.
- Use optimal breath groups when speaking, so for each breath, speak solely the number of words that can be created with ease.
- Use expiratory muscle strength training to develop the strength of the expiratory muscles. The patient blows into a pressurized device with sufficient effort to pass a preset threshold.
- Use inspiratory muscle strength training to develop the strength of the inspiratory muscles to allow better prolonged or repeated inhalations. The patient uses a handheld instrument like spirometry that is set to need a minimum inspiratory pressure for inspiration to continue.
- Use maximal vowel prolongation exercises to enhance the length and volume of speech.
- Use controlled exhalation exercises, where the air is exhaled slowly over a period to improve control of exhalation for speaking.
- Use speechless exercises to improve subglottal air pressure and respiratory support, for occurrence, blowing into a water glass manometer.
- Respiratory muscle strength training has been activated to be effective in the treatment of dysarthria.
Tips for speaking
- Speak slowly and loudly.
- Start with a topic word or/and name, so listeners know what you want to talk about.
- Avoid talking when you feel tired.
- Pause frequently.
- Use shorter sentences.
- analyze to make sure your listeners understand.
- Write or/and draw if you are having difficulty talking.
Strategies for Clear Speech:
- Think SLOW. The slower you speak, the simple it is for others to know you. This also permits time for the tongue, lips, and other fabricators to get where need to for assured speech sounds.
- Open your mouth and OVER utter the words.
- Make sure you are face-to-face with your listener and use motion and eye contact to add to the message.
- Reduce or/and eliminate background noise. Turn the TV or radio volume low when you are about to speak to someone.
- give the listener the situation. This aids to prepare the listener to expect certain words.
- Do not be afraid to repeat the words yourself if someone does not understand you the first time.
- Using the strategies which mention above, practice the following 3-4 times a day.
- PRACTICE saying Days of the Week
- PRACTICE counting 1-20
- PRACTICE saying favorite sports teams
- PRACTICE saying “My name is ”
- PRACTICE saying Months of the Year
- PRACTICE saying the alphabet “A, B, C, D, E, etc”
- PRACTICE saying “My birthday is ”
- PRACTICE saying different holidays (Thanksgiving, Christmas)
- PRACTICE saying names of family members
- PRACTICE saying particular sounds with extra strength: “P”, “B”, “K”, “G”
- PRACTICE saying common sentences and phrases you say repeatedly
Breath Control Exercises
- Breath in slowly for 3 seconds
- Hold your breath for 3 seconds
- exhale the air slowly for 3 seconds
- Continue breathing in this controlled manner
- Now, when you exhale the breath, hold out these sounds for as long as you can:hhh, ss,thh,ff, shh
- Now, add vowels to the end of the sounds and hold them out for as long as you can: haha,hhoe,hhi, how, who,ssah, so, see,ssow, issue,thhaw,thho,thhe,thhow,thhew,ffa,ffoe,ffee,ffow,ffoo, shh, shhow, shhe, shho,shhoe
Hyperadduction Exercises
- Patients with hyperadduction of the verbal folds may present with abnormal verbal quality and too much loudness. Treat by proceeding with light articulatory contacts and easy phonation.
- Light Sounds like ha, how, hoe, he, hi, who, hey, hall, hose, hot, hole, hear, hug, ham
Diaphragmatic Breathing
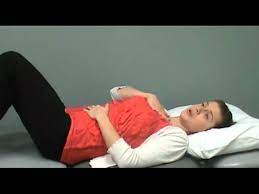
Patient Instructions:
- Put one hand on the stomach and your other hand on the chest. Feel your stomach elevate and fall with each breath. Continue for one minute.
- When you breathe in inhale: the stomach pushes out. The hand on the chest should persist still.
- When you breathe out exhale: Tighten the stomach muscles and feel them pull in. The hand on the chest should persist still.
- Breathe in, feeling your stomach push out. As you breathe out exhale, say the following sounds and words, remaining aware of the stomach slowly pulling in.
- Start breathing with simple sounds like “sss” and “shh”
- slightly work up to vowel sounds like “ahh” and “ooh”
- task up to single words like “hello” and your first name
- slightly work up toward longer words, phrases, and sentences
Pursed lip breathing

- Improves ventilation
- Releases trapped air in the lungs
- carry the airways open longer and decelerate the work of breathing
- continuous exhalation to slow the breathing rate
- enhances breathing patterns by moving old air out of the lungs and allowing new air to enter the lungs
- Relieves shortness of breath
- Create general relaxation
Pursed lip breathing technique
- Relax your neck and shoulder muscles.
- Breathe in (inhale) slowly over your nose for 2 counts, keeping your mouth closed. Do not take a deep breath inhale; a normal breath pattern will do. breathe in may help to count to yourself for inhale, 1, 2.
- Pucker or/and “purse” you’re lips as if you are going to whistle or slightly flicker the flame of a candle.
- Breathe out (exhale) slowly and slightly through the pursed lips while counting to 4. Breathing out may help to count to yourself for exhale, one, two, three, four.
Pursed lip breathing reminders
- Do not force the air out.
- Always breathe out and exhale for longer than you breathe in and inhale.
- Breathe slowly, and easily, and relaxed in and out until you are in complete control.
- Use pursed lip breathing during the difficult part of any activity
- Practice the pursed lip breathing 4-5 times a day at first so you can get the correct breathing pattern.
segmental breathing
- it will be important to emphasize the expansion of problems areas of the lung and chest wall
lateral costal expansion
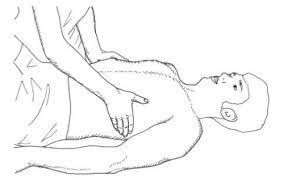
- lateral costal expansion sometimes called lateral basal expansion may be done unilaterally or bilaterally
- the patient is in a sitting or in a hook lying position
- place your hands along the lateral aspect of the lower ribs to fixate the patient’s concentration on the areas at which movement is to occur
- ask the patient to exhale and feel the rib cage move downward and inward
- as the patient exhales place the firm downward pressure into the ribs with the palm of your hands
- just prior to inspiration, apply quick downward and inward stretch to the chest, this placement is quickly stretch on the external intercostal to facilitate their contraction
- external intercostal muscles move the ribs outward and upward during inhalation
- ask the patient to expand their lower ribs against your hands as he or she inhales
- apply gentle manual resistance to the lower rib area to increase sensory awareness as the patient inhale and the chest expands and the ribs flare
- then again as the patient exhales, assist the patient by squeezing the rib cage in a downward and inward direction
- then when the patient is taught to perform this maneuver independently, he/she may place the hand over the ribs or apply resistance using a belt
posterior basal expansion

- the patient has to sit and leaned forward on a pillow, slightly bending the hips
- place your hands over the posterior aspects of the lower ribs
- ask the patient to exhale and feel the rib cage move downward and inward
- as the patient exhales place the firm downward pressure into the ribs with the palm of your hands
- just prior to inspiration, apply quick downward and inward stretch to the chest, this placement is quickly stretch on the external intercostal to facilitate their contraction
- external intercostal muscles move the ribs outward and upward during inhalation
- ask the patient to expand their lower ribs against your hands as he or she inhales
- apply gentle manual resistance to the lower rib area to increase sensory awareness as the patient inhale and the chest expands and the ribs flare
- then again as the patient exhales, assist the patient by squeezing the rib cage in a downward and inward direction
- then when the patient is taught to perform this maneuver independently, he/she may place the hand over the ribs or apply resistance using a belt
right middle lobe or lingula expansion
- the patient is sitting on the chair
- place your hands on either right or the left side of the patient’s chest just below the axilla
- ask the patient to exhale and feel the rib cage move downward and inward
- as the patient exhales place the firm downward pressure into the ribs with the palm of your hands
- just prior to inspiration, apply quick downward and inward stretch to the chest, this placement is quickly stretch on the external intercostal to facilitate their contraction
- external intercostal muscles move the ribs outward and upward during inhalation
- ask the patient to expand their lower ribs against your hands as he or she inhales
- apply gentle manual resistance to the lower rib area to increase sensory awareness as the patient inhale and the chest expands and the ribs flare
- then again as the patient exhales, assist the patient by squeezing the rib cage in a downward and inward direction
- then when the patient is taught to perform this maneuver independently, he/she may place the hand over the ribs or apply resistance using a belt
apical expansion
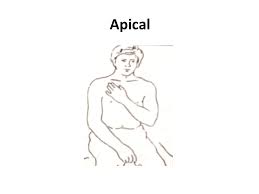
- the patient is sitting position
- apply the pressure below the clavicle with the fingertip
Glossopharyngeal breathing
- glossopharyngeal breathing is a means of increasing the patient’s inspiratory capacity when there is severe weakness in the muscle of inspiration
- it is taught to that patients who have difficulty in taking deep breathing and who can develop respiratory muscle problems due to weakness of that muscles
- the patient takes in several gulps of air then the mouth is closed and the tongue pushes the air back and trape in the pharynx, then the air is forced to the lungs while the glottis is opened
- this accelerates the depth of the inhalation and the patient’s vital capacity
preventing and relieving shortness of breath
- it is useful when the normal breathing pattern is interrupted and difficulty in breathing or shortness of breathe
- the patient assumes a relaxed, forward-bent posture
- this position stimulates diaphragmatic breathing
- use bronchodilators as prescribed
- have the patient gain control of his/her breathing and reduce the respiratory rate by using pursed lip breathing during exhalation
- be sure that the patient does not use forceful expiration
- have the patient emphasize the expiratory phase of breathing
- after each pursed lip exhalation the patient has to breathe diaphragmatically and avoid the use of accessory muscle
- have the patient remain in this posture and continue to breathe in a relaxed manner as possible
Exercise for trapezius muscle
Shoulder blade squeeze
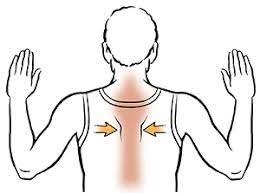
- trying to get a large trapezius, you need exercises to help the trapezius, stabilizing the shoulder and upper back to regain the strength of the trapezius
- Squeezing the shoulder blade is an easy way.
- Stand with good posture.
- Slowly squeeze the shoulder blades muscle together and hold for 3 seconds.
- Slowly release the shoulder blades muscles back to their relaxed positions.
- This exercise can also be done using cables, a resistance band, or/and holding your arms out front in a goal post position.
Shoulder Shrug

- Stand up with good posture.
- Raise your shoulders as high as you can get the shoulder as if attempting to touch your ears with your shoulders.
- Hold for a count of 2.
- Release the shoulders back into their relaxed positions.
- Repeat 20 times
Upright row
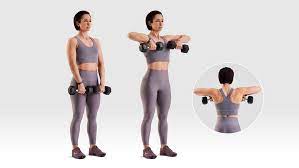
- the upright row is a trendy exercise for strengthening the trapezius muscles. You can also try an upright row with dumbbells or a barbell in your hands in the progression stage.
- Stand up straight.
- With your hand clenched, pull up your hand as high as you can while bending your elbows, keeping your hands close to the front of your body.
- Hold for a count of two.
- Release your arms back into a relaxed position, hands still clenched.
- Repeat 20 times.
Pushup
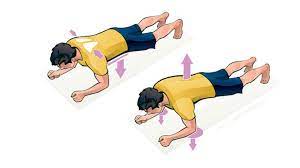
- There are a few different innovations of the push-up. Do the push-up which is easiest for you: variations of the push-up, A standard pushup, a pushup while kneeling on the floor, or a standing pushup in opposition to a wall.
- Put your hands flat on the floor or/and the wall.
- Lower the body toward your hands while keeping your back straight and your stomach tight. Do not let your head drop down; keep your neck in line with the rest of your spine.
- Lower your body until you’re close to the floor or/and the wall, and then push back into an upright position. Inhale as you push down and exhale as you push up.
Sternocleidomastoid exercise
- Before performing the Sternocleidomastoid stretches, loosen up the tight neck muscle first with the following 2 release techniques.
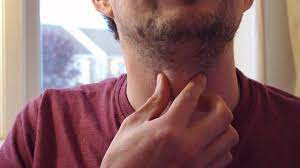
SCM release
Instructions:
- Locate the Sternocleidomastoid muscle.
- You should be able to feel a prominent band of muscle on each side of the neck either right or left.
- Do not press too deep as you may hit other sensitive structures of the neck.
- slightly massage sternocleidomastoid muscles with a pinch grip.
- Make sure to cover the all-over length of a muscle.
- Duration: 1 minute per side.
SCM glides
Instructions:
- Make a slight fist with the hand.
- angle the head towards the opposite side.
- Place the back part of the fingers opposite the side of the neck.
- Apply firm pressure to the muscle.
- Starting at the collar bone, perform slowly upwards praise towards the area back of the ear.
- Perform 5-10 strokes.
SCM stretch
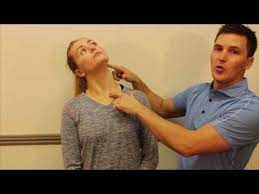
- Sit in front of a table.
- Keep your chin in and down throughout the SCM stretch.
- Put the left hand on the left side of the chin.
- Place your left elbow on the table in front of you.
- Rest the weight of your head onto your hand.
- Tilt the head to the left.
- Apply further pressure to the chin to accelerate the stretch.
- Aim to feel a firm stretch on the right side of the neck.
- Hold for 30 seconds.
- Perform on the other side.
another technique of SCM stretch

- Tuck your chin in and downwards.
- Tilt your head to the left.
- Place the opposite hand on the opposite side of the head.
- Apply downward pressure.
- gently turn the head to the right side.
- goal to feel a firm stretch in the right Sternocleidomastoid.
- Hold for 30 seconds.
- Repeat on another side.
stretch variation
- Place your fingers on top of the right collarbone.
- Pull the skin downwards.
- Tuck your chin in and down.
- Slowly turn the head on the way to the right side.
- Tilt the head towards the left side.
- goa to feel a stretch on the right Sternocleidomastoid.
- Hold for 30 seconds.
- Repeat on another side
Chair lean
- Sit down on a chair.
- Using the right hand, hold onto the side of the chair.
- Keep the shoulder completely relaxed.
- Lean your body completely towards the left.
- Tuck your chin in and downwards.
- Tilt your head towards the left.
- Put the opposite hand on the opposite side of the head
- Apply downward pressure.
- goal to feel a stretch on the right Sternocleidomastoid.
- Hold for 30 seconds.
- Repeat on another side
neck Elongation
- Tuck your chin in and downwards.
- Slide your head towards the right side.
- lengthen the right side of the neck in an upwards direction.
- goal to feel a stretch on the right side of the neck.
- Alternate sides.
- Perform 30 repetitions.
FAQs
- How long can you live with bulbar palsy?
The prognosis for bulbar palsy is poor. The symptoms of bulbar palsy gently worsen with onset starting between the ages of 50-70 years
- How do I regain my swallowing reflex?
take a breath and hold your breath very tightly.
do to gargle when holding your tongue back as away as possible.
do to yawn when holding your tongue back as away as possible.
produce a dry swallow, squeezing all the swallowing muscles as tightly as possible. - How fast does bulbar palsy progress?
Typical bulbar onset was analyzed if bulbar onset patients developed progressive limb symptoms and signs within the first six months
- Why is it called bulbar palsy?
The Bulbar relates to the medulla. Bulbar palsy is the result of diseases affecting the lower cranial nerves 9 to 12. A speech deficiency occurs due to paralysis or weakness of the muscles of articulation which are supplied by 9 to 12 cranial nerves.
- can dysphagia heal with exercise?
Many cases of dysphagia can be improved with treatment, Treatments for dysphagia include speech and language therapy to learn new swallowing techniques. changing the texture of the food and liquids to make them safer to swallow