
Trendelenburg Gait
Table of Contents
Definition and description of the Trendelenburg gait
- A unilateral weakness of the hip abductors, most commonly the gluteal muscles, results in the Trendelenburg gait. Damage to the superior gluteal nerve or a lesion in the fifth lumbar spine could be the cause of this weakness.
- It is difficult to support one’s weight on the side affected by this condition. During the stance phase of a normal gait, both lower limbs support half of the body weight.
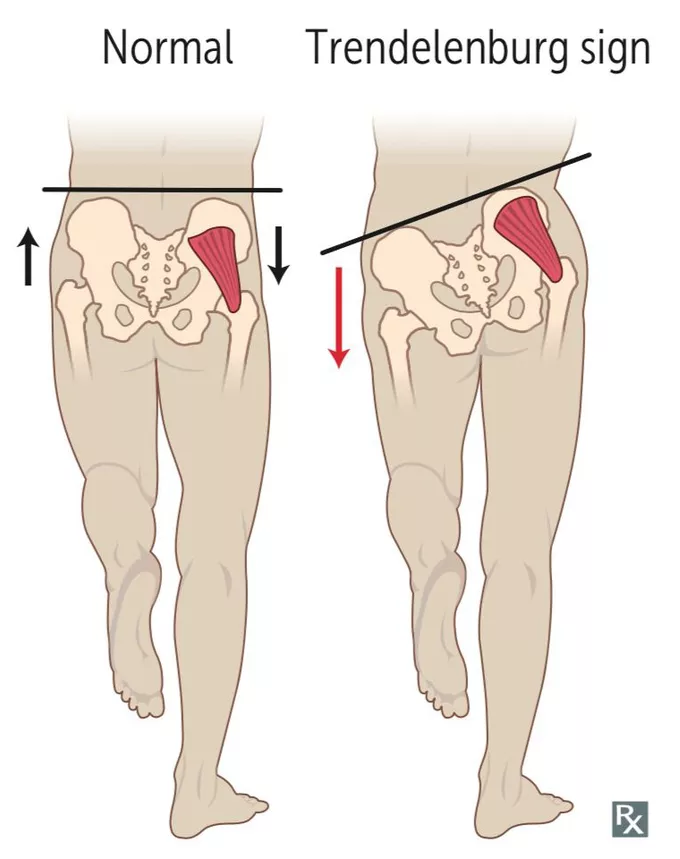
- During the swing phase, when one lower limb is lifted, the other bears the entire weight. The stance phase of gait involves the pelvis hiking up on the non-weight-bearing extremity and tilting downward on the weight-bearing extremity.
- On the other hand, a weak hip abductor causes the non-weight-bearing extremity to tilt downwards rather than upwards. The individual attempts to mitigate this effect by lateral tilting the trunk away from the affected hip. As a result, the person’s center of gravity is primarily on the stance limb, resulting in a reduction in the pelvic drop.
Anatomy Relevant to the Clinic
- The acetabulum and femoral head make up the hip joint. Soft tissues and twenty-two muscles surround these structures. The force and stability required for the femur to move during activity are provided by these muscles.
- The two primary hip abductors, the gluteus medius and gluteus minimus support the opposition of the pelvis and prevent the pelvis from dropping. The L4-S1 nerve roots are what give rise to the superior gluteal nerve. Through the sciatic notch, this nerve leaves the pelvis and supplies the hip joint, gluteus medius and minimus muscles, and tensor fascia lata.
Epidemiology
- With the effort and the load on the same side of the fulcrum, the hip joint and its abductor mechanism operate like a class 3 lever. A positive Trendelenburg gait will result from any pathology of the lever that binds the fulcrum, load, effort, or all three.
- The following conditions result in the fulcrum’s failure:
- Legg-Calve-Perthes disease, osteonecrosis of the hip, developmental dysplasia of the hip, and chronically dislocated hips caused by infections like tuberculosis of the hip are all examples of conditions in which the lever fails:
- Greater trochanteric avulsion presents as a non-union of the femoral neck Coxa Vara Failure of effort in the following circumstances:
- Post total hip arthroplasty Trendelenburg gait occurs when a patient has paralysis or paresis of the hip abductors. Poliomyelitis L5 radiculopathy Superior gluteal nerve damage Gluteus medius and minimus tendinitis Gluteus medius and minimus abscess Gluteus medius and minimus tendinitis Neuronal damage to the superior gluteal nerve, whether from nerve entrapment or iatrogenic factors, may result in hip abductor weakness.
- Patients who have developmental dysplasia of the hip, congenital dislocation of the hip (CDH), congenital coxa vara, or coxa valga secondary to other disorders like Legg-Calvé-Perthes disease, or slipped capital femoral epiphysis, also exhibit the Trendelenburg gait. The abductor’s muscles are normal in these conditions, but they suffer from a mechanical disadvantage. Additionally, patients with slipped capital femoral epiphysis may exhibit Trendelenburg gait due to muscular weakness.
- Trendelenburg’s gait can also be seen following hip replacement surgery and intramedullary femoral fixation. The dissection of the gluteus medius muscle during surgery to expose the hip joint causes Trendelenburg gait in hip replacement patients; accordingly the brokenness in the abductor’s muscles. This goes away as wound healing gets better.
- Muscular dystrophy and hemiplegic cerebral palsy are two additional conditions that can cause a Trendelenburg gait.
Symptoms of Trendelenburg Gait
- The Trendelenburg gait is best observed from behind or in front of the patient and is characterized by a trunk shift over the affected hip when standing and away when walking.
- On the non-weight-bearing extremity, the pelvis tilts downwards rather than upwards during gait. The individual attempts to mitigate this effect by lateral tilting the trunk away from the affected hip. As a result, the person’s center of gravity is primarily on the stance limb, resulting in a reduction in the pelvic drop.
Diagnostic Options
- The examiner is able to detect stride and step length deficiencies as well as sagittal plane motion of the trunk and lower extremity, including the extensor or gluteus maximus lurch, in which the patient thrusts the trunk posteriorly to compensate for weak hip extensors (gluteus maximus muscle), when observing the patient’s gait from the side.
- Additionally, ankle dorsiflexor weakness and foot drop, which prevent the foot from clearing the ground and are compensated for by excessive lower extremity flexion to facilitate floor clearance (steppage gait), can be observed from the side.
- Gluteus medius muscle weakness on both sides: A wobbling gait, also known as a “chorus girl swing,” is produced by the accentuated side-to-side movement in the gait.
- By flexing their trunk over the hip to bear the weight, some people make up for this.
Diagnostic procedures
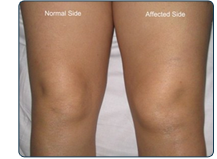
- The hip abductor muscle’s integrity is assessed by the Trendelenburg sign. When there are signs of Trendelenburg but no X-ray was taken, the therapist can use this test. The individual must stand on one leg. When the lifted leg’s hip also goes up, or hikes, the test is negative because the pelvis is tilted upward. The test is positive when there is a drop of the hip or a downward slant of the pelvis.
- The Trendelenburg pathology is best diagnosed or confirmed by X-ray.
- The surgeon will use information from clinical and X-ray assessments to make a diagnosis of hip pain. These two data sources will answer the following questions:
- The amount of valgus, extension, and de-rotation at the proximal osteotomy; the amount of varus and lengthening at the distal osteotomy; and the level of the proximal osteotomy.
- Examining a patient can help determine whether they have Trendelenburg gait using the modified McKay criteria. The range of hip joint movement, Trendelenburg sign status, pain symptoms, and gait pattern are all measured by these criteria.
| Grade | Criteria |
| Excellent | Stable, painless hip; no limp; negative |
| Trendelenburg sign; a full range of motion | |
| Good | Stable, painless hip; slight limp; slight |
| decrease in range of motion | |
| Fair | Stable, painless hip; limp; positive |
| Trendelenburg sign; as well as a limited range of | |
| action, or a combination of these | |
| Poor | Unstable or even painful hip or both; positive |
| Trendelenburg sign |
Treatment of Trendelenburg Gait
Medical Treatment
- Medical management can attempt to address the underlying causes of a compensated Trendelenburg gait in patients. In children younger than six years old, open reduction and salter innominate osteotomy (SIO) are effective in treating developmental dysplasia of the hip without the need for preoperative traction.
- Patients with untreated congenital dislocations benefit significantly from pelvic support osteotomies in terms of posture, gait, and walking tolerance.
- Utilizing a GaitMat II system, individuals with somatic dysfunctions may benefit from improved gait parameters as a result of Osteopathic Manipulative Treatment (OMT).
Physical Therapy Treatment of Trendelenburg Gait
- Trendelenburg gait can lead to the development of other hip and knee bone diseases like arthritis and premature hip joint wear and tear. Therefore, it is critical to identify a form of physical therapy that will reduce Trendelenburg’s gait in order to reduce the risk of additional injuries.
- The Trendelenburg gait is an abnormal gait brought on by hip abductors that are weak. Therefore, strengthening the hip abductors is the primary goal of physical therapy for this impairment. The patient should lie on their side and abduct their upper leg toward the ceiling as an appropriate exercise to strengthen the hip abductors. A theraband or weight can be wrapped around the active limb to make the exercise harder. Exercise can be advanced with regard to gravity, burden, and recurrence.
- Functional closed-chain exercises, lateral step-ups, and functional balance exercises are additional treatments for Trendelenburg gait. Additionally, strengthening the remaining hip muscles on the affected side is essential.
Hip Abductors strengthening
Hip Abduction with Cable
- Using a cable to strengthen the hip abductors, perform this strengthening exercise:
- The patient required a cable machine for this exercise. When it comes to making hip abductors, it can be an effective tool.
- Choose a lower pulley setting for the cable machine.
- While performing this test try to carefully listen what the physical therapist is saying, and follow the instructions very carefully.
- Wrap the ankle slip around the outside foot and hold the machine with a closed hand for stability.
- Squeeze the hip abductors to straighten the outer leg out to the lateral side while extending both legs.
- At that point, hold for one to two seconds, then slowly return to the starting position.

Side Lurch
- Instructions to do the reinforcing exercise:
- It is an excellent alternative to the lunge that works the hip abductors. Take a standing position with your feet spread more than shoulder-width apart and your toes slightly flared out.
- Flex the left knee, shift the weight to the left side, and keep the right leg straight.
- Then return to the starting position and perform the exercise again on the right side.
- Use alternate legs for this as well.
Leg Out Side Kickouts
- How to perform the leg outside kick outs strengthening exercise:
- The challenging exercise known as leg outside kick outs puts the gluteus medius’ endurance to the test.
- The patient must assume the quadruped position (on all four limbs) for this exercise. kicked outside and extended the leg after flexing the knee.
- Repeat the move with the other leg.
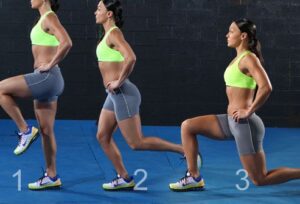
Curtsy Lunge
- How to Perform the Curtsy Lunge This Strengthening Exercise:
- Another variation of the lunge that intensely engages the gluteus medius is this one.
- A patient must stand with their back straight and their chest raised for this exercise. Step with your left foot back and to the right while keeping your right foot straight in front of you.
- The legs should be crossed and both knees should be flexed. Check to see that the right knee is level with the right ankle.
- After that, drive up to a standing position with control. Move the left foot out in front in the same manner.
- After each set or after each repetition, the patient can switch legs.

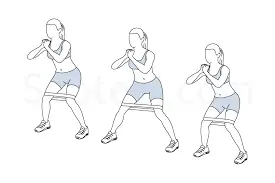
Resistance Band Side Walks
- Side Walks with a Resistance Band: How to Perform This Strengthening Exercise:
- The hip muscles can be strengthened effectively in this manner. Using their own body weight, the patient can take lateral steps.
- Put a resistance band around your ankle just above the joint.
- Squat into a semi-seated position from a standing position with your feet under your hips. The gaze should be directed forward and the shoulders should be lowered.
- Step to the side while pressing your heel against a band.
- Step back together so that your feet are once more hip-width apart.
- Make sure to keep an eye on the feet being parallel and concentrate on driving the foot out with the hips. The toe will usually try to move first. Maintain constant tension on a resistance band.
- Step to the side for another ten to fifteen steps.
- Take an additional eight to ten steps in the opposite direction.
- A patient can also perform these in a stable position if he or she has limited space. Simply know to press the body out with the foot and not let the foot do all the in and out movement without help from anyone else.
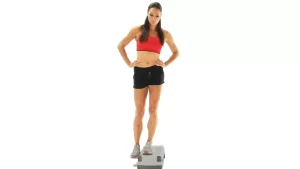
Hip Drop
- How to perform this advanced exercise for strengthening the hip drop:
- This exercise is mostly done to fix a weak hip abductor, which can cause problems with leg mechanics like iliotibial band syndrome.
- To ensure that the hips rather than the legs are initiating the movement, this straightforward but deliberate move must be executed with control and body awareness.
- The patient must stand with one foot on a surface with steps for this exercise. The patient must maintain a straight posture. Start the motion at the hip joint by lowering the opposite leg.
- Throughout the entire motion, the shoulder should remain stable. Keep your pelvis still while holding the lower down position for two to four seconds. Resuming your neutral hip position
- In a controlled motion, gradually lower and raise both legs.
- On each side, perform ten to twenty repetitions.
Lying Hip Abductions
- How to Perform Lying Hip Abductions This Strengthening Exercise:
- The muscles of the gluteus medius and gluteus minimus will be the primary targets of this exercise.
- A patient must lie on their left side for this exercise, with their legs straight out in front of them and the forearm supporting their upper body.
- Lift the right leg as high as you can by squeezing the gluteus minimus.
- Hold for a few seconds before slowly returning to the starting position.
- Use your left leg for this motion.
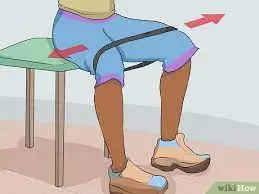
Sitting hip abduction with resistance band
- Using a resistance band to sit with the hip abducted How to perform advanced hip strengthening exercises:
- A patient must sit in a chair for this exercise. With the knees’ hips shoulder-width apart, wrap the resistance band around or above the knees.
- Bring the knees close to the body after gently moving them outside in opposition to a resistance band.
- Throughout this exercise, maintain an upright posture.
- Perform ten to fifteen sets of one to two repetitions.
Side plank hip abduction
- How to perform the side plank with hip abduction:
- Place your forearm under your body while lying on your right side to support your weight.
- Put your left hand on your hips. For balance, place the left fist on the stomach and hips.
- Now, raise the left leg in the air and raise the trunk and hips until the body is in a straight line.
- During this part of the exercise, exhale. Hold for around one second.
- The next step is to lower the left leg until it is on top of the right one, and then lower the hips back down until the buttocks touch the ground.
- During this part of the practice, breathe.
- Finish the number of times you want to.
- After that, switch to the left side and repeat ten to twenty times.
- Perform this on alternate legs for one to two sets of ten to twenty repetitions.

Closed Chain Lower Body Kinetic Exercises
- Squats, deadlifts, lunges, power cleans, and leg presses are all examples of closed-chain lower-body kinetic exercises. The quadriceps, hamstrings, hip flexors, soleus, and gastrocnemius muscles are all targeted in these exercises. The knee, hip, and ankle are the joints that allow for movement.
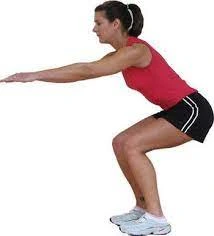
- An illustration of a closed kinetic chain exercise using the standing squat. While performing this exercise, the individual’s feet remain firmly planted on the ground, and the surface acts as resistance in response to the individual’s own weight or that of additional weights, such as dumbbells.
Squat Exercise
- Exercise for Squatting To perform a squat:
- To begin, place the subjects’ feet in the preferred position (to lessen the subject’s stress and increase the training’s external validity). shoulders in flexion at 90 degrees.
- The individual presses their hips back into a sitting position while keeping their chest up and engaging their abdominals. They also shift their weight onto your heels.
- The subject flexes his or her knees to the point where the hip crease falls below the patella while keeping his or her knees above but not below the toes.
- The subject draws a sigh and ascends once more to the starting position.
- The client is to follow these instructions:
- “Put your feet shoulder-width apart and stand straight. Return to your starting position after squatting down until you believe your top thighs are parallel to the ground. Until you are told to stop, perform 10 continuous repetitions at a steady, moderate pace.
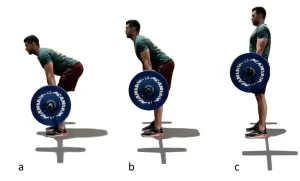
Deadlift Exercise
- To perform a deadlift:
- Start with your feet about shoulder-width apart (the stance of your feet may change depending on the variation). The bar is close to the shins and under the feet. Lower the torso to the bar by bending at the waist and pushing the buttocks back. After that, keep your hands on the bar.
- Engage the lats by squeezing the shoulder blades together, then the core muscles. Keep your hips lower than your shoulders and keep your head and neck in a neutral position.
- Pull the weight up by pushing through the feet. Instead of lifting the weight, consider pushing the floor away. The bar should never be too far from the shins. To secure the lift’s top, squeeze the glutes.
- Lower in the opposite direction to the floor.
- Depending on the individual’s goals, sport, or limitations, the deadlift exercise can be modified in a variety of ways. The individual will be able to concentrate on particular muscle groups or imitate a desired activity with each variation.
Conventional Deadlift
- The conventional deadlift is often the most commonly thought of. The person stands with their feet approximately shoulder width with the arms outside their thighs. There is increased emphasis on the lower back due to the trunk having more of a forward lean.
Sumo Deadlift
- The person stands with their arms inside their thighs and a wider stance. Utilizing the hips more than the back, the trunk maintains a more upright stance.
Straight/Stiff Leg Deadlift
- The person stands with their knees extended (but not fully locked out) and their feet about shoulder-width apart. The hips are flexing and move posteriorly, causing the downward motion, and the trunk is in a neutral position. The hamstrings and lower back are the primary targets.
Romanian Deadlift
- Standing with feet about shoulder width apart, the person bends their knees about 15 degrees. The hips are flexing and move posteriorly, causing the downward motion, and the trunk is in a neutral position. The gluteals, hamstrings, and lower back are the primary targets.
Rack Deadlifts
- The person can perform the exercise in any stance they like, but with a rack, the bar starts at a higher height. The person can set the bar’s height to whatever height they want. This lets the person concentrate on lifting heavier weights, working on their weak spots, or doing something similar.
Deficit Deadlifts
- This is performed in any stance that the performer chooses, but the bar is typically set lower than it would normally be on an elevated surface. This lets the person concentrate on the first deadlift pull, work on a weak spot, or do something similar.
Snatch Grip Deadlift
- The person performs the exercise with a standard setup, but instead of gripping the bar just outside the thighs, they use a much wider grip. When this wider grip is used, the scapula and upper back muscles are stabilized more.
Additional Variations
- The variations associated with deadlifts transcend the exercise itself. To change the exercise, you can make more changes.
Bars
- Changing the kind of bar used can make it more interesting. The forces and demands are altered by stiff bars, hex bars, or bars with a larger diameter.
Resistance
- Throughout the deadlift’s range of motion, the use of resistance bands and chains can add resistance that either increases or decreases.
Grips
- The majority of people use either the double overhand (with both palms facing the bar) or the opposing grip (with one palm facing in and the other out) of the two grips. A bar with a larger diameter or something wrapped around it could be used to test the grip. A fingertip grip, in which the bar is held more by the fingers than by the palm, could be an alternative.
Speed
- You can change the speed at which the lift is performed. A person could complete a repetition as quickly as possible or at a rate that was slower than usual.
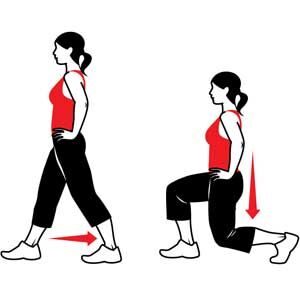
Lunges
- How to Perform a Lunge Stand with your feet hip-width apart to begin.
- Take a step forward that is longer as compared to the walk so that one of the legs is in front of the torso as well as the other is behind it. The foot should land level as well as stay level while it is on the floor. A heel of the rear foot may rise off the floor.
- As the patient lowers herself, bend the knees about 90 degrees. Keep the core engaged as well as the trunk upright.
- After that, to get back to where the patient starts, forcefully push off with the front leg.
- Things to keep in mind:
- As you lower toward the ground, your lead knee should not extend past your toes.
- The ground should not touch your rear knee.
- Keep your hips symmetrical (at the same height without hiking your front leg’s hip or dropping your back leg’s hip).
- To help keep your trunk upright during the movement, contract your abdominal muscles.
- During the landing and return, you should keep your feet hip-width apart.
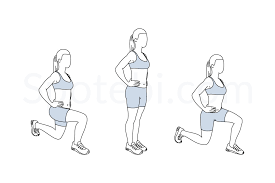
Variations on a lunge (and when to use each)
- There are numerous lunge variations. All of them work the same muscles, but some are worked more than others. To add variety and challenge to your workout, you can perform a different version each time or combine different variations.
Static lunge
- The split squat, also known as the static lunge, does not require a step out or return. As a result, it may be simpler to perform for individuals with knee pain or as an introduction to lunge exercises.
- Similar to the forward lunge, the medial and lateral quadriceps muscles are emphasized.
- How to do it:
- With one foot in front of the other and your feet hip-width apart, stand in a split stance. The back of your heel will be above the ground.
- Bend your knees to a 90-degree angle as you lower yourself toward the ground.
- To straighten the knee, push into both feet, and return to the upright position, initiate the movement from your glutes before firing into the quadriceps.
- Make this exercise a jumping lunge to make it an advanced plyometric exercise. From the lower part of your jump, violently push off of the two feet, switch them in mid-air, and land in a thrust with the contrary foot in front.
- If you’re not sure if jumping lunges are right for you, talk to a trainer first because they’re hard.
Back lunge
- Similar to the forward-stepping lunge, the back lunge only requires you to move your rear foot.
- The exercise focuses less on the quadriceps muscles and more on the gluteals and hamstrings because it moves through space in reverse. As a result, the knee is less affected.
- How to do it:
- Standing with the feet hip-width apart is an ideal embarking position.
- Take a step backward that is longer than a walking stride, keeping one leg in front of you and the other behind your torso. With your heel raised, your back foot should land at the ball of your foot.
- As the person lowers himself, bend the knees about 90 degrees. Keep in mind to keep the hips level as well as the trunk upright.
- To get back to where you started, push off with a lot of force from the ball of your back foot.
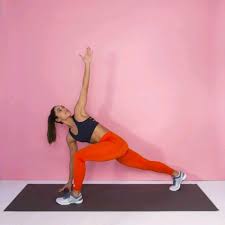
Lateral lunge
- The lateral lunge requires a side step rather than a forward or backward motion. Due to the horizontal development design, crotch muscles (the adductors) are more dynamic in this variety than in different kinds of rushes. Additionally, the medial quadriceps are emphasized (10Trusted Source).
- How to do it:
- Keep the feet hip-width apart as the person stands.
- While keeping your other foot flat, step out wide to the side.
- Keep the other knee straight while bending your “stepping” knee. When you lunge forward or backward, your shoulders will be slightly ahead of your knee and your body will hinge slightly forward.
- To get back to where a person started, firmly push off with the foot.

Curtsy lunge
- The curtsy lunge is a great exercise for strengthening the gluteus medius and hip adductors, also known as the inner thighs.
- Throughout this exercise, the gluteus medius stabilizes your pelvis while you lunge with your legs crossed and the adductors keep the legs in that position as a person lowers.
- How to do it:
- Keep the feet hip-width apart as you stand.
- Cross your legs as you step to the side with one leg behind the other. Your back foot’s heel will rise off the ground.
- Lower your front thigh until it is parallel to the floor by bending both knees. Keep your knees moving directly over your toes, your core engaged, and your chest raised.
- To straighten both of your knees, press into your legs, especially your front leg. At the same time, lift your back foot to bring it back to a hip-width, parallel stance.
- If you have trouble maintaining your balance, you can switch legs as you go or stay on one leg at a time. Make sure that you do the same number of reps on each side.
Walking lunge
- The walking lunge is a type of lunge that can be performed either forward or backward, as described here. It places a greater emphasis on the medial quadriceps, hamstring muscles, and gluteal muscles.
- How to do it:
- Keep the feet hip-width apart as a person stands.
- Take a step in front of you and lower yourself until your knees are bent at a 90-degree angle.
- Take the lead leg by shifting forward.
- Step through by stepping off with both legs and lifting your back leg so that your rear foot lands in a lunge position in front of you.
- Continue moving forward and repeat.
- Do this exercise very carefully.
Power cleans
- Starting position Proper setup is essential before beginning the first part of the movement:
- Standing with your feet slightly wider than shoulder width and your toes slightly pointing outward, place the barbell just in front of your shins. Your knees can now track directly over your feet as a result of this.
- With your hands facing your legs and a grip slightly wider than shoulder width, squat down and grasp the bar.
- Your shoulders should be just slightly in front of the bar, and your arms should be fully extended, just outside your knees.
- First, pull
- Drive the bar off the floor with forceful hip and knee extensions while maintaining a strong torso and natural spine curve. Keep the bar close to your body. Your shoulders and hips ought to rise at the same rate.
- As the bar moves upward, keep your arms extended, your heels on the ground, and your shoulders slightly in front of the bar.
- Your foot should bear the weight evenly throughout.
- Transition (scoop)
- To move your thighs against the bar, thrust your hips forward, slightly bend your knees, and shift your weight toward the front of your feet as the bar rises above your knees.
- You can expect a powerful second pull as a result of this.
- Second pull (power)
- Extend your hips, knees, and ankles explosively as the bar comes off your thighs. The bar should be kept close to your torso.
- Pull your arms and body under the bar by quickly shrugging your shoulders and flexing your elbows as your hips, knees, and ankles extend.
- Catch
- Drop into a partial squat position while maintaining a strong and straight torso.
- Your upper arms should be parallel to the floor, your elbows fully flexed, and your hands should rotate around and under the bar as your body comes under it to form a shelf.
- Stand tall with the bar in the catch position on your shoulders and clavicle once you have gained control and balance.
- The return
- After finishing the rep, turn your hands back around the bar to remove it from your clavicle and shoulders. Return the bar to your thighs gradually.
- To return the bar to the floor, simultaneously flex your hips and knees.
- Prepare the bar for the subsequent rep.
- Do this exercise very carefully.
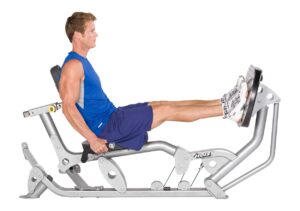
Leg presses
- Step-by-Step Instructions for Leg Presses Your body should be in a specific position when you sit at a leg press machine. Sit comfortably on the machine with your back and head pressed against the cushioned support. Make sure your heels are flat and place your feet on the footplate about hip-width apart.
- Instead of being raised, your bottom should be flat against the seat. At your knees, your legs should form a 90-degree angle. Your glutes will be strained if your feet are placed too high on the plate; If you sit too low, you put too much stress on your knees. Your knees shouldn’t be bowed in any way—they should be parallel to your feet.
- The person listen this instructions carefully.
- Make sure to maintain this alignment as you press. To keep your head and spine in place and to provide support, grasp the assist handles.
- Push the platform away with your heels and forefoot while strengthening your abdominal muscles. On the footplate, your heels should remain level. The pad should never be moved solely with the front of your foot or toes.
- Exhale while extending your legs and maintaining a flat head and back against the seat pad. Instead of extending explosively, extend slowly and controllably.
- Stop at the highest point of development. Make sure your knees are not locked out and are not bowing in or out.
- Return the footplate to its starting position by gradually bending the knees while inhaling. Throughout, keep the back and feet flat.
- Start slowly with three sets of 10-leg presses if you have never done them before. As you gain strength, you can move on to higher levels.
FAQs
The Trendelenburg test, also known as the unilateral leg stand, is an effective method for identifying hip-joint dysfunction. When a patient is unable to keep their pelvis horizontal to the ground while standing first on one foot and then on the other, they have a positive Trendelenburg sign.
Superior gluteal nerve Damage to the superior gluteal nerve, which runs from the pelvis to the gluteus minimus muscle, frequently causes muscle weakness that leads to the Trendelenburg gait. When this nerve is damaged, the side that is affected can’t support the body’s weight.
What’s the standpoint? Although the Trendelenburg gait can be disruptive, it can often be treated with special shoes or exercises that strengthen the muscles in your hip abductor. Your physician will assist you in developing a treatment strategy in the event that this gait is caused by an underlying condition such as muscular dystrophy or osteoarthritis.
Weakness in the hip abductor muscles is indicated by the positive Trendelenburg sign: both a gluteus medius as well as a gluteus minimus. These findings can be linked to a variety of hip abnormalities, including rheumatoid arthritis, osteoarthritis, as well as congenital hip dislocation.
A Trendelenburg gait is an abnormal gait resulting from a defective hip abductor mechanism. The primary musculature involved is the gluteal musculature, including the gluteus medius and gluteus minimus muscles. The weakness of these muscles causes drooping of the pelvis to the contralateral side while walking


One Comment