
Shoulder Range of motion exercise: Types, How to do?
Table of Contents
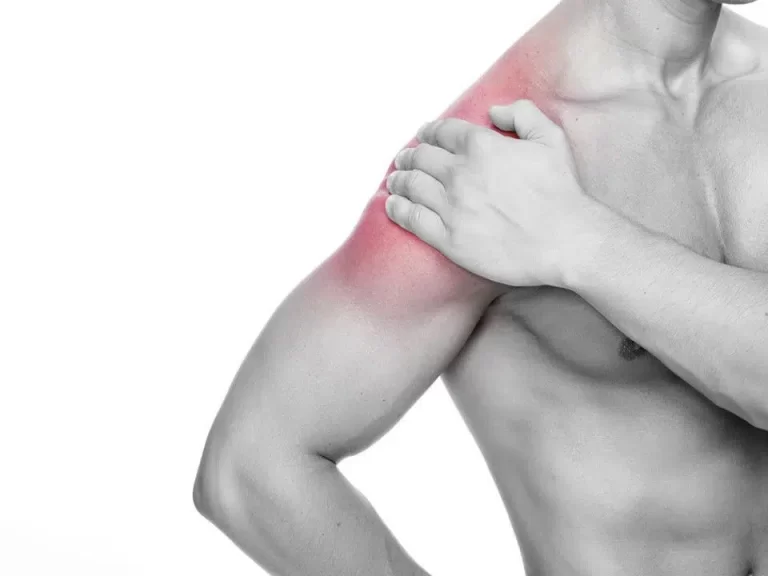
Introduction of shoulder range of motion exercise
- The shoulder range of motion exercise is to move the shoulder from its complete spectrum of movement with support or without support accordingly called active, passive or assisted range of motion exercise.
- The shoulder range of motion is the capability of the shoulder joint to go through its complete spectrum of movement. The range of the motion of the shoulder joint is divided into three parts namely, passive range of motion exercise, active-assisted range of motion exercise, or active range of motion exercise.
- This is refer to the activity aimed at increasing the movement of the shoulder joint. This motion is influenced by several structures, namely the configuration of bone surfaces within the shoulder joint, joint capsule, ligaments, tendons, and muscles acting on the shoulder joint.
Brief introduction of three types of range of motion exercises
- The first one is the passive range of motion exercise: The motion applied to the shoulder joint only by other person or persons or even the passive motion machine. When a passive range of motion is applied, the shoulder joint of an individual receiving exercise is completely relaxed while the outside force moves the body part, such as the shoulder, throughout the available range of motion.
- Secondly, active-assisted range of motion exercise: The shoulder Joint receives partial helps from the outside force. This range of motion may result from the majority of a motion applied by a therapist or by an individual or persons assisting the patient. It also can be the half effort on the shoulder joint from each source.
- Lastly, active range of motion exercise: The motion of the shoulder joint performed entirely by a person. In this type of exercise, there is no outside force should be added while performing the motion.
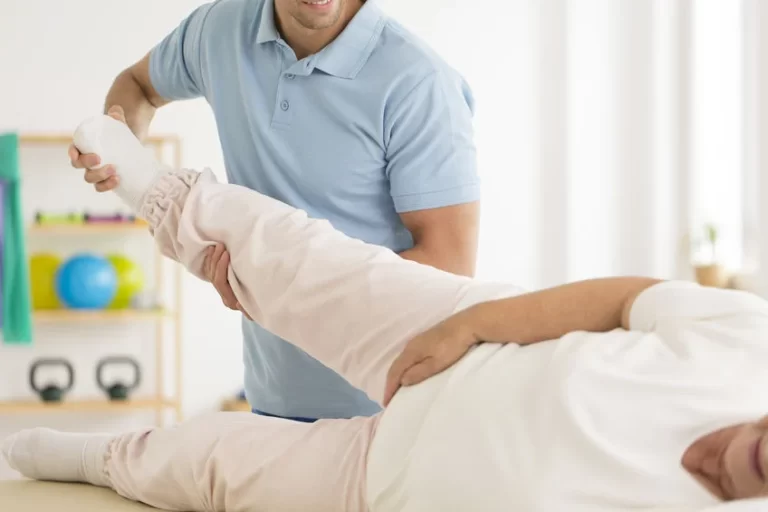
Passive range of motion exercise of the shoulder
- This is useful for the shoulder joint that has become inactive due to injury or even a paralysis attack. In the passive range of motion exercises of the shoulder joint, a patient does not perform any movement themselves; instead, a therapist moves the upper limb or body part of the stiff shoulder joint, gently stretching muscles and reminding them how to move correctly. In the majority of the cases, therapeutic stretching exercises are mixed with the passive range of motion exercises to promote faster recovery of the stiff shoulder joint. Here, the therapist stretches the soft tissue of the shoulder to relax the surrounding muscles and relieve tension as well. Passive range of motion exercises for the shoulder also helps minimize stiffness and rigidity in the shoulder joint that has been immobilized.
- Some of the most common and safest passive range of motion(ROM) exercises for the shoulder is related to stretching the surrounding muscles with the goal to increase muscle flexibility. One way to do Passive range of motion exercise is with the tool including the stretching strap. These exercises assist a patient hold the stretch for a more sustained period of time, but having a physiotherapist who aids with the stretch is the more effective way to practice passive range of motion exercises for the shoulder. With this type of exercise, the trained professional moves the upper arm into the stretch and holds it, with the intent to increase muscle flexibility.
- This is superior for a few reasons.
The first one is the physiotherapist understands proper limits and knows how far to go as well.
Secondly, the physiotherapist knows how long to hold the stretch.
Lastly, the therapists are also trained to know if it is targeting a proper area to achieve more benefits. With that in a mind.
In which conditions the physiotherapist should apply a passive range of motion exercise in the shoulder joint
- The passive range of motion(PROM) exercises for the shoulder are typically used where there is a paralysis attack, when the patient is comatose, in the presence of the healing fracture, or if the pain is elicited while the active muscle contraction. One of the main goals of PROME is to counteract the negative effects of immobilization, but it is important to remember that the passive range of motion (PROM) exercise cannot prevent muscle atrophy.
Some benefits of passive range of motion exercise on the shoulder
- Passive range of motion exercises does not only assist in promoting healthy joint functionality but also benefit a patient in reducing pain, promoting healing, restoring and maintaining range of movement in certainly affected joints, as well as building muscle mass, allowing for better blood flow as well as aids in improving oxygen levels.
Some guidelines for the passive range of motion for the shoulder
- Passive range of motion may be done in lying or even sitting positions.
- Support the weight of an arm at all times.
- Support above as well as below the shoulder joint the patient is moving.
- Keep the motions slow as well as smooth.
- Do not force the motion if the shoulder muscle or shoulder joint is stiff.
- The therapist should move only as much as the shoulder muscle or shoulder joint will allow.
- The passive range of motion should be pain-free. If the shoulder motions cause pain, stop and let the therapist know.
Exercises
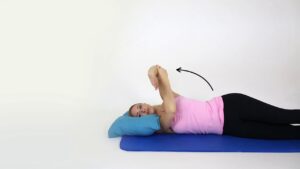
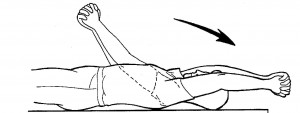
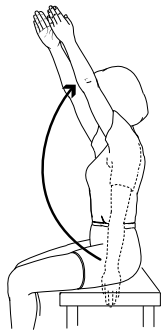
- Passive shoulder flexion up to 90degrees
- First of all, tell the patient to take a relaxed position, which means supine on the plinth. After that, the therapist gently supports the arm at the elbow as well as the wrist/hand. Then, tell the patient when the therapist slowly lifts the arm up to the shoulder height at 90degrees, and try to move the arm during the motion occurs. In the starting phase do not go above 90degrees. Do ten repetitions per session. Do three sessions per day.
- Passive shoulder abduction up to 90degrees
- To begin with, tell the patient to take a comfortable position, meaning a supine position on the plinth. After that, the physical therapist gently supports the arm at the elbow as well as the wrist/hand. Then, tell a patient that when the physiotherapist slowly moves the arm slightly out to the side as well as up to shoulder height up to 90degrees, try to move the arm in the direction of the motion while the movement occurs. In the starting phase do not go above 90degrees. Do ten repetitions in one session. Do three sessions per day.
- Towel stretch the passive range of motion exercise
- First of all, hold one end of the three-foot-long towel behind the back as well as grab the opposite end with the other hand. Hold a towel in the horizontal position. Use a healthy arm to pull the injured arm upward to stretch it. The patient can also do an advanced version of this exercise with a towel draped over the healthy shoulder. Hold the bottom of a towel with the injured arm as well as pull it toward the lower back with the uninjured arm. Do this exercise ten to twenty times per day in one session. Do three sessions per day.
- Supine passive external rotation
- First of all, tell the patient to lie on the back, and keep the elbow of the injured arm against the side with the elbow bent at 90 degrees. Using the cane or even a long stick in the other hand, push against the hand of the injured arm so that the injured arm rotates outward. Hold around ten seconds, and then relax the arm. Do ten repetitions per session. Do three sessions per day.
- Supine passive internal rotation
- First of all, tell a patient to lie on the back. Keep the elbow of the affected arm against the side with the elbow bent to 90 degrees. In addition, using the cane or a long stick in the opposite hand, push against the hand of the affected arm so that the affected arm rotates inward. Hold around five seconds, and then relax an arm. Do ten repetitions in one session. Do three sessions in one day.
- Standing passive internal rotation
- To begin with, tell the patient to stand in the doorway facing the door frame or near the edge of the wall. Then, with the hand opposite to the wall or doorframe, keep the affected arm firmly against the side, and the elbow at the right (90 degrees) angle. By moving the feet, rotate a body towards the door or the wall to produce inward rotation of the shoulder.
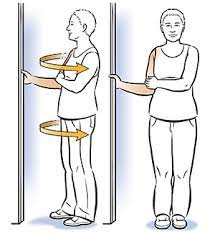
- Standing passive external rotation
- To embark with, tell a patient to stand in a doorway facing the door frame or even near the edge of a wall. After that, with the hand opposite a wall or door frame, keep the injured arm firmly against the side, and the elbow at the right (90 degrees) angle. By moving the feet, rotate the body away from the door or the wall to produce outward rotation of the shoulder.
- Standing passive forward flexion
- To begin with, stand facing the mirror with the hands rotated so the thumbs face forward. Raise an arm upward keeping an elbow straight. Try to raise an arm by hinging at the shoulder as opposed to raising the arm with the shoulder blade. Do ten repetitions to 90 degrees. If the patient can do this without hiking a shoulder blade, do ten repetitions fully overhead.
- Passive forward elevation
- These exercises are designed to improve the shoulder passive forward elevation. Using any combination of these exercises, do at least ten repetitions in one session. Do three sessions per day.
- Wand Exercises: While taking a supine position, hold the cane broom handle in both hands with elbows straight. After that, raise the cane over the head, or as high as the patient can with the assistance of a healthy hand. If pain-free, attempt the same exercise while sitting upright on the chair. Do ten repetitions per session. Do three sessions per day.
- Opposite arm assisted: While supine or sitting on the chair, use the unaffected arm to help the affected arm with forwarding flexion.
- Wall slides: First of all, place the affected arm against a wall with the elbow straight. Use fingers to climb or even ‘walk” the wall while moving the body forward.
- Passive shoulder flexion
- To embark with, tell the patient to take a relaxed position, such as supine. After that, the therapist should hold the arm at the elbow as well as the wrist. Then, move it straight forward as well as upward toward the ear side. After that, bring back to the embarking position. Do ten repetitions per session. Do three sessions per day.
- Passive shoulder extension
- To begin with, tell the patient to take a relaxed position, such as supine, but the position of the palm should be facing up. After that, hold the arm at the elbow as well as the wrist. Then, move the arm straight out to a side, and after that upward toward the ear as well as back again. Do it ten times per session. Do three sessions per day.
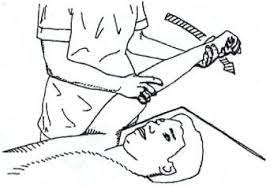
- Passive shoulder external rotation
First of all, tell the patient to take a relaxed position, such as supine. After that, the therapist should move the arm out to the side at shoulder level. With the elbow bent, the arm should be held, at the elbow as well as the wrist, and roll it forward toward the bedside. Gently hold the shoulder up. Do ten repetitions per session. Do three sessions per day.
- Passive shoulder internal rotation
To begin with, tell a patient to take a relaxed position, such as supine. Then, the therapist should move the arm inward to the side at shoulder level. With the elbow bent to 90degrees, the arm should be held, at the elbow and wrist. Do 10 repetitions in one session. Do three sessions in one day. - Passive horizontal abduction
- First of all, tell the patient to take a relaxed position, such as supine. With the arm at shoulder level as well as elbow bent, bring the arm across the body as well as touch the fingers to the back of the opposite shoulder. Repeat this exercise ten times per session. Do three sessions per day.
- Passive shoulder abduction
- To start with, ask the patient to take a relaxed position, like supine. After that, a physiotherapist should hold an arm at the elbow and wrist. After that, the clinician moves it away from the body’s midline and tries to touch the ear. Then, bring back to the starting position. Do 10 repetitions in one session. Do three sessions in one day.
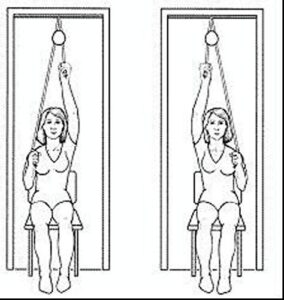
- Passive shoulder flexion as well as an extension with the use of pulley and rope
- To embark with, tell a patient to take a comfortable position, such as sitting on the table. Then, attach the pulley over the door or onto the hook overhead. The therapist should instruct the patient that holds the two ends of the rope with each hand. After that, pull down with the unaffected arm, and allow an affected arm to rise. Hold for around two to three seconds at the endpoint, then slowly allow the affected arm to lower. Repeat this motion with the injured as well as uninjured hands ten times per session. Do three sessions in one day.
- Passive shoulder abduction and adduction with the use of pulley as well as rope
- To begin with, the therapist should tell the patient to take a relaxed position, such as sitting at the table. After that, attach the pulley over a door or onto a hook overhead. Then, the therapist gives the instruction to the patient that holds the two ends of the rope with each hand. After that, pull down the rope from side to side with the healthy arm, and allow the injured arm to rise. Hold for the next two to three seconds at the endpoint, then slowly allow the injured arm to lower. Repeat this movement or action with affected as well as unaffected hands ten times in one session. Do this exercise three times a day.
Active-assisted range of motion exercise
- As the name suggests, these exercises mainly involve partial assistance or help from a physiotherapist or from a patient himself/herself. A patient does most of the movement, but he/she gets little assistance to complete the shoulder movement correctly. In most cases, this restricted shoulder motion is the result of weakness or even pain caused owing to falls, bruises, or accidents, up to serious injuries. A therapist mostly uses the strap or the band to secure the shoulder joint before helping the movement. In the beginning, a patient can suffer a great deal of pain and weakness when performing these exercises, but with time, a patient has a great scope for gradual and lasting improvement in the range of movement around the shoulder joint.
Some benefits of the shoulder active-assisted range of motion exercise
- Increase motion of the shoulder joint.
- Improve the function of the shoulder joint as well as the whole upper limb.
- Improve motion efficiency.
- Increase independence.
- Decrease shoulder pain.
- Increase as well as maintain shoulder joint integrity.
Exercise
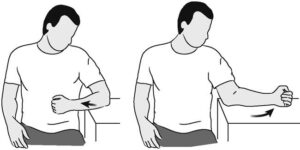
- Supine active-assisted arm elevation
- First of all, lie on the back. After that, hold the injured arm at the wrist with the opposite hand. Then, using the strength of the opposite arm, lift the injured arm upward, as if to bring an arm overhead, and slowly lower the arm back to a bed. Do it ten times per session. Do two sessions per day.
- Supine active-assisted forward flexion
- First of all, tell the patient to lie on the back. After that, hold the stick in both the hands about shoulder-width apart, and raise the injured arm with the assistance of the uninjured arm up and then backward as if to reach overhead. Hold ten seconds per repetition. Do ten repetitions per session, and do three sessions per day.
- Behind the back active-assisted internal rotation
- First of all, take a position like sitting on the chair or standing, and place the hand of the injured arm behind the back at the waistline. Use the healthy hand of the therapist, to help the injured hand higher toward the shoulder blade. The therapist gives the command to the patient that moves the hand upward, but when the patient cannot do the therapist assists the patient to reach the full range. Hold for the next ten seconds then relax. Do it ten times per session. Do two sessions per day.
- Supine or seated active-assisted forward elevation (overhead elbow lift)
- During this phase, the patient can stand or sit on a chair. If this position is easier, begin lying on the back until the patient can achieve maximal motion, then use the standing or even seated position. Assume an upright position with an erect posture, looking straight ahead. Place the hands on either thigh with the affected thumb facing up as well as the elbow straight. In the starting, this stretch is not performed only with the injured arm but uses the healthy hand for assistance going up as well as coming down. As the patient becomes stronger, he/she can raise as well as lower the arm without assistance. The injured arm should be lifted as high as possible, or to the endpoint of pain. Try maximum to raise the arm by hinging at a shoulder as against to raising an arm with a shoulder blade.
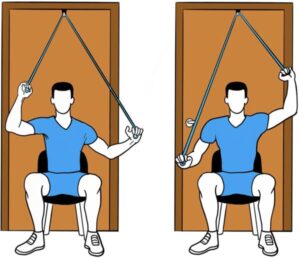
- Active-assisted shoulder flexion and extension with the use of pulley and rope
- To begin with, tell the patient to take a relaxed position such as sitting at the table. After that, attach the pulley over a door or even onto the hook overhead. Hold the two ends of the rope with each hand. After that, pull down with the uninjured arm, and allow the injured arm to rise. Hold five seconds at the endpoint, then slowly allow the injured arm to lower. Repeat this movement with affected and unaffected hands ten times in one session. Do this exercise three times in one day.

- Active-assisted shoulder abduction as well as adduction with the use of pulley and rope
- To embark with, the therapist should tell a patient to take a comfortable position, namely sitting on a table. Then, attach the pulley over the door or onto the hook overhead. Hold the two ends of a rope with each hand. Then, pull down the rope from side to side with the unaffected arm, and allow the affected arm to rise. Hold for the next five seconds at the endpoint, then slowly allow the affected arm to lower. Repeat this motion or action with injured as well as uninjured hands 10 times per session. Do it three times per day.
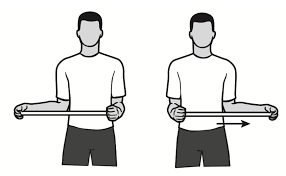
- Active-assisted shoulder flexion and extension range of motion exercise with the use of a stick
- First of all, tell the patient to take a relaxed position, like supine or sitting with the supported back. After that, the therapist should give the command to the patient that holds the two ends of the stick in both the hand, with the use of a healthy hand move the shoulder upward, meaning towards the ear side. Do this exercise ten times per session, do three sessions per day.

- Active-assisted shoulder Abduction and adduction range of motion exercise with the use of a stick
- To begin with, tell a patient to take the relaxed position, namely supine or sitting with the supported back. After that, A physiotherapist should give a command to a patient that holds the two ends of a stick in affected as well as unaffected hands, then with the use of the uninjured hand move the shoulder upward by moving the hand from the side to side, but injured hand must be worked while performing this movement, when the injured hand does not work then the uninjured hand should work, meaning towards the ear side. Do it ten times per session. Do three sessions in one day.
- Active-assisted shoulder internal rotation range of motion exercise with the use of the stick
- First of all, tell the patient to take a comfortable position, such as sitting with the unsupported back with the elbow 90degrees of flexion. Then, the physiotherapist should give the command to a patient that holds the two ends of the stick in injured as well as uninjured hands, after that with the use of the healthy hand move the shoulder inward, but the affected hand must be worked while performing the internal rotation movement when the affected hand does not work then the healthy hand should work. Do this exercise ten times in one session. Do three sessions per day.
- Active-assisted shoulder external rotation range of motion exercise with the use of the stick
- To begin with, tell a patient to take a relaxed position, like sitting with an unsupported back and elbow should be 90degrees of flexion. After that, a therapist should give a command to the patient that holds the two ends of a stick in both hands, then with the use of the unaffected hand move the shoulder outward, but the injured hand must be worked while performing the external rotation motion when the injured hand does not work than the good hand should work. Do it ten times per session. Do three sessions in one day.
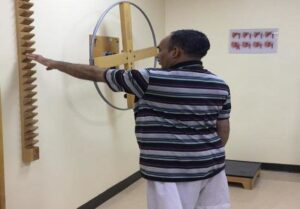
- Active-assisted shoulder flexion and extension range of motion exercise with the use of the ladder
- To embark with, tell the patient to stand in front of the finger ladder. After that, place the affected hand on the finger ladder and move the fingers upward on the ladder meaning as far as possible increase the steps of the ladder and do shoulder flexion, then come back to the neutral position. Do it ten times per session. Do three sessions per day.
- Active-assisted shoulder abduction and adduction range of motion exercise with the use of the ladder
- To begin with, ask a patient to stand at a 90degrees angle from the finger ladder, but the affected side should be in front of the ladder. After that, place an injured hand on the finger ladder as well as move the fingers upward on a ladder meaning as far as possible improve the steps of the ladder and do shoulder abduction, then come back to the starting position. Do it ten times in one session. Do three sessions in one day.
Active range of motion exercises
Some goals of the active range of motion exercise
- Increase strength
- Maintain/improve endurance
- Promote circulation
- maintain/increase range of motion (ROM)
Precautions or even patient education:
- No active range of motion (AROM) of the elbow joint
- No excessive external rotation range of motion (ROM) /or stretching of the shoulder
- Use of the sling to minimize the activity of the biceps
- No lifting of the objects with the operative shoulder
- Keep incisions clean as well as dry
- No message to the proximal biceps tendon or tendinosis site
Exercises
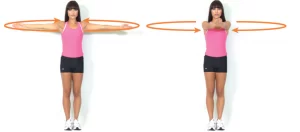
- Active circles
- First of all, tell the patient to take a lean-forward position so the arm comes away from the body. After that, the therapist should give the command to the patient that rotates the arm clockwise, ten times per session as well as anti-clockwise direction ten times per session. Do three sessions per day.
- Active shoulder movement up as well as down with clapping
- To begin with, tell the patient to take a comfortable position, such as standing. After that, the therapist should give the command to the patient that raises the arm forward as well as up over the head. Then, try to raise it so that the inner arm touches the ear and clap. Bring an arm back down aside. Bring it back as long as possible behind the body. Return the arm to the embarking position. Repeat this exercise ten times per session. Do three sessions per day.
- Active shoulder movement, side to side with clapping
- First of all, the therapist should give the command to the patient to take a comfortable position, like standing or sitting. After that, the patient should raise the arm to the side as well as up over the head as long as possible and do a clap. Return the arm to the side. Bring an arm across the front of the body as well as reach to the opposite shoulder. Return the arm to the embarking position. Do it ten times per session. Do three sessions per day.
- Active shoulder rotation
- To embark with, the therapist should give the command to the patient that raises both shoulders up toward the ears, as if the patient were trying to shrug. Lower them to the embarking position, and relax the shoulders. Pull the shoulders back. Then relax them again. Roll the shoulders in a smooth circle. Then roll the shoulders in the smooth circle in the other direction too. Do ten repetitions per session. Do three sessions per day.
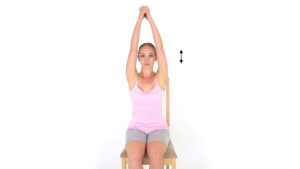
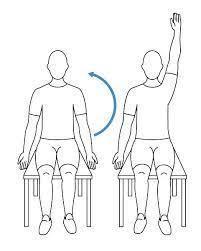
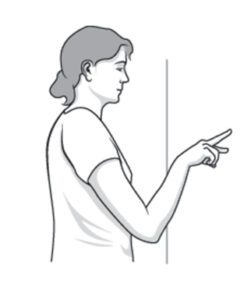
- Active shoulder flexion
- First of all, the physiotherapist should tell the patient to take a comfortable position for shoulder flexion exercises, such as sitting. After that, the patient should be commanded by the therapist that starts with the arm by the affected side and slowly lifts the hand toward the roof with the elbow straight. Then, slowly bring the arm back down by the side with the elbow straight. Repeat this exercise ten times per session. Do three sessions per day.
- Active shoulder extension
- To begin with, the therapist should tell a patient to take a comfortable position for shoulder extension exercise, like supine or sitting with a hand that should be flexed. Then, a patient should be commanded by the clinician that starts with the arm by the injured side and slowly bring the hand toward the ground with the elbow straight. Repeat it ten times in one session. Do three sessions in one day.
- Active shoulder abduction
- To embark with, the therapist should tell a patient to take a comfortable position for shoulder abduction exercises, like supine, side-lying, or sitting. Then, a patient should be commanded by the physiotherapist that starts to do this exercise with the arm by the injured side, slowly lift the hand but move by the side toward the ceiling with the elbow straight. After that, slowly bring an arm back down by the side with an elbow straight. Repeat it ten times in one session. Do three sessions in a day.
- Active horizontal adduction(transverse flexion)
- First of all, tell the patient to lie down on the bed. After that, instruct a patient to do the movement of the humerus in the horizontal or transverse plane toward and across the chest. Do it ten times per session. Do three sessions per day.
- Active horizontal abduction(transverse extension)
- To begin with, tell the patient to lie on the bed. After that, the therapist should instruct the patient to do the movement of the humerus in a horizontal or transverse plane, which means to perform horizontal abduction, and move the arm just away from the chest with the elbow should be 90degrees flexed.
- Active shoulder internal rotation
- First of all, the therapist instructs the patient to take a comfortable position, namely supine or standing. After that, the patient should be instructed by the therapist to raise the arm to shoulder height at the 90º angle to a body, then rotate the hand inward in standing or upward in supine until the hand is even with an elbow. After that, slowly let the hand rotate to the embarking position. Do it ten times per session. Do three sessions per day.
- Active shoulder external rotation
- To embark with, the physiotherapist should give the instruction to the patient to take a relaxed position, like supine or standing. Then, a patient should be commanded by the clinician to raise an arm to shoulder height at a 90º angle to the body, after that rotate the hand outward, if the patient is in standing or downward if the patient is supine until the hand is even with the elbow. And then, slowly let the hand rotate to the embarking position. Do it ten times in one session. Do three sessions in one day.
- Diagonal active abduction
- First of all, tell the patient to stand properly. Then, do the movement of the humerus in the diagonal plane, meaning away from the midline of the body. Do it ten times per session. Do three sessions in one day.
- Diagonal active adduction
- To begin with, the therapist should give the instruction to the patient that does the movement of the humerus in a diagonal plane toward the midline of the body. Do it ten times in one session. Do three sessions per day.
- Finger walk
- This exercise is one type of active-assisted exercise, which should be done by the patient with the use of the wall. To begin with, the therapist should give the instruction to the patient that stands facing the wall three-quarters of an arm’s length away. After that, reach out as well as touch the wall at the waist level with the fingertips of the injured arm. With the elbow slightly bent, slowly walk the fingers up a wall, spider-like, until the patient has raised the arm as far as he/she comfortably can. Slowly lower the arm (with the assistance of the healthy arm, if necessary). Do it ten times in one session. Do three sessions in a day.
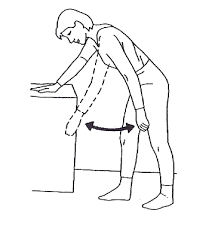
- Pendular shoulder flexion and extension exercises
- First of all, tell the patient to take a standing position, and slightly bend over at the waist letting the injured arm hang down at the side. Start with bending over the little as pain allows, as well as eventually bend over further to get more movement as pain as well as comfort allows. After that, sway the body back and forth using the weight of an arm and gravity to generate small circles. Move the arm forward and backward. Do ten repetitions per session. Do three sessions per day.
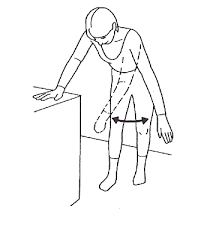
- Pendular shoulder abduction as well as adduction exercises
- To embark with, tell a patient to take a standing position, and slightly bend over at a waist letting the affected arm hang down at the side. Begin with bending over a little as pain allows, and eventually bend over further to get more motion as pain and comfort allows. Then, sway the body back as well as forth using a weight of an arm as well as gravity to generate small circles. Move the arm side to side. Do ten repetitions in one session. Do three sessions in one day.
- Pendular shoulder rotation exercises
- To begin with, tell the patient to take the standing position, and slightly bend over at the waist letting the injured arm hang down at the side. Start with bending over the little as pain allows, as well as eventually bend over further to get more movement as pain and comfort allow. After that, sway a body back and forth using the weight of an arm and gravity to generate small circles. Move the arm clockwise and anticlockwise. Do ten repetitions per session. Do three sessions per day.

One Comment