Manual Muscle Testing of Ankle
Manual muscle testing (MMT) of the ankle is a physical examination technique used to assess the strength and function of the muscles around the ankle joint. It is commonly performed by healthcare professionals, such as physical therapists or physicians, to evaluate muscle weakness, monitor progress in rehabilitation, or diagnose certain conditions affecting the ankle.
Table of Contents
Ankle plantar flexion
Testing muscles
- Gastrocnemius
- Soleus

Patient’s position
For examining gastrocnemius and soleus together:
To assess grades 3-5 patient should stand on examined leg, and knee extension, the patient can hold stable objects like a table or bench to balance himself.
For assessing grades 0-2 Patient should be in the side-lying position, knee in extension, and ankle off the bed.
Therapist’s position
For assessing grades 3-5 Therapist should be in position comfortably with a lateral side view of the motion being performed
For assessing grades 0-2 Therapist stand at the feet.
How to test?
Explain the procedure to the patient: Before starting the test, explain the procedure to the patient and ask for their cooperation. Inform them that you will be applying resistance against their foot as they push down.
Patient to assess plantar flexion in the form of single-limb heel raise
Stabilize the joint: Stabilize the joint being tested by placing one hand on either side of the ankle. This will prevent any unwanted movement during the test.
Apply resistance: Apply resistance against the ball of the foot as the patient pushes down. Use enough force to provide resistance but not enough to overpower the patient’s effort.
Observe for a range of motion: Observe for a full range of motion as the patient pushes down. If there is an incomplete range of motion, note it down.
Grade the muscle strength: Grade the muscle strength according to the patient’s effort and the amount of resistance applied. Use the grading system from 0-5
- Grade 0: No contraction can feel
- Grade 1: A flicker or trace of contraction is felt, but no movement occurs
- Grade 2: Do the movement with gravity eliminated ex, horizontal
- Grade 3:Do the movement opposite to the gravity but not resistance
- Grade 4:Do the movement opposite gravity with mild to the moderate resistance force
- Grade 5: do the movement opposite to the maximum strength
Repeat on both sides: Repeat the test on both sides to compare the muscle strength and note any differences.
Document: Document the muscle strength grade and any observations made during the test in the patient’s medical record.
Interpretation: Interpretation of results should be done by a qualified healthcare professional, taking into account other factors such as age, gender, medical history, and other clinical findings.
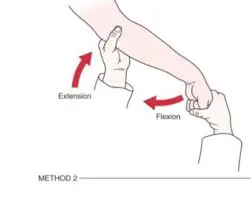
Ankle Dorsiflexion
Testing muscles

- Tibialis Anterior
- Extensor Digitorum Longus
- Peroneus Tertius
- Extensor Hallucis Longus
Patient’s position
The patient should be in a short sitting, ankle hanging off the bed.
To assess grades 0-2 patient should be in a side-lying position, with a gravity minimal position.
Therapist’s position
The therapist should sit on a stool or chair in front of the patient
Do the Palpation of the tibialis anterior.
The other hand is used for giving resistance force over the dorsal foot.
How to test?
Stabilize the joint: Stabilize the joint being tested by placing one hand on either side of the ankle. This will prevent any unwanted movement during the test.
Apply resistance: Apply resistance against the ball of the foot as the patient pushes down. Use enough force to provide resistance but not enough to overpower the patient’s effort.
Observe for a range of motion: Observe for a full range of motion as the patient pushes down. If there is an incomplete range of motion, note it down.
Grade the muscle strength: Grade the muscle strength according to the patient’s effort and the amount of resistance applied
- Grade 0: No contraction can feel
- Grade 1: A flicker or trace of contraction is felt, but no movement occurs
- Grade 2: Do the movement with gravity eliminated ex, horizontal
- Grade 3:Do the movement opposite to the gravity but not resistance
- Grade 4:Do the movement opposite gravity with mild to the moderate resistance force
- Grade 5: do the movement opposite to the maximum strength
Repeat on both sides: Repeat the test on both sides to compare the muscle strength and note any differences.
Document: Document the muscle strength grade and any observations made during the test in the patient’s medical record.
Interpretation: Interpretation of results should be done by a qualified healthcare professional, taking into account other factors such as age, gender, medical history, and other clinical findings.
Ankle Inversion

Testing muscles
- Tibialis posterior
Patient’s position
The patient must be in the side-lying position
Examine in side lying ankle off the edge of the bed.
For assessing grades 0 to 2 patient is supposed to be in a supine or short sitting position.
Therapist’s position
The therapist should be on a stool or chair in front of the patient.
Do the palpation of the tibialis posterior muscle
Other hand use for resistance over the dorsum & medial aspect of the foot
How to test?
- Position the patient in a seated or supine position with the ankle in a neutral position.
- Stabilize the lower leg with one hand while grasping the foot with the other hand.
- Instruct the patient to resist as you attempt to invert their foot (turning it inward) while maintaining a neutral ankle joint position.
- Apply gradual force while assessing the strength of the patient’s resistance.
- Grade the strength of the muscle on a scale of 0-5, with 0 being no muscle contraction and 5 being normal strength with a full range of motion.
- Repeat the test on the other ankle for comparison.
- Document your findings and incorporate them into the patient’s treatment plan.
It is very important to notice that manual muscle testing should only be performed by trained medical professionals who have been properly trained with the proper method. moreover, it is very important to consider any contraindications or precautions before doing an examination on a patient.
Ankle eversion
Testing muscles
- Peroneus Longus
- Peroneus Brevis
Patient’s position
The patient must be in a comfortable posture.
The patient has to be in a Side-lying position with the test-side ankle off the edge of the bed.
For assessing grades 0 to 2 patient suppose to be in a supine or short sitting position
Therapist’s position
The therapist should be on a stool or chair in front of the patient
His One hand is used for palpation of peroneal tendon muscle.
For assessing grades 4 and 5 give resistance force on the dorsum and lateral foot
How to test?
Here are the steps to perform ankle eversion manual muscle testing:
- Position the patient in a seated or supine position with the ankle in a neutral position.
- Instruct the patient to resist as you attempt to evert their foot (turning it outward) while maintaining a neutral ankle joint position.
- Stabilize the lower leg with one hand while grasping the foot with the other hand.
- Apply gradual force while assessing the strength of the patient’s resistance.
- Grade the strength of the muscle on a scale of 0-5, with 0 being no muscle contraction and 5 being normal strength with a full range of motion.
- Repeat the test on the other ankle for comparison.
- Document your findings and incorporate them into the patient’s treatment plan as needed.
It is very important to notice that manual muscle testing should only be performed by trained medical professionals who have been properly trained with the proper method. moreover, it is very important to consider any contraindications or precautions before doing an examination on a patient.
Precaution
- Ensure that the patient is comfortable and relaxed before starting the test.
- Explain the procedure to the patient before starting the test.
- Avoid excessive force during the test to prevent injury to the patient.
- Use proper body mechanics to avoid straining your muscles.
- Avoid performing the test on a patient with an acute ankle injury or severe pain.
- Stop the test immediately if the patient experiences any discomfort or pain.
- Always perform a thorough assessment of the patient’s medical history and current condition before performing the test
FAQ
Ankle manual muscle testing is a physical examination technique used to assess the strength of the muscles that control ankle movement.
The dorsiflexors, plantarflexors, inverters, and everters of the ankle are typically tested during ankle manual muscle testing
Ankle manual muscle testing is important for diagnosing and monitoring conditions that affect the muscles surrounding the ankle joint, such as ankle sprains, tendonitis, and neurological disorders. It can also help guide treatment planning and rehabilitation efforts.
Ankle manual muscle testing should only be performed by trained healthcare professionals who have been properly trained in the technique. Additionally, it is important to consider any contraindications or precautions before performing the test on a patient.