
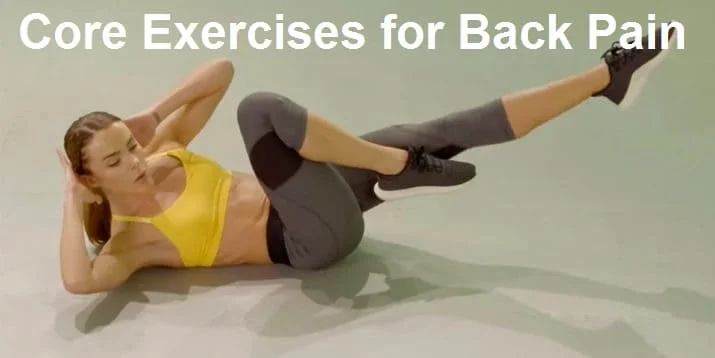
Core exercise for Back Pain
Table of Contents
Introduction of Core Exercise for Back Pain
- Core exercise for back pain is highly recommended by Physiotherapists for improving the function of the lower back, Stability, and Balance.
- Core stability (CS) was introduced for the first time in the 1990s by (Hodges and Richardson) while studying the timing of trunk muscles in patients with chronic low back pain CLBP.
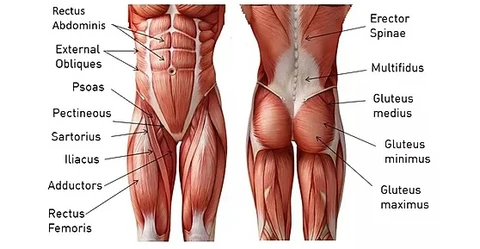
- Traditionally this term has referred to the active component of the stabilizing system including deep/local muscles that provide segmental stability (eg transversus abdominis, lumbar multifidus) and/or the superficial/global muscles (eg rectus abdominis, erector spinae) that enable trunk movement/torque generation and also assist in stability in more physically demanding tasks.
- The low back, also called the lumbar region, is the area of the back that starts below the rib cage.
- Lumbar (lower back) Five vertebrae (L1 to L5) make up the lower part of the spine. Your lumbar spine supports the upper parts of the spine. It connects to the pelvis and bears most of your body’s weight, as well as the stress of lifting and carrying items. Many back problems occur in the lumbar spine.
Definition
- The part of the spine is comprised of five vertebral bodies (L1-L5) that extend from the lower thoracic spine (chest) to the sacrum (bottom of the spine). The vertebral bodies are stacked on top of each other with a disc in between each one.
- They include the large muscles in the lower back (erector spinae), which help hold up the spine, and gluteal muscles. Flexor muscles. Attached to the front of the spine, these muscles include the abdominal muscles. They allow us to flex, bend forward, lift, and arch the lower back.
- CS is defined as the ability to maintain equilibrium and control of your spine and pelvic region during movement without compensatory movement just within physiological limits.
WHICH ARE THE CORE MUSCLES?
Local/ deep muscles
- muscles that contribute to joint stability and are located more centrally near the joint anatomically attach to many parts of passive elements of the joint to provide stability for the joint during movement.
- The local/deep muscles have their origin or insertion on the lumbar vertebra and, therefore, can exert a segmental stabilizing/stiffening effect. Local muscles are;
- Transversus abdominis
- Multifidus
- Diaphragm
- Pelvic floor muscles
- Internal obliques
- The mechanism of the deep muscle stability is controversial but transversus abdominis may act like a canister with the diaphragm and pelvic floor muscles. This co-contraction increases the intro-abdominal pressure, which creates an extension moment at the spine and has been hypothesized to increase stability/stiffness in particular via connections with the thoracolumbar fascia. The multifidus may increase the rotational segmental stability in the sagittal and horizontal plan.
- Normal function of the deep muscle system is impaired with back pain. There is strong evidence supporting the effectiveness of treatment aimed at normalizing this function by way of specific motor control training, and specific muscle activation.
Global muscles
- There is a wide range of superficial/global muscles that are large, cross multiple segments, responsible for movement. attach the pelvis trunk to the thoracic or upper limb and lower limb and do not attach directly to the vertebrae for example;
- Rectus abdominis
- External obliques
- Parts of the erector spinae.
- These muscles generate torque, acting like guy ropes to control spinal orientation and work in co-contraction to control spinal motion in the application of external loads.
Anatomy
| Action of the Trunk | What the Action Looks Like (Move Your Body!) | Primary Muscles |
| Trunk flexion | Bend forward, or “curl up” action | Rectus abdominis (trunk flexors) |
| Trunk extension | Stand up straight (from bent over), bend backwards | Erector spinae (back extensors) |
| Trunk rotation (ipsilateral and contralateral rotation) | Twist to the left and right | Internal and external obliques |
| Lateral trunk flexion | Bend to the side | Obliques and one side of rectus abdominis and erector spinae |
| Compression of the abdomen | Draw your belly button into your spine | Transverse abdominis |
| Spinal stability | Holds your spine stable during movement | Multifidus |
Functions of the core Muscles
The core is used to stabilize the thorax and the pelvis during dynamic movement and it also provides internal pressure to expel substances (vomit, feces, carbon-laden air, etc.)
- Continence
Continence is the ability to withhold bowel movements, and urinary stress incontinence (the lack of bladder control due to pelvic floor dysfunction) can result from weak core musculature.
2. Pregnancy
Core muscles, specifically the transversus abdominis, are used during labor and delivery.
3. Valsalva maneuver
Core muscles are also involved in the Valsalva maneuver, where the thorax tightens while the breath is held to assist, often involuntarily, in activities such as lifting, pushing, excretion, and birthing.
Core exercises: Why you should strengthen your core muscles
- Core exercises improve your balance and stability
Core exercises strengthen the muscles in your pelvis, lower back, hips, and abdomen to work in harmony. This leads to better balance and stability, whether on the playing field or in daily activities. In fact, most sports and other physical activities depend on stable core muscles.
2. Core exercises don’t require specialized equipment or a gym membership:-
Any exercise that involves the use of your abdominal and back muscles in a coordinated fashion counts as a core exercise. For example, using free weights in a manner that involves maintaining a stable trunk can train and strengthen several of your muscles, including your core muscles.
You may also try several specific core exercises to stabilize and strengthen your core. Some examples of core exercises include planks, situps, and fitness ball exercises.
3. Core exercises can help tone your abs:-
Core exercises are important. Although it takes aerobic activity to burn abdominal fat, core exercises can strengthen and tone the underlying muscles.
Strong core muscles make it easier to do most physical activities.
such as swing a golf club, get a glass from the top shelf and bend down to tie your shoes. Strong core muscles are also important for athletes, such as runners, as weak core muscles can lead to more fatigue, less endurance and injuries.
Weak core muscles can also leave you susceptible to poor posture, lower back pain and muscle injuries. Strengthening core muscles may also help improve back pain.
4. Core exercises can help you reach your fitness goals:
Aerobic exercise and muscular fitness are the primary elements of most fitness programs. But to have a well-rounded fitness program, consider including core exercises in the mix as well.
Importance of Core Strength
Improved Balance and Stability
- Core exercises train the muscles in your pelvis, lower back, hips and abdomen to work together. This leads to better balance and stability making daily activities such as walking, running, and sitting much easier. A strong core will consist of muscles that work together to support your body. This will make you less susceptible to injuries, keeping your body aligned and minimizing strain on your muscles and joints.
Eliminates Back Pain:
- A body that is aligned and upright will make you less prone to have back pain. A person’s core is at the center of their body which supports your entire body especially the neck and the back. If a core is not strengthened then other structures of your back will have to work harder to support the body. This leads to muscle strains and back pain.
Upright Posture:
- Good posture lessens wear and tear on the spine and allows you to breathe deeply making it easier for oxygen to travel through your muscles so they are able to contract. An upright posture can help you survive sitting or standing for long periods of time. It is important to have a strengthened core because it keeps your body aligned, eliminates back pain, and increases your overall exercise output.
Core exercise for back pain:
Core Muscles Strengthening Exercises
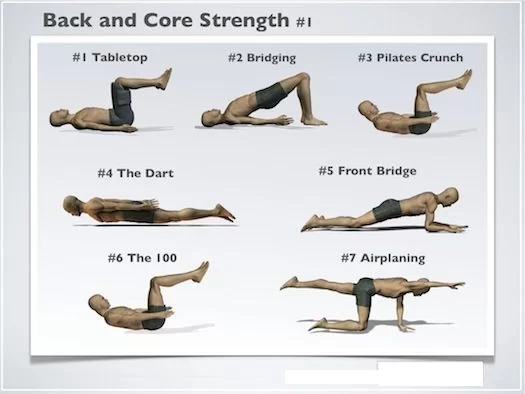
Beginners – (Core exercise for back pain):
1)Bridge
2)Crunch
3)Plank
4)Supine Toe Tap
5)Panther shoulder tap
6)Half kneeling wood chop
7)Rolling like a ball
Intermediate moves:
1)Bird dog
2)Mountain climber
3)Warrior crunch
4)Leg raise
5)Butterfly sit up
6)Dead bug
7)Side blend
8)C-curve
9Plank tap
Advanced moves:
1)Side plank with rotation
2)Bird dog with elbow to knee
3)Bicycle crunch
4)High boat to low boat
5)Body saw
6)Jackknife
7)Hollow hold to jackknife
8)Hollow body rock
9)Wheelbarrow
10)Tabletop leg press
11)Row your boat
12)Single leg jackknife
13)Hip dip
How to do Core exercise for back pain?
Beginners:
- 1)Bridge :
- This pose activates your glutes to lift your hips. This trains your core while toning your butt and thighs.
- Start on your back. Bend your knees and plant your feet on the floor at hip width. Place your hands at your sides, palms down.
- Tighten your core and glutes.
- Raise your hips until your knees are in line with your shoulders.
- Hold for 10–30 seconds.
- 2)Crunch:
- Crunches are a classic core-strengthening move. The act of lifting your upper body works your abdominal muscles.
- If you have low back pain, do crunches with care. Move slowly and start with just a few reps.
- Start on your back. Bend your knees and plant your feet on the floor at hip width. Line up your head and spine. Cross your arms across your chest.
- Tighten your core and relax your neck and shoulders. Tuck in your chin and lift your upper back, keeping your lower back, pelvis, and feet on the floor. Pause.
- Slowly lower your upper back to return to the starting position.
- Start with 1 set of 8–12 reps.
- 3)Plank:
- The plank is a full-body exercise that targets your core. It also strengthens your arms, shoulders, back, glutes, and legs.
- Start on all fours, with your hands below your shoulders and your knees below your hips.
- Straighten your legs behind you, keeping your feet hip-width apart. Tighten your core.
- Hold for 10–30 seconds.
- To make this exercise easier, place your knees on the floor.
- 4)Supine Toe Tap:
- The Supine Toe Tap is a basic Pilates exercise. It engages your core muscles while working your glutes, hips, and legs.
- Toe taps also place minimal pressure on your spine. If you have back pain, toe taps may be an ideal alternative to crunches.
- Start on your back. Lift your legs, knees bent to 90 degrees. Place your hands at your sides, palms down.
- Tighten your core. Lower your right foot and gently tap the floor, keeping your left leg still and your back flat.
- Raise your right leg to return to the starting position. Repeat with your left leg.
- Start with 1 set of 8–12 reps.
- 5)Panther shoulder tap:
- Start on all fours.
- Engage your core and while keeping your back flat and your butt down (like you’re in a plank), lift your knees off the floor about 1-3 inches. Gaze at the floor a few inches in front of your hands to keep your neck in a comfortable position.
- Tap your right hand to your left shoulder, and then your left hand to your right shoulder, while using your core strength to keep your hips as still as you can.
- Continue alternating sides.
- 6)Half kneeling wood chop:
- Start on your knees, and then step one leg a few feet in front of the other, foot flat on the floor and knee bent at 90 degrees. Hold a light-to-medium dumbbell by the knee that’s on the floor. Grasp onto both ends of the weight. This is starting position.
- Bring the weight diagonally up toward the ceiling on the opposite side of your body, twisting your abs as you do. Keep your hips facing forward—only your core muscles should be rotating.
- Bring the weight back down to starting position.
- Do all your reps on one side, and then repeat on the other side.
- 7)Rolling like a ball:
- Sit up tall with your knees bent and feet flat on the floor. Wrap your arms around your legs and hold onto the outside of your ankles. Curl your head and chest forward in toward your knees.
- Scoop your core muscles in deeply, then roll your body back until your shoulders touch the ground. Don’t roll so far that your neck or head touches the ground.
- Rock back up to a seated position.
Intermediate moves:
- 1)Bird dog:
- The bird dog engages both your abdominal and back muscles, so it’s an ideal core-strengthening move. It also challenges your coordination, balance, and stability.
- Start on all fours, hands below your shoulders and knees below your hips.
- Tighten your core. Lift and straighten your right leg to hip level. Simultaneously lift and extend your left arm to shoulder level, palm down. Pause.
- Repeat with your left leg and right arm.
- Start with 1 set of 8–12 reps.
- 2)Mountain climber:
- This intermediate exercise combines a plank with knee movements, so it’s an excellent move for balance and core strength.
- Start in a plank with your hands below your shoulders. Tighten your core.
- Lift your right knee toward your chest, keeping your back straight and hips down.
- Return your right leg to the starting position as you simultaneously lift your left knee toward your chest.
- Continue alternating legs. Start with 1 set of 8–12 reps.
- 3)Warrior crunch:
- This crunch variation works your core and lower body, including your thighs, glutes, and quads.
- Stand with your feet slightly wider than shoulder width and your toes turned outward. Put your hands behind your head and open your chest.
- Tighten your core and glutes. Bend your knees until your thighs are parallel to the floor.
- Bend your torso to the side, moving your right elbow toward your right thigh. Repeat on the left side.
- Start with 1 set of 8–12 reps.
- 4)Leg raise:
- Lie face up with your legs extended and hands at your sides or tucked underneath your hips for extra support.
- Slowly raise your legs, keeping them together and as straight as possible, until the soles of your shoes are facing the ceiling.
- Then, slowly lower your legs back down. Don’t let your feet touch the floor; instead, keep them hovering a few inches off. That’s 1 rep.
- As you do this move, make sure to keep your lower back flat on the floor. If you’re having a tough time doing that, don’t lower your legs as far.
- 5)Butterfly sit up:
- Lie face up with the soles of your feet together, knees bent out to sides. Reach your arms overhead. This is starting position.
- Using your core, roll your body up until you are sitting upright. Reach forward to touch your toes. That’s 1 rep.
- Slowly lower back down to starting position and continue immediately into the next rep.
- 6)Dead bug:
- Lie face up with your arms extended toward the ceiling and your legs in a tabletop position (knees bent 90 degrees and stacked over your hips). This is starting position.
- Slowly extend your right leg out straight, while simultaneously dropping your left arm overhead. Keep both a few inches from the ground. Squeeze your butt and keep your core engaged the entire time, lower back pressed into the floor.
- Bring your arm and leg back to the starting position.
- Repeat on the other side, extending your left leg and your right arm.
- 7)Side blend:
- Start in a side plank with your right hand on the floor, directly underneath your right shoulder, and your feet staggered so the left is right in front of the right (as shown). You can also stack your left foot on top of your right.
- Engage your core and your butt. Let your left arm relax by your left side.
- Dip your hips down toward the ground and then lift them back up. This is 1 rep.
- Do all your reps on one side, and then repeat on the other side.
- 8)C-curve:
- Sit on your tailbone with your knees bent and feet flat on the floor. Hold onto each leg just above the knee.
- Round your spine, tuck your tailbone, and begin to lower your torso back, as if you were lowering back after a sit-up.
- About halfway (like in the photo above), stop and hold. Keep your entire core and your quads engaged.
- For an extra challenge, let go of your legs and just hold your arms out in front of you.
- 9)Plank tap:
- Start in a high plank position with your palms flat on the floor, hands shoulder-width apart, shoulders stacked directly above your wrists, legs extended behind you, and your core and glutes engaged.
- Tap your right hand to your left shoulder while engaging your core and glutes to keep your hips as still as possible. Try not to rock at the hips.
- Do the same thing with your left hand to your right shoulder.
- Continue alternating sides.
Advanced moves:
- 1)Side plank with rotation:
- This exercise is an advanced version of the basic plank. It strengthens the arms, shoulders, and obliques by combining a side plank with arm movements.
- Lie on your right side with your right forearm below your shoulder. Extend your legs, left foot on top of right. Tighten your core.
- Lift your hips to form a straight line with your body. Raise your left arm straight up.
- Rotate your torso toward the floor and bring your left arm under your body.
- Rotate your torso and straighten your left arm to return to the starting position.
- Start with 1 set of 8–12 reps.
- Repeat on the other side.
- 2)Bird dog with elbow to knee:
- This variation on the basic bird dog incorporates fluid movement to engage your abs and back while improving core mobility.
- Start on all fours, hands below your shoulders and knees below your hips.
- Tighten your core. Lift and straighten your right leg to hip level. Simultaneously lift and extend your left arm to shoulder level, palm down.
- Bring your right knee and left elbow toward each other. Return to the starting position.
- Start with 1 set of 8–12 reps.
- Repeat on the other side.
- 3)Bicycle crunch:
- This classic exercise strengthens your abs by placing them under constant tension.
- Start on your back. Bend your knees and plant your feet on the floor at hip width. Line up your head and spine. Place your hands behind your head, elbows pointing out to the sides.
- Tighten your core and move your shoulders back and down. Bend your right knee toward your chest and extend your left leg, lifting it a few inches off the floor.
- Lift your left shoulder and upper back, bringing your left elbow toward your right knee.
- Tap your left shoulder on the floor and simultaneously switch your legs.
- Continue alternating elbows and knees, starting with 1 set of 8–12 reps.
- 4)High boat to low boat:
- Sit up straight with your legs bent, feet flat on the floor.
- Keeping your legs together, slowly lift them off the floor until they form a 45-degree angle to your torso. Engage your entire core, keep your back flat, and balance on your tailbone.
- You can keep your knees bent (as pictured) or straighten them out for more of a challenge.
- Reach your arms straight out in front of you, parallel to the floor. If you feel that you need some extra support, place your hands on the floor, underneath your hips.
- This is High Boat. Hold here for three deep breaths.
- Then, lower your legs, straightening them out, while also lowering your upper body. Both your shoulder blades and legs should hover a few inches off the floor. If that is too challenging, keep them slightly higher off the floor and work toward bringing them lower and lower.
- This is Low Boat. Hold for one breath, and then lift your legs and torso back to High Boat.
- 5)Body saw:
- Put your toes on a set of gliders or towels and then get into a forearm plank with your forearms on the floor, elbows directly underneath your shoulders, hands facing forward so that your arms are parallel, and legs extended behind you. Tuck your tailbone and engage your core, butt, and quads. This is starting position.
- Slowly push with your forearms and elbows to slide the gliders or towels back toward the wall behind you. Move as far as you can without losing core engagement. Don’t let your hips sag.
- Slowly pull with your arms and elbows to return to the starting position.
- 6)Jackknife:
- Lie face up with your legs extended and arms extended overhead on the floor, keeping them close to your ears. Contract your abs to press your low back into ground. This is starting position.
- Point your toes, squeeze your thighs together, squeeze your glutes, and simultaneously lift your legs and upper back off the ground, reaching your hands forward to meet your feet so that your body forms a V.
- Keep your core engaged as you slowly lower to return to starting position.
- 7)Hollow hold to jackknife:
- Lie face up with your legs extended and arms straight over your head, keeping them close to your ears.
- Contract your abs to press your low back into ground.
- Point your toes, squeeze your thighs together, squeeze your glutes, and lift your legs off the ground.
- Lift your shoulders off the ground and keep your head in a neutral position so that you’re not straining your neck. Your legs and mid-back should both be off the ground, and you should be in the shape of a banana with just your low back and hips on the ground. This is starting position, a hollow hold.
- Stay in the hollow hold position for as long as you can, up to 10 seconds.
- Then, lift your arms and legs to meet so that your body forms a “V” hold for a breath, and slowly lower back down to hollow hold position.
- 8)Hollow body rock:
- Lie face up with your legs extended and arms straight over your head, keeping them close to your ears.
- Contract your abs to press your low back into ground.
- Point your toes, squeeze your thighs together, squeeze your glutes, and lift your legs off the ground.
- Lift your shoulders off the ground and keep your head in a neutral position so that you’re not straining your neck. Your legs and mid-back should both be off the ground, and you should be in the shape of a banana with just your low back and hips on the ground. This is starting position.
- Slowly rock forward and back, keeping everything tight, to the point that your feet and hands nearly touch the floor.
- If this is too difficult, get into the starting position and simply hold.
- 9)Wheelbarrow:
- Start on all fours with a glider or towel under each hand. Squeeze your core and tuck your tailbone so that your back is flat, like you’re doing a plank from your knees. This is starting position.
- Slowly push your hands in front of you, keeping your arms straight. Glide as far as you can while still maintaining your torso in a plank position.
- Press into the floor and pull your arms back to return to starting position.
- 10)Tabletoop leg press:
- Lie face up with your legs raised in a tabletop position (knees bent 90 degrees and stacked over your hips).
- Contract your abs to press your low back into ground. Crunch up just a few inches and place your hands on the front of your quads.
- Drive your quads into your hands while simultaneously pressing them away. There should be no visible movement in your body, but you should feel the battle and intense tension in your core.
- 11)Row your boat:
- Sit up straight with your legs bent, feet flat on the floor.
- Keeping your legs together, slowly lift them off the floor until they form a 45-degree angle to your torso. Engage your entire core, keep your back flat, and balance on your tailbone.
- You can keep your knees bent (as pictured) or straighten them out for more of a challenge.
- Reach your arms straight out in front of you, parallel to the floor. If you feel that you need some extra support, place your hands on the floor, underneath your hips. This is High Boat.
- From here, clasp your hands in front of you and twist at the waist toward one side, swinging your arms to the same side as if you had an oar in your hands and you were rowing.
- Immediately twist to the opposite side and repeat the same arm movement.
- Continue alternating sides.
- 12)Single leg jackknife:
- Lie face up with your legs extended and arms by your sides. Contract your abs to press your low back into the ground. This is the starting position.
- Squeeze your thighs together, squeeze your glutes, and simultaneously lift your left leg and upper back off the ground, reaching your right hand forward to meet your left foot. Your torso and your left leg should form a V.
- Keep your core engaged as you slowly lower to return to the starting position.
- Repeat with the opposite leg and arm. Continue alternating sides.
- 13)Hip dip:
- Start in a forearm plank with your forearms on the floor, elbows directly underneath your shoulders, hands facing forward so that your arms are parallel, and legs extended behind you. Tuck your tailbone and engage your core, butt, and quads.
- Rotate your hips to the left side and tap the floor. Repeat on the right side.
- Continue alternating sides.


5 Comments