External & internal obliques muscles stretching exercise
Table of Contents
What are external as well as internal oblique muscles stretching?
- External & internal obliques muscles stretching exercise is a great way to increase the flexibility of the trunk & have many health benefits.
External, as well as internal obliques, are large muscles in an abdominal area. - This muscle extends diagonally from the ribs to the pelvis, this obliques plus the rectus & transverse abdominals make up the abdominal wall, Oblique muscles work together to control movement in the spine, rib cage, and pelvis as well.
- If the patient looks at the anatomy of the obliques, as much as where they attach to a pelvis & rib cage, they are involved in the stabilization of a pelvis, so this is important to make sure that these muscles may be flexible & they are working as they should. Which provides flexibility throughout the entire motion system. Stretching oblique muscles assists to promote good posture, balance, as well as coordination; decrease the risk of injuries, & improves fitness as well as athletic performance.
- When the patient thinks of stretching, the abdominals might not be the first muscles that come to mind. However, tight abdominals may increase the risk of injury. The muscles that run along the sides of the waist, the obliques, allow the patient to bend sideways and rotate the torso.
- When external oblique, as well as internal oblique muscles, are tight, this can affect the performance in sports requiring overhead hitting & cause a misalignment of a spine to the right or left. By including oblique stretches in the regular workouts the patient may help to prevent injury, maintain correct spinal alignment as well as improve the posture.
- If the patient overstretches, they can do more harm than good for the obliques. The patient should expect some discomfort, pulling, or even slight burning with the oblique stretches, but sharp pain may indicate muscle damage.
- In effect, overstretching becomes counterproductive. Perform oblique stretches on both sides right & left equally to maintain muscular balance as well as proper spinal alignment.
Health Benefits of External & internal Oblique Stretches
- Treats as well as Prevents Low Back Pain:
- When the patient does not stretch the oblique muscle, then the muscles will stiffen as well as become less flexible over time & induce back pain. That is why regular doing of the lower back, as well as oblique stretches, is helpful to prevent or treat back pain issues.
- Supports Proper Muscle Functioning:
- It is general knowledge that stretches may improve flexibility. These stretches involve the use of the abdominal muscles.
- promoting their proper functioning, which in turn prevents & even treats slipping rib syndrome as well as neuralgia.
- Improves Recovery:
- Stretching oblique muscles assists them to come back to full movement, speeding up recovery & allowing you to have your next workout easy.
- Prepares the Body For The Training:
- When the patient is doing stretching before the workout, they warm up the body, preparing the muscles for the workout, & this leads to improving physical performance & prevention of possible injuries.
Anatomy of the External obliques muscle
- Origin
- This originates from an external surface of the lower eight ribs 5-12.
- Insertion
- Most posterior fibers are directed vertically & other fibers are anteromedially.
- The External oblique continues as an aponeurosis at midclavicular line superior as well as spinoumblical line inferiority, by which inserts into a linea alba, an anterior half of the iliac crest & the pubic tubercle.
- Nerve
- The upper two-thirds of the external abdominal oblique is supplied by lower intercostal nerves T7-T11 as well as subcostal nerve T12.
- The lower third is supplied by an iliohypogastricL1 from the lumbar plexus.
- Blood supply
- Upper 2/3 receives blood supply from branches of lower posterior intercostal as well as subcostal arteries, lower 1/3 from deep circumflex iliac artery.
Anatomy of the internal obliques muscle
- Origin
- Lateral two-thirds of an inguinal ligament, anterior two-thirds of the intermediate line of the iliac crest, thoracolumbar fascia.
- Insertion
- Lower four ribs, abdominal aponeurosis of the linea alba, and the crest of the pubis.
- Nerve
- Ventral rami of intercostal nerves(T 7-T 11),
- ilioinguinal nerve( L1).
- Blood supply
- This receives blood supply from
- Lower posterior intercostal as well as subcostal arteries,
- superior & inferior epigastric arteries,
- superficial as well as deep circumflex arteries,
- posterior lumbar arteries.
There have different variations of oblique muscle stretches
- Stand and Bend
- Sit and Lean
- Lie Down and Twist
- Seated Rotation
- Triangle Pose (Trikonasana)
- Cobra Pose (Bhujangasana)
- Cat-Cow Stretch
- Criss-Cross Prep
- Half Lord of the Fishes Pose
- Spine Stretch Forward
Stand and Bend
- How to perform it?
- This variation not only stretches the oblique muscles but also stretches the anterior abdominal muscles & the muscles that run along the spinal column. Embark this stretches by standing with the feet shoulder-width apart & both feet parallel.
- Intertwine the fingers as well as extend the arms overhead, turning the palms up toward the sky. Breathe in & engage the abdominals as well as glutes. Breathe out & bend to the right, the hips should be steady throughout the exercise. Hold the peak position for 30 seconds, then come back to the starting position. Repeat the stretch on both sides.

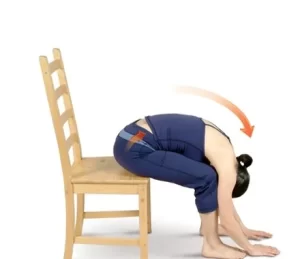
Sit and Lean
- How to perform it?
- The sit or lean stretch, may elongate the oblique muscle & work the patient’s lower flexors. For example, sit erect in the chair with the feet hip-width apart & feet flat on the floor. Slowly raise the upper back & then flexed from the waist. Lower the head as well as the torso toward the left knee, feeling the right oblique stretch.
- Continue to lower the head to below the left knee. Hold the stretch for up to thirty seconds, then come back to the starting position. Repeat the stretch, lowering the head to the right knee.
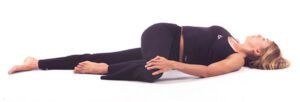
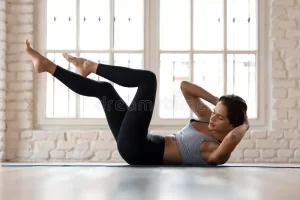
Lie Down and Twist
- How to perform it?
- Any time the patient twists the torso to the left or right, they will stretch as well as strengthen the oblique muscle. For instance, try supine oblique stretches with a twist. Begin by lying on the ground face-up with the head cradled in the hands or the arms extended to your sides at shoulder level. Flexed the knees up to a 90-degree angle, the legs should be together.
- Slowly draw the hips & both knees to the left side while keeping the feet stacked. The right foot should be on top of the left foot. Keep the upper body as well as shoulders pinned to the floor throughout the stretch. Hold the peak position for anywhere for thirty seconds and then come back to the start position. Repeat the stretch on the opposite side.
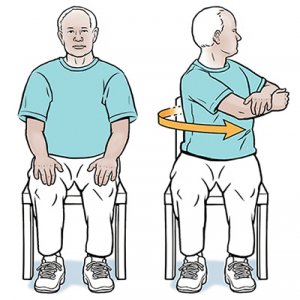
Seated Rotation
- How to perform it?
- Take the sit on a chair with the spine neutral.
- Rotate the body to the right side & pause the position.
- Then turn on the left side & pause.
- Hold the rotation for 20-30 seconds.
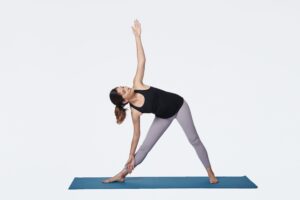
Triangle Pose (Trikonasana)
- How to perform it?
- To perform the stretch the patient has to Stand on the yoga mat, with the feet double shoulder-width apart.
- The right foot should point straight to the front while the left heel is perpendicular to the right foot (left foot toes pointing to the left). Learn the trunk to the left, touching the top of the left foot or the left shin with the left hand during pointing the right arm vertically upwards.
- Turn the head so that you face the right arm. Hold the position for twenty seconds (or less, if the patient starts experiencing discomfort), & repeat, changing sides.
Cobra Pose (Bhujangasana)
- How to perform it?
- To do the stretch you have to Lie down facing the floor with the top of the feet flat on the mat.
- With the arms stretched out in front, press down on the hands during keeping the arms straight, lifting the trunk off the ground.
- As the patient does leave the pelvis, thighs, knees, & feet are pressed to the mat. Hold the pose for thirty seconds, then come back to the supine.

Cat-Cow Stretch
- How to perform it?
- The stretch assists with the mobility as well as the flexibility of the transverse abdominal muscles. This also giassists intretching as well as strengthens the abdominal & lower back muscles.
- To do the stretch the patient has to come on the hands as well as knees, & tuck the head down as you arch the back, similar to how the cat does it.
- Now Extend the neck as much as possible, & drop the tummy all the way downwards, stretching a transverse abdominal
- muscles.
- Hold for 20 seconds, then come back to the starting position.
- Repeat 3 to 4 times.

Criss-Cross Prep
- Start on the back with the knees bent, feet flat on the ground. Make sure the feet are about a fist’s distance apart. Reach the arms by the side with the shoulders away from the ears. Feel like you are open across the front of the chest.
- Bring the straight left arm across the body & place it on the right thigh. The left arm will stay straight through the whole exercise.
- Bend the right elbow as well as place the right hand behind the back of the head so that the fingertips are touching the part of the skull behind the ear. Try your best to relax the right shoulder open so the back of the arm as well as elbow rest on the ground.
- Keep the pelvis in neutral, do not let the low back collapse or even press into the floor, & inhale through the nose.
- Exhale through pursed lips, let the low belly drop toward the spine, & slide the left hand up the right leg. The patient should feel the rib cage lift as well as rotate. The right elbow & back of the arm stay stable on the ground the whole time. Make sure the pelvis stays in neutral & does not collapse or press into the floor.
- Inhale through the nose & rotate back to the center.
- Complete 5-10 repetitions on this side.
Half Lord of the Fishes Pose
- Inhale as well as exhale through the nose throughout this pose.
- Begin seated with the legs straight in front of you.
- Feel the SITS bones press into the mat beneath you. The patient might have to use the hand to scoot some tissue out of the way in order to feel a good connection between the bottom & the ground. The patient may use the hands to internally rotate the thighs.
- Press down through the SITs bones to feel the head reach toward the roof.
- Draw the belly button to the spine.
- Bend the right knee.
- Step the right foot so that it is now on the outside of the left knee.
- Bend the left leg & bring the left foot toward the right butt cheek. Only do this if the patient is able to reconnect both SITs bones to the mat. If one of the SITs bones will not reconnect, straighten the left leg & reconnect. This is really important that you are able to feel both SITs bones press into the mat.
- Press down through the SITs bones & feel yourself lift through the top of the head.
- Double-check that the abdominals are still drawn toward the spine.
- Inhale & reach the left arm toward the ceiling to get a good stretch in the side body.
- Exhale as well as rotate toward the right. Let the right arm naturally reach the ground behind you. Stay high on the fingertips to assist keep the right arm active. Bring the outside of the left arm to the outside of the right thigh, & bend the elbow. If the arm will not meet the thigh, bend the left elbow & loop the arm around the right knee to facilitate the twist. Gaze over the right shoulder.
- Hold here & breathe for 5-8 breaths.
- To come out of this pose, keep the muscular energy as you unwind & return back to the starting position with the legs straight in front of you.
- Repeat steps 3-14 for the other side. Make sure that this time you bend the left knee & bring the outside of the right arm to the outside of the left thigh. Switch sides.
Spine Stretch Forward
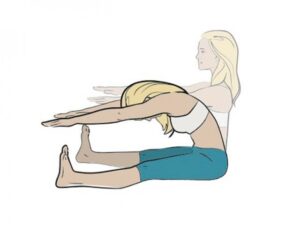
- Sit with the legs straight in front of you, wider than the hips. Flex the feet so you feel the heels press into the mat. Make sure that you can feel the SITs bones press into the mat. If you cannot feel the SITs bones (those bony parts in the tush), sit on the folded blanket or bolster. This will assist reduce strain on the hamstrings and, when you get elevated to the correct height, the patient should be able to feel the SITs bones press into whatever you are sitting on.
- Take a moment to sit in the position. Make sure that the hip flexors (in the front of the hips) are relaxed. If you are not sure if they are, take the thumbs & press into the front of the hips. Feel free to explore a little & dig around.
- As you feel the SITs bones press into whatever is beneath you, feel yourself lift through the top of the head. When the patient lift through the spine, notice how the belly button naturally draws toward the spine.
- Inhale through the nose to lengthen the spine & lightly engage the abdominals.
- Exhale through pursed lips as well as roll forward one vertebra at a time (starting with the head). As you roll, let the hands slide along the tops of the legs, keeping the elbows straight. (This will help keep the shoulders away from the ears.) Stop after the bottom rib hinges into the body so that you make a C shape. Never collapse the upper body onto the legs. You should still feel that the SITs bones pressing into the mat, and the hip flexors should be relaxed.
- Inhale into the spine. Exhale & hold here. Inhale as well as exhale two more times so you take a total of three breaths here.
- On the last exhale, reverse sequence & roll up one vertebra at a time. Draw the belly button to the spine as you stack it back up.
- Make sure the head comes all the way up to neutral when you come back.
- You may do this 3-5 times.
Safety Tips
- To stay safe while stretching the abdominal muscles, keep these tips in mind:
- Go at your own pace: Stretching is not an activity that requires speed or the ability to keep up with the person next to you. To stay safe & get the most out of the abdominal stretches, do not push yourself beyond what is comfortable.
- Avoid quick motions: Avoid doing any fast or even jerky movements during stretching. This includes bouncing while moving through &holding the stretch.
- Only go as far as you can: During any type of stretching, it is important to only go to the point of tension. If the patient goes beyond this, you increase the potential for injury.
- Decrease the range of motion if the abs hurt. If you are feeling extra tightness or even discomfort in the trunk area, go easy on the stretching, & consider reducing the range of motion. The patient does not have to do the full range of motion to benefit from stretching.
- “Some muscles may lose their flexibility after repeated workouts, which can alter the posture & put additional pressure on the spine”.
FAQ
How does the patient relax their external oblique?
Raise the arms to the side with the elbows bent as well as fingers pointing up. Engage the abdominal muscles & slowly bend sideways to the right, bringing the right elbow towards the ground. Do not bend forward or even rotate. The patient should feel the stretch through the obliques.
What causes tight internal oblique?
The oblique muscle strain is most likely caused when the torso, the part of the body (trunk) excluding the head as well as limbs, gets twisted or even rotated badly. Other oblique muscle strain causes include Too much use of the muscle. Intense workouts.
What does oblique strain feel like?
The oblique injury also called side strain, may feel like sharp pain in the rib cage the first time the oblique muscle gets injured. Over time, the patient may experience a sense of tightness as well as pressure on the lower ribs or the front side of the abdomen.
What is the difference between internal and external obliques?
Internal obliques originate from an inguinal ligament, which is a ligament that runs from an anterior iliac spine to a pubic bone. Additionally, they can insert on an anterior iliac crest. The external obliques, however, originate on the lower eight ribs.
How long do oblique strains take to heal?
While some mild oblique strains may be resolved in just a few days, severe strains can require surgery with a recovery time of 3-4 months. However, when the recovery is severe this condition takes more time as compared to the mild injury to the muscles, we can say 5 to 6 months nearly.