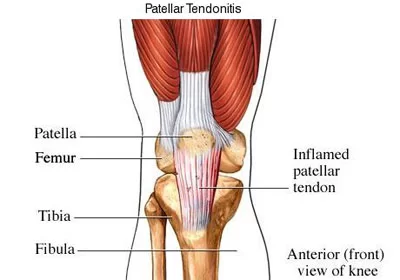
16 Best Exercises For Fracture Of The Anterior Superior Iliac Spine
Table of Contents
Introduction:
A common injury among teenagers participating in sports, especially those involving sudden, powerful muscular contractions, is an avulsion fracture of the anterior superior iliac spine. A bony part at the front of the iliac crest, the anterior superior iliac spine, is where the sartorius muscle and the inguinal ligament join.
Often, this type of injury is marked by aching, swelling, and an unusually intense pain in the immediate area of the front of the hip. The diagnosis is typically confirmed by a physical examination and imaging tests such as MRI scans or X-rays, which can reveal the extent of the fracture and any associated soft tissue damage.
Nonsurgical therapy is still the most well-known and widely used option for less painful treatment. Depending on the patient’s needs, the degree of fragment displacement, or the severity of the avulsion fracture, surgery may be required even when conservative treatment is first advised.
Following an anterior superior iliac spine fracture, targeted Exercises For Fracture Of The Anterior Superior Iliac Spine are usually used to promote recovery. These exercises involve controlled mobility and rest.
Causes:
Muscle imbalance or not enough warm-up
- An unusual, unexpected contraction put on by a poor warm-up raises the chance of fracture.
Direct Pelvic Trauma
- An anterior superior iliac spine attack or impact, such as in:
- A car accident, Contact-based sports, such as football tackles and rugby hits, or falling onto the hip or pelvis.
Prolonged or excessive stress
- The Anterior Superior Iliac Spine may eventually develop an avulsion as a result of recurrent strains that weaken the bone or the muscle-tendon attachment.
Previous Weakness or Injury
- A history of hip or pelvic injuries may put the anterior superior iliac spine at risk for reinjury.
- Muscle imbalances or previous strains may make the area prone to injury.
Medical Conditions Underlying (Rare)
- Weakness of bones (such as osteoporosis or osteomalacia)
- metastases or tumors affecting the pelvic bones
- Genetic disorders that impact bone or connective tissue, such as osteogenesis imperfecta
Signs and symptoms:
Bruising
- may appear 24–72 hours after an injury.
- Depending on how severe it is, pain may move to the thigh or groin.
Sharp, Acute Pain in the Front of the Hips or Pelvis
- usually occurs after a strenuous activity, such as running, jumping, or kicking.
- “Snapping” or “pulling” sensation that is intense and localised to the site of the injury.
Tightness or muscular contractions
- Muscle spasms for protection may occur in the pelvis and thighs.
- Your sartorius or quadriceps may feel stiff or difficult to stretch.
Limitations on Movement
- Extending the leg backward, or hip flexion or extension, is uncomfortable or restricted when resistance is present.
- Overstretching the sartorius muscle, as occurs when the hip is extended while the knee is flexed, causes pain.
Tenderness Over ASIS
- It hurts to palpate the ASIS directly.
- Frequently, extremely sensitive to pressure or touch.
Walking with difficulty or limping
- Bearing weight can be uncomfortable or painful.
- To avoid utilizing their affected leg, some people may start to limp noticeably.
Weakness of Muscles
- Tensor Fascia Lata (TFL) and/or sartorius muscular weakness or stiffness.
- During functional movements, it could be slight but noticeable.
Advantages of exercise:
Reduces the constant pain
- Ineffective treatment may be the reason for persistent hip, pelvic, or low back pain.
- Through the restoration of normal muscle function and biomechanics, exercise can help prevent long-term problems.
Encourages Blood Flow and Healing
- Improved blood flow from gentle movement helps the injured area receive more nutrients and oxygen, helping in the healing of soft tissues and bones.
- By avoiding blood stasis, mobilisation reduces the likelihood of issues like deep vein thrombosis (DVT).
Prepares to Return to Activity or Sports
- A designed rehabilitation program includes sport-specific workouts to prepare the patient to return to full-time sports engagement.
- Exercise is essential for increasing stamina, endurance, and flexibility to prevent further injuries.
Provides Back Normal Function and Gait
- Specific exercises target compensatory movement patterns, poor posture, and limping that arise with an injury.
- Encourages healthy leg movement and symmetrical weight bearing.
Prevent Muscle Atrophy
- Muscular atrophy results after immobilisation, especially in the quadriceps, hip flexors, and abdominal muscles.
- Controlled exercise helps in the maintenance of strength and muscle mass during the healing process by encouraging muscular activation.
Avoids Joint Stiffness and Contractures
- Immobilisation may cause tight hip flexors and pelvic supports.
- Stretching and mobility exercises, particularly in the tensor fascia lata and iliopsoas, help prevent contractures.
Increases Strength and Functionality
- The rectus femoris, iliopsoas, and sartorius are among the surrounding muscles that are strengthened by physiotherapy with gradual loading.
Strengthens the Pelvic and Core
- Core-focused rehabilitation enhances pelvic control.
- Stability in the lower back
- Lowers the chance of recurrent injuries or follow-up issues like low back pain.
Facilitates Emotional and Mental Healing
- Movement helps the damaged area feel more confident.
- Helps fight off mood swings caused by inactivity, fear, or frustration by releasing endorphins.
Exercise For The Anterior Superior Iliac Spine Fracture:
Restoring mobility is the primary goal of a hip rotation rehabilitation program for those who suffer from this issue. Other objectives include hip-strengthening and stretching activities. Your anterior superior iliac spine will benefit most from these recommended stretches and exercises.
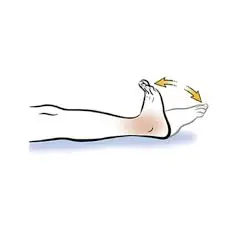
Ankle pump
- Extend your legs when lying or sitting.
- Your legs should remain relaxed and supported.
- The movement of your toes away from you as you push the gas pedal is called plantar flexion.
- The next step is dorsiflexion, which is flexing your foot and pinching your toes together.
- Continue moving in a steady, flexible rhythm like this.
- Then return to your neutral position.
- Then relax.
- Repeat these exercises five to ten times.
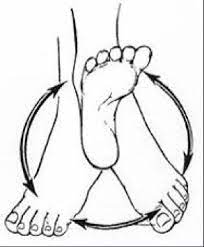
Ankle circle
- Extend your leg while lying on the bed.
- Keep your leg loose and off the ground.
- Carefully turn your foot in a circle at the ankle.
- Make five to ten clockwise rounds.
- Next, 5–10 anticlockwise.
- Then return to your neutral position.
- Then relax.
- Repeat these exercises five to ten times.
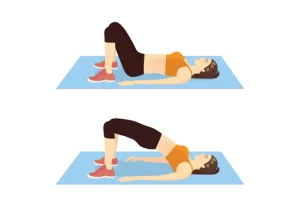
Bridging
- Using a mat if you have one, lie on your back in an open area on the floor.
- By your sides, rest your hands.
- Lower your feet flat on the floor beneath your knees while bending your knees.
- By pressing your lower back against the floor, you may tighten your buttocks and abdomen.
- Raise your hips so that your knees and shoulders form a straight line.
- Pull your belly button back towards your spine while generating core pressure.
- Hold this position for a few seconds.
- Lower your body.
- Then return to your neutral position.
- Then relax.
- Repeat these exercises five to ten times.
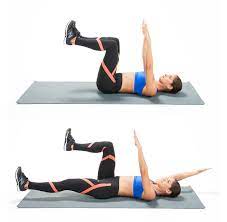
Dead bug
- The dead bug exercise requires about the same amount of space as a yoga mat because it is done on the ground.
- With your arms straight up and at an angle parallel to your body, lie on the mat.
- Raise your feet off the floor by bending your hips and knees to a 90-degree angle.
- Both your thighs and shins, and your torso and thighs should create a straight angle.
- This is where you start.
- Keep your lower back in touch with the mat while engaging your core.
- Throughout the workout, you want your spine to stay in this neutral, stable position.
- Slowly extend your left arm backward, across your head, and towards the floor, keeping your right arm and left leg in their exact positions.
- You reach your right heel towards the floor while simultaneously extending your right knee and hip.
- As you complete the extensions, breathe in and move gently and steadily.
- Don’t move or twist your abs or hips.
- Stop your movement as your arm and leg touch the floor.
- Put your right leg and left arm back where they were before you reversed the motion.
- Breathe out as you go, moving gently and calmly.
- Then return to your neutral position.
- Then relax.
- Repeat these exercises five to ten times.
Isometric Glute Squeezes
- Place your feet flat on the floor and lie on your back.
- Your arms were at your sides, relaxed.
- Squeeze your buttocks together as firmly as you can to activate your glutes.
- For a few seconds, hold the squeeze.
- Then return to your neutral position.
- Then relax.
- Repeat these exercises five to ten times.

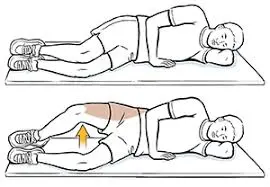
Clamshell
- Your hips and shoulders should be aligned while you lie on your side.
- Keep your feet together while bending your knees to around a 90-degree angle.
- Make sure your head is in line with your spine and support yourself with your lower arm.
- Avoid arching your back by using your core and tucking your pelvis gently.
- Without turning your hips, raise your top knee as high as you can while keeping your feet touching.
- At the top, take a moment to squeeze your glutes.
- Return to your initial posture by lowering your knee gradually.
- Don’t jump or rock; instead, keep your movement regulated.
- Then return to your neutral position.
- Then relax.
- Repeat these exercises five to ten times.
Seated Resistance Hamstring Curl
- Place the resistance band behind you, low to the ground.
- Faced away from the anchor point, take a seat on a stable bench or chair.
- The sort of band you have will determine whether you loop it around your heels or ankles.
- To apply pressure to the band when your legs are outstretched, scoot forward a little on the chair.
- Maintain a straight back, engage your core, and sit tall.
- Knees bent slightly, legs stretched forward a little.
- Make sure your feet are hip-width apart.
- As much as it is comfortable, bend your knees and pull your heels back toward the chair.
- Remain upright and prevent slumping.
- Squeeze your hamstrings as you perform the curl.
- Hold this position for a few seconds.
- Move your legs slowly while avoiding the pull of the band.
- Avoid having your legs snapped forward by the band.
- Then return to your neutral position.
- Then relax.
- Repeat these exercises five to ten times.

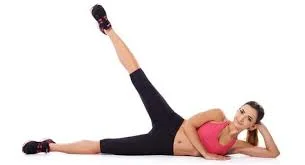
Lying Lateral Leg Raises
- Position yourself on a yoga mat in the right side line position.
- Use your right hand or a little towel underneath it to support your head and neck.
- To assist with upper body support, place your left hand on the side of your left hip or in front of your waist. Get your core moving.
- Place your legs on top of each other with your legs fully stretched, without locking your knees.
- Keeping your feet in line, start the upward action by lifting your left leg a few inches from your right.
- Hold this position for a few seconds.
- Then return to your neutral position.
- Then relax.
- Repeat these exercises five to ten times.
Resistance Band Clamshell
- Place your hips and shoulders lined up on your side.
- Aim for a 90-degree bend in your knees, keeping your feet parallel to your hips.
- Over your knees, place the resistance band.
- Rest your head against your arm while using your core.
- Avoid allowing the top hip to roll back; instead, keep your hips upright.
- Your feet remain together during the exercise.
- Don’t arch your back and maintain a neutral spine.
- Raise the top knee vertically while keeping your feet clasped together.
- Limit the distance you can go without turning your pelvis.
- Keep your glutes squeezed while maintaining this position.
- Return your knee to the floor slowly and gradually.
- Then return to your neutral position.
- Then relax.
- Repeat these exercises five to ten times.

Thomas test
- A sturdy bed, bench, or exam table should be adjusted so that your legs may extend loosely over the side.
- On your back, lie close to the table’s edge.
- Your legs ought to extend naturally at the knees from the edge.
- With the help of your hands, pull one knee to your chest.
- Keep your lower back flat against the table by holding your knee to your chest.
- The opposing leg continues to extend loosely from the edge.
- Hold this position for a few seconds.
- Then return to your neutral position.
- Then relax.
- Repeat these exercises five to ten times.

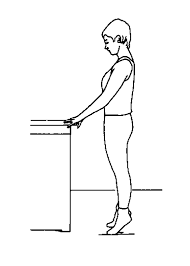
Standing heel raise
- Get started by standing on the ground.
- Position yourself behind a chair.
- Then, for support, rest your hands on the back of the chair.
- Make sure your feet are hip-width apart.
- To put your weight on your toes, you have to lift your heels off the floor.
- Hold this position for a few seconds.
- Drop down your heels.
- Then return to your neutral position.
- Then relax.
- Repeat these exercises five to ten times.
Standing Hip abduction
- Get started by standing on the ground.
- After that, spread your feet shoulder-width apart.
- Reach out to the side with the left arm while holding onto a solid object, like a wall, table, or chair.
- Next, extend the right leg to the right side.
- Keep your left leg straight and avoid twisting your hips.
- Hold this position for a few seconds.
- Then return to your neutral position.
- Then relax.
- Repeat these exercises five to ten times.
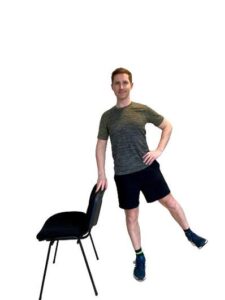
Standing Hip extensions
- Begin by standing on the ground.
- Keep the spacing between your feet shoulder-width apart.
- Spread both arms wide in front of you and stabilise yourself by holding onto a chair, table, or wall.
- Then extend your left leg.
- As much as you can raise the leg without injuring it, then gently squeeze the buttocks.
- Hold this position for a few seconds.
- Then return to your neutral position.
- Then relax.
- Repeat these exercises five to ten times.

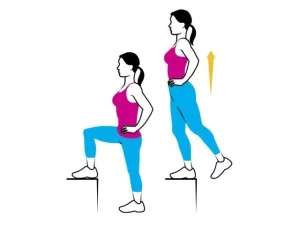
Step Up
- You should begin by standing on the floor.
- Put a lower platform or step box in front of you after that.
- Put the injured foot on the step, such as the right foot if the right ASIS is broken.
- Push through your heel to elevate your body and straighten your knees and hips.
- Control your muscles rather than using force.
- Lift the unhurt foot to the step.
- Step back down gradually, beginning with the foot that isn’t hurt and working your way down to the one that is.
- Then return to your neutral position.
- Then relax.
- Repeat these exercises five to ten times.
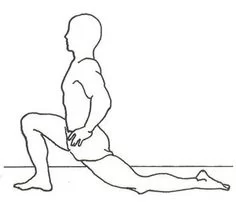
Hip Flexor Stretch
- Take a lunge position to begin.
- With your left foot in front of you, kneel on your right knee, making both knees 90 degrees.
- Under your knee, use a towel or yoga mat for comfort.
- Maintain a straight back.
- Tuck your pelvis in a little.
- Use your abdominal muscles.
- Your hips should be moving toward your front heel as you lean forward a little.
- The right hip’s front should feel somewhat stretched.
- Hold this position for a few seconds.
- Avoid jumping and take deep breaths.
- You can support yourself by placing your hands on your front knee.
- Then return to your neutral position.
- Then relax.
- Repeat these exercises five to ten times.
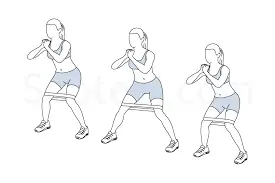
Sidewalk with Band
- Make sure the band is flat and not curved when you wrap it around both legs and just above each ankle.
- You should place your feet shoulder-width apart.
- The band should not be stretched, but rather taut.
- Position yourself with your knees slightly bent in a half-squat position.
- Maintain your feet in line with your shoulders while positioning your face forward and distributing your body weight equally between both feet.
- Maintain the half-squat stance by taking a step sideways with the opposing leg and moving your weight over the other leg.
- Use this leg to perform 5–10 repetitions of sideways in/out motions.
- During the exercise, maintain a level hip position.
- For this exercise, it helps to maintain a low, forward-facing posture.
- Then return to your neutral position.
- Then relax.
- Repeat these exercises five to ten times.
What safety measures must be followed when exercising?
Safety is crucial when exercising following an anterior superior iliac spine (ASIS) fracture in order to facilitate an easy return to full function, assure proper healing, and avoid re-injury.
Avoid painful motions.
- If you get intense, pulling, or chronic pelvic or groin pain while exercising, you should stop.
- In the beginning, refrain from performing too many thigh or hip flexor stretches.
Start with thoughtful, low-impact motions.
- Avoid hurrying, jumping, twisting, or changing direction unexpectedly.
- Start with isometric and range-of-motion exercises.
Development of Weight-Bearing
- Remain in the recommended weight-bearing state (non-weight bearing → partial, → full).
- Use crutches or other devices for mobility as directed in the early stages.
Slowly make progress.
- Increase repetitions, resistance, and range of motion gradually.
- Don’t begin running, jumping, or sport-specific workouts until the end of your recovery and under professional supervision.
Pay attention to fatigue and pain.
- It’s normal to have some muscle soreness.
- Avoid ignoring extreme pain, as this could be a sign of re-injury.
Use assistive technology as needed.
- Use walkers, crutches, or canes if your balance is off.
- Full weight-bearing can only be achieved with a doctor’s approval.
- If your balance is compromised, do not stand unsupported.
Maintain Proper Posture
- Keep your hips, knees, and feet in a neutral position during each exercise.
- Use wall support, mirrors, or supervision to ensure form.
- An improper posture may cause strain on the joints or muscles nearby.
Employ the Right Method
- Form should always come before intensity.
- Pay attention to hip control, core engagement, and pelvic alignment.
- Consult a physiotherapist if you have concerns about the quality of your movements.
Keep the Uninjured Side in Mind
- Keep the rest of your body strong and flexible.
- As tolerated, include core exercises, upper-body movements, and mild mobility.
Make getting enough sleep and rest a priority.
- Include rest days between sessions to allow recovery.
- Balance rehab with proper sleep, hydration, and diet to help bone healing.
When did you stop working out?
Stop exercising and consult your doctor if you have any of the following symptoms:
Severe or Unexpected Pain
- Located at the anterior superior iliac spine (ASIS), which is the front of the pelvis or groin.
- Pain that gets worse while you work out or after.
Either swelling or inflammation
- Joint swelling can result from excessive exercise, especially in the early phases.
- Additionally, it could be caused by underlying conditions like arthritis.
Signs of Fatigue or Overuse
- Persist for 24 to 48 hours after working exercise.
- Feeling too exhausted to carry out basic movements or rehabilitation exercises.
Reduced Power or Range of Motion
- If, rather than expanding, your range of motion contracts.
- If you suddenly feel weak in your legs or pelvis.
Not the Correct Form or Approach
- Poor posture might cause strain in other joints and compensatory movement.
If you have an anterior superior iliac spine fracture, which workouts should you avoid?
Exercises or activities that put strain on the hip flexors, pelvis, or require fast leg movements should be avoided if you have an anterior superior iliac spine (ASIS) fracture, especially while the injury is still healing.
Running or Jogging
- The fracture site is stressed by repeated hip flexion and high impact.
- It can cause dislocation or postpone recovery.
Training with high-intensity intervals (HIIT)
- Frequently involves running, jumping, or sudden direction changes.
- Re-injury risk as a result of sudden muscle contraction.
Deep Lunges or Squats
- They are more dominant in the legs and glutes, but they continue to apply force on the hips and pelvis.
- Avoid until the doctor gives the all-clear.
Continuously stretching the quadriceps or hip flexors
- The fracture site may be pulled if muscles connected to the ASIS are overstretched.
- May cause a delay in healing.
Core Exercises That Involve Hip Flexion
- Exercises such as V-ups, mountain climbers, and bicycle crunches.
- Push on the ASIS while vigorously using your hip flexors.
Engage in Martial Arts or Sports
- Risk of slipping and falling, or suffering direct pelvic injuries.
- Wait to return after you’ve healed completely and been cleared by a physician.
Prevention:
Give rest and recovery priority.
- One frequent cause is overuse.
- Take 7 to 9 hours of rest.
- Plan days for rest.
- Utilize soft tissue techniques (massage, foam rolling) to promote healing.
Increase Your Mobility & Flexibility
- Tight hamstrings, quadriceps, or hip flexors can place excessive strain on their bony attachments, increasing the risk of avulsion.
- Stretch frequently:
- Quadriceps and hip flexor muscles
- Calves and hamstrings muscles
Prevent Unexpected Increases in Activity
- Sprinting or kicking are examples of sudden, powerful contractions that cause the majority of ASIS fractures.
- Avoid making weekly increases in training volume or intensity of more than ten percent.
- There should be a gradual build-up before jumping or sprinting at high intensity.
Pay Attention to Your Body
- Hip or groin pain should not be ignored, particularly if it gets worse while you run or kick.
- Avulsion or tension in ASIS can appear early as:
- A sharp pain in the pelvic front
- Bruising or swelling
- Limping
- If any of these happen, stop training and get checked out by a doctor.
Summary:
In children and young adults who participate in sports, avulsion fractures of the anterior iliac spine are uncommon acute injuries. The patient’s history has a big impact on the diagnosis. Growth plate injuries need to be identified and treated quickly to prevent these types of fractures.
Recovery from an anterior superior iliac spine fracture requires patience and persistence. With the correct assistance, the majority of people regain full function and can return to their usual sports or activities. Continue to follow a graded exercise regimen throughout your recovery, and stay in regular communication with your physiotherapist.
Early and thoughtful assessment and treatment of growth plate injury are necessary to prevent these types of fractures. The most effective plan of action is still conservative therapy since it permits a return to sports without any side effects.
FAQ:
Is exercising safe for someone who has had an avulsion fracture?
Moving and exercising early: The following exercises must be performed with very little pain. This could keep your ankle and foot from getting overly tight. Early weight bearing, or placing weight through the injured foot, speeds up the healing process.
After an avulsion fracture, is physiotherapy rehabilitation necessary?
After avulsion injuries, physical rehabilitation is crucial for early weight bearing and return to sports. Reducing pain and swelling after an avulsion fracture is the primary goal. For the bone to heal, cold compression and enough rest must be applied.
If you have a fractured anterior superior iliac spine, what should you not do?
To give the bone time to heal, you should refrain from engaging in physically demanding activities like running and playing sports.
Can an avulsion fracture heal itself without the need for surgery?
Rest, ice, and carefully supervised exercise regimens intended to improve range of motion, build muscle, and promote bone healing are typically used to treat avulsion fractures.
What are the risk factors for avulsion fractures?
Young athletes who are still growing their bones are more likely to have them. Youngsters who play or practise too hard, too frequently, or with incorrect skills may be more prone to these fractures.
How can avulsion fractures be prevented?
Before engaging in any sport, warm up and stretch.
Avoid going overboard in any sport.
Avoid making sudden motions (such as twisting or changing direction).
Engage in activities that will help you build and strengthen your pelvic muscles.
Does physiotherapy help after a fracture?
In actuality, this is one of the greatest treatments for fractures. Physiotherapy allows the injured limbs to be strengthened in the early phases of healing and lessens joint stiffness around broken limbs. Later, in unaffected areas, applying different modalities may be beneficial in reducing pain and swelling.
When you have a fracture, how do you usually walk?
Early on in the healing process, you may probably need assistance with crutches or a walker. In particular situations, following an injury or surgery, the patient may be able to place as much weight as possible on the leg; however, until the fracture has healed, you might not be able to place your whole body weight on the leg.
References:
- M. R. Safran (2018). anterior superior iliac spine avulsion fractures (AIIS). At the Sports Medicine Department of Orthopedic Surgery. ASIS-Avulsion.pdf https://marcsafranmd.com/wp-content/uploads/2018/08
- D. Bariya (2023, Dec. 13). Fracture of the anterior superior iliac spine by avulsion. Avulsion fracture of the anterior superior iliac spine. Mobile Physiotherapy Clinic. https://mobilephysiotherapyclinic.in/
- Work out at hip-exercises-sitting.htm or go to https://www.uhb.nhs.uk/services/trauma-and-orthopaedics/hip-fracture-surgery.htm (see “Hip exercises (sitting exercises) complying with hip fracture surgery,” at the moment). When the incident occurred, “hip movements adhering to a hip fracture procedure (sitting as exercises),”
- K. G. P. Exercise, Dpt, 2023, September 18. Exercises for Physical Therapy and Walking After a Femur Fracture Very well Medical. https://www.verywellhealth.com/physical-therapy-and-exercises-for-broken-femur-5224410. Citation inside the text: (Dpt, 2023)
- July 5, 2024a; Barrell, A. How can you lessen iliac crest pain? What is it? Article: 319695 https://www.medicalnewstoday.com
- Guide | Femur Fracture Physical Therapy Guide. 2020, June 14. Pick PT. physical-therapy-guide-femur-fracture https://www.choosept.com/guide. In 2020, the Physical Therapy Guide to Femur Fracture was published. Citation inside the text:
- Image 7, Manual for Lifting. 2023b, April 24. Form, advantages, and guidance for the Resistance Band Seated Leg Curl. Seated-leg-curl with resistance band: https://liftmanual.com/