22 Best Exercise for Dancer’s Heel
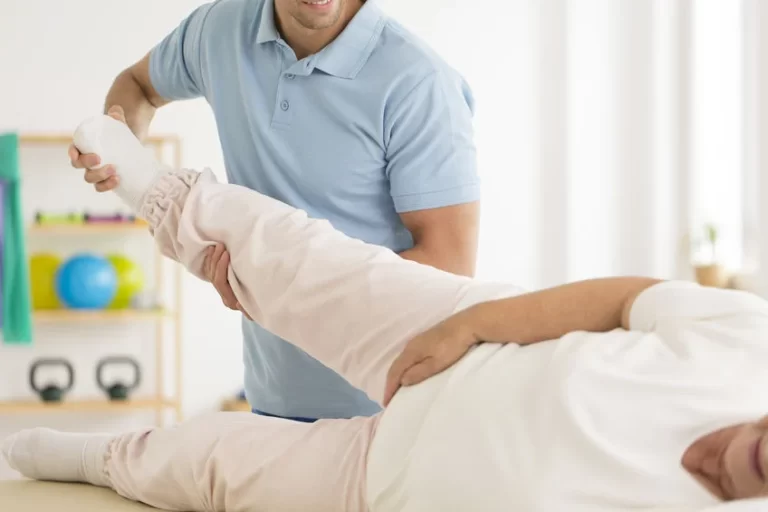
Exercise for a Dancer’s Heel is an essential part of your overall treatment program along with Pain medication, Rest, and Physiotherapy Treatment.
Dancer’s heel, also known as Achilles tendinitis, is a common condition among dancers and athletes. To address this condition effectively, it’s essential to incorporate specific exercises into your routine.
Table of Contents
Introduction
“Dancer’s heel,” also known as “dancer’s tendonitis,” is a condition that primarily affects people who engage in activities that require repetitive or excessive use of the foot and ankle muscles, such as dancers and athletes. (It affects all sports that require repetitive thrusts and extreme leg bending, e.g. swimmers, sprinters, soccer players and athletes, and gymnasts). the ankle is compressed due to bone formation at the back of the ankle. The pain can be triggered by a sprained ankle or tissue stuck between the ankle and the heel. When the soft tissue at the back of the ankle is compressed, it becomes inflamed and painful. Back impingement syndrome is common in ballet dancers.
The ankle is an important joint to understand when it comes to dance injuries because it is the connection between the foot and the foot that creates the stability of the lower limb. It is one of the most frequently injured areas of the body in dance. The incidence of complex ankle joints in ballet, modern, flamenco, and tap dancers ranges from 27 to 49% of all injuries.
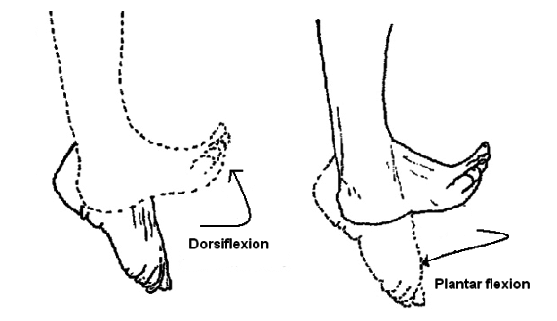
Dancer’s tendinitis is also called Flexor Hallucis Longus (FHL) tendinitis, which is an overuse injury in which repetitive plantarflexion and dorsiflexion (pointing and bending) of the foot causes inflammation of the FHL tendon.
In dancers, FHL injuries are usually caused by the repetitive motion of changing position from plié to relevé. (Plié is a French term meaning to bend, and relevé is a ballet term meaning “raised”. The term relevé describes the act of a dancer rising on toes). This movement generates a force equal to ten times the dancer’s body weight,
In this article, we’ve covered everything about a dancer’s heel condition, including symptoms, causes, and medical and physical therapy. Physiotherapy exercises include all types of exercises such as mobility exercises, stretching exercises, and strengthening exercises. Physiotherapy also includes machine therapy to relieve pain and regulate the full range of motion, reduce swelling, and strengthen the ankle or foot muscles.
Our Approach to Dancer’s Heel
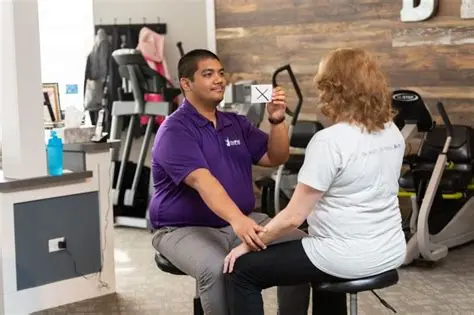
Dancer’s heel treatment begins with non-surgical treatments to reduce pain and swelling. We can also recommend working with a physiotherapist familiar with dance injuries. The procedure used depends on the source and location of the problem.
Our team includes highly trained orthopedists specializing in ankles and feet, as well as podiatrists, physiotherapists, and (specialists in modified footwear and lower leg support devices). Our goal is to relieve pain and restore mobility so patients can return to their normal lives and activities they enjoy. We offer doctors, medical imaging, and physical therapy in one convenient location.
Causes of dancers’ heel
Dancers are dealing with most of the ankle conditions. The most common reasons that lead to injuries of the heel are:
Ballet dance and repetitive classes, rehearsals, and performances
Duration of training
Environmental factors such as hard floors and cold studios etc.
Equipment used, especially shoes
Individual dancer’s body alignment
Prior history of injury
Nutritional deficiencies
Excessive activity
Extra bone growth(Os Trigonum)
Biomechanical factors
inflammation and pain in the posterior aspect of the ankle.
High-impact activities (Running, jumping, and other high-impact movements )
Muscle and tendon strains (Tight calf muscles)
Symptoms of Dancer’s Heel
Common symptoms of dancer’s tendonitis include:
Heel pain
Limping
Heel warmth
Morning heel stiffness
Redness and swelling
Tenderness to touch
When you do dorsiflexion movement you do not feel the pain
Diagnosing Dancer’s Heel
Diagnosis of dancer’s tendinitis or Achilles tendinitis usually involves a combination of medical history, physical examination and sometimes imaging. The assessment steps are given below:
Medical History:
The healthcare provider will first ask about the child’s symptoms, including how the pain started, activities that worsen or relieve the pain, and any related medical history.
Medical examination:
The healthcare provider will perform a thorough physical examination of the affected leg. They assess pain, swelling, and warmth in the heel area. They can also assess a person’s gait and foot mechanics to identify contributing factors.
Palpation:
To assess the tenderness of the growth plate and surrounding areas, the provider can press lightly on the back of the heel.
Range of motion:
The provider may test ankle and foot range of motion to assess limitations or abnormalities.
Image studies:
In most cases, the diagnosis of a dancer’s tendinitis does not require imaging tests, such as X-rays, because it is a clinical diagnosis. X-ray studies provide you with other possible causes of heel pain, such as stress fractures or structural problems. if there is not any type of this condition your x-rays show normal.
Positive Tomasen test:
This test evaluates the MTP effect of the first movement. This test was performed by evaluating the range of motion of the first MTP in both positions, i.e.maximum arch flexion and moderate ankle dorsiflexion. To perform the test correctly, the first tarsal head must be stabilized to prevent compensatory flexion of the first tarsal head. A positive test is the first MTP joint discomfort or decreased extension of twenty degrees with an ankle reflex. If the therapist allows the person to release the foot bend the sole straight and point the foot out, they will have a better range of motion of the big toe. This happens because the plantar flexion stretches the tendon. The doctor will look for other possible causes of heel pain and rule out conditions that mimic the symptoms of a dancer’s tendinitis. A healthcare provider diagnoses the dancer’s illness based on information gathered from the medical history, physical examination, and necessary imaging studies if the clinical findings are consistent with the clinical features. disease scores.
Exercises for Dancers’ heel
Ankle circles
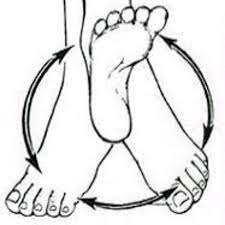
If your ankles are weak or if you want to improve your dance performance, ankle exercises, and stretches can improve your mobility and strength. Start by stretching. These circles help with movement and can be done sitting or lying down. Place a rolled towel or foam roller under the ankle. Rotate your ankle slowly in circles, clockwise for ten circles and counterclockwise for eight to ten circles. Move only the foot and ankle, not the foot. Change the stretch by tracing the letters of the alphabet with your big toe.
Ankle flexion (plnterflexion)
If your ankles are weak or you want to improve your athletic performance, ankle exercises, and stretches can improve your mobility and strength. his move uses a resistance band to strengthen the ankle while you point the toes down toward the heel (plantar flexion). Start with the Sitting position on the floor or plinth with one leg flexion at the knee, heel on the ground, and the other foot comfortably flat on the floor.
Wrap the tape around the front of your foot and hold each end with your hands. gradually point your toes in the flexion position and then back to the starting position. releasing the tension. performed three sets of ten repetitions on each leg three days a week.
Ankle flexion (dorsiflexion)
If your ankles are weak or you want to improve your dance performance, ankle exercises, and Stretches can improve your mobility and strength. This exercise uses a tension band to flex the ankle while pulling the toes toward you (dorsiflexion). Start with the Sitting position on the floor or mat with your legs stretched out in front of you. Tie the ribbon around the leg of a chair or table, then wrap it around the other leg.
Gradually point your toes towards you and then return to the starting position. performed three sets of ten repetitions on each leg three days a week.
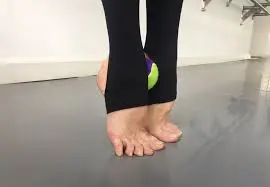
Toe splay

This exercise helps you control the muscles in your toes. You can do toe splay exercise one leg at a time or both legs together. Sit with your feet on the floor. Spread(toe abduction) your toes as far as possible.
Holding the movement around five to ten seconds gradually increases the duration of the hold which is representative of the progression of the condition. Relax your toes. Repeat five to ten times on each finger. For the progression, you can add exercise with the elastic rubber wrap the rubber around your fingers, and then do the toe splay. rubber increase the resistance and provide strength to your muscle.
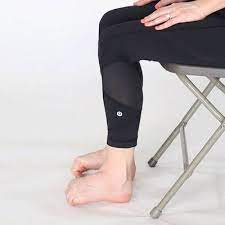
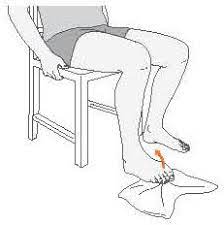
Planter fascia strech
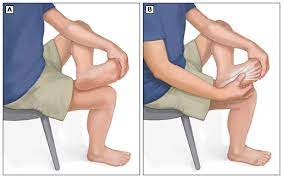
If you have heel pain from regular dance practice, one of the best ways to get relief is by stretching and strengthening the problem area. Relaxing the plantar fascia can prevent it from tearing, strengthen the supporting muscles (thereby helping to reduce stress on the ligament), and reduce inflammation. While sitting on a chair, keep one leg on the floor and cross the other leg over it.
The ankle of the crossed leg should rest on the thigh of the lower leg. Hold your calcaneum for stabilization and put your other hand on the toes. Extend the bottom of your foot by gently pulling your toes back. Do the stretch three times, holding for ten to fifteen seconds each time. Then do the same procedure or stretch on the other leg. You can be performed three times per session and do three sets or before dance practice.
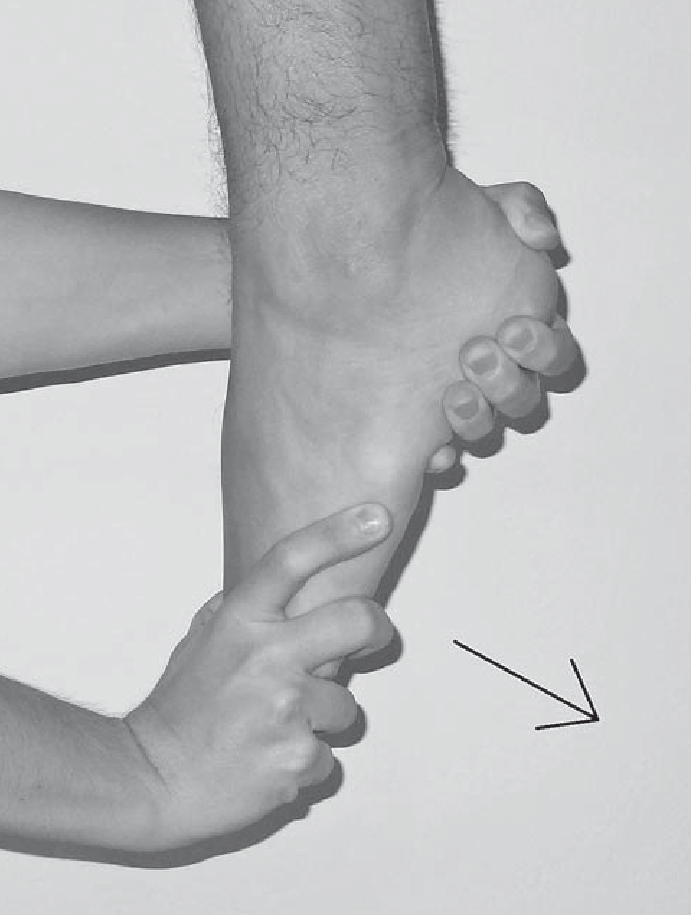
Great toe stretch
For a great toe stretch, with the use of one hand stabilize your foot by holding it near the area (closer to the center) where your toes meet. Hold the big toe with your other hand gently pull it forward and bend it down or up from the bottom until you feel a slight stretch. Do not turn it to maximum range of motion as this can cause more pain. Hold the toe position for 30 seconds where you feel a slight stretch before releasing.
Optional: Gently massage the arch of your foot with one hand as you stretch
Stretching the big toes relaxes and reduces pain. Stretching your toes lengthens and relaxes the muscles, which prevents painful spasms and contractions. Combined with toe-strengthening exercises, these stretches can also help prevent overuse or repetitive strain injuries. And since they are also very painful, stretching is a win in every way.
Calf muscle stretch

Calf stretching is an important part of rehabilitation in the treatment of many foot and ankle problems. A calf strain can affect the position of the foot, its movement, and its balance. This is a common cause of both leg and knee pain. Studies have shown that the most effective way to stretch is to stretch your calves for 30 seconds. Repeat legs at least three times for best results. Less and stretching has minimal effect. A calf stretch should be uncomfortable but not painful. Any discomfort should stop as soon as you stop straining.
Calf stretches should not be performed immediately after an injury, such as a calf tear, as this can cause further damage. Due to the anatomy of the calf muscles, each calf muscle must be stretched separately. Gastrocnemius stretches usually feel stronger than Soleus stretches.
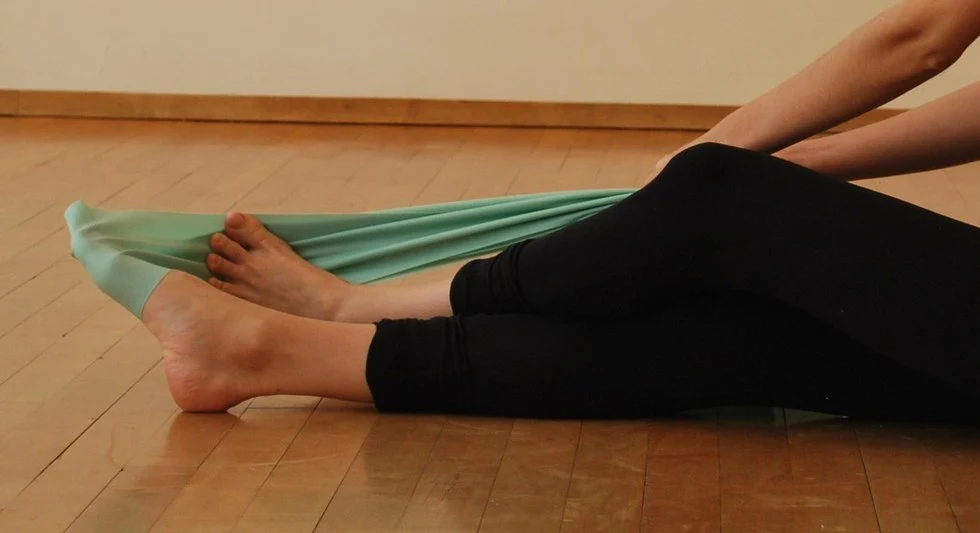
Starting position: Sit on the floor with your leg straight out in front of you. Place a towel or belt around the balls of your feet and hold the ends.
Action: Pull your toes and feet toward you and walk through the towel to increase ankle flexion until you feel a strong stretch in the back of your leg.
Repetition: Hold the stretch for around 30 seconds, repeat three times per session, and do three sets per day.
Variations: To stretch the gastrocnemius muscle, keep your knee straight while performing this exercise. Bend the knee slightly to stretch the soleus.
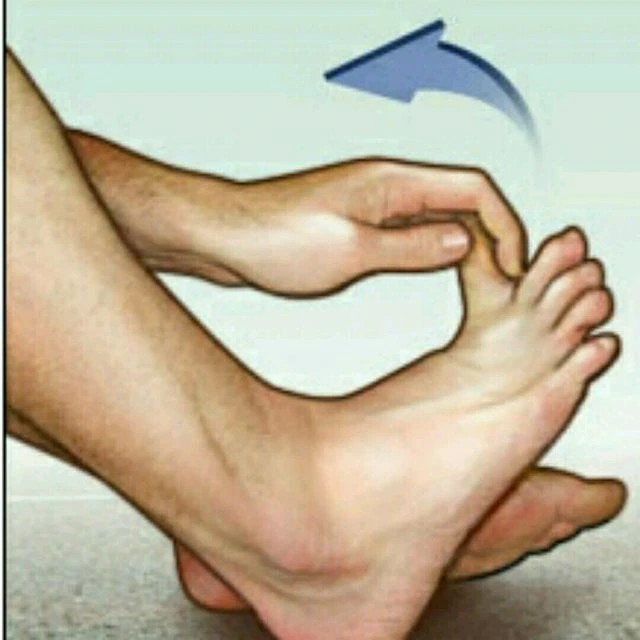
Foot Doming exercise
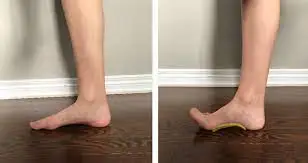
Foot domming exercises are a good way to target these inner leg muscles. You can do this doming position to pull the big toe towards the heel while developing a “dome” under the foot as shown above.
The progression is to try to hold the dome position while placing your toes on the surface. the duration is more or less the same as the test described above.
Do not move your toes and try to keep your ankles and feet neutral. This exercise can be done in different positions such as sitting, standing, standing on one leg, and then moving to other movements (squat and pulse) depending on how ambitious you are. you can perform nine to ten repetitions per session and do three sets per day. for the progression, you can add modifications.
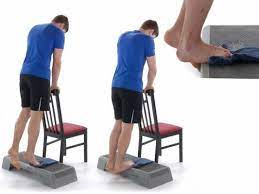
Adding heavy-weight resistance training
This can be another sensible way to increase the ability of the foot and sole to treat and prevent injuries. Do this exercise by finding the stairs. As an exercise, in the leg position shown in the picture, lift the heel with a towel under the toes, and stretch the sole of the sole. Run every other day. Each heel raise should consist of a three-second concentric phase (rising) a three-second eccentric phase (falling) and a two-second isometric phase (stopping at the top of the exercise).
As a general guideline, aim for a maximum of three sets of 12 repetitions, and after four weeks move to five sets of seven to eight repetitions. A backpack with books can be added after two weeks and the backpack load can be increased as you progress.
Single leg balance
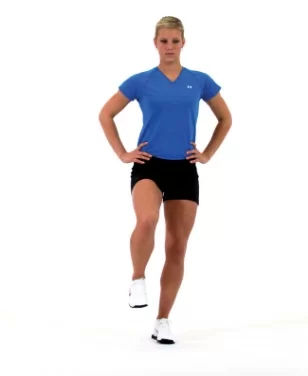
For the single leg raise exercise stand on a flat surface with your feet shoulder-width apart. Keep a chair or a wall close to your support when you need it. Raise your arms to your sides, and stand on one leg. Do this every day and try to increase the number of seconds you can hold steady on each leg. If you can balance on one leg for 60 seconds, try the following variations:
balance with eyes closed or open. balanced with arms at the sides
balanced on an unstable surface, such as a pillow, a folded towel, or a balance board Two to five repetitions were performed per session. For example, try standing on one leg brushing your teeth, or standing in line.
Standing heel lifts
Stretching can improve your mobility and strength. Incorporating ankle stretching and strengthening into your daily routine will pay off in the event of an accident contraceptive Strengthening your ankles also helps you walk properly and prevent knee pain and hip muscles. Stand with your feet about shoulder-width apart. Hold close to a chair or wall for support you need it Lift your heels off the floor so that you are standing on your feet. Slowly lower your heels to the floor. Control is important for muscle strengthening.
Performed two or five sets of ten repetitions. You can add resistance to this exercise by holding free weights while lifting your heels. You can also add this exercise to your daily routine, like washing the dishes.
Marble pick-up exercise

Toe exercises using marbles (or alternatively small balls and stones) are one of the best ways to build foot strength to treat a dancer’s heel and other heel conditions such as plantar fasciitis and calcined spur. marble selection according to your strength you can choose heavy or light marbles which totally depend on you. Not only is it a great way to improve strength and flexibility in your toes and feet, but it can be done almost anywhere. All you need is a chair and some marbles, stones, or small balls:
For the exercise arrange a chair and take a sitting position. Place several small marbles, stones, or balls on the floor near your feet so they can be picked up by your toes. Place a drinking cup or mug on the floor within your feet’s reach
Try picking up marbles with just the use of your toe strength. After picking up each marble or stone, pick it up with your toes and then try to place it in a drinking cup or mug. This helps prevent strength and flexibility imbalances that can lead to walking problems and obstacles to recovery.
Toe raise point, and curl
This three-part exercise moves your toes and legs. For this exercise sit with your back straight in an unsupported chair with your feet on the surface. Keep your toes on the ground and lift your heels until only the balls of your feet and toes touch the ground. Hold for five seconds. Only the tip of your big toe and second toe touch the surface.
Hold for five to seven seconds. Keep your heels touching the ground and curl through your toes so that the tip of your fingers touches the ground. Hold for five seconds. exercises that improve the range of motion and help elevate the legs can reduce the risk of injury. Repeat each position Ten times.
The Theraband
Straighten out your right leg in front of you when you sit down on the floor. Place the tape (or other elastic band) so that it covers the foot and toes. Hold both ends of the tape separately with both hands. Place the leg fully bent, the knee straight and lifted, and both sides of the leg flat.
Make sure one side of the leg doesn’t pull back more than the other. Extend the arch of the foot to a semi-point position. Keep your toes fully flexed and spread. Then extend your toes as well, keeping your foot in line with your shin. Reverse the process by flexing and extending the toes while maintaining arch extension and then fully flexing the foot. Take your time with each step of the exercise to keep your legs in the correct position. Do seven to ten repetitions and then with the left leg. The goal is to increase the number of extensions and flexions with time and practice.
Sand walking
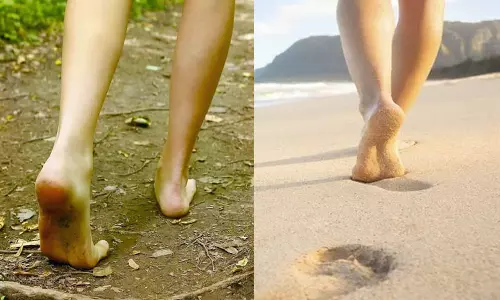
Walking barefoot through the sand provides the strength and flexibility of your feet and toe muscles and provides great calf flexibility through the walk. Walking on sand is more difficult compared to walking on hard roads, so be sure to turn around before you get tired. For example, you can search the sand at a beach, desert sand, or volleyball court.
Take off your shoes and socks. to walk The duration of the walk depends entirely on your choice, the duration can be five or ten minutes.
Glute kickbacks
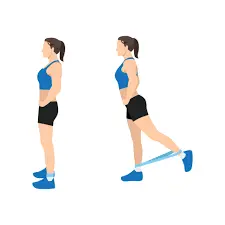
Glute kickback exercise works by isolating the gluteal muscles and activating them through different movements. Your glutes are your biggest and strongest muscles, consisting of your glutes, biceps, and minis. Together, these muscles help extend and rotate the hip and stabilize the pelvis. On all fours, knees and toes bent and touching the floor. Keep your hips above your knees and your hands directly under your shoulders. Brace your core, keep your hips slightly bent and your ribs down. Don’t arch your back.
Extend your left leg back until your thigh is parallel to the ground. Squeeze your left glute and hold this position for a moment. Return to the starting position without the foot touching the floor. Do 10-15 repetitions on the left side before moving to the right. Do two to three sets. You can add weights to increase the weight and load if you want to take your backstroke to the next level. Simply place the dumbbell in the crease of your knee and grab it between your calf and hamstring as you raise your leg.
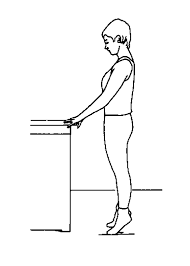
Achilles stretch
The cord that originated along with the heel to the calf muscles is called the Achilles tendon. Keeping the muscles flexible can relieve foot, ankle, and leg pain. start with the standing position facing a wall with your arms outstretched and palms facing the wall.
Place the affected foot behind you, keep your knee straight, and flexion of the knee of the other leg. you should take care of your position which is comfortable during the whole exercise.
do flexion of your hips until you experience the stretch in your Achilles tendon and calf muscle. If you want the stretch anywhere, flexion of the posterior aspect of the knee slightly and push your hips forward. Hold the stretch for 30 seconds repeat three to five times per session and then change the leg.
Downward Dog
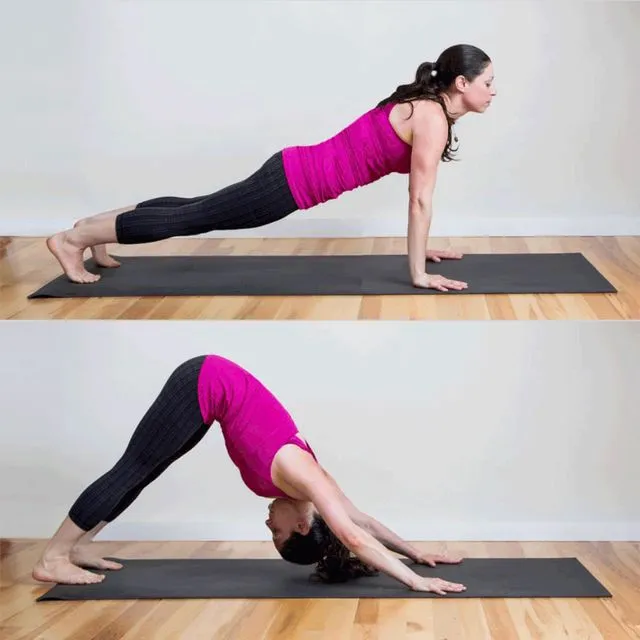
First, come to your knees and hands, placing your wrists under your shoulders and your knees under your hips. After curling your toes, push back through your hands. Then lift your hips and gently stretch your legs. Spread your fingers apart and press your palms into the floor to squeeze your fingertips. Roll the upper arms outward to expand the collarbones. Let your head hang. Then slowly move your shoulders away from your ears toward your hips.
You need to keep your quads tight so that the weight of your body is released from your arms. This is the resting position. Keep your tailbone high, place your heels on the floor, and gently rotate your thighs inward. Make sure that the distance between the arms and legs is the same in both resting and transition positions. Exhale gradually and bend your knees, allowing yourself to release and return to the starting position.
Avoid excess stretch of your body, as this can reason of strain and injury.
Do not perform this asana if you have had a serious injury to any of your body parts.
Avoid this yoga pose if you have a headache or nausea.
If you are pregnant, you should avoid this exercise.
Ball exercise
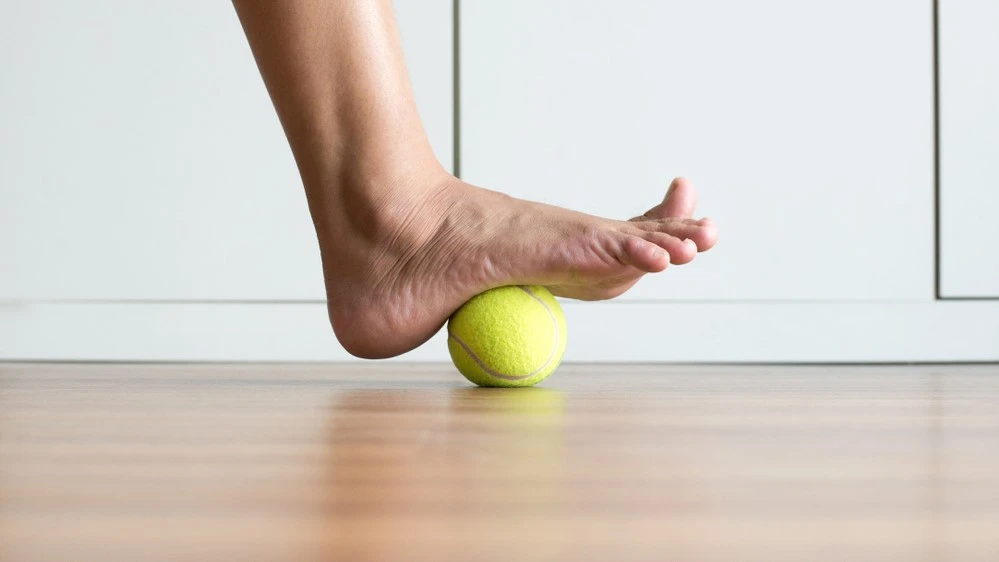
Exercises should be done barefoot if possible, but can also be effective in socks. Place your feet so that the heel of the foot is at the base of the toes the ball is on the ground and the toes are raised on the ball. It doesn’t matter if you can’t put your little finger on the ball. Carefully roll the ball with the help of your foot forward, following the circular pattern of the ball with your toes.
You should finish this movement with your toes pointed toward the floor and your heels lifted. In this position, you may feel a stretch at the top of your leg. Hold this position for a second, pulling your toes toward the ball. Another option is to try to catch the ball with your toes. Repeat this process for one minute. Sometimes your leg may cramp while trying to catch the ball. If this happens, rest for a while and try again.
A few days of these exercises usually resolve the cramps. Get a good grip on the ball and try to pick it up. Don’t worry if it seems impossible, just grab and catch the ball. Over time, most people find that they can catch the ball much better and begin to retrieve it. If you can catch the ball easily, keep doing these exercises because extra leg strength is always good.
Repeat the ball exercise five to ten times per session.
Single foot press
The benefits of single-leg pressing are ankle stability and arch.
Start in a standing position position with a back. Lift one heel off the floor and press the ball into the floor. Attach the calf to the top of the raised leg. Push your hips up and down, keeping the lifted legs and ankles stable. You can do this exercise for 15 repetitions per exercise with three sets per day.
A variation on the single-leg press
Sumo ankle press
Start with a squat position and Keep your back straight.
Engage your core and gluteus. If maintaining balance seems difficult, you can lower your heels between each repetition. Keep your heart rate slow and steady. You can do this exercise for 15 repetitions per exercise with three sets per day.
Ankle jump
Stand tall with your feet together and place your hands on your waist as shown here. Look straight ahead or slightly down. Do not arch your back and keep your abdominal muscles tight during the exercise. Jump straight up using your calf muscles. (ankle extension only) Do not bend your knees too much.
Then bend your ankles and pull your toes up as far as you can. Keep your upper body tight and don’t arch your back. In fact, I recommend moving your legs and head forward a bit. (This way it is not possible to lean back). When you have reached the highest point, extend your legs and upper body vertically again, but do not extend your ankles yet. Extend your ankles slightly before returning to the floor and explosively push the balls of your feet into the ground. Immediately jump back and keep contact with the floor as short as possible. Jump up without bending your knees too much.
Keep your legs straight. This is reactive strength training for the calf muscles, but some absorption with the knees is fine. Do this exercise only with good shoes and on a flat surface.
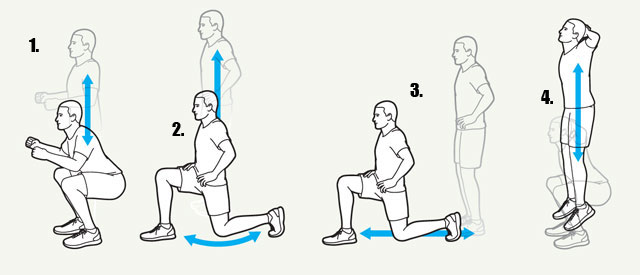
Lunges
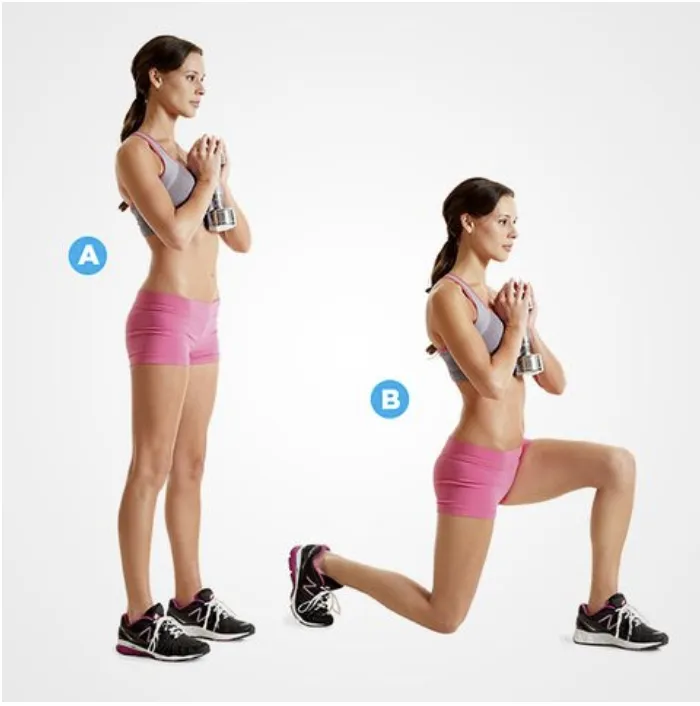
This exercise is useful for injury prevention and post-injury recovery. It is often part of a core strength program or rehabilitation protocol that allows athletes and sports professionals to return to their sport or activity as quickly as possible. This way you can better improve the asymmetry of strength compared to, for example, squatting.
Lunges also test and improve your balance and stability in unilateral movements. start with the standing position. after that make a longer step forward compared to the walking step, so that one hip is in front of the body and the other hip is behind. Your foot should keep flat on the ground. Your back heel will lift off the ground. Bend your knees to about 90 degrees as you go down. Then forcefully push off the front leg to return to the starting position.
Modification of a lunge (and when to use each)
Static lunge
Back lunge
Lateral lunge
Curtsy lunge
Walking lunge
Adding weight to your lunges
Towel curl exercise
For the Towel curl exercise, you require a towel or napkin and then start with a standing position or sit in a chair with your heels under your knees. Keep your feet parallel to each other, toes pointing forward. the heel should be down, lift the leg up, and bend the leg back. Your heel should be stable on the ends of the towel. reach with your toes on both sides and the middle of your foot so that your foot touches the towel as far as possible. Take the towel towards you through your toes. try to develop a dome position under the arch. Every time you extend and retract your legs, you can move the towel slightly. You can also rest between two sessions. Repeat this exercise at least seven to ten repetitions. This exercise can also be done with both the foot at the same time. You can do this exercise every day with three sets or even twice a week.
Modification of towel curl exercise
Add weight:
Once you have mastered the basic toe and want to make this exercise more difficult, add light objects to the end of the towel. You can start with a lighter weight, like five to six bounces. Press the towel forward in the opposite motion of curling the toes, curling and opening the toes. Again, keep your heel down so the ankle or heel is not doing the work. To benefit from this exercise, it is important to keep your heel stable and firmly on the floor.
Some foot care(prevention) tips for dancers
Live a healthy lifestyle
Wear well-fitting shoes and clothing
Stay hydrated! Drink lots of water, and juices and eat well
Performed a proper warm-up and cool-down exercise before dance practice
Pay attention to the right technique and use it!
Include vitamin-rich foods in your daily meals. If vitamin D deficiency and osteoporosis are detected, seek treatment
Choose the dance form that suits you
Be careful not to overexert yourself and give yourself time to rest between exercises
Train your strength and endurance (think yoga, pilates, swimming, or cycling)
Don’t dance through the pain! If an injury occurs, seek immediate medical attention and advice from a doctor, PT, or athletic trainer.
Be aware of your body’s limits and don’t push too fast or too early
Wear professionally appropriate shoes with good soles and support
Always warm up before practicing dance moves.
Remember to train all the muscles in your body, not just your legs. It helps to strengthen all the muscles and avoid excessive load on the legs
Key targets of workouts for dancers
When developing exercises, it is important to train to improve the key physical attributes necessary for performance. Strength and endurance, agility, and balance are required. Based on these goals, you will receive tips for your dance practice to develop exercises that will give you maximum benefit as a dancer. These exercises fit into one of six categories of daily exercises for dancers:
Strength training
Dancing is an activity that requires a lot of movement, which can cause muscle imbalances and injuries if the body is not strong enough to withstand the movements performed. And the muscles of the body are used differently when dancers perform different dance styles. A dancer’s twirls, twirls, and jumps can be hard on the body. Strength training helps:
Increase vertical jump height.
Improve jump resistance. Improve strength and endurance without bulking up, while maintaining the aesthetics of dance. With the right exercises, you don’t have to be afraid of “lifting”. Improving body strength also helps prevent common dance injuries such as muscle strains, ligament sprains, and overuse injuries.
When beginning a dancer’s workout routine, it is best to use body weight during the workout. Typical exercises can be push-ups and heels. As your body gets stronger, you can add weights to your routine to ensure proper muscle tone and strength development.
Core exercises
Core muscles are the foundation of our body. They are responsible for stabilizing and supporting the spine, pelvis, and trunk. The upper body muscles also help connect the upper and lower body so they work together as one unit during movement. Core exercise increases the strength, and endurance of muscle and provide good posture to your body. It also helps prevent injury by strengthening the back, hip, and abdominal muscles in the following ways:
Helps dynamically control the spine during movement
Improves the coordination of the muscles that control your body, not just your abs
Build a stable base from which to move the limbs
Stabilizing the core allows for an even and efficient transmission of power throughout the body Great exercises for all levels are planks and beast (similar to a plank but with bent knees).
Balance exercises
As a dancer, you will more use of your feet. You must maintain your position, balance, and feet firmly. You make energetic movements that require you to move quickly from one place to another. Balance exercises help dancers improve their sense of balance and prevent injuries when performing these types of movements. Improving balance helps:
Avoid falling
Develop better posture
Improve coordination
Faster recovery from injury
There are many exercises that improve balance. The two best are the tightrope squat and the tandem position.
Flexibility exercises
The flexibility represents the mobility of your foot muscles. The more flexible you are, the more freely you can express yourself through dance. Four ways flexibility exercises can help improve your dancing include:
Increase movement speed
Keep your joints healthy
Enables more demanding movements
Reduces the risk of injury
Two great exercises that are specifically designed to target flexibility are the forward fold and the 90/90 hip stretch.
Aerobic exercises
Dancing is physically demanding because it uses the whole body and all the muscles. These muscles need oxygen to function effectively. Aerobic exercise strengthens the heart and lungs. This exercise maintains the weight and increases the strength of the foot. Aerobic exercise also helps the body eliminate toxins and waste products that build up in muscles and tissues over time. Effective aerobic exercise helps:
Strengthen the whole body
Strengthens muscles
Improve your energy level and strength available for movement
Improve your circulation
Aerobic exercises are performed at a low intensity for long periods of time and include jogging and jumping rope.
How much rest should a dancer get?
Although many experts emphasize the importance of adequate rest, there are no specific guidelines regarding the frequency and duration of rest. However, we do know that dancing five hours a day or more is associated with an increased risk of injury. It is also known that intense activity causes microdamage, which recovers to a peak 12-14 hours after exercise. So it would make sense to take the next day off after intense activity. A dancer should work at their highest level a few times a week and then take at least two days off, preferably in a row. A rest period of three to four weeks after the season is also ideal for recovery.
What should be in the first aid kit for dancers’ heel condition?
Your standard first aid kit may already contain many of the things you need to deal with an emergency. However, when it comes to common dance injuries, you may want to add a few more elements such as:
Instant cold pack
Pre-wrap and Sports Tape (if qualified suppliers are available)
Elastic bandages (used only for compression, not for support during dance)
crutches
Topical pain reliever
Choose The Right Pair Of Heels
The shoes you wear with heels to dance class can make or break your experience. Make sure you choose a pair that fits your feet well and offers enough support for long-term use.
Look for heels that have:
1. Supportive design – cover around the back of the foot, wide toe box, and ankle strap
2. Strong heel – up to 2.5 inches
3. Cushioned insole – provides cushion and support
4. The right grip – prevents slipping on the dance floor
5. Breathable material – material keeps your foot dry
6. Correct fit – Be sure to try them on before you buy
Tips For Safely Dancing In Heels
Safety while dancing in high heels is just as important as having fun. When dancing in high heels, remember these tips:
Start slow and take your time – As with any new activity, dancing in high heels takes time to get used to. Take one step at a time and start with basic movements.
Stretch before dancing – Stretching can help reduce the risk of injury by relaxing tight muscles.
Focus on your form – maintain proper posture and perform each movement correctly to avoid pain or injury.
Listen to your body – if something you feel uncomfortable or painful, stop and rest. Never allow yourself too hard and always practice with safety.
Work with a professional trainer – If you are just starting out or looking to boost your confidence, consider the guidance of a professional trainer. They can give you personal advice and help you perfect your technique.
Gait analysis For dancers’ heel
A physical therapist can analyze the locomotion (walking pattern) to assess any abnormalities or imbalances that may be contributing to the condition. Mechanically adjusting the locomotion can help decrease tension on the heel.
Manual therapy for dancers’ heels:
Manual techniques such as massage and manual manipulation can help relieve muscle tension, improve circulation, and promote wound healing in the affected area.
Massage techniques and manual manipulation can help relieve muscle tension, improve circulation, and promote the healing of a dancer’s tendonitis. Here are some methods that a medical professional or trained therapist can use:
Soft tissue massage: The therapist applies gentle pressure and massage techniques to the muscles around the lower leg and heel. It helps to relax tight muscles, relieve muscle tension, and improve blood supply to the affected area.
Myofascial release: Myofascial release techniques target fascia, the connective tissue surrounding muscles, and other structures. The therapist uses gentle pressure to stretch and release balance restrictions that can contribute to muscle tension.
Active Release Technique (ART): ART is a technique that involves a combination of movement and deep pressure to treat soft tissue restrictions and adhesions. It is often used to break up scar tissue and improve elasticity.
Joint mobilization: Joint mobility means that the therapist gently moves the foot and ankle joints through their natural range of motion. It can improve joint mobility, reduce stiffness, and promote healing.
Heat treatment: The area can be heated before or after the massage to relax the muscles and improve circulation. It is important to note that these techniques must be performed by qualified medical professionals or therapists trained in these techniques. Consult your healthcare provider before starting manual therapy, especially for children. They can help determine the right approach and ensure that treatment is tailored to the child’s specific condition and needs.
A note from Samrpan Physiotherapy Clinic
Keeping your feet strong and flexible can reduce foot and ankle pain, reduce muscle pain, improve overall foot health, and keep you active. Exercises that improve range of motion and help elevate the legs can reduce the risk of injury. Regular and gradual stretches will increase the flexibility of your foot muscles. Strength training gives the muscles better support and protection for the entire leg.
You can do these gentle stretching and strengthening exercises three days a week or as often as every day—while you are checking your phone or on a conference call—to start building a range of motion and strength for lifelong leg health and vitality.
FAQ
How do you feel about a dancer’s heel?
Treatments. You may be asked to rest the ankle for a short time to reduce swelling and pain. A special walking boot or short leg brace may be recommended to limit ankle motion for up to four weeks. Mild pain relievers and anti-inflammatory drugs may also be prescribed.
What is the best exercise for heel pain?
Calf stretch
With your hands supporting you against the wall, slowly and carefully bend your left leg forward, keeping your right knee straight and your right heel on the ground. Hold the muscle stretch for around 15-30 seconds and then release. Repeat this three times, then switch legs.
Why do my heels hurt as a dancer?
Dancer’s heel, also known as posterior impingement syndrome, occurs when the tissue at the back of the ankle is compressed by the formation of the posterior malleolus. The pain can be triggered by a sprained ankle or tissue stuck between the ankle and the heel.
How do dancers relieve foot pain?
Leave your feet in the bath for about 15 minutes and dry. Epsom salt has been used by dancers forever for its many benefits, including reducing swelling and pain and soothing the skin.
How do dancers treat their feet?
Dancer’s Foot Care
Avoid soaking or cutting the callus, as these can cause very tender, raw areas that can also cause inflammation. Gentle treatment of the hardening with a pumice stone is a good choice. Never feel that callus removal is your best bet.