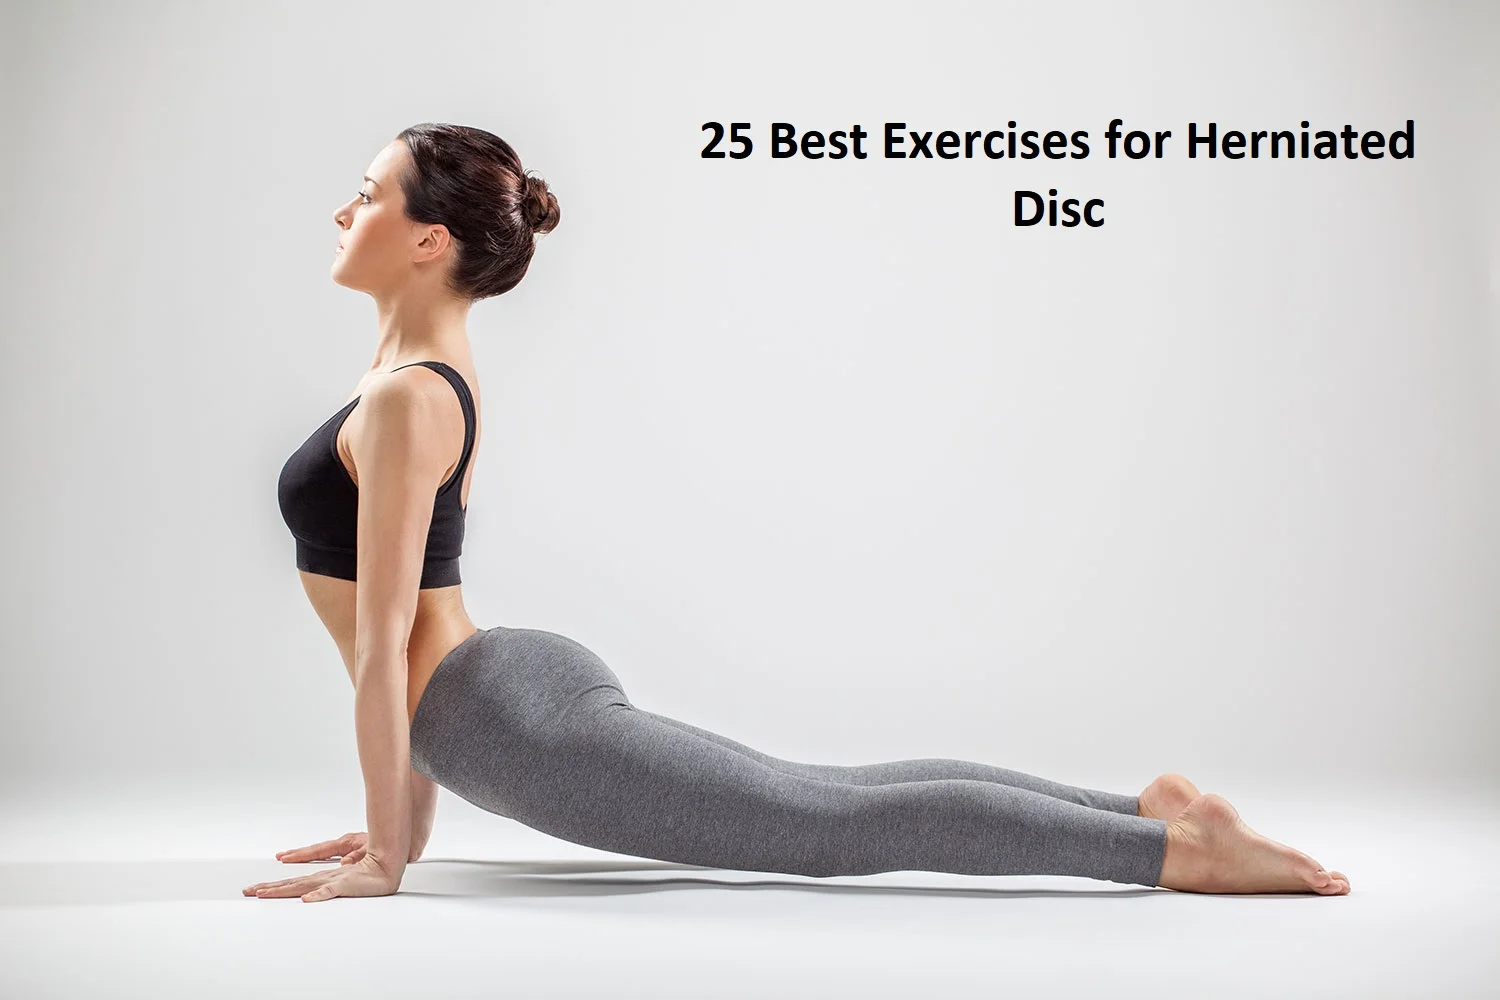
Best Exercise for Herniated Disc
Exercise for Herniated Disc is an important part of your overall treatment along with Pain medication, rest, supporting braces, and Physical therapy modalities. Exercise improves the strength and stability of the spine and helps to return to activity.
Table of Contents
Introduction
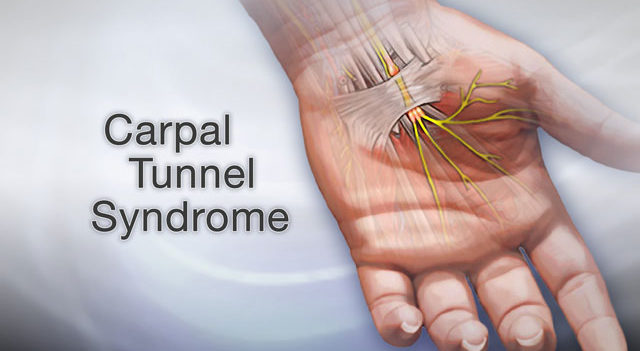
When the soft inner core of a spinal disc protrudes through a compromised or damaged outer layer, the disease is characterized as a herniated disc, also known as a slipped disc or ruptured disc. Understanding the anatomy of the spine can help you better comprehend what a herniated disc is.
The spinal column is formed by a group of bones called vertebrae that are piled on top of one another to make up the spine. Intervertebral discs are a type of rubbery cushion found between each pair of vertebrae. These discs provide the spine flexibility and allow for movement by performing as shock absorbers.
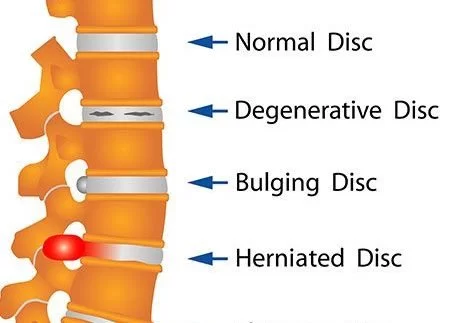
The nucleus pulposus, a gel-like substance in the center of each disc, is located between the tough annulus fibrosus outer layer. When a herniated disc develops, the nucleus pulposus extends over its usual limits by pushing through a tear or weak spot in the annulus fibrosus.
Numerous symptoms may be experienced as a result of this protrusion’s strain on the spinal cord or surrounding spinal nerves. Which nerves are impacted and which symptoms appear depends on where the herniated disc is located.
What are the Causes of Herniated discs?
- Age-related degeneration: As people age naturally, the discs in their spine might lose flexibility, become thinner, and become more prone to herniation.
- Disc trauma or injury: Discs can herniate as a result of sudden, strong impacts or injuries to the spine, such as those caused by falls, accidents, or sports-related injuries.
- Overuse or repetitive strain: It can cause the discs to become herniated. This can happen if you engage in repetitive motions, heavy lifting, or frequent bending and twisting.
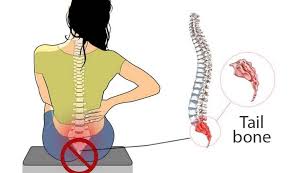
- Poor body mechanics and posture: It can increase the risk of disc herniation. Examples include slouching or spending a lot of time sitting with your spine out of alignment. Disc injury can also be caused by poor body mechanics and lifting practices.
- Excess body weight: Being overweight puts extra strain on the spinal discs, increasing the risk of herniation.
- Genetic factors: Some people may be genetically predisposed to disc degeneration or weakening, which increases their risk of ruptured discs.
- Sedentary lifestyle: Lack of regular exercise, extended sitting, and inactivity can deteriorate the muscles that support the spine, increasing disc pressure and the risk of herniation.
- Improper lifting and bending: Lifting heavy things incorrectly can strain the discs and increase the risk of herniation, particularly when paired with twisting or bending actions.
- Pre-existing spinal conditions: People with spinal stenosis, degenerative disc disease, or other anomalies are likelier to have herniated discs.
Symptoms of Herniated discs:
- Pain in the area that is being affected (such as the neck or lower back)
- Radiating pain (such as sciatica in the leg or brachialgia in the arm) that travels along the route of the afflicted nerve
- Tingling or numbness in the region that the damaged nerve supplies
- Weakening in the muscles that are under the afflicted nerve’s control
- Reflex changes, such as weakened or heightened reflex responses
- Discomfort or difficulty with specific postures or motions
- Coughing, sneezing, or straining with more discomfort (as a result of increasing pressure on the ruptured disc)
- Loss of balance or coordination(In situations when the herniation affects the spinal cord)
- Sensation in the afflicted region is reduced or changed.
- In severe forms of cauda equina syndrome, bowel or bladder problems may occur.
What Are The Risk Factors For A Herniated Disc?
The risk factors include:
- Age: The risk of herniated discs increases with age, with peak prevalence occurring between the ages of 30 and 50. Disc degeneration and weakening of the outer layer (annulus fibrosus) become more common as we get older.
- Gender: Men have a slightly higher risk of developing herniated discs compared to women.
- Weight: Excess body weight puts additional stress on the spinal discs, increasing the risk of disc degeneration and herniation.
- Occupation: Jobs that involve repetitive lifting, bending, twisting, or physically demanding tasks can contribute to disc degeneration and herniation.
- Sedentary lifestyle: Lack of regular exercise and a sedentary lifestyle can weaken the muscles supporting the spine and contribute to disc degeneration and herniation.
- Genetics: There are certain genetic factors that can make an individual more susceptible to disc problems.
- Poor posture: Consistently maintaining poor posture, such as slouching or sitting with a rounded back, can place excessive stress on the spinal discs and increase the risk of herniation.
- Improper lifting techniques: Lifting heavy objects with improper forms, such as using the back instead of the legs, can strain the discs.
- Trauma or injury: Previous spine injuries, such as fractures or accidents.
Exercise for herniated disc
Neck & Upper Back Herniated Disc Exercises:
Even younger people frequently suffer ruptured discs in the neck and upper back, despite the fact that aging is a typical contributing factor. The same lower back herniation symptoms of pain, numbness, and tingling are frequently present. However, the symptoms still include issues with coordination, balance, and walking as well as pain in the arms, hands, or shoulders. No matter where along the spine the gel-like center of a disc protrudes through the stiff outer layer, the reasons for herniation are the same.
Upper back and neck herniations may frequently be treated with the correct exercises and avoidance of anything that causes excruciating pain, much as lower back herniations.
Here are a few general exercises that may be beneficial for cervical disc herniation:
The Chin Tuck exercise:
The Chin Tuck exercise is a simple and effective exercise for improving posture, strengthening the neck muscles, and relieving tension in the cervical spine. Here’s how to perform the Chin Tuck exercise:

- Straighten your back and shoulders whether sitting or standing.
- Keep your eyes focused straight ahead.
- Gently retract your chin by pulling it straight back, as if making a double chin. Imagine that you’re trying to align your ears with your shoulders.
- Hold the position for 5 to 10 seconds, feeling a stretch at the back of your neck.
- Relax and return to the starting position.
- Repeat the exercise for several repetitions.
- Tips for performing the Chin Tuck exercise correctly:
- Make sure to keep your head level and avoid tilting it up or down.
- Focus on the movement coming from the neck, rather than the jaw or mouth.
- Perform the exercise slowly and with control, ensuring that you feel a gentle stretch but not pain.
- Breathe normally throughout the exercise.
Isometric neck exercise:
These isometric exercises involve contracting and holding muscles without actually moving the joints.
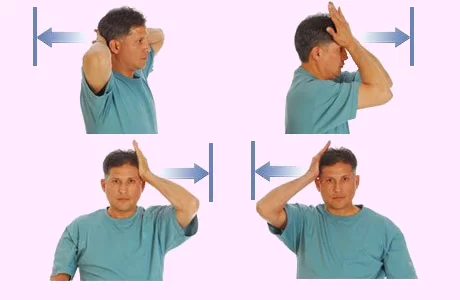
Isometric Neck Extension:
How to perform it:
Place your head in a neutral posture as you sit or stand.
On the back of your head, place your hands.
While simultaneously resisting the motion with your hands, gently press your head back into your hands.
After 5 to 10 seconds, relax the contraction.
5–10 times, then stop.
Isometric Neck Flexion:
How to perform it:
Place your head in a neutral posture as you sit or stand.
Your palms should be on your forehead.
While simultaneously restraining the motion with your hands, thrust your head forward into your hands.
After 5 to 10 seconds, relax the contraction.
5–10 times, then stop.
Isometric Neck Side Bend:
How to perform it:
Place your head in a neutral posture as you sit or stand.
Put one hand right above the ear on the side of your head.
While simultaneously restraining the motion with your hand, tilt your head to the side of it.
After 5 to 10 seconds, relax the contraction.
On the opposite side, repeat.
Count from 5 to 10 times on each side.
Isometric Neck Rotation:
How to perform it:
Place your head in a neutral posture as you sit or stand.
Put one hand right above the ear on the side of your head.
At the same moment that you rotate your head into your hand, use your hand to obstruct the motion.
After 5 to 10 seconds, relax the contraction.
On the opposite side, repeat.
Count from 5 to 10 times on each side.
During these exercises, be careful to maintain good posture and be a pain- and discomfort-free.
Neck Side Bend:
How to perform it:
Place your head in a neutral posture when sitting or standing.
Bring your right ear close to your right shoulder as you slowly incline your head to the right.
Hold for a short while before returning to the beginning point.
On the left, repeat.
On each side, perform 7 to 10 repetitions.
Neck Rotation:
How to perform it:
Place your head in a neutral posture when sitting or standing.
Try to slowly gaze over your right shoulder while you turn your head to the right.
Hold for a short while before returning to the beginning point.
On the left, repeat.
On each side, perform 7 to 10 repetitions.
Neck Retraction:
How to do it:
Place your head in a neutral position as you sit or stand.
Draw your head back straight and slowly, as if you were making a double chin.
Hold for a short duration of time before returning to the starting position.
Ten to fifteen times, repeat this motion.
Shoulder Blade Squeezes:
How to perform it:
Sit or stand with your arms at your sides while performing shoulder blade squeezes.
Try to hold a pencil between your shoulder blades by tightly squeezing them together.
After a brief period of holding, release the pressure.
15-20 times, then repeat.
Neck roll:
How to perform it:
Whether you’re seated or standing, turn your back to the front. Tilt your neck to the right to start. Your neck and trap muscles should both feel stretched.
After a few moments, slowly rotate your head in the other direction.
When you touch your left shoulder, take a little pause.
Finish the rotation by returning to your starting point.
Repeat these motions in a clockwise direction.
Repeat this series two or three times.
Stretching exercise:
Stretching exercises for the cervical spine can help improve flexibility, relieve tension, and promote proper alignment
Neck Side Stretch:
How to perform it:
Sit or stand with your head in a neutral posture and perform a neck-side stretch.
Bring your right ear close to your right shoulder as you slowly incline your head to the right.
For 15 to 30 seconds, hold it.
Repeat on the left side while returning to your starting position.
3-5 stretches should be done on each side.
Neck Rotation Stretch:
How to do it:
Sit or stand with your head in a neutral posture to perform the neck rotation stretch.
Try to slowly gaze over your right shoulder while you turn your head to the right.
For 15 to 30 seconds, maintain it.
Repeat on the left side while returning to your starting position.
3-5 stretches should be done on each side.
Chin to Chest Stretch:
How to perform it:
Place your head in a neutral posture as you sit or stand.
Feel a stretch at the back of your neck as you slowly bring your chin towards your chest.
For 15 to 30 seconds, maintain it.
Bring your head back up slowly to its original position.
Do three or more stretches.
Stretch the upper trapezius:
How to perform it:
Straighten your back as you stand or sit.
Grab your left ear lightly with your right arm as you extend it above your head.
With your right hand gently tugging down, tilt your head to the right, putting your right ear towards your right shoulder.
For 15 to 30 seconds, maintain it.
Repeat on the other side after it.
3-5 stretches should be done on each side.
One Arm Pec Stretch – At A Wall (Do Both Sides):
This will loosen up the chest region, which is sometimes stiff, and cause the neck to hunch forward. Your posture will improve and some of the discomfort may go away if you release your pain.
How to perform it:
Stretch one arm behind you with the palm towards the wall as you get close to the wall.
Leaning forward and a little bit away from the extended arm, pull in your stomach slightly (do not arch your back).
Your chest should feel stretched.
Hold for a minute.
On the other side, repeat.
Be sure to extend your chest as well as your shoulders. Adjust your position’s angle to develop your chest muscles.
Nerve flossing:
Nerve flossing, also known as neural flossing, is a gentle practice that can help relieve neural discomfort, improve nerve function, and relax muscles. To do neural flossing at home, use the following methods:

Straighten your arm out to the side.
Pull them up while keeping your shoulders tight and your elbows straight.
Bend your hand down, palm facing up.
At the same time, lean forward.
Continue moving back and forth like this.
You should feel a tiny tug between your forearm and fingertips when performing this exercise. This exercise should be repeated at least 30 times before stopping.
Cervical Traction Exercise:
Traction is a good way to reduce strain on damaged nerves. Traction may be achieved in a variety of ways, but here’s one simple method for doing it at home. This workout will require the assistance of one other person!
How to perform it:
Take a bath towel.
Place the bath towel at the base of your skull/the back of your head.
While the towel is at the base of the skull, you will need someone to pull it upwards (in the other direction).
Make careful to apply light pressure.
Maintain this posture for at least 30 seconds and up to one minute.
Exercise for upper back herniated disc:
Upper back herniated disc exercises are advised for pain caused by a herniated disc that occurs in the upper back rather than the neck. These consist of:
Thoracic Extension Stretch:
How to perform it:
Place your feet flat on the ground while sitting on the edge of a bench or chair.
With your elbows sticking out to the sides, interlace your fingers behind your head.
Keep your lower back and neck in a neutral position while gently arching your upper back backward.
Hold the stretch for 10 to 15 seconds, emphasizing how far your upper back can expand.
Numerous times, repeat the stretch.
Overhead arm reach:
How to perform it:
Put your feet on the floor and lean forward on a chair.
Raise your right arm over your head and reach to the left. Bend your torso when you feel a stretch in your right neck and shoulder.
Go back to the beginning place. 5 times total, then switch to your left arm and repeat.
Sit-ups:
How to do it:
Your feet should be firmly planted while you lay on your back with your knees bent.
To extend the back of your neck, tuck your chin into your chest.
You can cross your arms with your hands on opposing shoulders, interlace your fingers at the base of your head, or put your palms down next to your torso.
As you raise your upper body towards your thighs, exhale.
As you carefully lower yourself back to the ground, take a breath.
Shoulder Rolls:

How to perform it:
Starting with a proud chest, neutral spine, and tightened core, stand or sit tall. Draw your shoulders down and back. Keep looking ahead.
Shrug your shoulders as high as you can towards your ears to start the shoulder roll. Keep your shoulders back and avoid arching your back or allowing your neck to stick out while performing this.
Once you’ve raised your shoulders as far as they will go, draw them back by squeezing your shoulder blades together.
Pull your shoulders down by engaging your middle back.
When you are in the neutral beginning posture, round your upper back slightly and have a tight core to press your shoulders forward.
Once again shrug up and begin the shoulder roll.
Perform 10 to 15 shoulder rolls, then take a 30-second break before beginning a new set. Do three to five sets, if possible.
Chair rotation:
How to perform it:
Lie back on a chair. Your right side needs to be propped up against the chair’s back.
Rotate your body to the right while keeping your legs still and reaching with your hands for the chair’s back.
Maintain your upper body rotation while extending further and deeper with your arms until your muscles relax.
Ten seconds of holding. On each side, repeat three times.
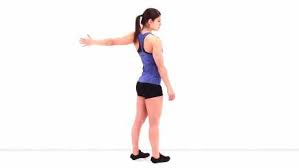
Scapular Retraction (Using Resistance Bands):
The goal of this exercise is to enhance your posture by stabilizing and strengthening the muscles in your mid-back.
How to Execute it:
Start out by assuming a proper stance.
Straighten your elbows as you extend your arms in front of you while holding a resistance band in each hand (the amount of resistance you apply depends on your degree of personal strength).
Slowly extend your arms behind your body and lock your elbows behind you. Your shoulder blades’ intermuscular muscles should feel tightening.
Don’t venture outside your comfort zone. While some muscle aches or burning is OK, arm or neck pain is not.
Keep your shoulders from shrugging away from your ears.
Repeat two times for ten, then three times for ten.
This should be difficult by the time you reach reps. 8, 9, and 10. If it isn’t, up the band’s resistance setting.
Back Burn exercise:
How to perform it:
Sit or stand in the same posture as for the chin exercise while doing the back burn exercise, leaning your head back against a wall.
Put your lower back on the wall as flat as possible.
With your wrists at shoulder height, lean on the wall with your elbows, forearms, and the backs of your hands and fingers.
Slide your arms gently up above and back down, trying to keep your head, fingers, and hands as much as possible in touch with the wall.
Repeating one workout 10-15 times with three sets each day is recommended.
Exercise for Lumbar Spine herniated disc:
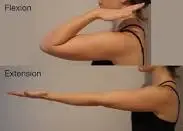
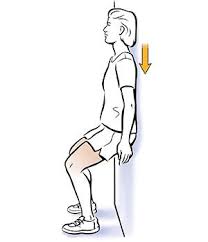
Standing Extension:
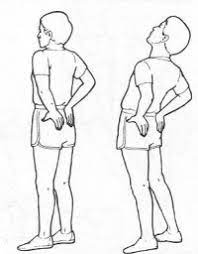
How it works: This standing extension helps you stop hunching over all the time. This stretch aids in returning the disc to its neutral position since repetitive flexion of the spine and poor posture are the main causes of bulging discs and herniated discs, particularly bending forward with poor posture.
- What to do – Start this workout by standing up straight. Next, lay both hands on the sides of your lower back. Now stretch your spine back and drive your pelvis forward with the aid of your hands. Your neck should be extended so that you finish up facing the ceiling.
- – Do 2-3 sets of 10 repetitions starting at the beginning.
- When you need a break from working at your desk, this one is really fantastic to do.
Half Cobra Pose (Prone Lumbar Extension):
How it helps: To promote better healing, the Half Cobra Stretch works to move the disc material back toward the intervertebral disc’s center. Repeated lower back extensions are intended to “centralize symptoms,” which essentially means that discomfort that radiates from the low back up the afflicted leg and into the foot should do so. This will relieve the pain.
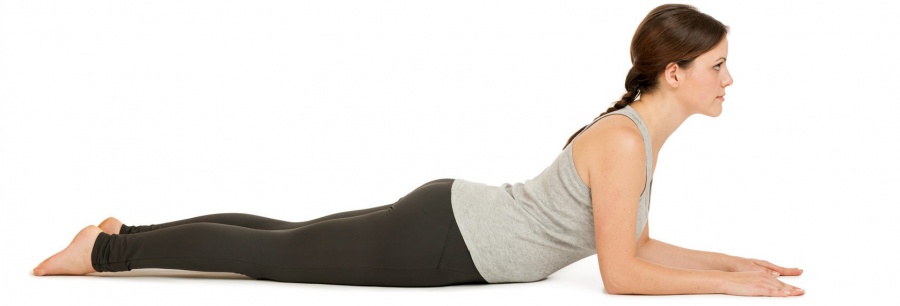
- How to execute it – Start this exercise by lying on your stomach (prone position), gently raising your arms upwards while maintaining touch with the floor with your hips.
- Before switching back to the prone position (laying face down), hold the propped-up position for 10 to 15 seconds. Build up to maintain the finish position for 30 seconds. Ten repetitions of this stretch are the target.
Full Cobra Pose (Advanced Extension)
How it helps: This stretch operates on the same logic as the last half-Cobra stance. In order to reduce pain sensations, this enhanced extension aids in pushing disc material back toward the intervertebral disc’s center.
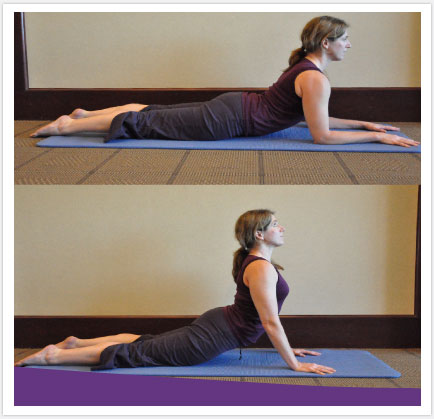
- How to do it: Once you’ve mastered the half-cobra stance, go to the advanced variation of this stretch to up the level of effort. Start this exercise by lying on your stomach with your hands at your sides. Keep your pelvis in touch with the floor and you are lower back relaxed as you gently press up on your hands.
- Keep your arms propped up for 10 seconds. Your goal is to perform this stretch ten times.
- If it seems comfortable, try holding this position for 20 to 30 seconds after that.
Spinal Decompression exercises:
Spinal decompression exercises are designed to relieve pressure on the spine and promote proper alignment. These exercises can help alleviate back pain and improve spinal flexibility.
Hanging from a Pull-Up Bar:
How it helps – The initial step in treating a herniated or bulging disc should be spinal decompression since it effectively makes space between your vertebrae and relieves pressure on the discs.
How to perform –
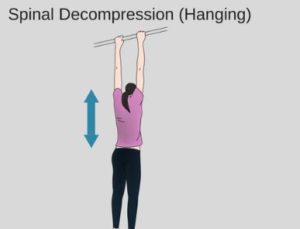
- Find a stable pull-up bar that you can hang from.
- Take an overhand hold on the bar, shoulder-width apart.
- Allow your body to hang freely, allowing your spine to decompress.
- Relax your shoulders and engage your core.
- For 30 to 60 seconds, keep the position.
- If you have the strength, you can gently sway side to side or perform gentle knee tucks while hanging.
- Gradually increase your hanging time as your strength and comfort level improve.
Cat-Camel stretch exercise:
The cat and camel exercise is a common exercise used to promote flexibility and mobility in the spine, particularly the lower back.
How to perform it:
Starting Position: Start on your hands and knees, placing your knees firmly beneath your hips and your hands directly beneath your shoulders. Maintain a neutral spinal alignment.

Cat Position: Slowly exhale and round your back upward toward the ceiling, like an angry cat. Imagine pulling your belly button up toward your spine. Allow your head to drop down gently. For just a few seconds, maintain this pose.
Camel Position: Inhale and reverse the movement. Lower your abdomen toward the floor, arching your back in the opposite direction. Lift your head and look forward. For just a few seconds, maintain this pose.
Repeat: Slowly move between the cat and camel positions, focusing on the fluidity of the movement. Coordinate your breath with the movement, exhaling as you round your back and inhaling as you arch your back.
Do 2-3 sets of this stretch, aiming for 10 repetitions.
Remember these key points while performing the cat and camel exercise:
Move slowly and mindfully, focusing on the stretch and movement in your spine.
Avoid any jerky or sudden movements.
Do not force your body into any uncomfortable positions.
Use just the range of motion that seems natural to you.
The moment you feel any pain or discomfort, discontinue the workout.
Supine spinal twist/Pelvic rotation exercise:
If you have a herniated disc, it’s crucial to be cautious and gentle with your exercises. The supine spinal twist can be modified to accommodate individuals with a herniated disc.
How to perform it:

- Sleep on your back and extend your legs out in front of you.
- Put your feet hip-width apart on the floor with your knees bent.
- To provide support, place a cushion or folded blanket beneath your head and neck.
- With your palms facing up, extend your arms out to the sides at shoulder height.
- Slowly bend your knees to the right side, allowing them to come as close to the floor as possible without causing pain or discomfort.
- Gently turn your head to the left, looking toward your left hand.
- Take slow, deep breaths and relax into the stretch.
- Hold this posture for 30 to 60 seconds, or as long as it feels comfortable.
- Slowly return your knees to the center and repeat on the opposite side.
Important tips for individuals with a herniated disc:
Don’t force the stretch; allow your body to relax and gradually deepen the twist over time.
If needed, place a folded blanket or bolster under your knees to provide additional support and reduce strain on the spine.
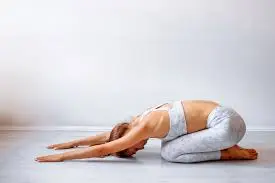
Child’s Pose:
Child’s Pose can be a beneficial exercise for individuals with a herniated disc as it helps to gently stretch and decompress the spine. However, it’s essential to modify the exercise to avoid putting excessive pressure on the affected area.
- How to do it:
- Beginning with your knees hip-width apart, go down on your hands and knees.
- Slowly sit your hips back toward your heels, extending your arms forward.
- Place a cushion, folded blanket, or bolster on your thighs or beneath your torso for added support.
- Spread your knees slightly wider than hip-width apart to create more space for your belly and chest.
- Gently lower your forehead to the floor or rest it on a block or pillow to maintain a neutral spine position.
- Allow your shoulders to loosen up and relax away from your ears.
- Breathe deeply and focus on relaxing and elongating your spine.
- Hold the position for 30 seconds to 1 minute, or as long as it feels comfortable.
- To come out of the pose, slowly walk your hands back towards your body, lifting your torso upright.
Important factors to take into account if you have a herniated disc:
Avoid deepening the stretch if it causes pain or discomfort. Listen to your body and modify the exercise accordingly.
If needed, use additional props, such as a cushion or bolster, to support your body and reduce strain on the spine.
If placing your forehead on the floor causes discomfort, you can stack your fists or rest your forehead on a block or pillow.
Consult with a healthcare professional or a physical therapist for personalized guidance and recommendations based on your specific condition.
Knee-to-Chest Stretch:
The Knee-to-Chest Stretch can be a beneficial exercise for individuals with a herniated disc, as it helps to stretch the lower back and alleviate pressure on the spine.

- How to perform this exercise:
- Lie on your back on a comfortable surface, such as a mat or carpet.
- Keep your feet level on the ground and hip distance apart while bending your knees.
- Place a small cushion or folded towel under your head and neck for support.
- Gently bring one knee toward your chest, clasping your hands behind your thigh or shin. You can also use a strap or towel to assist if needed.
- Keep your opposite leg relaxed and extended on the floor.
- Slowly pull your knee closer to your chest until you feel a gentle stretch in your lower back. Avoid any movement or position that causes pain or discomfort.
- Hold the stretch for 15-30 seconds, breathing deeply and allowing your body to relax into the stretch.
- Return the leg to its starting position gradually.
- Repeat the stretch with the other leg.
- Perform 2-3 repetitions on each leg.
Double knee-to-chest
The double knee-to-chest exercise, also known as the double knee hug, is a stretching exercise that can help relieve tension in the lower back and promote flexibility.
How to perform the double knee-to-chest exercise:
Lie on your back on a comfortable surface, such as a mat or carpeted floor.
Flex both knees (Bend) towards your chest.
Use your hands to grasp your knees or shins. You can interlace your fingers or hold onto your lower legs, whichever feels more comfortable for you.
Gently pull your knees closer to your chest, allowing your lower back to stretch and relax.
Hold the stretch for 20-30 seconds, breathing deeply and focusing on releasing tension in your lower back.
Slowly release the stretch and return your feet to the floor.
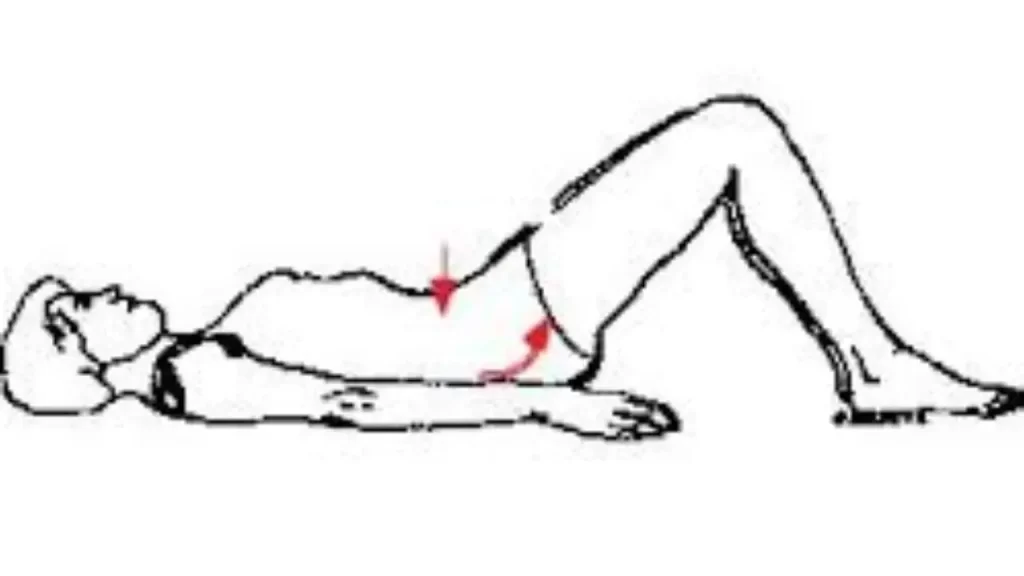
Pelvic tilt exercise:
The pelvic tilt exercise is a simple yet effective movement that helps strengthen and stabilize the core muscles, including the muscles of the lower back, abdomen, and pelvis. How to perform the pelvic tilt exercise:
Starting Position: Lie on your back on a soft mat or a comfortable surface while keeping your knees bent & feet flat on the floor. Maintain relaxed arms by your sides.
Pelvic Tilt:
- Engage your abdominal muscles by gently drawing your belly button inward toward your spine. This helps activate your core muscles.
- Slowly press your lower back into the floor/mat, tilting your pelvis backward. Consider pressing your lower back on the floor.
- Hold the position for a few seconds while maintaining a deep breath.
- Slowly release the tilt and allow your lower back to return to its neutral position.
- Repeat: Perform 10-15 repetitions of the pelvic tilt, focusing on controlled and deliberate movements. Gradually increase the duration of each hold as you become more comfortable with the exercise.
Important tips for pelvic tilt exercise:
Keep your breathing relaxed and natural throughout the exercise.
Avoid pushing your lower back into the floor with excessive force. The movement should be regulated and delicate.
Make sure to isolate the movement in your pelvis, without involving excessive movement in other parts of your body.
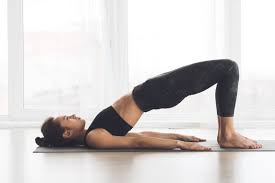
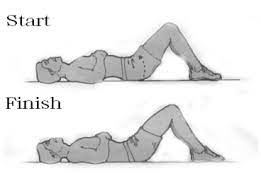
Bridge exercise:
The bridge exercise is a great way to strengthen the muscles in your buttocks, lower back, and core. It also helps improve hip stability and posture. How you can perform the bridge exercise:
Starting Position: Lie on your back on a soft mat or a comfortable surface while keeping your knees bent and feet flat on the floor. With your palms down, keep your arms at your sides in a comfortable position.
Bridge:
- Engage your core muscles by gently drawing your belly button inward toward your spine.
- Press your feet into the floor and lift your hips upward, pushing through your heels.
- Aim to create a straight line from your knees to your shoulders, with your thighs and torso parallel to the floor.
- Squeeze your buttocks at the top of the movement to activate your glute muscles.
- Hold the bridge position for a few seconds while maintaining a deep breath.
- Lowering:
- Slowly lower your hips back down to the starting position, one vertebra at a time.
- Control the movement and avoid letting your hips drop quickly to the floor.
- Repeat: Perform 10-15 repetitions of the bridge exercise, focusing on maintaining proper form and control throughout each repetition.
Important tips for the bridge exercise:
Keep your breathing relaxed and natural throughout the exercise.
Avoid arching your lower back excessively or letting your knees collapse inward. Maintain a neutral spine and alignment.
Focus on engaging your glute muscles and not relying solely on your lower back for lifting your hips.
If you find it challenging to lift your hips off the floor, start with smaller movements and gradually increase the range of motion as you get stronger.
Straight leg raise exercise:
The straight leg raise exercise is a commonly prescribed exercise for individuals with a herniated disc, specifically for those experiencing radiating leg pain (sciatica) caused by nerve compression. This exercise helps stretch and strengthen the muscles surrounding the lumbar spine.
How to perform?
Lie flat on your back on a firm surface, such as a mat or carpet, with your legs extended.
Bend one knee and keep your foot flat on the floor, while the other leg remains extended.
Slowly raise the extended leg upward, keeping it as straight as possible.
Stop raising the leg when you feel a mild to moderate stretch in the back of your leg or when you experience any pain or discomfort. You don’t need to lift the leg too high; the goal is to feel a gentle stretch without exacerbating your symptoms.
Hold the raised leg in that position for a few seconds, then slowly lower it back down to the starting position.
Repeat the exercise with the other leg.
Aim to perform 10-15 repetitions on each leg, gradually increasing the number of repetitions over time as tolerated.
Hip extension exercise:
The glutes and hamstrings, as well as other muscles in your buttocks and lower back, can be strengthened by performing hip extension exercises while resting on your back.
How to perform hip extension:
With your legs outstretched and your arms by your sides, lie face down on a mat or other soft surface.
your core muscles are tensed.
Squeeze your buttocks and lift one leg off the ground to start. Keep your leg straight and your knee slightly bent.
Maintain control and avoid arching your lower back while lifting your leg as high as you can comfortably do so.
After a little period of holding the top position, carefully drop your leg back down.
With the other leg, repeat the exercise.
For each leg, carry out numerous repetitions; as you gain stronger, increase the number of repetitions.
It’s crucial to maintain control and perfect form throughout the workout. Any workout that hurts should be avoided.
Isometric Abdominal Exercise/ abdominal bracing:
How to perform it:
Think of a thread pulling your belly button in the direction of your spine. By drawing in your abdominal muscles, activating them, tightening them in this posture, and holding them for three to five seconds, you may try to hollow out your stomach. Then exhale while you contract your abdominal muscles, then release and repeat. Simple and adaptable, this exercise may be performed while sitting, standing, or even lying down.
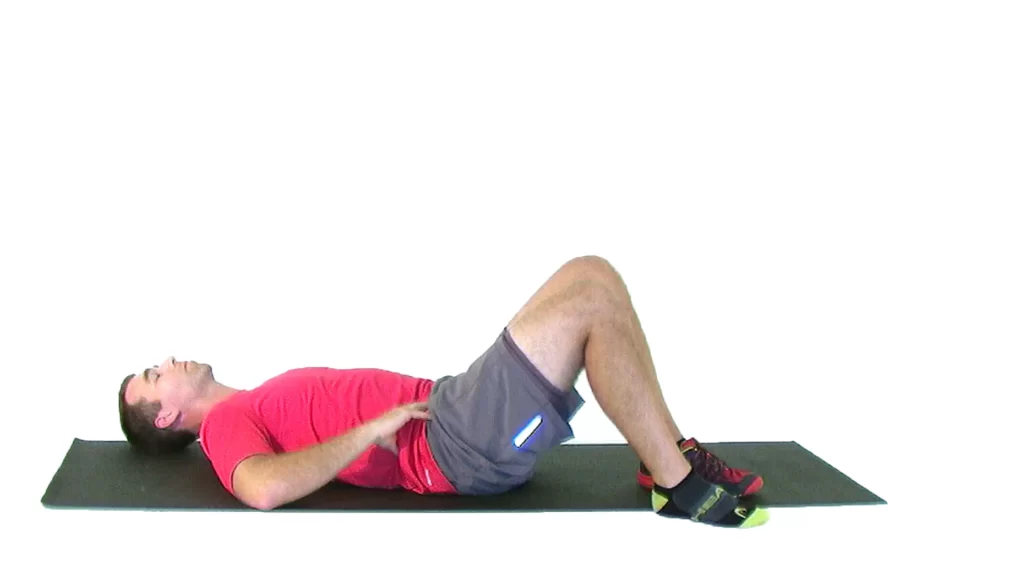
Back flexibility exercise(isometric back exercise):
How to perform it:
- Beginning in a supine posture on the floor or plinth, with both knees bent and both hips flexed, is the best position to start. To lift your lower back off the floor, contract your abs.
- You will need a serviette to perform this workout, which will strengthen your lumbar muscles and develop the contraction of the abdominal muscles.
- Hold the position for the required five to ten seconds, then release the tension or return to the default position. Pull the button all the way down to straighten your back.
- After holding for five seconds, release. repeat Start each day with five repetitions, then gradually increase to 30. About three to five times should be repeated.
The Bird Dog exercise:
The Bird Dog exercise is a popular core-strengthening exercise that targets the muscles of the back, abdominals, and glutes. It also helps improve stability and balance.
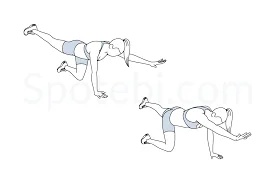
- How to perform the Bird Dog exercise:
- Begin on your knees and hands, placing your knees firmly beneath your hips and your hands directly behind your shoulders. The position of your spine should be neutral.
- Pulling your belly button towards your spine will help you to activate your core muscles.
- Slowly stretch your left leg backward while also extending your right arm forward. Keep your arm and leg parallel to the ground, and try to maintain your balance.
- Focus on keeping your hips level and your torso stable. Avoid arching or rounding your back.
- Hold the posture for a short period of time while feeling your abdominal muscles tense.
- Slowly return your arm and leg to the starting position, and repeat the movement on the opposite side (left arm and right leg).
- Continue alternating sides for the desired number of repetitions (start with 5 to 10 repetitions per side) or for a specified duration of time.
- Aim to maintain a controlled and steady motion throughout the exercise.
Stretching Exercises to Relieve Lumbar Herniated Disc Pain:
One of the greatest methods to treat radiating leg pain from a lumbar herniated disc is daily stretching. The hamstring muscles in your legs may be stretched out to provide greater lumbar spine support and to relieve strain on your sciatic nerve, which runs down your. Just keep in mind to halt if your discomfort increases while exercising.
Towel hamstring stretch:
The towel hamstring stretch could be an excellent choice if you want to stretch while lying down. In order to do this stretch:
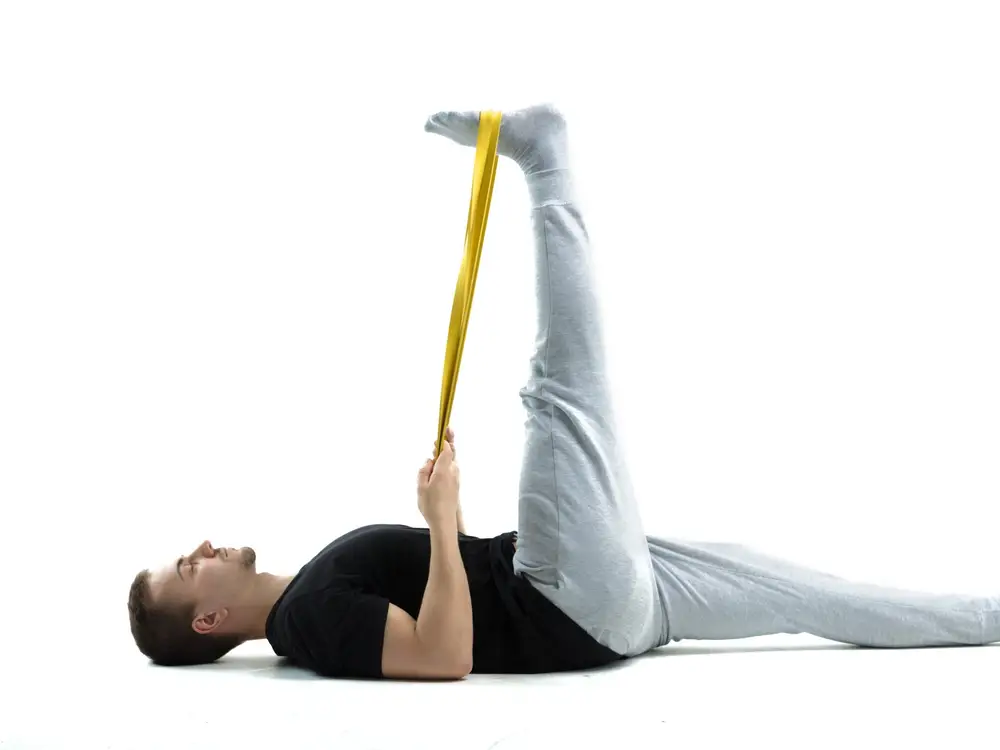
Lay on your back with your right leg bent and your left leg flat on the ground.
Lift your right leg slowly while contracting your core muscles.
The right ball of your foot should be wrapped in a towel or yoga strap. With one hand on either end of the strap, hold it.
Straighten your right leg and gently lift your right heel towards the sky. Maintain a strong footing with your left leg on the ground.
Hold this position for 15 to 30 seconds after a stretch is felt.
Return your right leg to its starting position by letting go. At least three times for each leg, switch legs, and repeat.
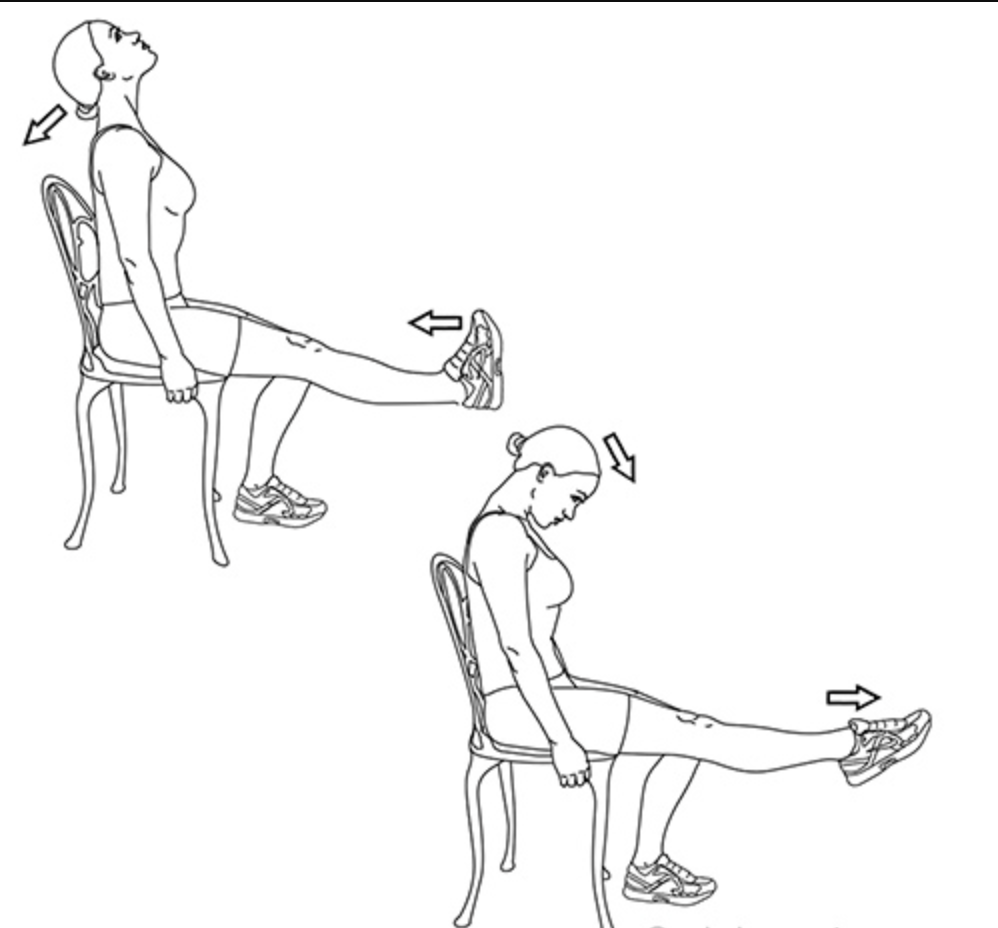
Seated hamstring stretch:
Given that it is performed while seated, this stretch is perfect for anyone with restricted mobility or extremely tight hamstrings.
How to do this stretch:
Sit at the front edge of a sturdy chair with a straight back, placing both feet 3 to 6 inches apart on the floor.
With your heel on the floor and your toes pointing up, straighten one leg in front of you.
Leaning over the extended leg while maintaining a straight back. Your thighs’ backs need to remain out.
If you can, maintain this posture for 30 seconds. After then, change to the opposite leg.
Piriformis Muscle Stretch:
Stretching the piriformis muscle, a tiny muscle in the buttocks can aid with low back discomfort. If you have sciatica, this stretch will also be beneficial.
How to perform it:
On the ground or on a yoga mat, lie on your back.
Kneel down while keeping both of your heels firmly on the ground.
Your ankle should be resting on the bent knee of the leg you are picking up. This ought to resemble an inverted triangle.
Grab the bent leg with both hands by extending one arm through the triangle.
Once you feel a tug in the crossed leg’s buttock, pull the leg towards your chest and hold.
Continue with the opposite leg.
Calf stretching:
How to perform it: Begin by holding the chair for balance. Your right leg is bent. With your left leg, take a step back and gently stretch it behind you. Place your left heel firmly down on the floor. A stretch in the calf of the back of the leg should be felt. Keeping the posture for at least 20 to 30 seconds is crucial. After two repetitions, swap legs. Leaning forward will allow you to bend your right knee more deeply, but be careful not to let it extend past your toes. The stretch itself is the calf stretch.
Self-stretching is a different technique that needs a hand towel or napkin. This stretching exercise is for the calves.
Starting position is a straight-legged sitting position on the mat or plinth.
Wrap the towel or napkin in a loop around the ball of one foot. Hold the towel by both ends.
Pull the towel towards the body while keeping the legs straight. Hold the position for 30 to 60 seconds before returning to the starting position. Then take a 30-second break.
Three times every session, three sets per day, repeat the stretch, then switch to the opposite side.
Sciatic Nerve Floss:
Sciatic nerve flossing can be beneficial for individuals with a herniated disc causing sciatic nerve compression.
Here’s a general description of how sciatic nerve flossing can be performed for a herniated disc:
- Select a comfortable sitting or lying posture.
- Straighten the afflicted leg out in front of you.
- Begin by gently flexing your neck and bending your head forward.
- Simultaneously, flex your affected foot upward (dorsiflexion) and slowly lift your leg up until you feel a mild stretch in your lower back and leg. Always keep your leg straight.
- Hold this position for a few seconds while maintaining the stretch.
- Slowly lower your leg back down and simultaneously extend your neck, bringing your head back to a neutral position.
- Repeat the movement, combining the neck and leg motions, for several repetitions, aiming for a smooth and controlled motion.
It’s important to emphasize that sciatic nerve flossing should be done with caution and within a pain-free range of motion. If you experience increased pain or any unusual sensations during the exercise, then stop immediately.
McKenzie Exercises:
McKenzie exercises, also known as McKenzie Method or McKenzie therapy, are a set of exercises developed by physiotherapist Robin McKenzie to help centralize and alleviate pain caused by disc herniation and other spinal conditions. These exercises focus on specific movements and positions to relieve pressure on the affected discs and promote healing.
Several McKenzie exercises include lying on your stomach, on a cushion, prone on your elbows, and other positions. inclined press-ups, Sitting flexion, lying extensions, and standing extensions.
Plank:
Plank exercises can be helpful for people with herniated discs because they assist to strengthen the core muscles, which include the muscles that support the spine and the abdominal muscles. However, in order to prevent making your problem worse, it’s crucial to approach planks cautiously and with the right form.
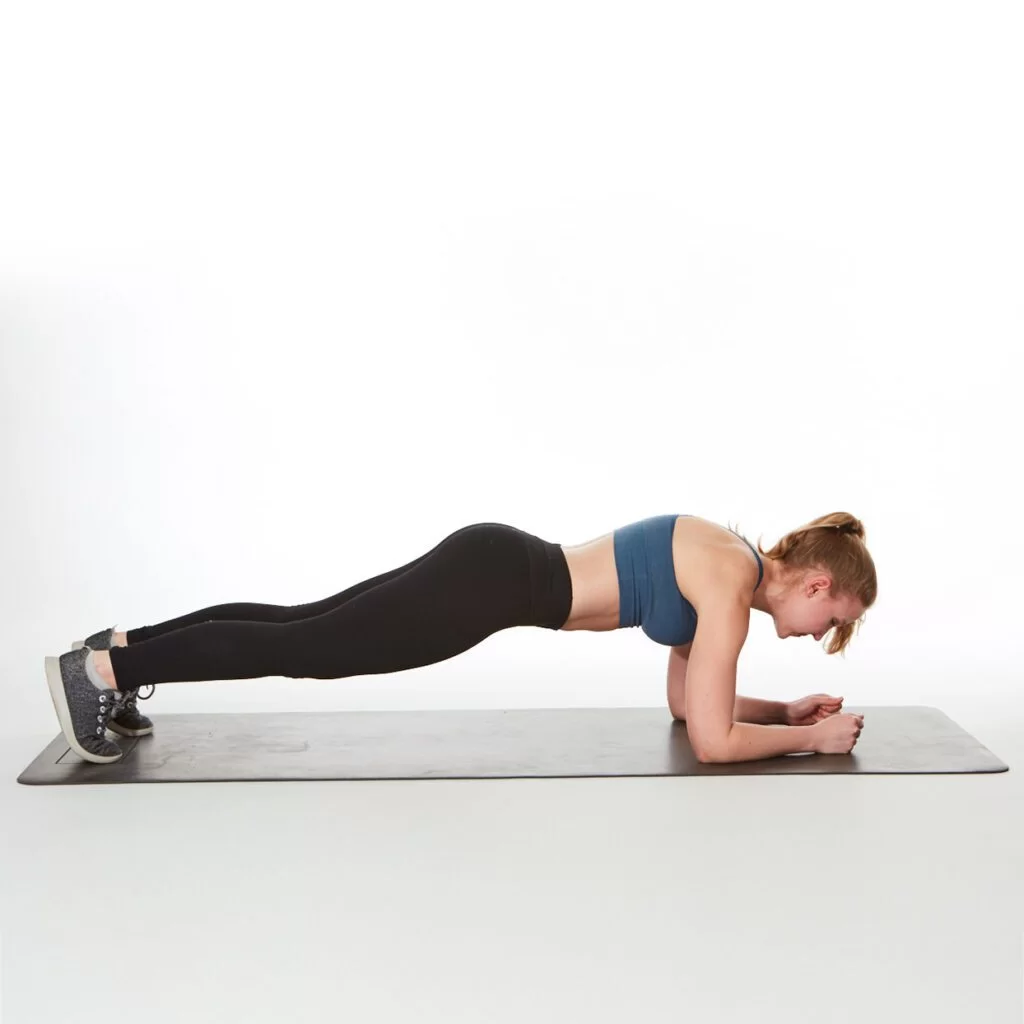
How to carry out an adaptation of the plank that is appropriate for those with a herniated disc:
Place your face down on a mat or other comfortable surface to start.
With your elbows exactly beneath your shoulders, place your forearms on the ground.
Engage your core muscles to maintain stability as you position your body in a straight line from your head to your heels.
Keep your lower legs and feet up while resting your knees on the ground.
For as long as it is comfortable for you to maintain appropriate form, hold this posture for a few seconds.
As you get stronger and more stable, gradually lengthen the hold.
It’s crucial to remember that this modified plank puts less strain on the lower back, making it more suited for people with a herniated disc.
Side plank
The side plank is an effective progression of the plank exercise. The quadratus lumborum muscle, hip joint gluteus medius, and tensor fascia lata (TFL) are the primary targets of this exercise. The stability of the hip joint is a function of these muscles.
Comprises the following actions:
With your left foot on the ground and your right leg slightly bent, lie on your right side of the body. Ensure that your right arm is stretched in front of you and that your right hand is placed squarely behind your right shoulder.
Lift your right hip off the ground by contracting your abs. To extend your right leg and bring your feet together, lift your right knee off the floor.
Hold the pose for 10 to 30 seconds while keeping your body straight.
Switch to the opposite side, then slowly revert to the exercise’s starting position. About three to five times every session, you should perform this exercise.
Wall sit:
A Wall Sit exercise:
This exercise may be done wherever a flat wall is available.
How to perform it: Your feet should be at shoulder width and roughly two feet away from the wall when you start with your back against it.
When your thighs are parallel to the ground, squeeze your abs and slowly glide your back down the wall.
Rather than being over your toes, position your feet such that your knees are squarely over your ankles.
Maintain a flat back against the wall.
Maintain the posture for 20–60 seconds.
Retrace your steps back up the wall until you are standing.
Perform the workout three more times after a 30-second break. Increase your hold duration by five seconds at a time as your strength grows.
Partial Crunches with Bent Knees:
Individuals with disc herniation may benefit from partial crunches with bent knees because they assist develop the abdominal muscles without placing too much strain on the lower back.
How to Do Partial Crunches With Bended Knees:
Legs bent and flat on the ground, hip-width apart, while you lay on your back. Put your hands behind your head, gently supporting it without pushing on your neck.
To contract your abdominal muscles, pull your belly button inward towards your spine. This helps to keep your core stable during the activity.
Lift your head, shoulder blades, and upper back slowly off the floor, beginning with your abdominal muscles. Avoid using your hands to raise yourself or pulling on your neck.
Lift till you feel a little contraction in your abdominals. Lifting too high or straining your neck is not recommended.
Hold the raised posture for a time, then gently return to the beginning position while keeping your abdominal muscles engaged.
Repeat as many times as necessary to achieve a regulated and smooth movement.
Keep the following considerations in mind:
Begin with a range of motion that is comfortable and does not produce pain or discomfort. As you gain strength and comfort, you may progressively improve your range of motion.
Prioritise quality above quantity. Instead of racing through repetitions, do the exercise with perfect form and control.
Stop immediately and talk with your healthcare provider or physical therapist if you encounter pain or discomfort during the workout.
Exercises like half crunches with bent knees must be combined with a full treatment plan for disc herniation, which may include other exercises, stretching, pain management measures, and changes to everyday activities. Always seek the advice of a healthcare expert for an appropriate diagnosis and treatment plan.
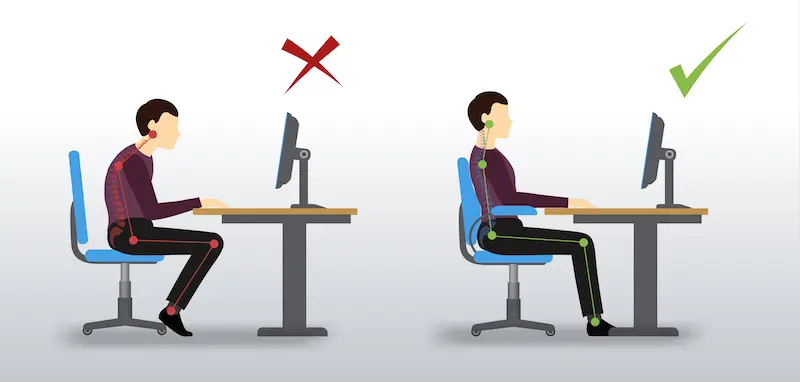
Maintain proper posture:
Bad posture can contribute to the development or worsening of a herniated disc. Poor posture often involves slouching or sitting with rounded shoulders, which places increased stress on the spinal discs. Over time, this can lead to the weakening and degeneration of the discs, making them more susceptible to herniation.
When you maintain proper posture, the natural curves of your spine are properly aligned, distributing the forces and pressures evenly across the discs. However, prolonged periods of poor posture can lead to an imbalance of these forces, causing excessive pressure on certain areas of the discs. This increased pressure can lead to the disc’s inner gel-like material pushing out through the outer layer, resulting in a herniated disc.
Additionally, bad posture can contribute to muscle imbalances and weakness, particularly in the core and back muscles. These imbalances further compromise the stability and support of the spine, increasing the risk of disc herniation.
For people who have a herniated disc, keeping good posture is essential. The following advice is provided for keeping proper posture:
Imagine a cord pulling the top of your head higher, straightening your spine, as you sit and stand erect. Keep your shoulders from rounded forward or slouching.
Use ergonomic supports: To preserve a neutral posture, sit on supportive chairs with enough lumbar support and change the height of your desk and computer monitor.
Don’t sit or stand for extended amounts of time; take breaks and move about. Take regular breaks to move around, stretch, or alter your position.
Lifting correctly involves bending at the knees and using your leg muscles, not your back. Hold items close to your body and raise without twisting.
Sleep in a supported position: To keep your spine in a neutral posture while you sleep, use a supportive mattress and pillows. To determine the ideal sleeping posture for your particular situation, speak with a medical practitioner.
Pilates for herniated disc:
This can be a beneficial form of exercise for individuals with a herniated disc. Pilates focuses on core strength, stability, flexibility, and proper body alignment, which can help support the spine and alleviate strain on the affected disc. However, it’s important to approach Pilates exercises for disc herniation with caution and consult with a healthcare professional or a certified Pilates instructor who has experience working with individuals with spinal conditions. For your specific needs, they can alter routines and offer individualized advice.
Seek professional guidance: Work with a qualified Pilates instructor who has experience in dealing with spinal conditions. They can assess your condition, design a tailored exercise program, and provide proper guidance and modifications as needed.
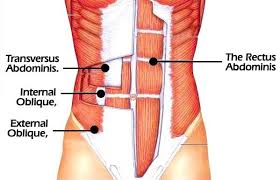
Focus on core strength: Pilates exercises emphasize core strength, which helps support the spine. Strengthening the deep abdominal muscles, including the transverse abdominis, can provide stability and protect the discs. Exercises such as the Pilates Hundred, abdominal curls, and pelvic curls can be beneficial.
Maintain neutral spine alignment: Pay attention to maintaining a neutral spine alignment during Pilates exercises. Avoid excessive flexion (forward bending) or extension (backward arching) of the spine, as these movements can exacerbate disc herniation. Engage the abdominal muscles to stabilize the spine and avoid putting excessive pressure on the affected disc.
Modify exercises: Some traditional Pilates exercises may need to be modified or avoided to accommodate the needs of individuals with disc herniation. For example, exercises that involve forward flexions, such as full sit-ups or deep forward folds, may need to be modified to avoid straining the discs. A certified instructor can provide appropriate modifications or alternative exercises that are safe for your condition.
Focus on flexibility: Gentle stretching and lengthening exercises can help improve flexibility and relieve tension in the surrounding muscles. However, avoid excessive stretching or movements that cause pain or discomfort. Gentle movements such as cat-camel stretches, gentle spinal twists, and hamstring stretches can be beneficial.
Mindful movement and breathing: Pilates emphasizes mindful movement and proper breathing techniques. Paying attention to your body’s alignment, movement patterns, and breathing can help maintain control and reduce the risk of injury.
Aerobic exercise:
Aerobic exercises, also known as aerobics, can provide numerous benefits for individuals with disc herniation. They help improve cardiovascular fitness, enhance overall health, and may contribute to pain management.
Activities like walking, jogging, swimming, cycling, and dancing are very useful in controlling low back pain.
Low-impact aerobics: Engaging in low-impact aerobics can help minimize stress on the spine while providing a cardiovascular workout. These exercises typically involve movements where at least one foot remains in contact with the ground at all times. Examples include low-impact aerobic classes, step aerobics with a low step height, or modified dance workouts.
Water aerobics: Exercising in water is an excellent option for individuals with disc herniation. The buoyancy of water reduces the impact on the spine, making it a gentle and supportive environment. Consider joining water aerobics classes or performing exercises in a pool with guidance from a professional.
Elliptical training: An elliptical machine can offer a low-impact aerobic workout involving smooth, gliding motions. It reduces stress on the spine compared to high-impact exercises like running or jumping. Ensure that you maintain proper posture and avoid excessive leaning or jerking movements.
Stationary biking: Cycling on a stationary bike is another low-impact aerobic exercise that can be beneficial for disc herniation. It helps strengthen the leg muscles while minimizing strain on the spine. Adjust the bike seat and handlebars to ensure proper alignment and comfort.
Safety Considerations
Exercises for degenerative disc disease are simple to follow; however, after a few days, you must add the progression exercise. Spend some time comprehending the practice. Don’t exert too much effort during a particular exercise, and don’t go beyond your comfort level with the range of motion.
Reduce the intensity, repetitions, and frequency of the exercise if you experience discomfort when performing any exercise for this condition until you discover a routine that is comfortable for you. If you have any lingering pain following these workouts or while exercising, let your doctor know.
Exercises To Avoid For Herniated Discs:
Regular exercise helps reduce the chance of getting a herniated disc, but if one has formed, there are some exercises to avoid. Avoid workouts that force the neck to bend or induce other spine misalignments, as well as those that apply excessive pressure or force to the spine.
Avoid the following exercises:
- Sit-ups: Sit-ups are challenging to complete correctly and are not advised for people with a herniated disc because of the strain placed on the lower back. Sit-ups are one of the most crucial herniated disc workouts to avoid since they can cause serious injury. Gentle exercises that stretch and strengthen back muscles while increasing flexibility are essential. Swimming, yoga, stretches that do not circle the neck or back, walking, and cycling are examples of gentle workouts.
- Squats: Squats demand you to bend forward while lowering yourself until your thighs are parallel to the ground. It puts a lot of strain on the spine, which can create a lot of discomfort in the lumbar region and cause the spine to hyperextend. Squats are not suggested for persons who have a herniated disc since they can be quite uncomfortable.
- Cycling: Avoid any workout that requires you to lean forward. Long rides combined with poor posture can aggravate a herniated disc, resulting in severe damage. Walking or even trekking is a better and safer approach to exercise with a herniated disc. Hiking is a lower-body workout that is less stressful on the spine.
- Hamstring Stretch While Standing: A person must raise their leg on an elevated platform and lean forward during a standing hamstring stretch. Leaning forward creates spine curvature, which increases strain on herniated discs.
- Deadlifting: Deadlifts are among the most difficult bulging disc movements to avoid. If done incorrectly, deadlifts can place a lot of strain on the spine and cause muscle and ligament damage. To avoid exacerbating your disc damage, avoid performing deadlifts.
- High-Intensity Aerobic Activity: Rapid transitions between motions are required for high-impact aerobic activity. These changes, when combined with leaping and other plyometric activities, can result in further damage and back strain. Instead of plyometric and high-impact aerobic activity, look for alternatives.
- Leg Press: A leg press is performed by lying down with knees near the chest and pushing up against the weights while rounding up the spine. This training move is quite effective; nevertheless, it is not suitable for people who have herniated discs.
- Leg lifts: Instead of using the core for leg lifts, many people opt to use their lower back. There could be more harm and muscle tension as a result.
- Unsupported forward bends: These movements stress the back’s already-damaged ligaments and tendons in addition to being excruciatingly uncomfortable.
- High-impact exercise: Running and other high-impact exercises can exacerbate vertebral compression.
How to Prevent Disc Herniation?
There are actions you can do to lessen the chance of disc herniation and keep your spine healthy, even if it’s not always feasible to totally prevent it. The following advice can help you avoid disc herniation:
- Practice good posture: Practise good posture by training your body to maintain it when standing, sitting, and moving. A strain on your spine’s discs might result from slouching or hunching forward. Keep your spine in a neutral alignment, your shoulders back, and your chest raised.
- Lift correctly: To prevent back discomfort, use the right lifting techniques. Lift using your legs rather than your back by flexing your knees while maintaining your back straight. When lifting and moving big goods, avoid twisting movements.
- Exercise regularly: Regular physical exercise will help to stabilize your spine by strengthening the muscles in your core. Exercises that target your back, pelvic, and abdominal muscles should be your main priority. Your spine’s discs may be stabilized and protected by strengthening your core.
- Maintain a healthy weight: Being overweight might strain your spine more and raise your risk of disc herniation. Maintaining a healthy weight through exercise and a balanced diet will lessen the strain on your spine.
- Use proper ergonomics: Make sure your desk and other areas where you spend a lot of time are ergonomically constructed by using correct ergonomics. Maintain good body alignment when seated, utilize supportive chairs with lumbar support, place your computer monitor at eye level, and get up and walk about frequently during breaks.
- Avoid repetitive movements and excessive strain: Avoid repeating motions and activities that put too much pressure on your spine: Be careful while engaging in repetitive motions or activities that put too much strain on your spine. Take regular pauses and practice good body mechanics if your profession or hobbies require heavy lifting or repeated motions to reduce the chance of injury.
- Warm-up before physical activity: Warm up your muscles with mild stretches and light aerobic activity before indulging in physical activities or exercise. The risk of injury is decreased by warming up your muscles and joints for exercise.
- Quit smoking: Smoking can weaken spinal discs and increase their susceptibility to injury by decreasing blood flow and oxygen delivery. Quitting smoking can help your discs function better and lower your chance of disc herniation.
- Practice proper body mechanics in daily activities: Use good body mechanics when performing daily tasks: Be mindful of your body mechanics when performing tasks like bending, lifting, and carrying. Utilize your legs instead of overworking your back. To lessen the strain on your spine, be aware of your posture and make necessary modifications.
- Manage stress: Prolonged stress can cause muscular tension, raise your risk of disc herniation, and cause back discomfort. Use stress-reduction strategies including exercise, meditation, and asking for help from loved ones or specialists.
FAQs
A disc herniation, also known as a slipped or herniated disc, refers to a condition in which one of the discs in the spine becomes damaged or compromised. The spine is made up of individual bones called vertebrae, and between each pair of vertebrae is a cushion-like structure called an intervertebral disc. The nucleus pulposus, which resembles gel, is located inside the stiff outer layer (annulus fibrosus) of these discs.
When a disc herniation occurs, the outer layer of the disc weakens or tears, allowing the inner gel-like material to protrude outwards. This bulging or leaking of the disc material can lead to compression or irritation of nearby spinal nerves or the spinal cord itself. The herniated disc material can also cause inflammation, resulting in pain, numbness, tingling, or weakness in the affected area.
Disc herniation can result from various factors, including aging and degeneration of the discs, repetitive or excessive strain on the spine, lifting heavy objects with improper technique, sudden trauma or injury, and genetic predisposition.
The most common symptoms of disc herniation are lower back pain and neck pain. Common symptoms include localized or radiating pain, numbness, tingling, or weakness in the affected area. The specific symptoms depend on the location of the herniated disc along the spine and the nerves affected.
Disc herniation can diagnose through a combination of medical history review, physical examination, and diagnostic tests such as imaging studies (e.g., MRI, CT scan) to visualize the spinal structures.MRI provides detailed images of the spine, allowing healthcare professionals to visualize the intervertebral discs, spinal cord, and nerve roots. It can help identify the location, size, and extent of the herniation.
Treatment options for disc herniation range from conservative measures to more invasive interventions. Non-surgical approaches may include rest, physical therapy, pain medication, hot/cold therapy, and lifestyle modifications. In severe cases, surgical procedures like discectomy or spinal fusion may be recommended.
While disc herniation cannot always be prevented, certain lifestyle choices can minimize the risk. Maintaining a healthy weight, practicing good posture, using proper lifting techniques, engaging in regular exercise, and avoiding prolonged sitting can help reduce the likelihood of disc herniation.
Exercise can be beneficial for disc herniation, but it’s essential to consult with a healthcare professional or physical therapist before starting an exercise program. They can guide you on safe exercises that promote strength, flexibility, and pain management while avoiding activities that may exacerbate your condition.
In many cases, disc herniation symptoms can improve or resolve on their own with conservative treatments such as rest, physical therapy, and medication. However, the extent of healing depends on various factors, including the severity of the herniation, individual factors, and adherence to recommended treatment.
In some cases, disc herniation can lead to chronic pain or recurrent symptoms. If conservative treatments are not effective or the condition worsens, surgical intervention may be necessary. However, with proper management and lifestyle modifications, many individuals with disc herniation can lead active and fulfilling lives.
Recovery time can vary depending on the severity of the herniation, the effectiveness of the treatment, and individual factors. Mild to moderate disc herniations may show improvement within a few weeks to a few months, while more severe cases or those requiring surgery may take longer for recovery.
The ability to work with a disc herniation depends on various factors, including the severity of symptoms, the nature of your job, and your doctor’s recommendations. Some individuals with disc herniation can continue working with modifications or accommodations, while others may need to take time off or adjust their duties temporarily.
While McKenzie exercises can be beneficial for many individuals with a herniated disc, their effectiveness can vary. The response to these exercises depends on factors such as the specific characteristics and severity of the herniation, individual factors, and adherence to the prescribed exercise program.
McKenzie exercises can help with a herniated disc by centralizing symptoms, relieving pain, increasing mobility and flexibility in the spine, empowering individuals to actively participate in their own recovery, and potentially avoiding the need for surgery.