
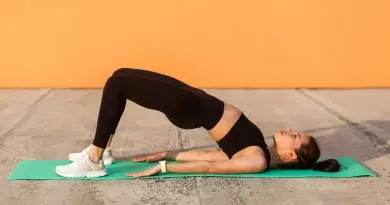
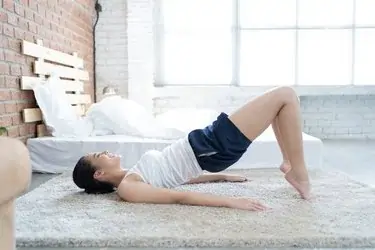
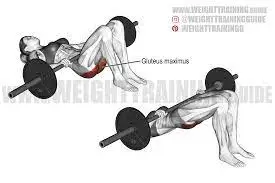
How to Do Bridge Exercise?
This bridge exercise is used to isolate & strengthen your gluteus means butt muscles [ the gluteus maximus, medius & minimus] with hamstring muscles, all muscles are the main muscles of the posterior chain.
This exercise is performed by lying on your back means in a supine position with your knee joint bent, feet flat on the ground & maintaining a comfortable distance from your butt.
This glute bridge exercise does not require any equipment & also be performed with a fitness or yoga mat & a towel.
This glute bridge exercise is simple & performs for any age or any fitness level.
Sometimes it becomes too challenging for you but you feel the benefits after finishing your workout.
You are including this exercise in your full-body workout & also in your warm-up.
Table of Contents
Which muscles work in the bridge exercise?
- These bridge exercises mostly work for the gluteal muscle.
- Most commonly this glute bridge exercise hammers on your largest glute muscle like the gluteus maximus.
- When you perform this exercise in the sagittal plane of motion which allows for forward & backward movement.
- Then if you perform this exercise in the frontal plane of motion it allows for side-to-side movement & gives better work to your smaller glute muscles with the hip abductor muscles called the gluteus minimus & gluteus medius.
- So that this exercise is primarily considered a butt exercise.
- But your glute muscles are not the only activities because hip raises in this exercise work your hamstring muscles too & your quad muscle also needs to fire during this movement to keep your feet pressed on the floor so that you do not slide out from under you.
What are the Health benefits of the basic bridge exercise?
- When you are trying your daily routine first you start with the basic bridges exercise.
- This basic bridge exercise also helps to strengthen your erector spinae muscle which runs the length of your back from your neck to your tailbone.
- This basic bridge exercise is a stabilizer of the posterior chain, including your hip abductors muscle, gluteus maximus muscle & hamstring muscle.
- As antagonist stabilizers muscles for this exercise include the rectus abdominis, obliques muscle & quadriceps muscle which is used to maintain stability.
- Your body power & body strength is generally improved as these stronger muscle groups.
- The strong core muscle also improves your posture & helps to ease your lower back pain.
- These bridge exercises are generally safe for many people with chronic back problems & even for pain management.
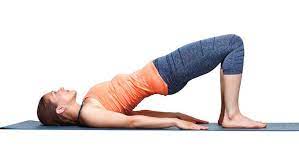
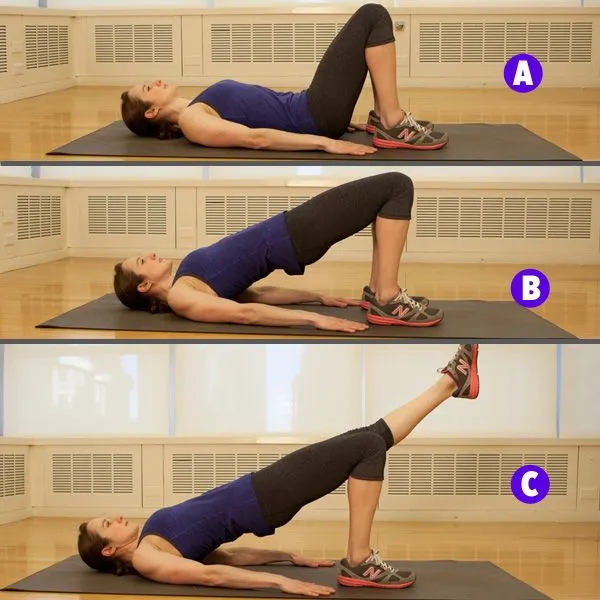
How to perform basic bridge exercises?
- This exercise is also known as the Hip raise & glute bridge exercise.
- This exercise mostly targets three muscles: The glutes, abs & hamstrings.
- In this exercise need to mat.
- First, you find an open space on the floor.
- You are lying on your back means in the supine position.
- For this exercise, you are using a mat.
- Rest your hands at your sides, bend your knee joint & place your feet flat on the floor & beneath your knee joint.
- First, tighten your abdominal & buttock muscles by pushing your lower back to the ground.
- Try to raise your hip joint to create a straight line from your knee joint to your shoulder joint.
- Then squeeze your core muscle & pull your belly button back toward your spine.
- Hold this exercise position for 30 seconds.
- Then lower the hip joint & return to the starting position.
- Perform 10 times in 1 session & 3 sessions per day.
Bridge exercise for glutes video:
Which are other Variations of a basic bridge exercise?
- Elevated Feet
- Straightened Legs
- Single-Leg Bridge
- Single-Leg Bridge With Lowered Leg
- Bridge March
- Bridge with weights
- Bridge with bands
- Bridge with the ball (elevated bridge)
- Single-leg bridge (bridge with leg extended)
- Glute bridge & hamstring curl
- Glute bridge extension
- Legs pointed outward
- Legs pointed forward
- Press through the heels
- Press through the toes
- One-legged glute bridge
- Bent-over row
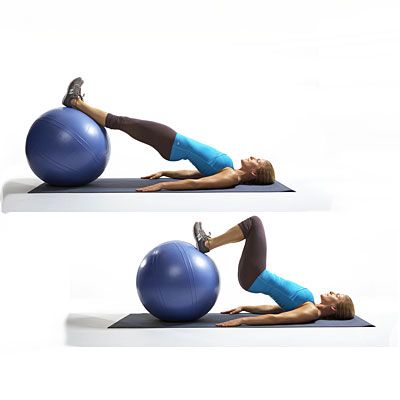
Elevated Feet:
- For this variation, you need an inflatable exercise ball.
- First, take the basic bridge exercise as a starting position with the place of an exercise ball at your feet.
- Then place your heels on the top of the ball.
- Try to raise your pelvis as a basic bridge exercise.
- Must keep your core muscle engaged throughout the movement during the exercise.
- Hold this exercise position for 30 seconds.
- Perform 10 times in 1 session & 3 sessions per day.
Straightened Legs:
- For this performing a starting position with the bridge exercise with straight legs rather than a bent knee joint is usually a challenge.
- Then add an exercise ball to support your legs which makes this exercise easy.
- Must keep your abdomen muscles engaged & place your arms at your sides to support your weight & prevent back strain.
- Hold this exercise position for 30 seconds.
- Perform 10 times in 1 session & 3 sessions per day.
Single-Leg Bridge:
- First, take the basic bridge exercise as a starting position.
- Try to raise your left leg as you raise your pelvis.
- Hold this exercise position then lower your hip joint back down to the floor.
- Must keep the leg raised.
- Hold this exercise position for 30 seconds.
- Perform 10 times in 1 session & 3 sessions per day.
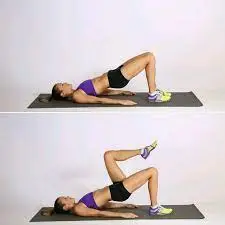
Single-Leg Bridge With Lowered Leg:
- The variations of this exercise add even more intensity to the single-leg bridge exercise by incorporating leg movement while the pelvis is in the raised position.
- First, take the basic bridge exercise as a starting position.
- Try to raise your left leg as you raise your pelvis.
- Then lower the left leg till you are almost touching the floor, while you are keeping the pelvis in the raised position.
- Try to lift the leg back up & hold this position before lowering your hip joint back down to the floor.
- Hold this exercise position for 30 seconds.
- Perform 10 times in 1 session & 3 sessions per day.
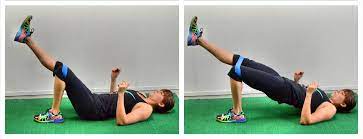
Bridge March:
- When you are getting bored with the basic bridge exercise & also mastered the single-leg bridge you try the bridge in March next.
- First, take to the basic bridge exercise as a starting position.
- You are raising your pelvis with the lift of your left leg & bringing your knee joint close to your core muscle.
- Then lower your left leg back down & raise your right leg.
- Try to bring your knee joint to your abs muscle.
- Hold this exercise position for 30 seconds.
- Perform 10 times in 1 session & 3 sessions per day.
Bridge with weights:
- For this exercise first, take a basic bridge exercise then place a weight on your hip joint to add resistance.
- Must be sure you hang on to the weight with your hands & not fall the weight.
- Then perform this exercise in the way of normal basic exercise with the weights.
- In the starting phase, you are holding this exercise for 15 seconds & perform it 5 times in 1 session or 3 sessions per day.
- With time increase the weight & increase the holding time with repetition.
Bridge with bands:
- You are performing this exercise in a couple of variations with the resistance bands.
- In the first variation:
- First, take a basic bridge exercise & place a loop or hip circle band just above your knee joint.
- When you raise your hip joint during this exercise, this band adds resistance & requires greater stabilization in your glutes muscles, hip joint & thighs.
- In the second variation :
- This variation is performed with a loop, hip circle, tube & therapy resistance band.
- First, take a basic bridge exercise &Place the band over your hip joint & hold the position against the floor on both sides with your hands & wrists.
- Must keep holding the band to the floor as you raise your hip joint.
- This variation adds resistance as you reach the peak of the bridge exercise.
- For this both variations:
- In the starting phase, you are holding this exercise for 15 seconds & perform it 5 times in 1 session or 3 sessions per day.
- With time increase the weight & increase the holding time with repetition.
Bridge with the ball (elevated bridge):
- First, take a basic bridge exercise by placing your heels hip-width apart on top of a stability ball.
- Then try to press through your heels & lift your hip joint like a bridge exercise position.
- But this variation takes to some serious stability, so must be you prepared for that.
- In the starting phase, you are holding this exercise for 15 seconds & perform it 5 times in 1 session or 3 sessions per day.
- With time increase the weight & increase the holding time with repetition.
Single-leg bridge (bridge with leg extended):
- First, take a basic bridge exercise with place your feet hip-width apart.
- When you press through your heels & lift into the bridge exercise position.
- Try to straighten one leg so that the other leg holds the bridge position.
- Then repeat this exercise on the other side.
- In the starting phase, you are holding this exercise for 15 seconds & perform it 5 times in 1 session or 3 sessions per day.
- With time increase the weight & increase the holding time with repetition.
Glute bridge & hamstring curl:

- You are lying face up means a supine position on a mat with your feet resting on top of a football & arms resting by your sides.
- Must be ensured put your spine is in a neutral position.
- This is your starting position for this exercise.
- Then gently draw your ribs to your hip joint & engage your core muscle.
- Try to push your heels into the fitball & lift your hip joint till you are resting on your upper back.
- Must ensure that your glute muscle initiates the movement.
- While keeping the core muscle engaged & hip joint elevated bend your knee joint to roll the ball in towards you.
- You feel the tension in your hamstring muscles.
- Then inhale & extend your legs before returning to the starting position.
- In the starting phase, you are holding this exercise for 15 seconds & perform it 5 times in 1 session or 3 sessions per day.
- With time increase the weight & increase the holding time with repetition.
Glute bridge extension:
- Start this exercise by lying face up on a yoga mat with your knee joint bent, feet hip-width apart & your arms resting by your sides.
- Must ensure that your spine is in a neutral position.
- This is your starting position for this exercise.
- Then inhale & brace your core muscle.
- After that exhale & push your heels onto the mat to lift your hip joint till you are resting on your upper back which creates a straight line from shoulder joint to knee joint.
- Must ensure that your glute muscle initiates the movement.
- Then keeping your core muscle engaged & hip jointly elevated, straighten one of your legs.
- You feel the tension in your glute muscle & hamstring muscle as you perform.
- After that inhale & bend your knee joint before returning to the starting position.
- In the starting phase, you are holding this exercise for 15 seconds & perform it 5 times in 1 session or 3 sessions per day.
- With time increase the weight & increase the holding time with repetition.
Legs pointed outward:
- You start this exercise flat on your back with your legs bent at a 90-degree angle & feet placed flat on the ground.
- Must be sure your toes are turned outward at 45-degree angles & your knee joints are facing in the same direction as your toes.
- Drive down through your feet & push your hip joint up.
- You feel this variation fatiguing the outer portion of your thighs.
- You must keep your knee joint over your toes throughout the entire movement.
- Do not let them move forward over the toes.
- With a controlled motion, let your hip joint sink back down toward the ground.
- In the starting phase, you are holding this exercise for 15 seconds & perform it 5 times in 1 session or 3 sessions per day.
- With time increase the weight & increase the holding time with repetition.
Legs pointed forward:
- You start this exercise flat on your back with your legs bent at a 90-degree angle & feet placed flat on the ground.
- Your toes are pointed straight forward & your thighs are parallel to each other.
- Try to drive down through your feet & push your hip joint up.
- You feel this variation fatiguing the inside of your thighs.
- Must keep your knee joint over your toes throughout the entire movement.
- With a controlled motion, let your hip joint sink back down towards the ground.
- In the starting phase, you are holding this exercise for 15 seconds & perform it 5 times in 1 session or 3 sessions per day.
- With time increase the weight & increase the holding time with repetition.
Press through the heels:
- Start this exercise flat on your back with your legs bent at a 90-degree angle & feet placed flat on the ground.
- Then drive your weight down through your heels & elevate your hip joint.
- You feel this variation fatiguing the back of your legs & glute muscles.
- In this exercise, you are targeting the posterior portion of your thighs & bringing your toes off of the ground as you drive up.
- With a controlled motion, let your hip joint sink back down toward the ground.
- In the starting phase, you are holding this exercise for 15 seconds & perform it 5 times in 1 session or 3 sessions per day.
- With time increase the weight & increase the holding time with repetition.
Press through the toes:
- Start this exercise flat on your back with your legs bent at a 90-degree angle & feet placed flat on the ground.
- Lift your heels & drive your weight down through your toes with elevated hip joints.
- In this exercise, you are targeting the posterior portion of your thighs & bringing your toes off of the ground as you drive up.
- With a controlled motion, let your hip joint sink back down toward the ground.
- In the starting phase, you are holding this exercise for 15 seconds & perform it 5 times in 1 session or 3 sessions per day.
- With time increase the weight & increase the holding time with repetition.
One-legged glute bridge:
- Start this exercise flat on your back with your legs bent at a 90-degree angle & feet placed flat on the ground.
- Try to raise 1 leg off the ground & straight up in the air.
- Then drive your weight down through the leg on the floor.
- Work to keep your hip joint squared.
- You feel this variation fatiguing your entire thigh & buttocks.
- With a controlled motion, let your hip joint sink back down toward the ground.
- In the starting phase, you are holding this exercise for 15 seconds & perform it 5 times in 1 session or 3 sessions per day.
- With time increase the weight & increase the holding time with repetition.
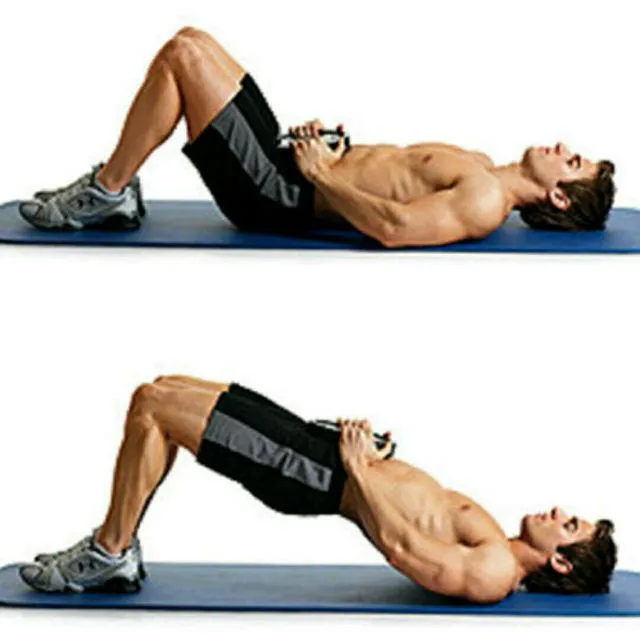
Bent-over row:
- You are lying on your back with your knee joint bent & feet flat on the floor hip-width apart.
- Hold a dumbbell in each hand & rest them right under your hip bones.
- This is the starting position of this Bent-over row exercise.
- Try to squeeze your glutes muscle & abs and push through your heels to lift your hip joint a few inches off the floor till your body forms a straight line from your shoulder joint to your knee joint.
- In the starting phase, you are holding this exercise for 15 seconds & perform it 5 times in 1 session or 3 sessions per day.
- With time increase the weight & increase the holding time with repetition.
What are the occur common mistakes during this basic bridge exercise?
You must avoid these postural issues when you are performing a basic bridge exercise.
- Raising your hip joint too high:
- You must avoid raising your hip joint too high to hyperextend your lower back which is lead to strain.
- You must be keeping your abdominal muscles engaged with must be sure you do not have to arch your back excessively.
- Allowing the Hips to Sag:
- When you find your hip joint is dropping during the hold of this bridge exercise you are lowering your pelvis back down to the floor.
- When you are performing as a first starting out, you need to hold this bridge exercise position for only a few seconds at a time till you build up strength.
What are the safety & precautions points of this basic bridge exercise?
- When you are suffering from certain health conditions or any injuries to the body & when you are recovering from illness or surgery,
- In this situation, you need to avoid these exercises so that you are not working your core, lower back, knee joint & glutes muscles till you have not healed from injury.
- It is the best way to avoid bridge exercises in this condition include:
- When you are in the final stages of pregnancy, just before delivery time & also when you are suffering from this condition which is known as diastasis recti.
- When you are in the stage of healing from surgery or an injury that occurs in your hip joints, back, abdomen, pelvis, knee joint, or ankle joint.
- If you are suffering from an abdominal hernia & another condition that is related to the muscles & tissue in your abdomen.
- You must check with your doctor before starting a workout & add these basic bridge exercises to your current routine.
- Stop this exercise as soon as possible when you feel pain in your lower back & hip joints & also experience a burning sensation.
- When you are trying this for the first time this exercise you start with 10 reps after that when you become stronger perform 3 sets of 25 reps.
- When you feel too difficult with the modification that performs 2 sets of 15 reps it helps you to strengthen the muscles harder without damaging this muscle.


2 Comments