35 Best Exercise for Upper Back Pain
In many cases, incorporating targeted exercises into your routine can play a crucial role in alleviating upper back pain and improving posture. By engaging in exercises that strengthen and stretch the muscles in the upper back and surrounding areas, individuals can find relief, enhance flexibility, and promote long-term spine health.
Table of Contents
Introduction
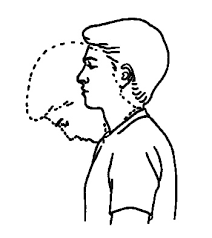
Upper back pain (and middle back pain) occurs anywhere from the base of the neck to the bottom of the rib cage. Your upper and middle back are considered as your thoracic spine. Your thoracic spine has twelve small bones called vertebrae. Your vertebrae make up your spine.
Each thoracic vertebra is connected by a pair of ribs. The ribs wrap around your body into a long flat bone in the center of your ribcage called the sternum. It forms the box. Your upper back also has discs that separate all the vertebrae. These plates absorb shock as you move. Your upper back also has many muscles and ligaments that hold your spine together.
For upper back pain, there is involvement of many causes it can be many different medical conditions or injuries or fractures to the bones, damage of discs, muscles, and ligaments of the upper back.
Upper back pain is not as considered as the neck or lower back pain. This is because the bones of the upper back do not move or bend as much as the bones of the neck and lower back. The bones of the upper back work together with the ribs to keep the back stable. They work together to protect your vital organs, including your heart and lungs.
In this article, we described the many stretching exercises that provide relief from tight muscles. We teach you mobility exercises and strengthening exercises. all exercises maintain the proper posture prepare your muscles and improve the range of movement and strenghing exercises provide the strength to the weak muscles of your upper back area.
Types
Upper back pain usually falls into two categories: joint dysfunction or muscle irritation. Patients who presented with pain due to joint dysfunction usually had either a sudden injury or natural age-related degeneration. For example, the joint cartilage or capsule can tear. If the vertebrae become weak, it is possible that it can also be degenerative disc disease.
On the other hand, muscle soreness is almost always caused by overuse injuries or a lack of strength. The large muscles of the upper back, which are connected with the shoulder and the back of the ribcage, are particularly affected by strain and tension. Bad posture only increases this type of pain.
Causes of Upper Back Pain
Upper back pain occurs with this medical condition or this is the reason behind your upper back pain. There are list included:
Strain and Sprains: Back strains and sprains are the most common cause of upper back pain. Lifting something too heavy or lifting it safely can injure muscles, tendons, or ligaments.
Poor posture: Many people with upper back pain have difficulty standing up straight. You may be standing “twisted” or on the side of your body and out of alignment with your spine.
Disc problems: Discs can slip or “bulge” out of alignment in the spine and press on nerves. They can also rupture (herniated discs).
Fractures: fractures of the spine bone during an accident, such as a car accident or a fall.
Arthritis: Osteoarthritis is the most common condition of arthritis that becomes the reason for upper back pain.
Muscle overload: Back muscle overload is another common cause of upper back pain. This is usually caused by repeating the same movements over time. This can be due to the following reasons: muscle tension, tension, anger
Herniated disc: Discs are soft, rubbery cushions between each vertebra. A herniated disc occurs when a piece of its cushion pushes through and presses on the spine.
Pinched nerve: (numbness and pain in the arms or legs, problems with urination, weakness or loss of control in the legs;
Myofascial pain: Myofascial pain can start after an injury or overuse, but chronic myofascial pain can last long after the initial injury. Fibromyalgia. Although this rare condition is known for pain and fatigue that spreads throughout the body, it usually affects the upper back.
Lung cancer: In very rare cases, back pain can be caused by lung cancer.
Spinal infection: Rarely, an infection can be the cause of back pain. A spinal epidural abscess is a collection of bacteria and pus that forms between the spinal cord and the bones of the spine.
Other Conditions
There is a list of specific postural condition that affects the spine and become the reason for upper low back pain. these include:
- scoliosis
- fibromyalgia
- spinal deformity
- problematic kyphosis
Symptoms of Upper Back Pain
People describe upper back pain in many different ways. Some people describe upper back pain with these types of words:
- Burning or sharp pain.
- Aching, throbbing pain.
- Muscle tension or stiffness.
- Pain radiating down the nerve.
- Tingling, numbness, or weakness.
- Some people also experience muscle aches or headaches.
- Upper back pain can sometimes be severe and restrict movement.
The Benefit of Stretching and Strengthening Exercises of Upper Back Muscles
Finding a balance between muscle length and strength should be your priority. If muscles are too strong without enough stretching, they can shorten and tighten. Less often, if they are too flexible without enough stability, your joints can become too loose and you won’t be able to control your movements properly.
The upper back muscles are often neglected during exercise because they are stronger and more efficient muscles that contribute more to your aesthetics. However, they are the cornerstone of attitude, and ignoring them opens you up to injury. By spending time on your upper back muscles, you can lift more weights with better muscle patterns and avoid unwanted injuries.
Exercise for Upper Back Pain
Neck roll
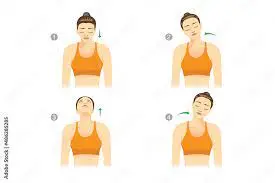
The main focus of the neck roll exercise is on the neck and upper back muscles.
Begin the exercise from a standing position or sit forward. Begin by tilting your neck to any side, right or left.
You should feel a stretch or tension during the exercise, allowing you to feel the tension from your neck to your trapezius. After a few seconds, gradually turn your head (neck) counterclockwise.
Pause a second or two when you reach your left shoulder. Complete one round, ending where you started the neck roll exercise. Repeat the same procedure by rolling clockwise. repeat the exercise five to ten times per session and do three sets per day.
Neck flexion
The following exercises will increase strength, relieve pain, and increase the range of motion in the neck and upper back. You can perform neck flexion exercises in sitting or standing. Use slow, controlled movements and avoid forced movements. As you move your neck, keep the rest of your body still to maintain proper alignment and posture.
The procedure of neck flexion:
Start with the sit or stand position(straight). Lower your chin to your chest and remember to stop if you feel pain or discomfort. Turn your head so that your right ear is close to your right shoulder. hold the neck flexion position for five to ten seconds. Keep your chin down and slowly tilt your head back until your left ear is near your left shoulder. Continue this gentle head roll from shoulder to shoulder several times. Pause and deepen the stretch whenever muscle tension occurs.
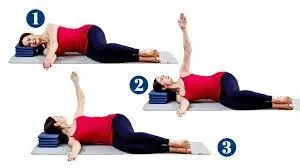
Arm Openings
Arm stretches are really effective stretches for upper back pain and are easily modified to increase or decrease the stretch. This is one of those upper back exercises you can do at home rather than in the office, and it’s a great way to start and end your day.
Lie on your side with a small pillow under your head, knees bent about 45 degrees, feet together, arms out to the sides, hands together
Roll your upper body and upper shoulders behind you to the floor, and follow the movement with your hand and head.
Open your arms as wide as is comfortable, and feel a strong stretch in the lower, middle, and upper back. Hold the arm opening position for around five to ten seconds.
Then repeat on the other side. While maintaining the stretch, bring the upper leg in front of the lower leg so that the knee rests on the floor – this increases the stretch.
Shoulder roll
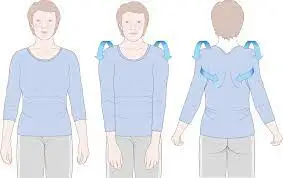
The main focus of these exercises is on the muscles of the shoulders and upper back. begin the exercise standing with your arms down by your sides. Roll your shoulders in a circular motion clockwise and anticlockwise with proper hold of the position.
repeat the exercise five to ten times per session and do three sets per day.
Keep your body relaxed and start with small circles. Breathe deeply and keep the movements smooth and continuous. Increase the diameter of the circles with each breath until you are moving smoothly through the entire range of motion. shoulders roll exercise provides mobility to the shoulder joint and improves blood circulation to the joints. This exercise provides warm stretches to the shoulder muscles, tendons, and joints and helps reduce pain and stiffness in the shoulder area. Improving shoulder flexibility is very helpful in achieving proper training form. Start slowly and do 30-second circles in each direction.
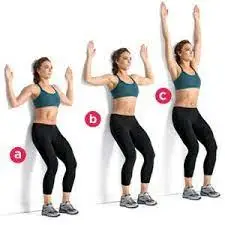
Arm circles
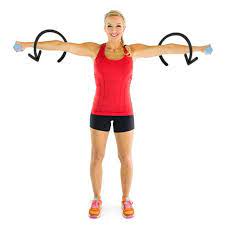
Stand straight, feet shoulder-width apart. Lift and extend your arms to your sides without bending your elbows. Slowly rotate your arms forward, making small circles about 1 foot in diameter. Complete the set in one direction, then switch back. As you circle, engage your core muscles, keep your back and arms straight, and maintain steady, deep breathing. Keep your head up and your body in a T shape during the exercise. Adding arm circles to your workout routine will help warm up your shoulders, arms, chest, and back. This is a great exercise to include at the beginning of an upper body workout to prevent injury and prepare your body for strength training. Arm circles are usually performed without weights, and each set lasts approximately one minute, and 30 seconds in each direction. As your strength increases, you can increase the challenge while doing this exercise and keep the weights light.
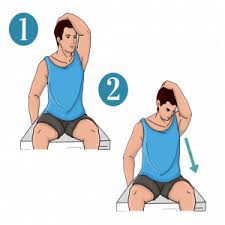
Chair rotation
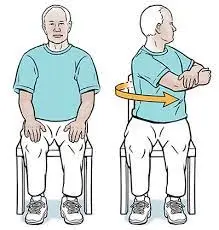
For the chair rotation exercise start with sitting in a chair with keeping your feet on the floor. shuffle your weight slightly forward to avoid rounding your back. Relax and keep your ears, shoulders, and hips in the same alignment:
Bend your arms and elbows slightly below shoulder height. Bend forward from the hips at the waist. Turn your head last. Don’t push through the pain. Press and hold to count from 10 to 30. Return to the starting position. Repeat 3-5 times on the other side. Then switch sides. Sit-ups are an effective way to stay physically active and all you need is a chair! chair rotation exercises increse the mobility of the spine. Like other forms of physical activity, seated exercise offers similar benefits by reducing the risk of injury or discomfort.
Wall angel
For the wall angle exercise, you can take the standing position with your feet about 6 to 8 inches (about 15 to 20 cm) from the wall. Support your back, back, shoulders, and head against the wall. Try to start with a neutral spine by pulling your navel towards your spine. Pull your ribs in and down and feel your mid back connect with the wall. Pull your chin slightly and try to touch the back of your head to the wall. If you have trouble getting your head against the wall, try placing a small pillow behind your head.
Next, extend your arms straight up and place them overhead on the wall with the back of your hand touching the wall in a “V” position. if you have trouble with any part of this alignment, move your feet further away from the wall and see if that solves the problem. Then begin to bend your elbows, sliding your hands along the wall until your hands are just above your shoulders. At the same time, keep your head, body, and back against the wall.
Just lower as much as you can, maintaining good posture without pain (it’s good to feel the stretch). At the lowest point, hold the 5 key before returning to the V starting position while maintaining focus. Do 5-10 repetitions and stop when your muscles can no longer hold the position without pain. Dumbbells activate the postural muscles in your upper back that help keep your shoulders back. They also lengthen and strengthen the pectoral, back, and trunk muscles. Your core muscles must also work to stabilize your body and keep it in a neutral position.
Row
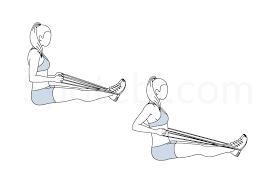
Roa exercise is good for upper back pain. You can do the vima exercise with dumbbells or a resistance band. This is a strengthening exercise for your shoulder muscles. Use a resistance band or light to medium dumbbells to perform this movement. Attach the resistance band to a bar or other stable surface and grasp each handle with outstretched hands.
Pull the dumbles straight back by flexion of your elbows, keeping them towards your body. You should feel how the floor works. If you are using a halter, hold it in your right hand and press it against the wall with your left arm extended. 45-degree hinge at the waist to allow the dumbbell to hang. Keeping your neck neutral and knees soft, pull the dumbbell straight up with your elbow.
Do 2-3 sets per day of 8-12 repetitions.
Prone I and T exercise
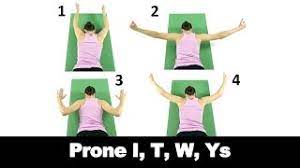
Lying I and T are done face down on the table (a bed, floor, or exercise ball can also be used). Wrap a towel and place it under your forehead, hands at your sides, palms facing the ceiling, begin to squeeze your shoulders, and lift your hands off the table. Hold for five seconds and then lower them ten times. Lying T is performed in the same position, but now the arms are moved to the side so that the palms are on the floor. Now squeeze your shoulders and raise your arms. Hold it ten times for five seconds.
Such a program should be done consistently and progress as it becomes easier. Physical therapy can help determine when to begin progression if you are unsure. I recommend going through the program with these exercises every day. The strengthening part can be done every other day and over time you can start adding other exercises like rows. You can add weight to fairly simple exercises as long as you stay fit. this stretch you can performed three times per day.
Thread The Needle
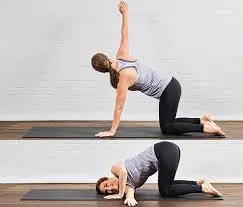
If your upper back is stiff, especially when twisting, needle threading is one of the best upper back stretches. Start on all fours, forming a tabletop with your body
Place your hips directly over your knees and place your elbows, shoulders, and wrists directly on the ground. Raise your right hand and direct your gaze with it, then follow your right hand down as you bring it under your left hand. Keep your hips high and let your chest rest or get close to the ground. Push your hips back and up, keeping pressure on your left palm
Hold the position for as long as necessary and then switch sides. To exit, press the left palm hard and slowly release the right hand, reaching back up to the sky, the gaze can follow. Return your right hand to the tabletop on the ground. Repeat on the left side.
W & Y Stretch & Retract
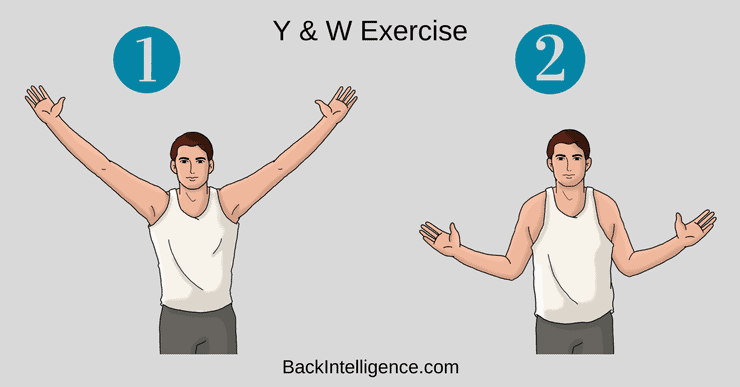
The muscles covered in the W and Y stretches open the pectoral muscles and strengthen the lower trapezius muscles. This exercise strengthens and stretches all the muscles of proper posture. And best of all, it’s easy to do from anywhere—even the office.
How to do it:
Start standing with a straight back. Make a W shape with your hand. Bend both arms to about a 90-degree angle as you lower them toward your stomach, then squeeze your shoulders. Hold for 2 breaths. Make a Y shape with your arms by extending both arms upwards. Hold for 2 breaths. Hold for 1-2 at each endpoint, aim for 10 repetitions.
Neck multidirectional isometric hold
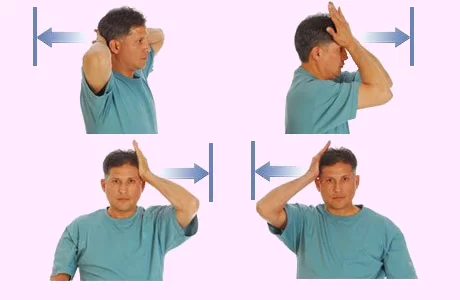
Isometric neck exercises can really help to safely and gently activate the muscles around the neck. To complete this exercise, do the following.
Sit up straight, and keep your neck straight. give the pressure from your palm against the forehead with medium intensity. Stand on your palms with your neck muscles. Hold for 10 seconds. relax
Performed the exercise again, push your head to the side and keep your neck straight. Stand on your palms with your neck muscles. Hold for 10 seconds. relax Do the exercise again, pressing the head. Stand on your palms with your neck muscles. Hold for 10 seconds. relax
Repeat 3 times on each side of the head.
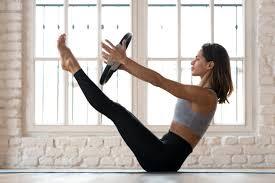
Side plank
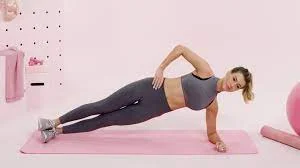
The side plank is a great exercise to strengthen the obliques, which are not heavily trained in abdominal exercises like boxing. Lie on your right side with your legs extended and stacked from hip to toe. The elbow of the right side is under the shoulder. Make sure your head, pelvis, and knee are directly in line with the coordination of your body.
This exercise develops your abs by pulling your belly button towards your spine.
As you exhale, lift your hips and knees off the mat. Your body is in a straight line without sagging or bending. Hold the position. take normal breaths three to four times and then inhale and back to the starting position. The goal should be 60 seconds. Switch sides and repeat. This exercise does not stress your lower back or neck like many core exercises.
During pregnancy, the side plank is recommended because it puts less strain on the abdominal muscles. This is a balance exercise and you will develop your balance and coordination. This exercise can help you maintain good posture and ease of movement by building a strong core and better balance.
Other Variations of The Side Plank
Side Twist
Side Plank From Knees
Single-Knee Side Plank
Stability Ball Side Plank
Pendulum exercise
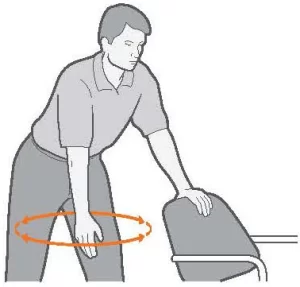
A lesser known dynamic stretch produced by doctors to strengthen the entire shoulder structure – pendulum stretches are aptly named, but unfortunately not suitable for rehabilitation (without medical supervision).
Instead, pendulum stretches work much better as a mobility warm-up before shoulder training.
To perform the pendulum stretch, the practitioner bends at the hips and back while supporting the body on a table with one hand.
Then, letting the free arm hang down from the body, the practitioner pulls the arm back before letting it go forward, continuing this pendulum motion without engaging the legs or any muscles other than the shoulders. Once the shoulder structure is sufficiently warmed up, the practitioner repeats this procedure with the opposite arm.
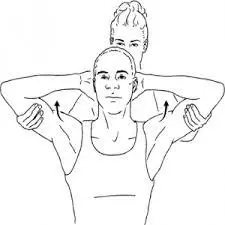
Scapular blade squeeze
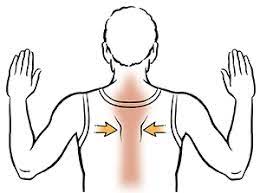
Our exercise this month is called the Shoulder Press, which focuses on drawing and squeezing the shoulder blades together. This exercise specifically trains the core muscles of the back, called the rhomboids. Their function in the body is not only to pull the shoulders together but also to hold them in the chest. This exercise is beneficial for shoulder and upper limb stability during large daily movements such as pushing, pulling, and holding objects.
It is also specially designed to improve posture and prevent “rounded” shoulders. Start by settling into a chair and placing your feet on the ground. change your weight gradually forward to avoid rounding your back. relax Keep your ears, shoulders, and hips aligned: raise your arms to shoulder height, elbows bent and palms facing forward. Move your shoulders and then squeeze your shoulders.
Hold for 10 seconds. Return to the starting position. To ensure your safety, consult your doctor before beginning an exercise program. Do 2-3 sets per day of 8-12 repetitions.
Bridging exercise
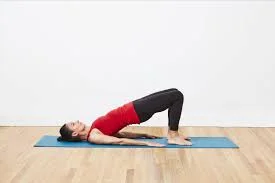
The bridge exercise (lying down) is an exercise that increases the muscle strength of the hip extensors and promotes body stability. If done correctly, the bridge exercise can help improve posture. For the bridging exercise start with the supine position with flexion of both knees. Your feet should be on the floor beneath your knees, and your hands should be at your sides. contract your glutes by pressing your lower back into the surface. Lift your hips along with your knee to create a bridge from your knees to your shoulders. Hold the position around 20-30 seconds. Lower back to your hip and knee to the starting position.
Other Variations of the Bridge Exercise
Elevated Feet
Straightened Legs
Single-Leg Bridge
Bridge March
Trapezius muscle stretch
The benefit of stretching the trapezius muscles is that it reduces tension in the trapezius muscles, improves posture, and increases shoulder mobility. Stretching your upper trapezius daily or weekly can improve all of these signs, improving your posture over time. Remember, it takes consistency and time!
these are The procedure of the trapezius muscle stretch follow the steps:
Start sitting or standing for this stretch. Either way, keep your spine in a neutral position and engage your core.
Place your right hand with your elbow on your lower back, making an L or V shape behind your back.
Place your left hand above your head. Press your head with your left hand, gently pulling your head to the side towards your shoulder. This creates a stretch from the base of the head through the neck and upper trapezius. Hold the stretch for 30-45 seconds and then repeat on the other side.
Of course, you can do the upper trapezius stretch standing up, but if you’re feeling shy, sit down. You can still stretch your neck just as well without worrying about swaying.
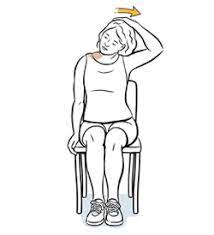
Leavotor scapule strech
The levator scapulae elevate the scapula and tilt the glenoid cavity inferiorly rotating the scapula downward. When the scapula has been fixed, the levator scapulae cause the cervical spine to contract laterally and stabilize the vertebra during movement. The benefit of stretching is a gentle stretch that reduces muscle tension or pain. Stretching this muscle daily can reduce the risk of neck pain recurring. it relieves neck pain, prevents forward head position, and improves posture,
Increases circulation around the neck, relaxes the neck joint, increases the range of motion of the neck, and lengthens the scapula so that it performs its full range of motion. For this stretch, start in a seated position with your back straight. Grab the end of the seat with your left hand to lower your left shoulder, pulling toward the floor. Bend over and turn your head to the right. Then tilt your head slightly forward until you feel a stretch on the left side and back of your neck. Press lightly with your right hand for a greater stretch.
Hold this stretch position for around 10-15 seconds and relax.
Do 2-3 times on each side.
Pectoralis muscle stretch
The benefits of this stretch are that it improves posture and flexibility, increases range of motion (ROM), promotes good circulation, aids recovery from exercise, and increases chest muscle strength. There are many procedures to tighten the pectoral muscle. start from a standing or sitting position. Gently press your shoulders together and move your elbows and hands back.
Change the height of your hands, such as hands behind your head, hands on your head, or hands a few inches above your head. If you feel a stretch, hold it 2-4 times for 20-30 seconds.
The pull should be gentle, not jerky or sudden. It should be smooth and flowing. Do not strain frozen muscles. It’s good to stretch after warming up, getting out of the shower, or at the end of a workout. Never stretch frozen muscles – do a light cardio warm-up first. If you feel the stretch in the shoulder joint more than the chest, which is the goal, change the position of the arms. Don’t push yourself too far. You should feel a slight stretch in your muscles, but the stretch should not be painful. Don’t focus on the same stretch over and over again.
Overhead shoulder strech
The upper shoulder stretch provides a stretch for those muscles that have the medial head, the lateral head of the triceps, and the medial head. Stand straight, shoulders back, chest out, and feet shoulder-width apart. Raise one arm above your head, bend your elbow, and place your hand behind your neck. Grab the elbow with the other hand and gently pull it behind the head. Hold the stretch for about 10-15 seconds. take rest and then follow the same procedure on the other side.
Try to keep the bicep close to the ear and do not force it past. you can do three to five repetitions per session. do three sets a day. Increase the stretch as you try to reach down between your shoulder blades and along your spine, holding your hands behind your head.
Biceps muscle stretch
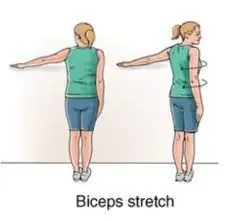
Biceps stretches are a great way to improve mobility and relieve tightness and tension in the front muscles of the arms, specifically the biceps, brachial, al, and brachial muscles. Together, these forearm muscles help bend the elbow, and the biceps (or “biceps” for short) also play a role in lifting the arm from the shoulders.
Biceps stretches are body movements that can help you prepare for anything from painting your house to doing some hammer curls at the gym. Biceps stretching can be done by many procedures in all procedures you can feel the stretch or tension in your biceps muscles. The body is moved slowly and continuously to increase the tension in the tight muscles. If you feel almost uncomfortable, the pose should be held to lengthen and stretch the muscles.
You will usually hold this position for at least 20 seconds to allow the muscles to relax and begin to lengthen. We do not recommend holding it for more than 60 seconds as the benefits will diminish. Static stretching is a very safe and effective form of stretching that has a limited risk of injury and can reduce the risk of injury. Static stretching is best done after exercise when the muscles are already warmed up, as it can be quite intense. It is the best choice to help the body start the healing process.
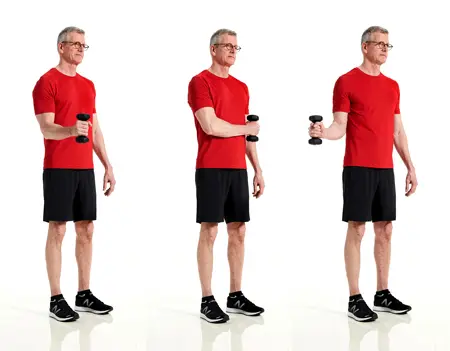
Reverse Dumbbell Flyes
Reverse dumbbell exercises are a variation of the classic bodybuilding fly exercise, a shoulder isolation movement that sometimes recruits the infraspinatus due to the angle of resistance and shoulder rotation associated with each repetition. In general, this infraspinatus exercise is not suitable for people trying to recover from injuries, as it requires the strength and stability of an already established rotator cuff to perform it safely.
For reverse dumbbell flies, the practitioner grips light dumbbells in both hands while bending at the hips and knees—keeping the torso relatively parallel to the floor for the optimal angle of resistance. If the practitioner finds it difficult to maintain this position during the exercise, he can also use a bench.
Since the arms are allowed to hang below the body first, the practitioner contracts the scapula and deltoids and pulls the dumbbells up and out, as if forming a T with the upper body. After the dumbbells are raised as high as possible, the exerciser allows the dumbbells to return to their original position under the body, completing the repetition.
Face pulldown
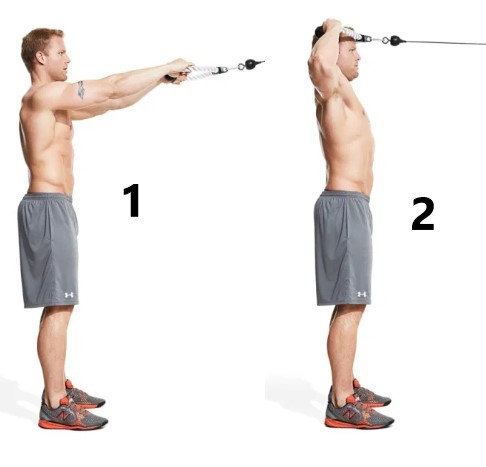
For the face-down exercise, position the pulley machine so that the pulley system is slightly above your head. For this exercise, use a double-handled rope grip. Reach out and grasp the handles with both hands, palms facing inward. Step back until your arms are fully extended, then touch your core and lean back slightly, setting your body at about a 20-degree angle.
Pull the rope towards you just enough to start lifting the weight off the stack, then brace your shoulders and roll them back to create a good position – you don’t want your shoulders to hunch or roll forward.
This is your starting point. Pull the handles of the accessory straight onto your forehead. Keep your palms facing in, while your elbows extend to your sides, drawing your back against your shoulders. performed smooth movement. You want to maintain good posture during your workout. Start with two sets of 20 repetitions.
Go a little lighter than you think you need to and focus on slow, controlled movements. If you have back or shoulder problems, talk to your doctor about whether this exercise is right for you. If you feel while the procedure of this exercise you should stop the exercise.
Other Variations of Face Pulls
Try Resistance Bands
Use Dumbbells
Adjust Your Grip
Try Seated Face Pulls
Lateral pull-down
This exercise is a great substitute for pull-ups or crunches if you struggle with these exercises or if you’re training to get into them. The push-up activates some of the same muscles as the pull-up, although to a lesser extent. Plus, since you’re sitting and pulling the bar, you can use your hip flexors and abs to stabilize your body as you perform. In fact, an older study showed that pull-ups engaged more abdominal muscles than pull-ups.
Start by sitting at a pull machine facing the bar. Adjust the knee pad so that your knees are bent 90 degrees and firmly under the padding and your feet are on the floor. Reach out and grab the bar slightly wider than shoulder-width. Extend your arms as far as possible without shrugging or getting up from your seat. Pull the bar down to your upper chest and aim just below the collarbone.
Think about pulling your elbows and shoulders down and back as you lower the bar. Keep your body tall and slightly bent back, 70-80 degrees above vertical. Hold the bar above your mid-chest for 1-2 seconds while pressing your pecs back and down. slowly back to the starting position. Remember not to shrug at the top of the movement. Do 2-3 sets of 8-10 repetitions.
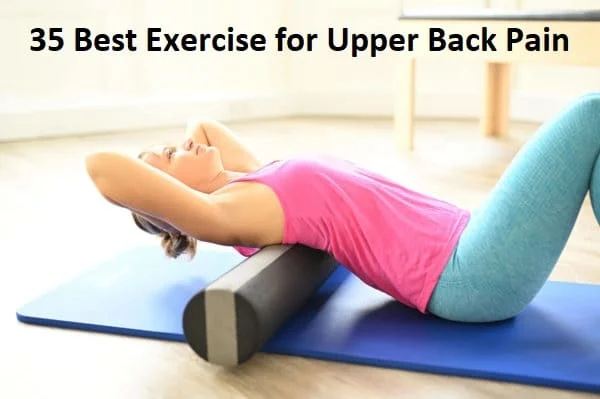
Thoracic Spine Foam Rolling
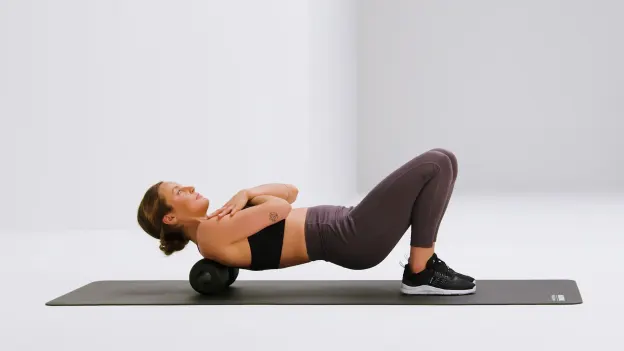
The Target Muscle of the thoracic spine foam rolling exercise involves the upper trapezius. This is a great way to relax your upper back. Lie on your back with your hands behind your head and a foam roller under your upper back. Begin to roll up and down slowly, starting at the center of the back and moving to the top of the shoulders.
Always keep your abs slightly contracted when doing thoracic spine foam exercises. Always maintain a neutral spine in the neck and lower back, avoiding possible arches. Keep your core contract and use your hip for rolling. It is important not to roll over bony areas (e.g. knees) or areas where you have an open wound or injury. Always
roll along the muscles and slowly. Slow down when rolling on a tight area or muscle knot
rush and rest in the area for 20-30 seconds or until you feel the area release
Take your time, do nice slow rolls.
Pelvic tilt exercise
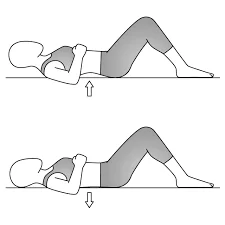
The benefit of the pelvic tilt exercise is that it also stretches tight lower back muscles, helping to reduce back pain and develop deep core strength to support the body in daily tasks such as squatting and lifting.
Begin the pelvic tilt exercise by lying on a mat or plinth with your knees bent and feet on the floor. Return to the starting position to complete the anterior hip flexion portion of the exercise.
Then tighten your abs and glutes to flatten your lower back to the ground. You may feel your tail lift slightly.
Focus on engaging your abs as you hold this back hip tilt position. Return to the starting position and allow your glutes and abs to fully relax before starting the next repetition. You should feel your hips, glutes, and pelvic floor muscles working with each rep. And even if you don’t see the same changes in your muscle strength as you do when you strengthen other muscles like your biceps, remember to trust the process and know that you’re making progress.
You can modify the pelvic tilt exercise to your comfort zone.
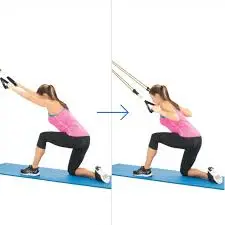
Internal and external rotation
This exercise mainly affects the scapula, and as you perform it, you will feel the scapulae at the front of your shoulders tighten. Hold the stick with one hand behind your back and the other hand at the other end of the stick. Pull the bar horizontally, causing passive shoulder tension. Feel the pull this movement creates. Hold the movement for around five to ten seconds and then relax for a few seconds. Repeat on the other side and complete four sets.
This exercise mainly affects the infraspinatus and small muscles. As you do this, you will feel the tension in the back of your shoulder. Hold the stick with one hand and squeeze the other end of the stick with the other hand. Holding the shoulder by the elbow, you reach to the side of the body, press the stick horizontally, and feel the pull in the back of the shoulder. hold the movement for around five to ten seconds and then relax for a seconds. Repeat on the other side, making four such repetitions on each side.
Superman exercise
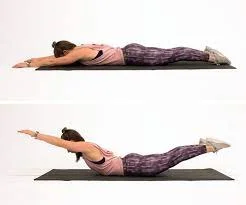
In the procedure of Superman exercise There are some steps you should follow while the exercise steps are included:
Start lying down Lie on a mat or plinth in a supine position (face down), legs straight and arms extended in front of you. Keeping your head in a neutral position (avoid looking up), slowly raise your arms and legs about 6 inches off the floor, or until you feel your lower back contract. Engage your gluteus, core, and interscapular muscles at the same time. Try to lift your navel slightly off the floor to contract your stomach.
A good way to describe it is to imagine you are Superman flying through the air. Stay in this position for 2-3 seconds. Make sure you do not stop taking breaths while exercising. Lower your arms, legs, and stomach back to the floor. Repeat this exercise for 2-3 sets of 8-12 repetitions. It is important to only lift as much as your body feels comfortable. Even though you may only lift a few inches off the floor, you’ll still get a great workout. If this movement seems too difficult, try simply lifting your hands off the floor. Also, avoid lifting your head or overextending your neck, which can cause pain or discomfort.
Bird dog exercise
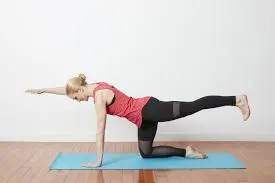
Bird dog is a simple core exercise that improves stability, promotes a neutral spine, and relieves lower back pain. This exercise pose targets the entire body for the strengthening of the core, hip, and back muscles. It also helps develop the proper posture and maintain mobility (range of motion). This exercise is suitable for people of all abilities, including older adults, and can be used for injury prevention, spinal alignment, and low back pain recovery.
You will require a mat for this exercise. keep a soft pillow or folded napkin under your knees for additional cushioning. You can check the alignment with a mirror. This can be done as follows.
Start from a table position on all fours. Place your knees under your hips and keep your hand under a shoulder. Maintain a neutral back with abs. Shrug your shoulders. Raise your left arm and right leg, keeping your shoulders and hips parallel to the surface. Stretch your neck to look at the floor and tuck your chin into your chest. Hold this position for around five to ten seconds and then back to the starting position. Raise your right arm and left leg, and hold this position for around five to ten seconds. back to the starting position. This is called one repetition. Do 2-3 sets of 8-12 repetitions.
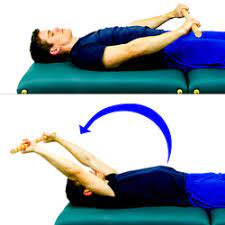
Knee to chest
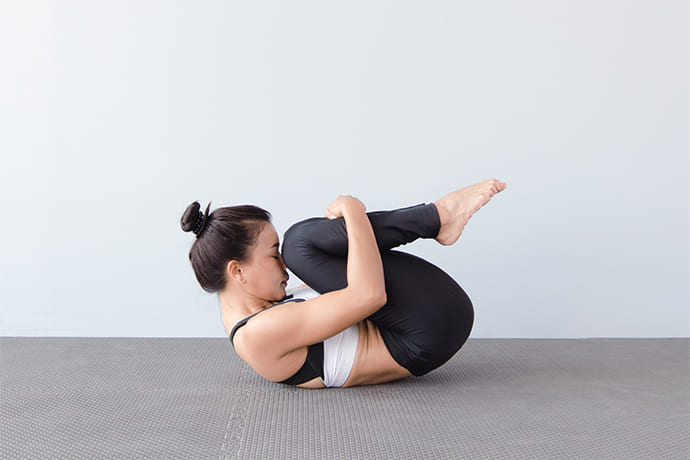
The knee-to-chest stretch is a very simple static stretch done on the floor. This stretch is a favorite of many to help relieve lower back pain and stretch the Erector Spinae muscles. Keep reading to learn more about the knee-to-chest stretch. The knee-to-chest stretch has many benefits, including reducing stress/tension in the lower back, being beneficial and safe for people with osteoarthritis or other arthritis, increasing blood flow to affected muscles, and increasing flexibility and range of motion. The knee-chest stretch focuses on the muscles of the lower back. Avoid this stretch if you have osteoporosis, as it can increase the risk of compression fractures in your vertebrae. Here’s how to do this stretch. For this exercise start with the supine lying position on the mat or plinth.
This is called lying down. Gently lift one bent knee to grab your calf with both hands. Interlace your fingers under your knee. If you’re doing the double knee-to-chest, lift both knees up. double knee to chest variation requires a lot of power, so you can start with the single knee-to-chest and then move on double knee to chest, especially for those who have more pain.
Similar to the single-leg version, if you are lifting both at the same time, curl your fingers or hook your wrists between your shins, just below the knee. Gently pull the bent knee or knees towards the body with your hands. Try to relax your knee, hips, and lower back as much as possible during the stretch. Hold the stretch for a few seconds. Return your feet to the floor. Repeat on the other side. Do the stretch about 10-15 repetitions per session, do three sets per day.
Cobra pose(back extensor exercise)
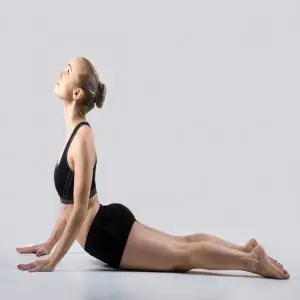
Cobra Pose increases spinal mobility, strengthens the supporting muscles of the spine, and can help relieve back pain. This can be especially useful if you sit a lot during the day. Sitting causes tension in the chest muscles and stretching and weakening of the back muscles.
A cobra can resist this crouching position. When you are in the middle of a sun salutation, you come to the Cobra from your knees, chest, and chin. If not, you can start by prone lying position. keep your palms on the surface of the plinth directly below your shoulders. extension of your elbows straight back and hug them to your sides. Pause for a moment looking directly at the mat with your neck in a neutral position. Attach the pubic bone to the floor. do inspiration to lift your chest off the surface of the plinth. Make sure your elbows should be in extension while the exercise. Don’t give your wings to either side. Keep the neck neutral. Don’t take it. The gaze remains on the floor. Practicing the cobra pose in daily life can also improve your sleep, especially if you are postmenopausal when sleep is notoriously difficult. Research supports the use of yoga to increase sleep even over aerobic activity. If you feel tension in your lower back, relax the position to lower yourself slightly, or come down and rest on your forearms.
Other variations of the cobra pose
With Cobra Lift
Hands-free cobra
Cat camel pose
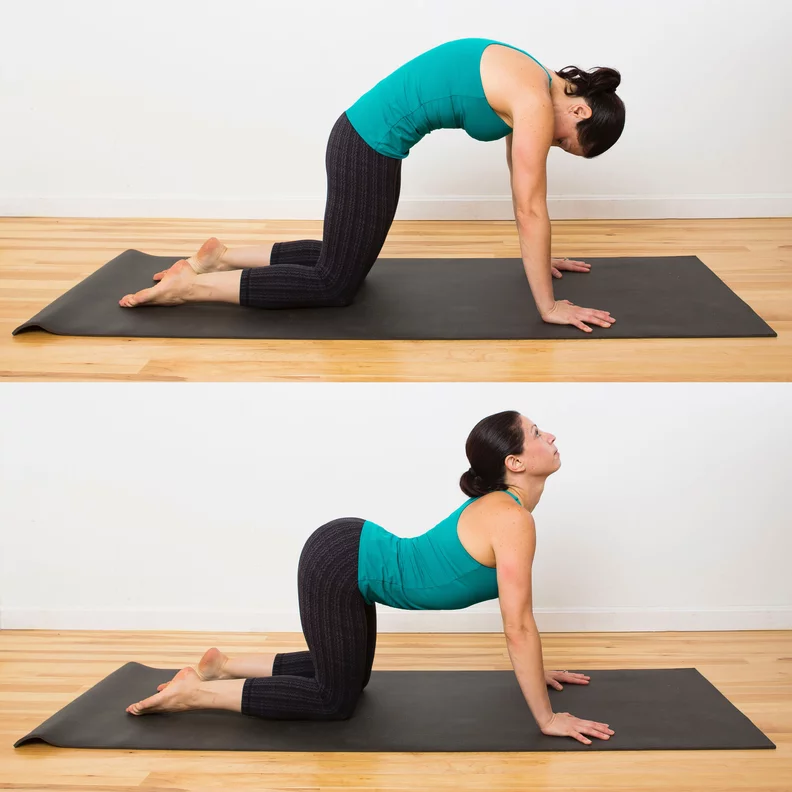
Cat-Cow Pose is a gentle stretch that stabilizes the spine, abdomen, and back extensors. Here are the step-by-step instructions for doing the camel exercise:
For the cat camel pose start with the quadrupled position. Make sure your wrist shoulders and the shoulders are aligned(in a straight line). Keep your core engaged, back flat, and spine neutral. This is the starting position. Now take a deep breath. do expiration and pull your back towards the ceiling. Or pull your belly into your spine keeping your core engaged. Release tension from your neck and pull your chin toward your neck. The position ought to resemble a cat stretch. do inspiration, relax your stomach, and make an arch on your back. Bring your tailbone up toward the ceiling as you lift your head. Do not squeeze the neck. this pose is known as the cow position and cat and cow stretch.
Continue the exercise with the cat to cow pose, and engage your whole body with each movement. do inspiration in cow pose and do expiration in cat pose. Repeat this Cat and Cow pose for at least five to seven rounds or until your, hips, back, and neck are fully warmed up to reap the full benefits of the Cow pose. Cat and cow pose is a good warm-up before yoga or exercise. In this position, the spine is stretched and flexed, helping to loosen the back.
The cat camel pose should always be pain-free. If you feel any pain, stop immediately. If you suffer from upper back pain, consult with your doctor or physiotherapist before performing this cat camel exercise to make sure these movements do not aggravate your back pain and it is safe for your back pain.
Wall push up
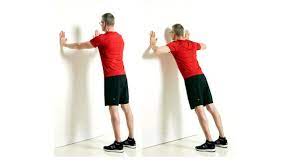
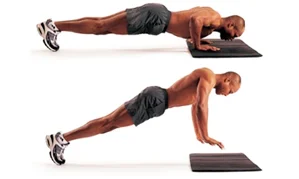
Pushups are one of the most effective bodyweight exercises you can add to your routine. Targeting your arms, chest, back, and shoulders will require enough strength to complete multiple repetitions correctly. A wall push-up is a great option for beginners who still don’t know how to do a normal push-up. Pressing against the wall, reduces the load due to gravity, making the exercise easier. Wall pressing requires only a wall. the distance between you and the wall is around your one shoulder far away from the wall.
Place both palms on the wall at approximately shoulder height and shoulder width apart, fingers pointing toward the ceiling. gradually flex your elbows and start by leaning your body towards the wall until your nose almost touches the wall.
Keep your back straight and your elbows bent at about a 45-degree angle (not straight out to the sides). gradually push your back for the original position.
When pressing against the wall, make sure your back is neutral and your hips are not leaning forward. Imagine a straight line running from the top of your head through your back and down to your feet. you have to consider slow, controlled movements instead of rushing. This will help you create the proper form for the most effective workout. You can change the difficulty of this exercise by varying the distance between your feet and the wall. The further they are, the more you have to carry your body weight and the harder it is to move.
Latral side flexion strech

The main benefit of the lateral flexion stretch is the feeling of tension in the lower back, which can cause lower back pain. Acute lower back injury (e.g. some people can twist their lower back just by sneezing hard!). Chronic low back pain, ie. pain that is always there but cannot be diagnosed with an MRI or X-ray. The doctors say that everything is fine with the back.
Be sure to land on the opposite hip before reaching for the hand
As you extend your upper arm to the right, make sure your right shoulder does not touch your right earlobe. The shoulders should be relaxed. Keep your chin away from your chest and your collars nice and open
Extend the energy through the fingertips of the upper hand to deepen the stretch
Repeat on the opposite side. If sitting as a woman is uncomfortable for you, do this exercise cross-legged instead. Keep your elbow in line with your shoulder, hips square, legs bent and together
Energize your legs and stretch your hips up to the ceiling. Make sure your shoulders stay away from your ears, especially when you lift your hips
If you have trouble keeping your balance when your feet are stacked, lift your top foot forward onto the mat to increase stability. Spend just 5 minutes doing these exercises every day (6-8 reps on each side) to increase lateral flexibility and strength in your spine and ultimately create better posture.
Child pose exercise
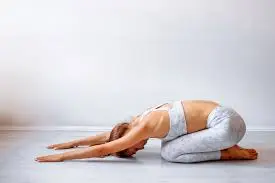
Start with the Kneel position on the yoga mat or plinth. Extend your knees like a mat, keeping your feet on the floor so that your big toes touch. Rest your stomach between your thighs and plant your forehead on the floor. Relax your shoulders, chin, and eyes. If you are not comfortable putting your forehead on the floor, you can keep it on a block or soft pillow. In the center of the forehead between the eyebrows is an energy point that stimulates the vagus nerve and supports the “rest and digest” response.
Finding a comfortable place for your forehead is the key to reaping its soothing benefits. Extend your arms forward, palms facing the floor, or bring your arms back by your thighs, palms facing up. You can also extend your arms forward, palms up, to free your shoulders, or try bending your elbows so that your palms touch and rest on your thumbs at the back of your neck. In this position, elbows forward. Stay as long as you want, finally connecting your breath with a steady inhalation and exhalation.
Child’s Pose is proof of the mild stretch to the shoulders, back, hips, thighs, neck, and ankles. It can help relieve back pain.
A child’s pose can promote deep breathing, awareness, and relaxation. Evidence has shown that breathing exercises can lower blood pressure and improve lung function and breathing capacity. don’t do child pose if you have a knee injury. If you are pregnant, spread your legs wider and do not press your stomach into your thighs. If you have a shoulder injury, holding your hands together provides the most support.
Risk Factors for Developing Upper Back Pain
The risk of back pain usually increases as a person ages, but this correlation does not apply to the upper back as well as the neck and lower back. Some studies show that young people – especially older young people – have a higher risk of developing upper back pain compared to other age groups. Excessive lifting or carrying.
Other risk factors for upper back pain include weakened heart and back muscles, female gender, other musculoskeletal pain, smoking, and poorer mental health.
How Can Chiropractors and Massage Therapists Help Relieve Upper Back Pain?
If you have upper back pain, a thorough evaluation, diagnosis, and treatment is very important to find the root cause of your pain. Treatment can help relieve the pain you are experiencing, but unless strategies are built around the factors that cause pain, such as poor posture, rehabilitation, and other lifestyle factors, you may only experience temporary relief.
At Pain & Wellness Center, chiropractors can effectively manage your upper back pain through a variety of treatments, including acupuncture, soft tissue therapy, joint and spine mobilization/manipulation, and physical rehabilitation.
Our experienced massage therapists also help reduce muscle tension in the upper back and neck and effectively relieve pain. We are happy to help you feel better and return to meaningful activities. Contact the Pain and Wellness Center today.
Other techniques for managing upper back pain
Other techniques to stretch and lengthen the muscles of the upper back include foam rolling, trigger points, and massage. Although they are great for short-term relief, the original problem, such as muscle imbalance or improper activation, may still remain and if not corrected, the tension will simply return. For example, if you get a massage to relax your shoulder muscles, but you do nothing to correct bad posture, they will only tighten again. However, these techniques are very useful for muscle recovery after a tough workout or event.
Workers must ensure that they maintain proper posture when using computers and other technical equipment, and even ergonomically assess their workplace to ensure that the monitor, mouse, and keyboard are in the correct position to avoid overexertion and constant aggravation. positions Taking regular breaks while sitting at your desk to stretch your neck and shoulders are also helpful. By taking care of your upper back, you create a strong foundation for great posture and movement. Good luck with these exercises and stretches and I hope it helps prevent back pain and injury.
Exercise and stretching
Stretching and an active lifestyle are often recommended to reduce back pain and speed up recovery after injury. Improving flexibility through stretching is also a great way to prevent future injuries. Since upper back pain is related to the large muscles in the shoulder area, exercises that stretch and strengthen the back, shoulder, and abdominal muscles are mostly recommended. These muscles help support the spine.
Regular yoga or pilates exercises can also help relieve back pain, as they involve different positions and movements that work the muscles of the upper and middle back. Stretching exercises are best done after exercise when the muscles are warmed up. If your back hurts a lot, you should take a break from exercise and stretching but try to avoid going too long before you start moving again. Instead, it’s okay to return to activity slowly.
The benefits of exercise
Exercise has many benefits if you have upper and middle back pain. They include:
Reducing muscle spasms and tension
Better circulation, which reduces inflammation and supplies nutrients to the painful area
Better mobility of soft tissues
Increase the confidence to complete daily tasks
Reduces anxiety and emotional stress
After 10 minutes of exercise, the brain produces “happy chemicals” that have a calming effect on the nerves.
Pain relievers
Over-the-counter pain relievers can reduce pain and swelling. Acetaminophen (such as Tylenol) relieves pain. Nonsteroidal anti-inflammatory drugs (NSAIDs), such as ibuprofen, aspirin, and Motrin, can reduce pain and swelling.
Ice or heat
Heat therapy reduces the pain and cryotherapy(ice) reduces the stiffness, and swelling in the middle and upper back muscles. Heat can reduce pain and stiffness, while ice can help reduce pain and swelling.
Manual and physical therapy
Manual therapy involves massage or spinal manipulation. It helps reduce muscle tension and back pain and improves blood circulation. A physical therapist can use special exercises along with massage to relieve upper and middle back pain. They will also give you advice on exercises and stretches you can do at home to relieve pain and support the area.
Practice good posture
Poor posture puts stress on your back and can lead to upper and middle back pain. Try to stand or sit tall, keeping your back as straight as possible and balancing your weight equally on both legs. Don’t limp or slack off. Keep your shoulders back when sitting and make sure you adopt the correct posture when using your computer and driving. For example, if you spend a lot of time in front of the computer, at home and at work, make sure the screen is at eye level, never below it, and not too far away that you have to reach for it. Again, if you are in the car for a long time, raise the steering wheel and sit closer to it.
When should I start exercising after the injury?
Starting training too soon can aggravate injuries and prolong the recovery process even more. Therefore, it is important to let the injury heal and slowly return to normal activities.
It is best to avoid exercise until you notice an improvement in pain, stiffness, and swelling.
A good sign is when you can do normal household chores and activities of daily living with little or no pain and have a full or near-full range of motion.
If in doubt, it’s best to talk to a health professional before starting any exercise.
A note from Samarpan Physiotherapy Clinic
for the take care of upper back pain It helps reduce muscle tension and pain in the back and improves blood flow. Your physiotherapist may teach you particular exercises included with modality to relieve your upper and middle back pain. They will also advise you on exercises and stretches to do at home to aid relief of your pain and to offer support for this area.
FAQ
Can I massage upper back pain?
Upper back massage – massage of body parts – Massage…
An upper back massage helps reduce muscle tension, tension, and pain in the upper back. During an upper back massage, the temperature of the muscles increases, which improves the elasticity of the tissues, and reduces muscle tension and tension. An increase in temperature also increases blood circulation.
Can exercise reduce upper back pain?
There are many exercises for Upper Back Pain, Neck Pain, Tight Shoulders
These exercises help relieve upper back pain with a combination of static or dynamic stretches, mobility exercises, strengthening exercises, and static stretches. and also included strengthening exercises.
How to sleep with back pain?
Five Best Sleeping Positions for Precaution Purposes while upper back pain:
Sleeping positions to treat back pain
Lying on your side in the baby position. …
Lying on his back. … Lying on your side provides support to your knees. … lying on your stomach so that the pillow is under your pelvis and lower belly. … sleep in a supine lying position with a pillow under your knees.
Is it good to sleep without a pillow?
Sleeps without a pillow The Sleep Foundation
In the absence of a pillow to support the head, side, and back supports may experience stiffness or tenderness in the lumbar or cervical spine. Neck pain from not using a pillow can also contribute to tension headaches. Even if stomach sleepers do not use a pillow, neck pain is not necessarily inevitable.
What causes upper back pain?
Common causes of upper back pain are inflammation and micro tears of the muscles, tendons, and ligaments of the upper back, arthritis, intervertebral disc stenosis, or misalignment of the thoracic or cervical spine.
Is upper back pain always severe?
Most cases of upper back pain can be treated at home with over-the-counter pain relievers, heat or ice, exercise, and improving posture. However, some symptoms associated with upper back pain may indicate a serious medical problem that requires immediate treatment by healthcare(physiotherapy).