
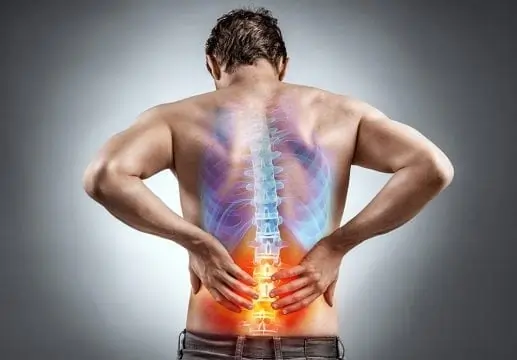
Muscle Pain in the Back
Muscle pain in the Back is common in most people.
It is uncomfortable & debilitating.
This muscle pain is due to injury, some activity & some medical conditions.
This muscle pain is affect any age of people but has different reasons.
Back muscle pain is released by to RICE principle, pain mediation & physiotherapy treatment.
Table of Contents
What are the types of back pain?
Back pain is classified as chronic or acute pain
- Acute muscle pain the back pain:
- This pain starts suddenly & lasts for up to 6 weeks.
- Chronic & long-term muscle pain in the Back pain:
- This pain develops over a longer period and lasts for over 3 months which causes ongoing problems.
What are the causes of back muscle pain?
Back muscle Strain:
- This Back muscle pain commonly occurs due to strain, tension, or injury in the back muscle.
- This muscle strain occurs due to:
- Create a muscle tension
- Damage in disks
- Occur to injuries, fractures & falls on disk
- Some Activities which are lead to strains or spasms of back muscle include:
- When you lift something improperly
- If you lifting something too heavy
- Do the abrupt & awkward movement
Structural problems:
- If occur to structural problems are given to result in back pain.
- Some structural problems include:
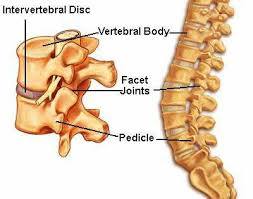
- Ruptured disks:
- Every vertebra in the spine is cushioned by disks.
- If occur to disk ruptures are applied more pressure on a nerve & resulting in back pain.
- Bulging disks:
- Another way of ruptured disks is a bulging disk which is given to result in more pressure on a nerve.
- Sciatica:
- Sharp & shooting pain that travels through the buttock & down the back of the leg and occurs due to a bulging & herniated disk which is pressing on a nerve.
- Arthritis (Lumbar spondylosis):
- Osteoarthritis means problems with the joints in the lower back & other places.
- In the other cases, if occurs the space around the spinal cord narrows.
- It is known as spinal stenosis.
- Abnormal curvature of the spine:
- When the spine curves in an unusual way, which is given to results in back pain result like lordosis, and scoliosis.
- Osteoporosis:
- Bones of the vertebrae of the spine, become brittle & porous which leads to compression fractures.
- Kidney problems:
- Sometimes Kidney stones & kidney infections which are lead to back pain.
Movement & posture:
- When you adopt a very hunched sitting position when you use computers it results in increased back & shoulder problems over time.
- Some everyday activities & poor posture which is lead to muscle pain:
- Twisting activities
- During coughing & sneezing
- If occur to muscle tension
- Due to over-stretching
- If you bend awkwardly for long periods
- When you lift & carrying something
- If you standing & sit for long periods
- Straining the neck forward, like when driving & using a computer
- When you do the long driving sessions without a break, even when not hunched
- If you sleeping on a mattress that does not support the body & must keep the spine straight
Some other medical conditions which are lead to back pain.
- Cauda equina syndrome:
- Cauda equina is a bundle of spinal nerve roots that arises from the lower end of the spinal cord.
- This syndrome produces dull pain in the lower back & upper buttocks & numbness in the buttocks, genitalia & thighs.
- Cancer of the spine:
- When an occurring tumor in the spine is pressed against a nerve is given to result in back pain.
- Infection of the spine:
- When you feel to fever & tender or warm area on the back which occurs due to an infection of the spine.
- Other infections:
- The other infections include Pelvic inflammatory disease, and bladder & kidney infections which lead to back pain.
What are the symptoms of back muscle injury?
- The main symptom of back muscle injury is like ache & dull pain anywhere in the back & which radiates to the buttocks & legs.
- Some back issues are produced by pain in other parts of the body depending on the nerves that affect it.
- If you feel a fever.
- Weight loss.
- If you observe inflammation & swelling in the back
- You feel persistent back pain, which is not reduced by lying down & also rest is not help
- Sometimes this pain reaches below the knee joint.
- You also feel numbness around the genitals, anus & buttocks.
In which condition do you need to contact a doctor as an emergency?
- When you feel numbness & tingling some symptoms include
- When this numbness is not improving with rest
- When you feel numbness with weakness
- Sometimes feel fever with numbness
- When you feel unexplained weight loss
What is the Diagnosis of back muscle pain?
- The doctor is diagnosed with back pain after checking the symptoms & carrying out a physical examination.
- Then the doctor is advised to do some imaging tests for diagnosis of back pain
- An X-ray, MRI & CT scan give information about the state of the soft tissues in the back.
- X-rays show the alignment of the bones & use to detect the signs of arthritis & broken bones, but it is not revealed damage in the muscles, spinal cord, nerves & disks.
- MRI & CT scans are used for diagnosis of herniated disks & problems with tissue, nerves, tendons, blood vessels, ligaments, , muscles & bones.
- Bone scans are used to detect bone tumors & compression fractures due to osteoporosis.
- Tracer & A radioactive substance is injected into a vein which it collects in the bones & helps the doctor for detect bone problems with the aid of a special camera.
- Electromyography & EMG is used to measure the electrical impulses that are produced by nerves in response to muscles & it is used to confirm nerve compression, which occurs with a herniated disk & spinal stenosis.
What are the risk factors for back muscle pain?
- Some points which are become a risk factor for this muscle pain include :
- Pregnancy
- Strenuous physical exercise
- Poor physical fitness
- Occupational activities
- Obesity & excess weight
- A sedentary lifestyle
- Genetic factors
- Older age
- Smoking
- Some medical conditions, like arthritis & cancer.
What is the treatment for back muscle pain?
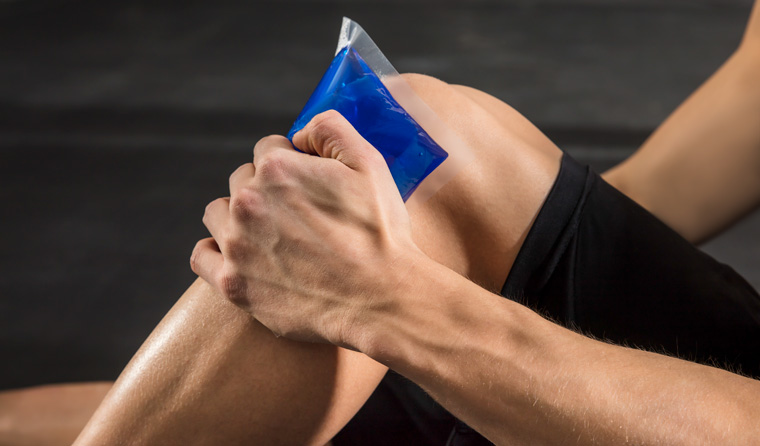
RICE principle:
When you feel pain in the back muscle doctor is advised to RICE principle as home treatment or primary treatment.
- R – rest = When you feel muscle pain doctor advises you to rest for sometimes form activities for release to muscle pain.
- I- ice = You are Applied to ice on the area of the pain for 20 minutes, release to swellings & muscle pain but always apply to the ice with the help of a towel between the skin & ice to prevent ice burn, you can also be used to ice pack & frozen peas for ice therapy.
- C- compression = You can also apply compression bandage release to muscle pain, and swelling.
- E- elevation = You must be elevated to the back with the help of a pillow under the foot for the release of muscle pain & swelling.
Pain medication :
- Some people’s back pain does not respond to OTC painkillers so the doctor requires a prescription for NSAIDs.
- Codeine & hydrocodone, are narcotics, but it is prescribed for short periods & they require close monitoring by the doctor.
- In some cases, the doctor is used to muscle relaxant drugs.
- Antidepressants such as amitriptyline which is prescribed in some cases.
Cortisone injections:
- When other options are not too effective the doctor is advised to cortisone injection which is applied into the epidural space, around the spinal cord.
- A cortisone injection is an anti-inflammatory drug.
- It helps to reduce the inflammation around the nerve roots.
- Cortisone Injections also be used for numb areas thought to be causing the pain.
Botox injection :
- Botox (botulism toxin) injection is advised to reduce pain & paralyze sprained muscles in spasms.
- These injections are effective for about 3 to 4 months.
Cognitive-behavioral therapy (CBT):
- CBT helps you manage chronic back pain which encourages new ways of thinking.
- This therapy includes relaxation techniques & ways of maintaining a positive attitude.
What is Physiotherapy treatment for back muscle pain?
When the muscle pain is not relieved after the home treatment & pain medication then the doctor has advised physiotherapy treatment to release muscle pain.
Physiotherapy treatment is help you relieve pain, swelling, spam & tightness of muscle pain.
The physiotherapy treatment includes massage, electrotherapy treatment & exercise therapy.
Massage :
- When the trigger & tender points are present in the muscle pain area therapist is advised to massage therapy release to the muscle pain.
- Massage is applied after 2 – 3 days of following the RICE principle when you feel to release of the pain.
- Massage is applied with the help of the oil & applied for 5 -10 minutes.
- Massage is applied 3 times per day at home.
Electrotherapy treatment :
After the RICE principle, pain medication & massage if the muscle pain is not relieved then Electrotherapy treatment for release of muscle pain.
To relieve the swellings, spasms & pain therapist is advised to electrotherapy treatment.
In electrotherapy, the treatment therapist is used to many machines.
- When the trigger & tender points are present therapists are advised & to apply US = ultrasound therapy for the release of muscle pain.
- This treatment is applied with the help of gel & applied for 5 to 10 minutes on the area of pain.
- This therapy helps you release pain & swelling.
- Reduce to pain therapist is applied to SWD = short wave diathermy, IFT = Interferential Therapy, TENS = Transcutaneous Electrical Nerve Stimulation on the area of pain.
- SWD = Short wave diathermy is hot therapy for release to spams on the area of pain.
- IFT = Interferential Therapy & TENS = Transcutaneous Electrical Nerve Stimulation is applied with the help of gel & electrodes on the area of pain.
- This therapy is applied for 10 minutes to the area of pain.
- Traction:
- This traction is known as lumbar traction.
- It is applied by the therapist in the clinic.
- Pulleys & weights are used to stretch the back.
- This traction is applied to half your weight of you.
- It is given to result in a herniated disk moving back into position.
- Traction is used to relieve pain, but only while traction is applied.
Exercise therapy for back muscle pain :
After following the RICE principle for the 2- 3 days at home & primary treatment & the help of pain medication, you feel released from the pain.
When you feel too comfortable & release from your muscle pain then the physiotherapist is advised to you exercise therapy reduce to muscle weakness & tightness.
The exercise therapy for muscle pain includes Stretching & strengthening Exercises.
Stretching exercise helps to relieve muscle tightness as well as strengthening Exercise is help you relieve muscle weakness.
Stretching exercise:
- After the follow of Electrotherapy for 2-3 days for release to muscle pain by physiotherapist then the therapist is advised to stretch for release to muscle tightness.
- This stretching is applied when your pain is released & when you feel comfortable.
- Hip flexor stretch.
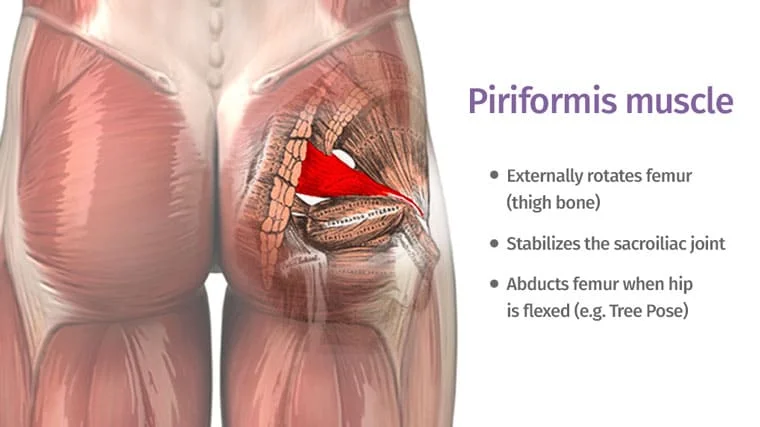
- Piriformis stretches
- Thread the needle
- Hamstring stretches
- Back runner stretch
- Back reach stretch
- Gluteal stretch
- Seated spinal twist stretch
- Sphinx stretch
- Lying Hamstring Stretch
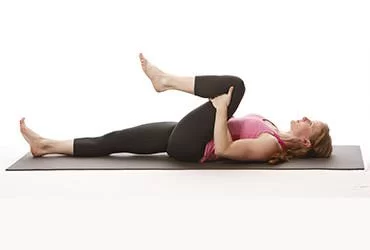
Hip flexor stretch :
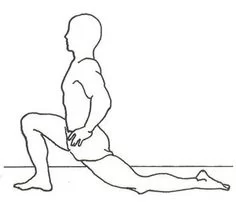
- The starting position of the stretching is supine.
- You are lying on the back with the knee joint bent & feet on the ground in front of the body.
- Then Move to the right ankle above the left knee joint & leave the knee onto the left thigh.
- Put the hands around the left thigh & pull it toward the body.
- Must be Kept to the head & shoulders on the floor.
- Hold this stretching position for 30 seconds.
- Then repeat this stretch on the other leg.
- Do the 3 times in 1 session & perform 3 sessions per day.

- This stretch is a strong stretch for the backside.
- The starting position of the stretching is supine.
- Must be placed on the leg crossed over onto the other thigh into the figure four of shape.
- Then gently lower the buttock to the ground.
- Hold this stretching position for 30 seconds.
- Do the 3 times in 1 session & perform 3 sessions per day.
Thread the needle :
- The starting position of this stretching is the downward dog position but on to the knee joint.
- Reach to the arm through to the give to the mid-back to stretch.
- Hold for 30 seconds.
- Do the 3 times in 1 session & perform 3 sessions per day.
Hamstring stretches :
- The starting position of this stretching is supine.
- You are lying on the back.
- Try to bend one leg & one leg into the air with the stretch band around the foot.
- Hold for this stretch for 30 seconds.
- Then repeat this stretch on the other leg.
- Do the 3 times in 1 session & perform 3 sessions per day.
Back runner stretch :
- This exercise starts in the sitting position with both legs extended & feet together.
- The hands are flat against the ground.
- Then slowly extend the forward to the patient feel to them comfortably.
- Hold for 30 seconds & relax.
- Do the 3 times in 1 session & perform 3 sessions per day.
Back reach stretch:
- The starting position of this stretching is on to all fours.
- Try to Raise the right leg backward & raise the left arm reaching in front of the body.
- Hold this stretching position for 30 seconds.
- Then return to the starting position.
- Repeat this position on the other leg.
- Do the 3 times in 1 session & perform 3 sessions per day.
Gluteal stretch:
- The starting position of this stretching is supine.
- You are lying down on the back then lift to the knee joint & cross to the right ankle joint over to the left knee joint.
- Try to Grip the left thigh gently & pull it towards the chest.
- Hold this stretching position for 20-30 seconds.
- Then repeat this position onto the other leg.
- Do the 3 times in 1 session & perform 3 sessions per day.
Seated spinal twist stretch :
- The starting position of this stretching is the sitting position.
- You are sitting on the floor with both legs extended out in front.
- Bend the left knee joint & place the foot on the outside of the right thigh.
- Then Place the right arm on the outside of the left thigh.
- A place to the left hand behind for support.
- Do the 3 times in 1 session & perform 3 sessions per day.
Sphinx stretch :
- The starting position of this stretching is prone.
- You are lying on the stomach with the elbows underneath the shoulder joint & hands are extended in front & palms facing down.
- Then Gently engage the lower back, buttocks & thighs as to the lift to the head & chest.
- Press the pelvis into the floor.
- Then Gaze straight ahead or gently close to the eyes.
- Hold this stretching position for 30 seconds.
- Do the 3 times in 1 session & perform 3 sessions per day.
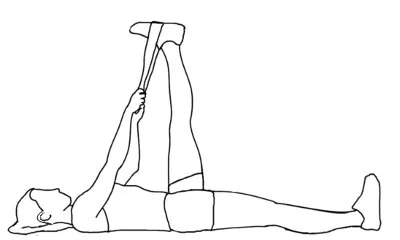
Lying Hamstring Stretch :
- The starting position of this stretching is supine.
- You are laid on the back with the legs stretched straight out & flexed to the feet.
- Try to Exhale deeply & pull to the right knee joint towards the body then close to the chest.
- Hold the right foot with the left hand.
- Once when to hold on to the feet
- Then try to straighten the knee joint without losing the grip of the feet.
- Hold this position for 2 – 3 minutes.
- Do the 3 times in 1 session & perform 3 sessions per day.
Back muscles Strengthening Exercises:
After the follow-up Electrotherapy & massage for 2 -3 days for the release of muscle pain by the physiotherapist then the therapist is advised to you strengthening exercises release to muscle weakness.
This strengthening exercise is always advised when you feel to release pain & when you feel comfortable.
This all-strengthening exercise helps you with muscle weakness & pain.
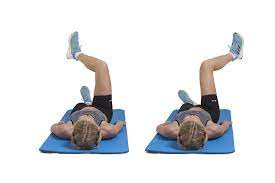
- Knee to Chest
- Knee Rotation
- Extensions
- Lower back rotation
- Foam rolling
- Pelvic Tilts
- Spiky ball roll on glutes
- Bridges
- Press-up Back Extensions
- Partial Crunches
- Wall Sits
- Superman position
- Cat/cow
- Back Dog Exercise
- Back flexion
- Hyperextension
- Extended Triangle
- Standing Forward Bend
- Pike-Up
- Circle plank
- Banded Clockwise Step
- Clamshell
- Hydrant
- Hip raise
- Side Plank Dip
- Push down
- Lean back
- Crescent Lunge
- Seated forward bend
- Child’s Pose
- Bird Dogs
- AdhoMukhaShavasana
- Cobra Pose
- Locust Pose
- Half Lord of the Fishes
- Two-Knee Spinal Twist
- Knees to Chest With Slow Rock
- Reclined Pigeon Pose
- Reclined Supine Twist
- Upward-Facing Dog
- Pigeon Pose
Knee to Chest :
- The starting position of this exercise is supine.
- You are Lying on the back.
- Gently pull to the one knee joint through to the chest.
- Hold this exercise for 10 seconds.
- Then extending to the arms back out of to the straight.
- Repeat this exercise on the opposite side.
- Do the 10 times in 1 session & perform 3 sessions per day.
Knee Rotation :
- The starting position of this exercise is supine.
- You are Lying With your feet which are put onto the ground.
- Bend to the knee joint.
- Then Gently move the knee joint from side to side into the wiper motion.
- Do the 10 times in 1 session & perform 3 sessions per day.
Extensions :
- The starting position of this exercise is prone.
- You are laid down on the stomach.
- Gently press up & extend to the lower back.
- Don’t hold this exercise position.
- If the patient is felt to stretch too strong then the patient has adjusted this position with the rest of the forearms.
- Do the 10 times in 1 session & perform 3 sessions per day.
Lower back rotation :
- The starting position of this exercise is supine.
- Then Tuck one foot behind the other knee joint.
- Gently pull the leg across.
- Hold to the exercise position for 10 seconds.
- Do the 10 times in 1 session & perform 3 sessions per day.
Foam rolling :
- This exercise is a great part of the exercises for lower back pain.
- Then Place the foam roller under the mid-back.
- Must be kept to the backside onto the ground.
- Then Gently extend to the spine backward.
- Hold this exercise position for 10 seconds at a time.
- Do the 10 times in 1 session & perform 3 sessions per day.
Pelvic Tilts :
- The starting position of this exercise is supine.
- You are Laying on the back.
- Try to arch to the lower back & flatten it into the ground.
- Do the 10 times in 1 session & perform 3 sessions per day.
Spiky ball roll on glutes :
- The starting position of this exercise is supine.
- Use to Roll the ball around to the fleshy part of the buttock for 10 seconds at a time.
- Do the 10 times in 1 session & perform 3 sessions per day.
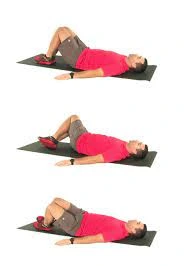
Bridges :
- The starting position of this exercise is supine.
- Lie on the back with the knee joint bent & the feet touching the floor.
- Try to Raise to the hip joint.
- Must be kept to the back in a straight line with to the knees & shoulder joint.
- Hold this exercise position means bridge for 10 seconds.
- Do the 10 times in 1 session & perform 3 sessions per day.
Cobra Pose:
- The starting position of this exercise is prone.
- Try to roll over to the stomach & place the elbow joint right underneath the shoulder joint & the hands are flat on the ground.
- Then Push down onto the hands & lift the shoulders away from the floor.
- Hold the exercise position for 30 seconds.
- Do the 10 times in 1 session & perform 3 sessions per day.
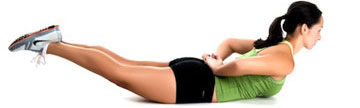
Partial Crunches :
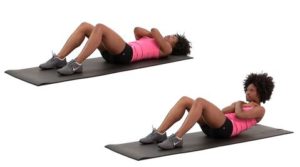
- The starting position of this exercise is supine.
- You are lying on the back with the knee joint bent & feet flat on the floor.
- Place the hands behind the head.
- Cross to the arms around the chest.
- then Tighten the abs muscle & raise the shoulder joint off into the floor to breathe out.
- Hold to this exercise position for 10 seconds then return to starting position.
- Do the 10 times in 1 session & perform 3 sessions per day.
Wall Sits :
- The starting position of this exercise is the standing position.
- You are Standing up facing away from the wall with the back & heels to the foot away.
- Try to Lean to the back flat against the wall & slide down till the knee joints are bent slightly.
- Gently press the low back into the wall.
- Hold this exercise position for 10 seconds & slide back up to the wall.
- Do the 10 times in 1 session & perform 3 sessions per day.
Superman position :
- The starting position of this exercise is prone.
- Try to Raise the shoulder joint & hold yourself up with the arms extended into the front of the body.
- Hold this exercise position for 30 seconds & return to the starting position.
- Do the 10 times in 1 session & perform 3 sessions per day.
Standing Back Extension:
- This exercise is done at any place.
- The starting position of this exercise is standing.
- You are Putting your hands onto the lower back.
- Slowly arch backward without discomfort.
- Hold this exercise position only for 3 seconds & return to the starting position.
- Do the 10 times in 1 session & perform 3 sessions per day.
Cat/cow:
- The starting position of this exercise is a kneeling position.
- Start with on to all fours.
- Try to Create the arch into the low back by raising the abdomen toward the sky & doing the head up.
- Hold this exercise for 30 seconds.
- Repeat this position on t the other leg.
- Do the 10 times in 1 session & perform 3 sessions per day.
Back Dog Exercise :
- First Do the Arch to the back in the opposite direction by lowering the abdomen toward the ground.
- At the same time raising their head.
- Hold this exercise position for 30 seconds & repeat this position on the other leg.
- Do the 10 times in 1 session & perform 3 sessions per day.
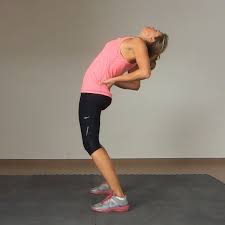
Back flexion :
- The starting position of this exercise is the standing position.
- Start with the knee joint & hands are done across the abdomen.
- Slowly do the lean forward & let the body curl the forward.
- Must be kept to the head off the ground.
- Hold this exercise position for 10 seconds.
- Do the 10 times in 1 session & perform 3 sessions per day.
Hyperextension :
- The starting position of this exercise is the prone position.
- You are lying on your stomach with both hands behind your back.
- Try to raise to the chest & feet off to the ground.
- Hold this exercise position for 10 seconds.
- Do the 10 times in 1 session & perform 3 sessions per day.
Extended Triangle :
- The starting position of this exercise is the standing position.
- From your standing position, walk to the feet about 4 feet apart.
- Try to turn the right toe to the face forward & the left toe out at an angle.
- Then Lift the arms parallel to the floor with the palms facing down.
- Tilt to the forward & hinge at to the right hip to come forward with to the arm & torso.
- Then Bring the hand to the leg with a yoga block / onto the floor.
- Try to Extend the left arm up toward the ceiling.
- After that Lookup, forward / down.
- Then repeat this position on the other leg.
- Hold this exercise position for 30 seconds.
- Do the 10 times in 1 session & perform 3 sessions per day.
Standing Forward Bend :
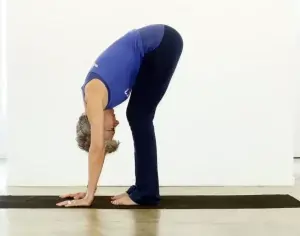
- The starting position of this exercise is a downward-facing dog.
- Slowly step forward onto the top of the mat.
- Then Stand with the feet shoulder-width apart.
- Try to Straighten the legs out & let the torso hang down.
- Tuck to the chin into toward the chest then relax to the shoulder joint.
- Then extend to the crown of the head toward the floor to create a long spine.
- Hold this exercise position for 30 seconds & repeat this exercise on the other leg.
- Do the 10 times in 1 session & perform 3 sessions per day.
Pike-Up :
- The starting position of this exercise is the high plank position.
- Position with the hands directly to the under shoulder joint & feet resting onto the ball.
- Try to Engage the core muscle in the balance.
- Use the abs muscle to lift the hip joint straight up till to weight comes over to the shoulder joint & ball to roll over forward to under the toe.
- Do this exercise body upside-down.
- Must be Kept slightly bent into the knees.
- Do the 10 times in 1 session & perform 3 sessions per day.
Circle Plank :
- The starting position of this exercise is the forearm plank.
- With to the forearm plank onto the ball with to the elbow joint directly under to the shoulder joint.
- Place your toes resting on the floor.
- Do the core muscles engage so that the body maintains a straight line from the shoulder joint to the heels.
- Engage the abs muscle & slowly make the small clockwise circles with the elbows onto the ball.
- Must be Kept to the rest of the body as till as possible.
- Repeat the counterclockwise for the 1 rep.
- Do the 10 times in 1 session & perform 3 sessions per day.
Banded Clockwise Step :
- The starting position of this exercise is the standing position.
- You are standing with the feet shoulder-width apart into the mini squat.
- Knee joints are slightly bent with the band around the thighs.
- Then Clasp the hands in front of the chest.
- Step about 6 inches forward with the right foot.
- A place to the whole foot onto the ground.
- Then return to the starting position.
- Do the 10 times in 1 session & perform 3 sessions per day.
Clam Shell :
- The starting position of this exercise is the side-lying position.
- This exercise Starts with to the put the band around the thighs just above the knee joint.
- You are lying on the floor on the one side with the knee joint stacked & bent to 90 degrees.
- Put the elbow joint below the shoulder joint & right hand onto the hip joint.
- Must be Keep the core tight & hip joint still to rotate to the right hip joint.
- Open to the splay knee joint & then return into the starting position for 1 rep.
- Do the 10 times in 1 session & perform 3 sessions per day.
Hydrant :
- The starting position of this exercise is the quadruped position.
- Start on all fours & the hip joint stacked over to the knee & shoulders over to the wrist with the resistance band around to the thighs just above the knees.
- Must be Kept to the 90-degree bend into the right leg.
- Lift the knee joint up & out to the right possibly with the right hip.
- When the patient feels the tension then lower the leg back to the start.
- Hold this exercise position for 10 seconds.
- Then repeat this position on the other leg.
- Do the 10 times in 1 session & perform 3 sessions per day.
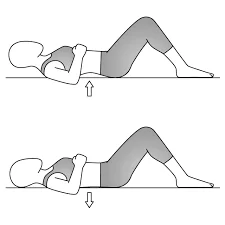
Hip Raise :
- The starting position of this exercise is the supine position.
- You are lying face up with the knee joint bent & feet flat on the floor.
- A brace to the core muscle & lift to the hip joint so the body forms into a straight line from the shoulders to the knees.
- Then Slowly lower the hip joint back down into the starting position.
- Do the 10 times in 1 session & perform 3 sessions per day.
Side Plank Dip :
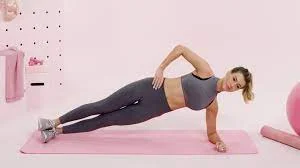
- The starting position of this exercise is a side plank position with the left elbow joint directly to the under left shoulder & right arm extended up to the ceiling.
- Feet are staggered & core muscle is engaged.
- Must be Kept to the feet staggered to alleviate extra pressure onto the lower back.
- Brace to the core muscle & lift the hips straight up.
- Then Slowly lower the hip joint back down into the starting position & maintain the tension in the core muscle for the 1 rep.
- Hold this position for 10 seconds.
- Then repeat this position on the other leg.
- Do the 10 times in 1 session & perform 3 sessions per day.
Push Down :
- The starting position of this exercise is the supine position.
- You are lying face up with the knee joint bent & feet flat on the floor.
- Core muscles are engaged so that the lower back presses into the floor.
- Lift the head off to the floor without the straining neck.
- Place the palms of your hands on the knees.
- Press your hands into the knee joint as you use them to give resistance.
- Hold this exercise & maintain resistance, for 10 seconds.
Lean Back :
- The starting position of this exercise is a kneeling position with the arms resting at the sides.
- Must be Kept in a straight line from the shoulder to the knee joint.
- slowly lean back.
- Engaging the core muscle till the patient feels the stretch in quads from the tops of the thighs.
- Hold this exercise position for 10 seconds.
- Repeat this position on the other leg.
- Do the 10 times in 1 session & perform 3 sessions per day.
Crescent Lunge :
- The starting position of this exercise is the standing position.
- Bend to the front knee joint.
- Must be kept to the back leg straight & heel lifted off to the floor.
- Try to bend the front leg so that the thigh is parallel to the floor.
- Square to the hip joint toward the front.
- Try to extend the arms toward the ceiling to either side of the head.
- Then Stretch up as press in the mat & feel the stretch into the hip joint.
- Hold this exercise position for 10 seconds.
- Do the 10 times in 1 session & perform 3 sessions per day.
Seated Forward Bend :
- The starting position of this exercise is the sitting position.
- The legs are in front of the body.
- Try to Reach the arms to the sides & over to the head.
- Reaching toward the ceiling.
- During the Inhale, stretch to the spine.
- The Exhale lengthens the spine.
- Move the forward into the bend.
- Must be Kept to the spine as long as to the hinge forward.
- Hold this exercise position for 10 seconds.
- Do the 10 times in 1 session & perform 3 sessions per day.
Child’s Pose :
- The starting position of this yoga is the kneeling position.
- Start this exercise with the knee joint to the apart & toes to the touch.
- Try to Reach out in front of them & sit down to the bum back towards the heels.
- Hold this yoga pose for 30 seconds.
- Do the 10 times in 1 session & perform 3 sessions per day.
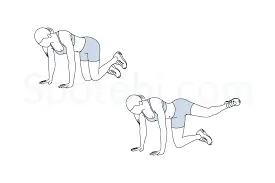
Bird Dogs :
- The first position for this exercise is on the hands & knee joint with both shoulder & hip-width apart.
- Must be Kept to the back straight & abs muscles are tight.
- Then Lift to the right leg & extend it straight to the behind.
- Hold this yoga pose for 10 seconds before the extension.
- Repeat this exercise position on the other leg.
- Do the 10 times in 1 session & perform 3 sessions per day.
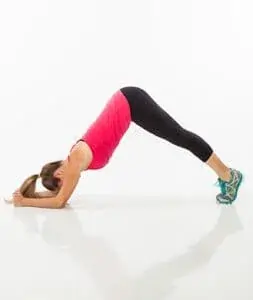
AdhoMukhaShavasana – Downward-facing Dog pose :
- The starting position of this yoga is the quadriceps position.
- A place to the hands into the alignment under the wrists & the knee joint is under the hip joint.
- Press into the hands & tuck the toes under & lift to the knee joint.
- Then Bring the sitting bones up toward the ceiling.
- Must be Kept to the slight bend into the knee joint & lengthen to the spine & tailbone.
- The heels are slightly off the ground.
- Try to press firmly into the hands.
- Then Distribute the weight evenly between both sides of your body & pay attention to the position of your hip joint & shoulders.
- Must be Kept to the head in line with the upper arms or to the chin tucked into them slightly.
- Hold this yoga pose for 30 seconds.
- Do the 10 times in 1 session & perform 3 sessions per day.
Cobra Pose :
- The starting position of this yoga pose is the prone position.
- You are lying on your stomach with the hands under the shoulder joint & the fingers facing forward.
- Then Draw the arms tightly to the chest.
- Don’t allow the elbow joint to go out onto the side.
- Press into the hands to slowly lift to the head, chest & shoulders.
- Maintain a slight bend into the elbow joint.
- You have to let the head drop back into the deep to pose.
- Then Release the back down to the mat on an exhale.
- Bring the arms to the side & rest on the head.
- Slowly move the hip joint from side to side to release tension in the lower back.
- Hold this exercise for 30 seconds.
- Do the 10 times in 1 session & perform 3 sessions per day.
Locust Pose :
- The starting position of this yoga pose is the prone position.
- Lie on the stomach with the arms next to the torso & palms facing up.
- Try to Touch the big toes together & turn out the heels to the side.
- Then Place the forehead lightly on the floor.
- Slowly lift to the head, chest & arms are partway, halfway, or all to the way up.
- Bring the hands together & interlace the fingers behind the back.
- Then this yoga poses straight ahead & slightly upward to lengthen the back of the neck.
- Hold into the yoga pose for up to 1 minute.
- Do the 10 times in 1 session & perform 3 sessions per day.
Half Lord of the Fishes :
- The starting position of this yoga pose is the sitting position.
- From the sitting position & draw the right foot close to the body.
- Bring the left foot to the outside of the leg.
- Try to Lengthen the spine as you twist the body to the left.
- Take the hand onto the floor behind for support.
- Move the right upper arm to the outside of your left thigh.
- Wrap your elbow joint around your left knee joint.
- Try to keep your hip joint square to deepen the twist in your spine.
- Turn your gaze to look over either shoulder.
- Hold this yoga pose for 30 seconds.
- Repeat this position on the other leg.
- Do the 10 times in 1 session & perform 3 sessions per day.
Two-Knee Spinal Twist :
- The starting position of this yoga pose is the supine position.
- You are lying on the back with the knee joint drawn into the chest & arms extended to the side.
- Try to Slowly lower the legs onto the left side.
- Must be kept to the knee joint as close as they together.
- Place a pillow under both the knee joint & between the knees.
- You are also used to the left hand gently pressing down onto the knee joint.
- Must be Kept to the neck straight / turn it to either side.
- Focus on breathing & do the deep breathing in this position.
- Hold this yoga pose for 30 seconds.
- Repeat this position on the other leg.
- Do the 10 times in 1 session & perform 3 sessions per day.
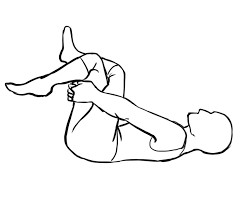
Knees to Chest With Slow Rock :
- The starting position of this yoga pose is the supine position.
- You are lying on the back.
- Then Hug both knee joints into your chest.
- Try to Slowly rock the torso back & forth while firmly holding onto the legs.
- Do this exercise for 1–2 minutes.
- Do the 10 times in 1 session & perform 3 sessions per day.
Reclined Supine Twist :
- The starting position of this yoga pose is the supine position.
- You are lying on the back.
- Hug the knee joint into the chest.
- Drop to both knees over to one side to twist the torso in the opposite direction.
- Keep the knee joint & hip joint in line with each other to draw them toward the floor.
- Then keep the chest as square to the ceiling as the patient possible.
- Hold this yoga pose for 30–60 seconds & repeat on to the other side.
- Do the 10 times in 1 session & perform 3 sessions per day.
Reclined Pigeon Pose :
- This yoga pose is known as the figure four stretches.
- The starting position of this yoga pose is the supine position.
- You are lying on the back.
- Cross to the right foot over to the left quad & bend to the left knee joint.
- Hold this exercise position for the back of the left leg & gently pull it toward the chest.
- Hold this yoga pose for 30–60 seconds
- Do the 10 times in 1 session & perform 3 sessions per day.
Upward-Facing Dog :
- The starting position of this yoga pose is the plank position.
- Try to drop the hip joint down onto the floor & flip the toes over so that the tops of the feet touch the floor.
- Tighten the core muscle & straighten the arms to push the chest up.
- Pull the shoulder joint back.
- Squeeze to the shoulder joint blades & tilt the head toward the ceiling & open up to the chest.
- Hold this yoga pose for 30–60 seconds.
- Do the 10 times in 1 session & perform 3 sessions per day.
Pigeon Pose :
- The starting position of this yoga pose is in the tabletop position / Downward-Facing Dog.
- A place to the right knee joint at the angle toward the front of the mat.
- Must be placed to the left leg back as far as possible.
- Due to the right ankle joint positioned into the left groin.
- Try to Open the hip joint is the best.
- Must be Kept to the hip joint square.
- Keep the body in an upright position.
- Use your hands for support.
- Fold to the upper body down.
- Placing the head onto the hands.
- Do Breathe deeply.
- Hold this yoga pose for up to 5 minutes.
- Do the 10 times in 1 session & perform 3 sessions per day.
Half Lord of the Fishes :
- The starting position of this yoga pose is the sitting position.
- Start this exercise with the position on the floor.
- Bringing the right foot toward the body.
- Must be Brought to the left foot around to the outside of the right leg.
- Then Stretch to the spine as to the twist to the body of to the left.
- For the support, you are placed on the left hand onto the floor behind the body.
- Bring the arm across to the left thigh as to the twist.
- Must be Kept the hip joint square.
- Do the 10 times in 1 session & perform 3 sessions per day.
Two-Knee Spinal Twist Pose :
The starting position of this yoga pose is the prone position.
You are lying on the back with the knee joint to the chest & arms stretched out to the sides.
Must be Kept held close together and then created to the twist motion.
Turn to the head to the right.
Must be kept to both shoulder joints on to the floor.
Do the 10 times in 1 session & perform 3 sessions per day.
Happy Baby :
- The starting position of this yoga pose is the supine position.
- You are lying on the back & bend to the knee joint into the stomach.
- uring the inhale, grab the outside of the feet with to the hands.
- Open to the knee joint up toward the armpits.
- Make sure the ankle joints are over to the knees with to the heels are flexed.
- Push the feet into the hands as they pull the hands down to create pressure& resistance.
- Hold this yoga pose in this position for 30 to 60 seconds.
- Do the 10 times in 1 session & perform 3 sessions per day.
What is Surgery treatment for back muscle pain?
After the medical treatment & physiotherapy treatment pain is not relieved then the doctor is advised surgical treatment.
Surgery for back muscle pain is very rare.
but If a patient has a herniated disk surgery is only an option.
Some surgeries for back pain include :
- Fusion:
- In this technique, two vertebrae are joined together, with the help of a bone graft that is inserted between them.
- The affected vertebrae are splinted together with the metal plates, screws & cages.
- It is a sign of greater risk for arthritis which subsequently develops in the adjoining vertebrae.
- Artificial disk:
- When the cushion of the vertebra is affected then An artificial disk is inserted & replaces the cushion between two vertebrae.
- Diskectomy:
- A portion of a disk is removed which is irritating & pressing against a nerve.
- Partially removing a vertebra:
- The doctor removed a small section of a vertebra that is pinching the spinal cord & nerves.
How to prevent back muscle pain?
- Exercise:
- Do Regular exercise which helps you build strength & control body weight.
- Diet:
- Make sure your diet includes enough calcium & vitamin D which are needed for bone health.
- A healthful diet also helps to control body weight.
- Posture when standing:
- Make sure in standing position your pelvis in a neutral position.
- Must be Stand upright, head facing forward, back straight & balance your weight evenly on both feet.
- In your daily standing position Keep your legs straight & your head in line with your spine.
- Bodyweight:
- The body weight is the risk of developing back pain.
- The difference in back pain risk between the obese & normal-weight individuals is considerable.
- When People carry their weight in the abdominal area versus the buttocks & hip areas are also at greater risk.
- Posture when sitting:
- A good seat for working is good back support, a swivel base & armrests.
- During the sitting position, try to keep your knee joint, and hip joint level & keep your feet flat on the floor & use a footstool.
- You should sit ideally upright with the support in the small of your back.
- When you are using a keyboard, make sure your elbow joints are at right angles & your forearms are placed horizontally.
- Lifting:
- When you try to lift something then use your legs for the lifting, rather than your back.
- Keep your back as straight as you can & keep your feet apart with one leg slightly forward so that it maintains balance.
- Then Bend only at the knee joint, hold the weight close to your body & straighten the legs while changing the position of your back as little as possible.
- Do not lift and twist at the same time:
- When you try to do something heavy must keep looking straight ahead, not up & down, so that your neck is a continuous straight line from your spine.
- Shoes:
- Always wear flat shoes which place less of a strain on the back.
- Driving:
- During driving, it is important to have proper support for your back.
- Make sure your wing mirrors are properly positioned so that you do not need to twist.
- The pedals are squarely in front of your feet.
- When you do a ton a long journey & then take plenty of breaks.

One Comment