Knee painful to bend:
We perform many knee joint bending activities throughout the day.
Because this movement is necessary for daily activities such as stairs climbing & sitting in a chair.
You also bend your knee joint during daily exercises such as squats & lunges.
The wear & tear of everyday life is take a toll on your knee joint.
There are several tendons, ligaments, bones & muscles in the area.
When occur to a problem with one of these structures, you feel knee pain during bending your leg.
Causes of knee joint pain are minor & sometimes treated with home remedies.
Other conditions require medical attention & contact with to doctor.
This pain is diagnosed by knee examination.
This pain is reduced by to RICE principle, pain medication & physiotherapy treatment.
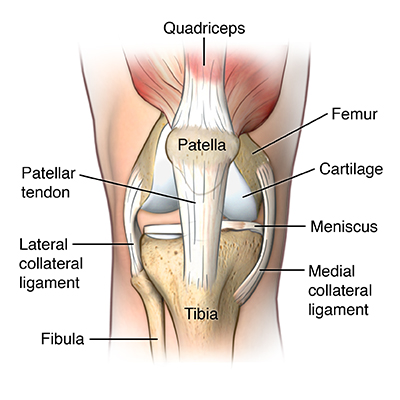
Table of Contents
What is the anatomy of the knee joint?
- The knee joint is one of the largest & most complex joints in the body.
- The knee joins include two 2 bones = the thigh bone – the femur & the shin bone – the tibia.
- Smaller bone is which is runs alongside the tibia – fibula & the kneecap – patella bone are the other bones that make the knee joint.
- Some tendons connect the knee joint bones to the leg muscles which move the knee joint.
- Ligaments = join the knee joint bones & provide stability to the knee joint.
- Two C-shaped pieces of cartilage it is known as the medial & lateral menisci which act as shock absorbers between the femur & tibia bone.
What are the causes of the painful knee during bending activities?

- Meniscus tears:
- It occurs in the C-shaped pieces of cartilage in your knee joint, which are called menisci Runner’s knee.
- In this condition, you feel dull pain at the front of your knee – patella which is also known as patellofemoral pain syndrome.
- Ligaments Tendonitis:
- This condition occurs to inflammation of tendons around knee joints.
- Some old knee injuries are produced by chronic (long-term) knee pain.
- A dislocated kneecap patella bone Iliotibial band syndrome
- In this condition, you feel burning pain on the outer side of your knee joint that is spread to your hip joint or thigh area.
- It occurs due to inflammation & commonly occurs in runners.
- Knee bursitis:
- This condition occurs to inflammation of the fluid-filled cushions (bursae) in your knee joint.
- It is produced to swelling, warmth & pain.
- Osgood-Schlatter disease:
- This condition produces pain & swelling at the one point where the patellar tendon meets the top of your shinbone.
- Osteoarthritis:
- It is a type of arthritis that occurs due to wear & tear of your joints over time.
- It is produced in pain, swelling & stiffness which is become worse in the morning.
- Patellar tendinitis:
- This condition occurs to inflammation of the patellar tendon, which is connect your kneecap patella bone to your shinbone.
- It is produced to burn pain just below your kneecap patella bone.
- Baker’s cyst:
- In this condition present swelling at the back of your knee joint.
- It occurs in the accumulation of the fluid which is provided to lubricate your knee joint.
- This condition is produced by swelling & tightness.
- Hamstring tendonitis:
- This condition occurs to inflammation of your hamstrings muscle.
- It is produced by pain behind your knee joint & thigh area.
- Knee injury:
- Damages the knee joint part & ligaments.
- It is produced to sharp pain & observes swelling.
What are the symptoms of the Knee painful to bend?
- Depending on the cause, a knee injury is produce sharp, dull ache, shooting pain & burning pain.
- You are also observed to swelling & feeling of tenderness in your knee touching.
- You also feel difficulty in some activities such as bending, straightening, or bearing weight on your knee joint.
- You feel to spams around to knee joint.
- You feel tightness & weakness in the muscle around the knee joint.
How do you diagnose painful knee at bending activities?
- The first doctor asked you some questions about your history & your symptoms.
- Then assess the knee joint & check the swelling or instability
- In the examination, the part doctor examines for strength & ROM of the knee joint.
- The doctor is advised to you imaging tests like an X-ray or MRI scan which os help you examine the bones & tissues of your knee joint.
- Sometimes recommend blood tests are helping to check some conditions like rheumatoid arthritis.
In which condition do you need to contact a doctor as an emergency?
You need to contact the doctor in many situations including:
- When you feel severe & chronic knee pain
- If you feel difficulty bending activities to straighten your knee
- When you observe swelling or redness in your knee joint.
- Knee muscle weakness
- When you heard popping or crunching sounds associated with pain
What are home remedies for Knee painful to bend?
- If you feel knee pain mild home remedies help to release the pain.
- First, change your activity
- Please take careful attention to how your knee joint feels during different activities.
- When a certain movement makes your knee joint hurt avoid these activities till you feel better.
- You also limit the movement means to perform low-impact activities instead.
- Perform low-impact activities which are applied to less stress on your knee joints.
- Examples of these activities include:
- Swimming
- Water aerobics
- Walking
- Biking
What is the treatment for the Knee painful to bend?
RICE principle:
When you feel pain in the knee joint due to this syndrome doctor is advised to RICE principle as home treatment or primary treatment.
- R – rest = When you feel pain doctor has advised you to your rest for sometimes form of activity release to the pain, this means doing a total rest or even using crutches & another mobility aid.
- I- ice = You are applied to ice on the area of the pain for 20 minutes, release to swellings & muscle pain but always applied to the ice with the help of a towel between the skin & ice to prevent ice burn, you can also be used to ice pack & frozen peas for ice therapy.
- C – Compression = to prevent form additional swelling you are lightly wrapping the knee joint with the elastic bandage
- & also leaving to hole in the area of the kneecap or patella & but make sure the bandage is not to fits tight & not produce additional pain.
- E – Elevation =if possible, rest with the knee joint raised higher than the heart by applying to pillow under the leg which helps you release swelling.
Pain medication for Knee painful to bend:
- To reduce pain & swelling, you are taken to nonsteroidal anti-inflammatory drugs (NSAIDs).
- For this medication used to common NSAIDs include ibuprofen (Advil) & naproxen (Aleve).
- But always follow the directions of dosage & frequency depending on your doctor.
- You can also apply pain-relieving gel & spray like volini gel & spray on the area of muscle pain release to muscle pain & swellings.
Orthotics for Knee painful to bend:
- In the orthotics used to the shoe which is inserts for stabilizing your ankle joint & foot.
- It helps to alleviate pain by reducing pressure on your knee joint.
Immobilization:
- When your knee pain occurs due to any trauma or injury, a doctor is advised to you wear a brace & cast.
- It helps you protect your knee joint & prevent you from moving the knee joint.
What is Physiotherapy treatment for the painful knee at bending activities?
When this pain is not relieved after the home treatment & pain medication then the doctor has advised physiotherapy treatment to release the pain.
Physiotherapy treatment is help you relieve pain, swelling, spam & tightness of the muscle.
The physiotherapy treatment includes massage, electrotherapy treatment & exercise therapy.
Massage:
- When the trigger & tender points are present in the pain area physiotherapist is advised to massage therapy release to these tender points.
- During a massage, a physiotherapist uses their hands to apply pressure on the tendons, muscles, and ligaments of the knee joint. Massage is applied after 2 – 3 days of following the RICE principle when you are not feeling to release the syndrome pain.
- Massage is applied with the help of the oil & applied for 5 -10 minutes.
- Massage is applied 3 times per day at home.
- You are used to various types of massage such as:
- Trigger point massage
- Deep tissue massage
- Swedish massage
Electrotherapy treatment for Knee painful to bend:
After the RICE principle, pain medication & massage if the syndrome muscle pain is not relieved then used Electrotherapy treatment for releasing this pain.
To relive the swellings, spams & pain physiotherapist is advised to you electrotherapy treatment.
In electrotherapy, the treatment therapist is used to many machines.
- When the trigger & tender points are present therapists are advised & to apply US = ultrasound therapy for the release of syndrome pain.
- This treatment is applied with the help of gel & applies for 5 to 10 minutes on the area of pain.
- This therapy helps you release pain & swelling.
- Reduce to pain physiotherapist is applied to SWD = short wave diathermy, IFT = Interferential Therapy, TENS = Transcutaneous Electrical Nerve Stimulation on the area of pain.
- SWD = Short wave diathermy is hot therapy for release to spams on the area of muscle pain.
- IFT = Interferential Therapy & TENS = Transcutaneous Electrical Nerve Stimulation is applied with the help of gel & electrodes on the area of muscle pain.
- This therapy is applied for 10 minutes to the area of muscle pain.
Exercise therapy for Knee painful to bend:
After following the RICE principle for the 2- 3 days at home & primary treatment & the help of pain medication, you feel released from the pain.
When you feel too comfortable & release from your muscle pain then the physiotherapist is advised to you exercise therapy reduce to muscle weakness & tightness.
The exercise therapy for muscle pain includes stretching & strengthening exercises.
Stretching exercise helps to relieve muscle tightness as well as strengthening exercise is help you relieve muscle weakness.
Stretching exercise:
After the follow of electrotherapy for 2-3 days for release to muscle pain by the physiotherapist then the therapist is advised to stretch for release to muscle tightness.
This stretching is applied when your pain is released & when you feel comfortable.
- Lunging Hip Flexor Stretch
- standing Quadriceps Stretch
- Hamstring Stretch in supine
- Wall Hamstring Stretch
- Iliotibial Band Stretch
- Side lunge
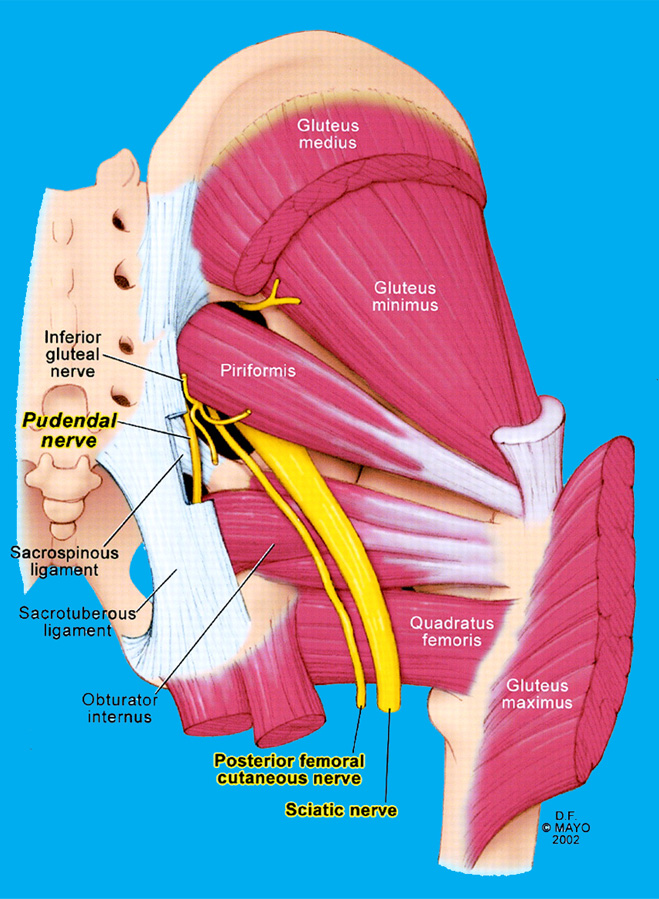
- Figure Four Piriformis Stretch
- Butterfly stretch
- Seated hamstring stretch
- Heel and calf stretch
Lunging Hip Flexor Stretch :

- The starting position of this stretching is kneeling.
- Kneel onto the left knee & keep the right shin on the ground.
- If you are found on the ground tough onto the back leg then try to do this stretch on a yoga mat.
- Try to move the right leg back to behind the body.
- Must keep the right foot facing the ceiling.
- Then Put both hands on the right knee joint & push the body forward.
- Must keep the torso & head in alignment.
- You feel the stretch into the hip & left leg.
- Hold this stretching position for 30 seconds.
- Do this stretching exercise 3 times in 1 session & perform the 3 sessions daily.
Standing Quadriceps Stretch :
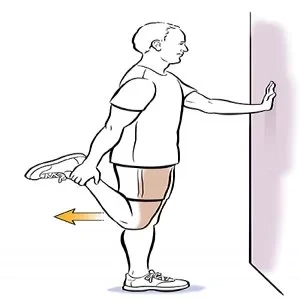
- The starting position of this stretching is standing.
- Try to raise the left arm straight out in front of the body.
- This position is helping you keep the balance.
- If this position is challenging for you modify this exercise by holding onto the back of a chair or wall for support.
- Then bend to the left knee joint & grab the left ankle.
- Try to bring the left foot back behind the body.
- Then pull the leg up & back with the hand onto the ankle joint.
- Must be kept to the torso & head into alignment.
- Hold this stretching position for 30 seconds.
- Do this stretching exercise 3 times in 1 session & perform the 3 sessions daily.
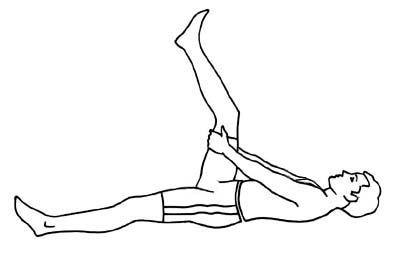
Hamstring Stretch in supine:
- The starting position of this stretching is supine.
- You are lying down on the back.
- Try to extend to the right leg in front of the body & bend to the left leg.
- Then wrap the hands around the back of the left thigh
- After that pull the leg slowly toward it as soon as you can.
- Hold this stretching position for 30 seconds.
- Do this stretching exercise 3 times in 1 session & perform the 3 sessions daily.
Wall Hamstring Stretch:
- The starting position of this stretching is supine.
- You are lying on the floor with your back facing the wall.
- Try to scoot to the body so that the glutes muscle touches the wall.
- Then place one leg onto the wall & try to extend the leg as soon as possible.
- Hold this stretching position for 30 seconds.
- Do this stretching exercise 3 times in 1 session & perform the 3 sessions daily.
Iliotibial Band Stretch:
- The starting position of this stretching is Side-lying.
- You are lying on one side.
- Must keep the bottom knee bent.
- Try to reach back & grab the left ankle joint & bend the knee joint.
- Rest to the foot of the bottom leg onto the upper knee.
- Use your foot on the knee joint to pull the upper knee off to the floor.
- Hold this stretching position for 30 seconds.
- Do this stretching exercise 3 times in 1 session & perform the 3 sessions daily.
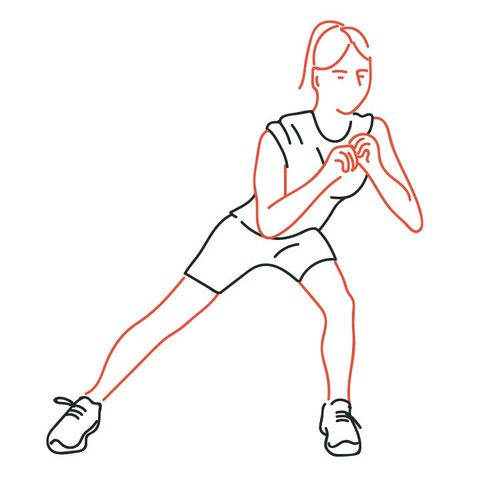
Side lunge:
- You are standing straight with the feet far too apart.
- Try to move the feet to a 45-degree angle.
- Then lunge to the one side.
- You feel a deep stretch into the thigh area.
- Hold this stretching position for 30 seconds.
- Do this stretching exercise 3 times in 1 session & perform the 3 sessions daily.
Figure Four Piriformis Stretch:
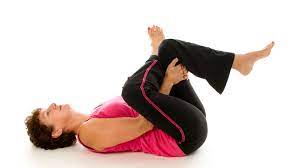
- This stretching is also known as the lying piriformis stretch.
- You are lying down on the backside.
- Must be kept to the knees bent & feet flat on the floor.
- If you are feeling hurt in your back you are used to a yoga mat or towel.
- Then place the palms onto the floor & move the arms away from the body.
- Try to move the leg ankle joint onto the bent right thigh.
- Then lift the right foot off to the ground or clasp the hands behind the right bent knee joint.
- Move the legs toward the chest as far as you can.
- Hold this stretching position for 30 seconds.
- Do this stretching exercise 3 times in 1 session & perform the 3 sessions daily.
Butterfly stretch:
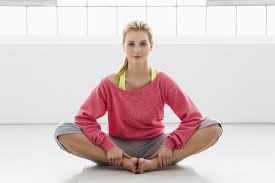
- The starting position of this stretching is sitting.
- You are sitting on the ground & must keep the torso & head up to high.
- Try to move the soles of the feet together to form a triangle into the legs.
- Drop the knee joint to the sides as far as you can.
- You are also used to the arms pushing down onto the knees for a deeper stretch.
- Try to lean forward.
- Must be keeping the torso & head aligned as best as you can.
- You feel this stretch in the inner thighs.
- Hold this stretching position for 30 seconds.
- Do this stretching exercise 3 times in 1 session & perform the 3 sessions daily.
Seated hamstring stretch :
- The starting position for this stretching is long sitting.
- Try to touch the knee joint with the help of the body lean.
- Hold this stretching position for 30 seconds.
- Do this stretching exercise 3 times in 1 session & perform the 3 sessions daily.
Heel and calf stretch :
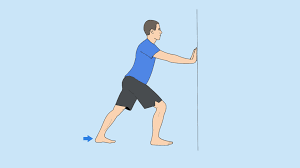
- The starting position for this stretching is standing.
- You are standing facing a wall.
- Try to place your hands on the wall or move one foot back as far as you can to comfortably.
- Toes on both feet facing forward, heels flat & with a slight bend into the knee joint.
- Try to lean into this stretch.
- You feel the stretch into the back leg.
- Hold this stretching position for 30 seconds.
- Do this stretching exercise 3 times in 1 session & perform the 3 sessions daily.
Strengthening Exercises:
After the follow of Electrotherapy & massage for 2 -3 days to release this pain by the physiotherapist then the therapist is advised to you do strengthening exercises for muscle weakness.
This strengthening exercise is always advised when you feel to release pain & when you feel comfortable.
This all-strengthening exercise helps you with muscle weakness & pain.
- Straight Leg Raises
- Hamstring Curls
- Prone Straight Leg Raises [ hip extension ]
- Wall Squats
- Calf Raises
- Step-Ups
- Side Leg Raises [ hip abduction ]
- Leg Presses
- Ankle pump exercise
- Clamshell exercise
- Half squats
- Leg extensions
- Knee Flexion (standing)
- Hamstring curls on a weight bench
- Single-leg dip
- Static Quadriceps exercise [ SQE]
- Knee Extension over to Roll [ VMO ]
- Camel Pose
- Hero Pose
- Twisted (or Revolved) Triangle Pose
- Lotus Pose
- Extended Hand-to-Big-Toe Pose
- Mountain Pose
- Supported Half Moon Pose
- Child’s Pose
- Easy Pose
- Wide-Angle Seated Forward Bend
- Chair Pose
- Peaceful Warrior Pose
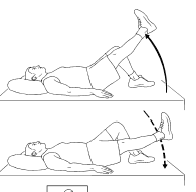
Straight Leg Raises :
- The starting position of this exercise is supine.
- You are lying on the back of the floor & another flat surface.
- Try to bend one knee joint & place the foot flat on the floor.
- Must keep the other leg straight or raise the leg to the height of this opposite knee joint.
- Must keep the pelvis still and not use the abdominal muscles.
- Hold this exercise position for 30 seconds.
- Do this exercise 10 times in 1 session & perform the 3 sessions daily.
Hamstring Curls:
- The starting position of this exercise is prone.
- You are lying flat on your stomach.
- Slowly bring the heels as close to the buttock as possible.
- Hold this exercise position for 30 seconds.
- Do this exercise 10 times in 1 session & perform the 3 sessions daily.
- The starting position of this exercise is standing.
- In the standing position hold to a chair & lift one leg at to time.
- Hold this exercise position for 30 seconds.
- Do this exercise 10 times in 1 session & perform the 3 sessions daily.
Prone Straight Leg Raises [ hip extension ]:
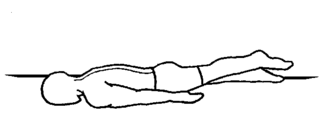
- The starting position of this exercise is prone.
- You are lying flat on your stomach.
- Must keep the legs straight.
- Try to tighten the muscles in the bottom & the hamstring of one leg.
- then one leg is lifted toward the ceiling.
- Hold this exercise position for 30 seconds.
- Do this exercise 10 times in 1 session & perform the 3 sessions daily.
Wall Squats
- The starting position of this exercise is standing near the wall.
- Must keep your feet on to the floor.
- You are standing with your back against a wall.
- Must keep the feet about to shoulder-width apart.
- Try to slowly bend the knees & keep the back or pelvis against the wall.
- But do not bend the deeply.
- Hold this exercise position for 30 seconds.
- Do this exercise 10 times in 1 session & perform the 3 sessions daily.
Calf Raises:
- The starting position of this exercise is standing.
- You are standing facing the back of the sturdy chair.
- You are used to other support such as the back of the couch & a wall bar at the gym.
- This exercise is also done on the stairs & holding to the banister with the heels.
- Try to hang off to the edge of this step.
- Then slowly raise the heels as high as possible then lower.
- Hold this exercise position for 30 seconds.
- Do this exercise 10 times in 1 session & perform the 3 sessions daily.
Step-Ups:
- The starting position of this exercise is standing.
- You place one foot onto a platform, step bench & to the lowest step onto a staircase.
- Must keep straight to the pelvis level.
- Try to bend to the knee joint & slowly lower to the opposite foot onto the floor.
- Then lightly touch the toe onto the floor & rise to back up the position.
- Hold this exercise position for 30 seconds.
- Do this exercise 10 times in 1 session & perform the 3 sessions daily.
Side Leg Raises [ hip abduction ]:

- The starting position of this exercise is side-lying.
- You are lying on one side with the legs stacked.
- Try to bend to the bottom leg for support.
- Then straighten to the top of the leg & raise to 45 degrees.
- Hold this exercise position for 30 seconds.
- Do this exercise 10 times in 1 session & perform the 3 sessions daily.
Leg Presses :
- The starting position of this exercise is sitting.
- you are sitting on a leg-press machine with the back & head against the support.
- the feet flat onto the footplate.
- try to adjust the seat back for the comfortable.
- then slowly push the plate away from till to legs are too extended.
- try to bend the knee joint & return to the starting position.
- Hold this exercise position for 30 seconds.
- Do this exercise 10 times in 1 session & perform the 3 sessions daily.
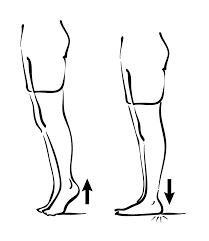
Ankle pump exercise :
- You are sitting or supine with to back straight against a chair.
- Try to legs are extended & spread slightly apart.
- Then point the toes up so the soles are too flat.
- Try to pretend to press down on the gas pedal of the automobile & point the toes down.
- Hold the toes in this stretch position for a brief count of 3 to 5 seconds.
- Then slowly return to the toes so that the foot is perpendicular to the floor.
- Hold this exercise position for 30 seconds.
- Do this exercise 10 times in 1 session & perform the 3 sessions daily.
Clamshell exercise:
- The starting position of this exercise is supine.
- You are lying on the side with the bent knee joint & must keep the affected leg on to the top.
- Extend to the lower arm under the head or bend to the arm.
- Try to make such a pillow for to the head & rest on the hand.
- Then place the top hand onto the top of the hip for support.
- Engage to the abdomen & must be kept to the hips facing downward during the exercise.
- Hold this exercise position for 30 seconds.
- Do this exercise 10 times in 1 session & perform the 3 sessions daily.
Half squats:
- This exercise is an excellent way to strengthen the quadriceps, glutes & hamstrings muscles without straining the knee joint.
- The starting position of this exercise is the standing squat position.
- With to the feet shoulder-width to apart.
- Try to place the hands on the hip joint out for balance.
- Looking straight ahead or slowly squat down about 10 inches.
- It is a halfway point to a full squat position.
- Hold for a few seconds, then stand up by pushing through to the heels.
- Hold this exercise position for 30 seconds.
- Do this exercise 10 times in 1 session & perform the 3 sessions daily.
Leg extensions:
- The starting position of this exercise is sitting.
- You are sitting up to tall in the chair.
- Try to put the feet flat on the floor or hip-width apart & look straight ahead.
- Must focus on thigh muscles & extend to one leg as high as possible without raising to buttocks off the chair.
- Hold this exercise position for 30 seconds.
- Do this exercise 10 times in 1 session & perform the 3 sessions daily.
Knee Flexion (standing) :
- The starting position of this exercise is standing.
- You are standing on to a 2-inch board & small step.
- Must keep the thigh in a straight line with the upper body
- Bending the knee joint to a 90-degree angle & slowly lower down.
- Must keep the foot flexed throughout the movement.
- Try to keep the thigh pressed against a table.
- Must be sure the thigh stays in line with the trunk.
- Hold this exercise position for 30 seconds.
- Do this exercise 10 times in 1 session & perform the 3 sessions daily.
Hamstring curls on a weight bench:
- You are lying face to down on the bench with the knee joints close together.
- Try to grip the handles for stability.
- Must be tucked to the feet under the weight.
- Then slowly bend to both knees.
- You are used to the force of the legs raised to the weight up.
- Then continue to lift the weight in a smooth motion till the knee joint bend at a 90-degree angle.
- Hold this exercise position for 30 seconds.
- Do this exercise 10 times in 1 session & perform the 3 sessions daily.
Single-leg dip:
- The starting position of this exercise is standing.
- You are holding the chair for support.
- Try to lift the right leg about 12 inches from the ground.
- Your all body weight must be placed on the left leg.
- Then slowly bend down to a few inches & pushing the weight into the heel of the supporting leg.
- Hold this exercise position for 30 seconds.
- Do this exercise 10 times in 1 session & perform the 3 sessions daily.
Static Quadriceps exercise [ SQE]:
- The starting position of this exercise is long sitting or supine.
- You have put any pillow, sand beg & fold the towel under the knee joint.
- Try to push the knee joint into the bed.
- Hold this exercise position for 30 seconds.
- Do this exercise 10 times in 1 session & perform the 3 sessions daily.
Knee Extension over to Roll [ VMO ]:
- The starting position of this exercise is long sitting or supine.
- You have put the rolled towel under the knee joint.
- Try to pull the toes up towards the shin & fully straighten the knee joint.
- Hold this exercise position for 30 seconds.
- Do this exercise 10 times in 1 session & perform the 3 sessions daily.
Camel Pose :
- You are in a kneeling position on the mat with the knee joint shoulder-width apart.
- Try to reach to the back & place your hands on the bottoms of the feet.
- Then become an arch into a back bend & so that the head falls back or gazes at the wall behind to body.
- Hold this yoga pose for 30 seconds to 1 minute.
- Do this exercise 10 times in 1 session & perform the 3 sessions daily.
Hero Pose :
- You are kneeling on the mat.
- Try to take to knee joint to out wide & pushing to feet out of the sides.
- Then sit between the heels & leaning back as far as possible.
- Hold this yoga pose for 30 seconds to 1 minute.
- Do this exercise 10 times in 1 session & perform the 3 sessions daily.
Twisted (or Revolved) Triangle Pose :
- The starting position of this yoga pose is standing.
- You are standing with the feet wider than hip-width apart & left to toes pointing forward.
- Try to right toes turned out of 45 degrees.
- Then reach the right arm down or place the arm onto the floor outside of the left foot.
- After that twist to the torso & reach the left arm up toward the sky.
- Hold this yoga pose for 30 seconds to 1 minute.
- Do this exercise 10 times in 1 session & perform the 3 sessions daily.
Lotus Pose :
- The starting position of this exercise is sitting.
- You are sitting on the floor with your legs straight out in front of the body.
- Bend to the knee joint & place the feet on opposite thighs with the bottoms of the feet pointing upward.
- In this yoga pose, you are used to a great range of motion & rotation from the hip, knee & ankle joints of both legs.
- Hold this yoga pose for 30 seconds to 1 minute.
- Do this exercise 10 times in 1 session & perform the 3 sessions daily.
Extended Hand-to-Big-Toe Pose :
- The starting position of this exercise is standing.
- In the standing position lift the right leg & bend to the knee joint toward to chest.
- Try to grab hold of the right big toe with the right hand.
- Then slowly extend to the right leg straight & out to the side.
- Hold this yoga pose for 30 seconds to 1 minute.
- Do this exercise 10 times in 1 session & perform the 3 sessions daily.
Mountain Pose:
- The starting position of this exercise is standing.
- In the first step, you are ensured so that the feet are placed close together.
- First, engage with the core muscle & feet then lift through to the core muscle.
- You are pressed onto the floor to evenly distribute body weight engage to the calf muscles.
- Use the quadriceps & rotate to the thighs for help to feel the stretch & tighten to the abs.
- Pull the shoulder joint back & down to ensure that it is stacked over to the ankle joint & hips while lifting the chin slightly or the chin stays parallel to the floor.
- Relax the facial muscles & take to deep breaths relax to the engaged muscles.
- Hold this yoga pose for 30 seconds to 1 minute.
- Do this exercise 10 times in 1 session & perform the 3 sessions daily.
Supported Half Moon Pose:
- This young Pose is also called the Ardha Chandrasana.
- The starting position of this yoga pose is standing.
- You stand with to the back of the wall & rotate to the right foot.
- Make sure to the bottom of the foot is parallel to the wall.
- After that place, the block in the right hand & then bend to the right knee.
- Shift the weight so that person balances on the right leg.
- Set the block onto the floor near the front of the right foot & apply to pressure on the right hand to straighten the right arm & leg.
- Rotate to the left side of the body in an upward direction so the back is in alignment with the wall behind the body
- Then The left leg does parallel with the floor & the left arm is created in a straight line with the right arm.
- Hold this yoga pose for 30 seconds to 1 minute.
- Do this exercise 10 times in 1 session & perform the 3 sessions daily.
Child’s Pose:
- The starting position of this exercise is sitting.
- In the first step, you fold the blanket & place it under the knee joint for protection.
- Get on to the hands & knees keeps the feet together with the toes tucked & knees separated so that to belly is rest between the thighs.
- Then try to bottom touching the heels & forehead is on the mat with the arms extended outward.
- Hold this yoga pose for 30 seconds to 1 minute.
- Do this exercise 10 times in 1 session & perform the 3 sessions daily.
Wide-Angle Seated Forward Bend:
- The starting position of this exercise is sitting.
- In the first step, you are straddling the legs out into the widest stance possible.
- Try to flex the feet to stimulate the leg muscles.
- Then place the hands onto the ground forward to in front.
- Pull the legs together & to the knees joint towards the chest.
- Hold this yoga pose for 30 seconds to 1 minute.
- Do this exercise 10 times in 1 session & perform the 3 sessions daily.
Chair Pose:
- The starting position of this exercise is standing.
- You are standing with your feet or legs together or then chest lifted.
- Try to sit back & down.
- Must keep the weight into the heels & raise to arms overhead.
- Hold this yoga pose for 30 seconds to 1 minute.
- Do this exercise 10 times in 1 session & perform the 3 sessions daily.
Peaceful Warrior Pose:
- You are stepping to the right foot forward with the toes pointing straight.
- Turn to the left toes for the 45 degrees to the side
- Extend the arms out with the palms facing up.
- Bend the right knee at to a 90-degree of angle & keep it in the line with to ankle.

What is the Surgical Treatment for the painful knee during bending activities?
After the medical treatment & physiotherapy treatment pain is not relieved then the doctor is advised surgical treatment.
- Anterior cruciate ligament – ACL reconstruction = is a surgery to repair a torn ACL.
- To treat a torn meniscus = meniscectomy or meniscus repair.
- Total knee replacement = TKR
- Tibial tubercle transfer = is a procedure for improving knee stability.
What is the recovery time for the painful knee at bending activities?
- In a normal situation, it takes about 6 weeks to recover from a knee joint injury.
- When occur to surgery, recovery time is range from 8 weeks to 12 months.
- But total recovery time depends on many factors, including:
- Type of surgery or injury
- Your overall health
- Your age
- Your treatment plan
- Your strength and activity level before surgery
- The severity of your condition
How do prevent painful knee during bending activities?
- First, avoid or limit the movements which are produced by knee joint pain.
- It is the best way to prevent the overuse of the muscle, which is lead to more severe pain & injuries.
- Do low-impact activities such as biking or swimming.
- Lose your weight if you are suffering from being overweight because the extra weight adds stress on your knee joint & increases the risk of knee pain.
- Always do the warm-up & cool down before exercise.
- It helps to protect your muscles & prevent form injury.
- You are using knee joint pads while you are doing the work with your knee joints.
- This Knee pads help you protect your kneecaps & reduce the pressure.