
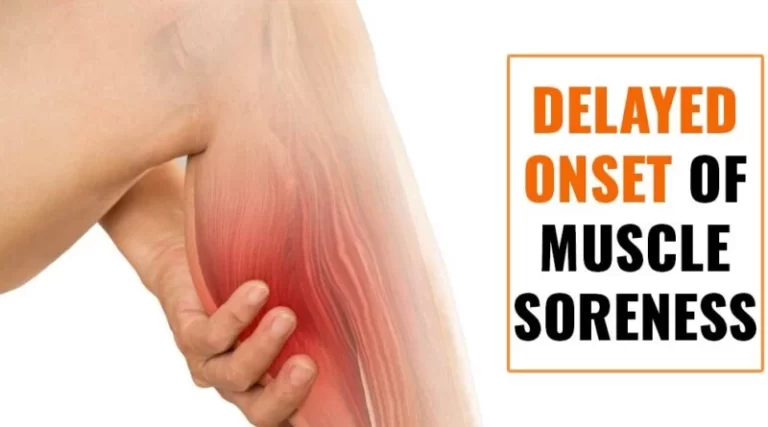
How to relieve muscle soreness fast?
Exercise is a most important part of a healthy & active life style. It improves the heart, and lungs & builds strong bones & muscles. This exercise is become to cause sore muscles. Soreness is common when you try a new exercise & increase in intensity. After the workout Your all body muscles become to get sore right away, it is known as acute soreness.
You feel the ache & tighten up about the 12 hours after the exercise. In some cases, the discomfort peak is for 48 to 72 hours afterward. It is called delayed-onset muscle soreness. During this time muscles are repaired & strengthen themselves. Sore muscle pain needs to improve quickly & last several days.
Table of Contents
DOMS = delayed onset muscle soreness:
- When yesterday’s workout is making the muscles scream today, it is a good sign.
- Which is known as the delayed onset muscle soreness = DOMS.
- It is worked hard enough to create tiny tears in the muscle fibers.
- It happens when the bump up the workout intensity, frequency & length
- This DOMS usually kicks in the 12 to 24 hours after a tough workout & peaks between the 24 to 72 hours.
- This soreness is going away in a few days.
Some points which are helpful to you prevent the form of soreness :
- Warm-up:
- Warming up is best for muscles before exercise better than stretching.
- Warm-up is waking up the muscles by increasing blood flow to them.
- In To warm-up, choose the light versions of certain exercises.
- In warm-up include slow jogging & biking, jumping rope/and lifting light weights.
- Drink water:
- Water is help to control the body temperature, loosen the joints & transport nutrients which is create energy.
- Without water, the body is struggle to perform at its highest level.
- Without water, You are feeling muscle cramps, fatigue, dizziness & more serious symptoms.
- Limited rest:
- Wait 48 hours before working for the same muscle groups in the same way.
- So that Limited & lighter exercise of the same muscles helps.
- For example, if the occur soreness after the running, you can do a light walk & bike ride for the next few days which is helpful.
- But Avoid complete rest & immobilization.
- Use proper technique:
- Always Do the exercises in the right way which is help to protect the muscle from strain or injury.
- If you go to the gym or health club for a workout, ask a trainer & instructor for help.
- The trainer shows the proper way to lift the weights & use the machines or equipment.
- Cool-down:
- It is important to stretch after the workout.
- Muscles become too relaxed & more flexible when you do the warm.
- Stretching is circulated the blood away from the muscles & back to the heart for recovery.
How to relieve muscle soreness fast?
Treatment for muscle soreness
RICE principle:
When the soreness & pain occur after the workout you can use to RICE principle as a first-line treatment.
- R- rest = You are doing the rest for some days after the pain & do not do any activity which is produced to pain in the injured area .it is helpful to the healing of the injury.
- I – ice = You can apply ice on the area of pain for 20 minutes which is help you release swelling & pain, use can also be used in ice packs, ice massages & ice slush baths, but not apply ice directly to the skin always apply to towel between the ice & skin which is preventing the skin form burn .this ice therapy is applied to 3 times per day.
- C- compression = You can warp the compression bandage on the area of pain for release to swellings & spams.
- E – elevation = You must elevate the injured part with the help of a pillow for release to swellings & spasms.
- Keep the elevated injured part for 2 to 3 hours a day.
Pain medication:
- You can also take to an anti-inflammatory drug release to muscle pain.
- The anti-inflammatory drug includes ibuprofen, aspirin & naproxen
- This drug is also reduced swellings.
- You can also apply pain relieving gel or patches such as volini gel on the area of pain.
Heat therapy:
- When not reduce the swelling & spasms after the treatment so heat therapy for 20 minutes is used to release the pain.
- It is stimulate to blood flow of the muscles to ease the tightness & help the feel better.
- You can also Try a warm towel & heating pad for heat therapy.
- But heat therapy is always used carefully because it is lead to burns on the skin so always Avoid direct contact with any heating device.
Eat antioxidants & protein:
- After soreness needs to frequently Eat antioxidants & protein in the next 24 hours because after soreness needs to body protein.
- You can use a Homemade sticky roast with the green salad & pomegranate seeds
- When you take to post-lift protein shake which is refuel the muscles.
- You can use it in protein = chicken/fish & antioxidant-rich foods = pomegranates/ kale in the hours after a tough workout.
Eating anti-inflammatory foods:
- After soreness needs to eat anti-inflammatory foods, it is more beneficial for release to soreness.
- Watermelon is best food for as anti-inflammatory foods.
- Other anti-inflammatory foods are:
- Pineapple
- Ginger
- Cherry juice anti-inflammatory foods in the watermelon include an amino acid called L-citrulline.
- This amino acid reduces the recovery of heart rate & muscle soreness.
What is Physiotherapy treatment for reliving soreness?
When the soreness is lead to serious complications & pain is not relive after some days & treatment so that need to contact the doctor & doctor is advice to physiotherapy treatment.
The physiotherapy treatment includes massage, electrotherapy treatment, foam roller exercises, exercise, stretching & yoga.
This all treatment is helpful to you relive to pain, swellings, spasms, tightness & weakness.
Massage:
- When the tender & trigger points are present in the area of soreness so the therapist is advised to massage to relieve the tender point’s pain.
- This massage is applied with the help of oil & powder to the area of pain.
- This massage is applied for 5 to 10 minutes & 3 times a day.
- This massage also helps to relieve the swellings & spam.
Electrotherapy treatment:
When the pain is severe so the therapist is advised to electrotherapy treatment for reducing to muscle pain.
The electrotherapy treatment includes to many machine for release of swelling, spasms & pain.
- When the trigger & tender points present apply to US = ultrasound therapy for release to muscle pain.
- This treatment is applied with the help of gel & applies for 5 to 10 minutes on the area of pain.
- This therapy helps you release pain & swelling.
- Reduce to pain therapist is applied to SWD = short wave diathermy, IFT = Interferential Therapy, TENS = Transcutaneous Electrical Nerve Stimulation on the area of pain.
- SWD = Short wave diathermy is hot therapy for release to spams on the area of pain.
- IFT = Interferential Therapy & TENS = Transcutaneous Electrical Nerve Stimulation is applied with the help of gel & electrodes on the area of pain.
- This therapy is applied for 10 minutes to the area of pain.
Stretching:
When the soreness occurs after a workout therapist is advised to do some stretching release to the soreness fast.
This stretching helps you release the muscle pain & tightness.
- Hamstring stretch
- Calf stretch
- Thigh stretch
- Inner thigh stretch
- Buttock stretch
- Lunging hip flexor stretch
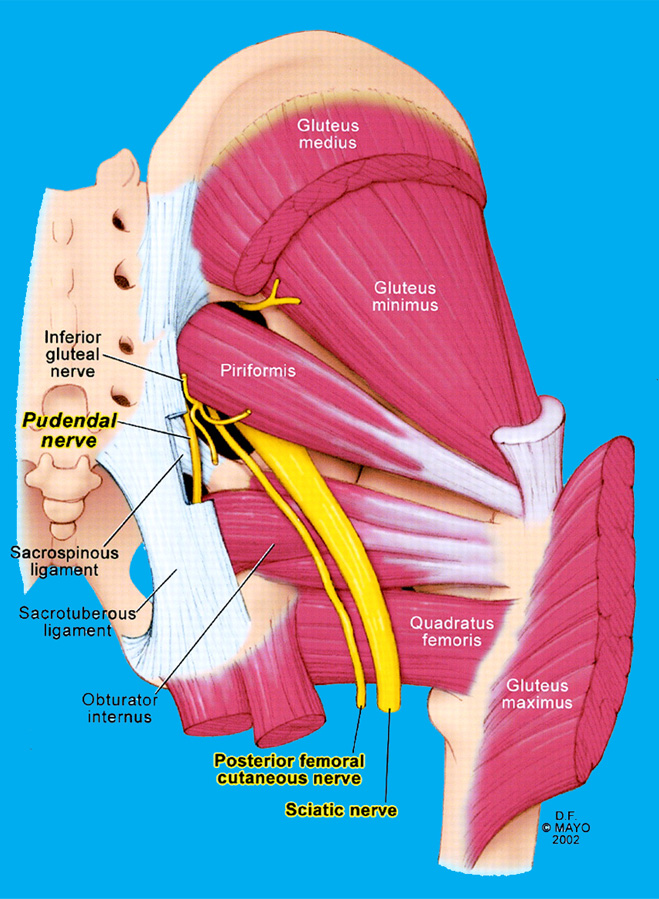
- Piriformis stretch
- Cat-Cow Stretch
- Overhead triceps stretch
- Standing bicep stretch
Hamstring stretch:
- The patient is Lying on the back & raises the right leg, must be kept straight as soon as possible.
- Cusp the hamstring muscle on the right leg with the help of both hands.
- Must be Keep the left leg bent with the foot on the floor.
- Gently bring the right leg towards the keep the straight as possible.
- Hold this stretching position for 30 seconds.
- Then Repeat with the opposite leg.
- This stretching is applied 3 times in 1 session & 3 sessions per day.
Calf stretch:
- The patient is in a standing position.
- Must be Keep the feet parallel, step forward on the right leg & bent.
- Then Lean forwards slightly.
- Must be Keep the left leg straight & gently try to lower the left heel to the ground
- Hold this stretching for 30 seconds.
- Then Repeat with the opposite leg.
- This stretching is applied 3 times in 1 session & 3 sessions per day.
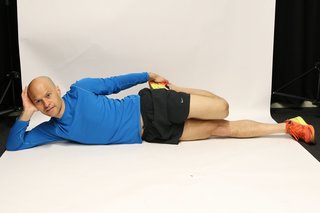
Thigh stretch:
- The patient is in the supine position.
- Lie on the right side.
- Grab the top of the left foot & gently pull the heel towards the left buttock, stretching the front of the thigh.
- Keep the try to knees touching.
- Hold this stretching for 30 seconds.
- Then Repeat with the opposite leg
- This stretching is applied 3 times in 1 session & 3 sessions per day.
Inner thigh stretch:
- The patient is Sitting down on the floor & a mat.
- Keeping the back straight, bend the legs out to the side.
- Put the soles of the feet together.
- Then Hold on to the feet or ankle.
- Gently lower the knees towards the floor.
- Hold this stretching for 30 seconds.
- Then Repeat with the opposite leg.
- This stretching is applied 3 times in 1 session & 3 sessions per day.
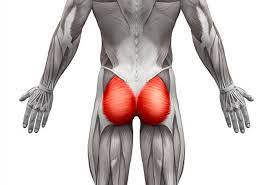
Buttock stretch:
- Lie on the back & bring the knees up to the chest.
- Cross the right leg over the left thigh.
- Grasp the back of the left thigh with both hands.
- Gently ease the left leg towards to chest.
- And hold this stretching for 30 seconds.
- Then Repeat with the opposite leg.
- This stretching is applied 3 times in 1 session & 3 sessions per day.
Lunging hip flexor stretch :
- The patient is Kneeling on the left knee.
- Must keep the right knee bent, with the right foot flat on the floor in front of you.
- Lean forward & stretch the left hip out toward the floor.
- Hold this stretching for 30 seconds.
- Then Repeat with the opposite leg.
- This stretching is applied 3 times in 1 session & 3 sessions per day.
Piriformis stretch:
- The patient is in a sitting position on the floor with the legs extended out in front of you.
- Keeping the right leg flat on the floor, lift the left leg & place the left ankle on the right knee joint.
- Then Slightly arch the back & lean forward till a stretch is felt in the buttocks.
- Hold this stretching for 30 seconds.
- Then Repeat with the opposite leg.
- This stretching is applied 3 times in 1 session & 3 sessions per day.
Cat-Cow Stretch:
- This exercise is Begin with the hands & knees on the floor, with the spine in a neutral or relaxed alignment.
- Inhale as they let the belly sink toward the floor & pressing the chest forward.
- Lift the head, relax the shoulders & begin to exhale.
- Then Round the spine upward, tucking in the tailbone & pressing the pubic bone forward.
- After that Relax your head toward the floor & repeat.
- Hold this stretching for 30 seconds.
- This stretching is applied 3 times in 1 session & 3 sessions per day.
Overhead triceps stretch:
- The patient is Stand with the feet hip-width apart & rolls the shoulders back & down to release any tension.
- Reach the right arm up to the ceiling, then bend the elbow to bring the right palm down toward the center of the back.
- Bring the left hand up to gently pull the right elbow downward.
- Hold this stretching for 30 seconds.
- Then Repeat with the opposite leg.
- This stretching is applied 3 times in 1 session & 3 sessions per day.
Standing bicep stretch:
- The patient is Standing up straight.
- Place the hands behind the back & interlace the hands at the base of the spine.
- Straighten out the arms & turn the hands so that the palms are facing down.
- Then, raise the arms as high as the patient can till they feel a stretch in the biceps & shoulders.
- Hold this stretching for 30 seconds.
- Then Repeat with the opposite leg.
- This stretching is applied 3 times in 1 session & 3 sessions per day.
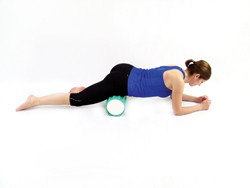
Foam roller exercises:
Foam roller exercise helps to you repair the muscles seriously & it is also decreased edema & leads to tissue healing.
- Quads
- Hip flexors
- Calves
- Hamstrings
- IT band
- Upper back
- Lats
- Shoulders
Quads:
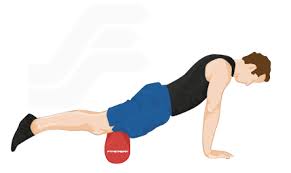
- This exercise is Start in a forearm plank position with the roller being put under the quad’s muscle.
- Bracing yourself with the upper body & core, begin to slowly roll down the roller till it reaches above the knee joint. Then, roll in the opposite direction till reaching the hip flexors.
- Do this exercise for 30 seconds.
- During the exercise When you hit a tender spot that holds the position for a few breaths.
- Repeat 3 times in 1 session & do the 3 sessions per day.
Hip flexors:
- This exercise is Start by lying down in means supine position, facing the floor on the foam roller & once again in a forearm plank position.
- Make sure the foam roller is underneath the affected hip flexor & the other leg is bent comfortably to the side.
- You are Resting on the forearms, begin to roll slowly up & down & side to side on the foam roller to target the hip flexor & give close attention to trigger points.
- Do this exercise for 30 seconds.
- Switch & repeat this exercise on the other side hip flexor.
Calves:
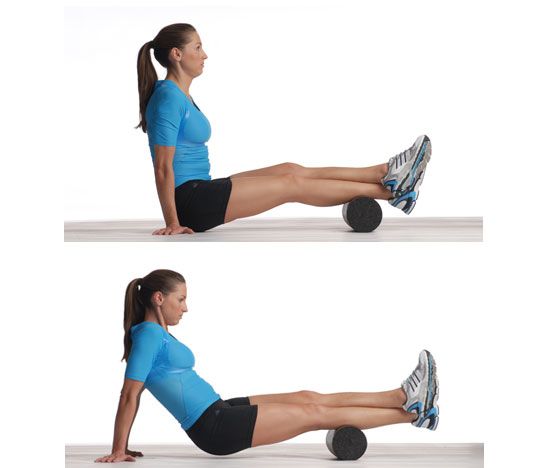
- You are Start this exercise in a sitting position on the floor with the legs are 8extended & place the foam roller under the calves.
- Lift the body so that the weight is resting on the foam roller.
- Cross the left leg over the right for extra pressure.
- Then Begin to slowly roll the right calf back & forth on the foam roller, navigating the body forward & back with the arms.
- This is Complete for 30 seconds.
- Switch the legs & focus on the left calf.
- Repeat 3 times in 1 session & do the 3 sessions per day.
Hamstrings:
- This exercise also starts with the sitting position on the floor with the legs extended.
- This time, place the foam roller underneath the hamstrings muscle.
- Lift the body so that the weight is resting on the foam roller & begin to slowly roll up or down between the back of the knee joint & glutes.
- Focus on tender spots & roll for at least 30 seconds overall.
- For the alternative way of this exercise complete the exercise again cross the legs & focus on one hamstring at a time.
- Repeat 3 times in 1 session & do the 3 sessions per day.
IT band :
- This exercise starts with lying on the right side with the foam roller placed underneath the right IT band & the side of the thigh.
- Rest the body-weight on the right forearm.
- Then do the right leg straight & the left leg must be bent at the knee joint with the foot placed comfortably in front of the right leg.
- Bracing yourself with the upper body & left leg, start to slowly roll along with the foam roller on the right IT band between the knee joint & glute muscle & stopping at tender spots.
- Do this exercise for 30 seconds, then switch to roll the left IT band.
- Repeat 3 times in 1 session & do the 3 sessions per day.
Upper back:
- This exercise starts with the supine position on the back with the foam roller placed under the upper back.
- The knee joint must be bent with the feet flat on the floor & the arms can either be down by the sides & or crossed in front of the chest.
- Brace the core muscle & lift the body into a shallow bridge position.
- Then Slowly start to roll up & down between the lower neck or mid-back.
- Do this exercise for 30 seconds
- Repeat 3 times in 1 session & do the 3 sessions per day.
Lats:
- This exercise is start in a lying position on the back at a 45-degree angle with the foam roller placed on the right lat.
- Must be Keep the right leg straight & bend the left leg into a comfortable position.
- Slowly start to roll from the right armpit down to the mid-back area & focusing on the tender areas.
- Repeat this exercise for 30 seconds.
- Switch to roll out the left lat.
Shoulders:
- The patient is lying on the side with the foam roller placed under the right shoulder.
- The lower body is resting on the ground comfortably with the left arm out in front to guide movement.
- Then Roll slowly up & down over the deltoid muscle.
- Rotate the trunk slightly so that hits part of the upper back as well if needed.
- Repeat this exercise for 30 seconds.
- Switch the sides & repeat this exercise on the left shoulder.
Exercise :
When the soreness occurs after a workout therapist is advised to do some easy exercise release to muscle pain.
This exercise depends on the area of pain.
Neck pain:
- When the soreness occurs in the neck follow the exercise :
- Head tilts = forward & back:
- Head Tilt = side to side:
- Head turns:
- Head tilts = forward & back:
- The patient is in a sitting & standing position.
- Gently blow the head & try to touch the chin to the chest.
- Then return to starting position.
- Perform 10 times in 1 session & 3 sessions per day.
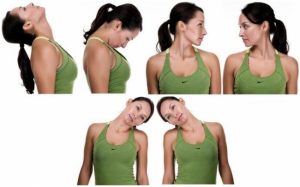
- Head Tilt = side to side:
- The patient is in a sitting & standing position.
- Then Tilt the head to the side & try to bring the ear toward the shoulder joint.
- Always take care to Do not to raise the shoulder joint to the ear.
- Then return to starting position.
- Perform 10 times in 1 session & 3 sessions per day.
- Head turns:
- The patient is in a sitting & standing position.
- Then turn the head to look over the shoulder joint.
- After that Tilt, the chin down & try to touch the shoulder joint.
- Always take care to Do not to raise the shoulder joint to the ear.
- Then return to starting position.
- Perform 10 times in 1 session & 3 sessions per day.
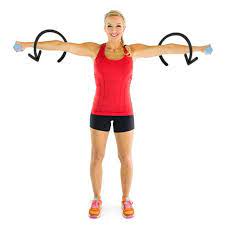
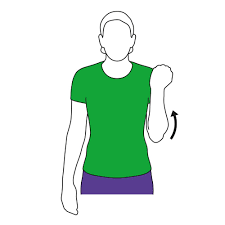
Shoulder pain;
- When the soreness occurs in the shoulder joint follow the exercise :
- Shoulder blade squeeze
- Arm circles
- Pendulum exercise:
- Wand exercise:
- Shoulder blade squeeze:
- Patient is in Standing position straight.
- Pull the shoulder blades down & back to bring the elbows back & inward.
- Hold the position for 10 seconds, then return to the starting position.
- This exercise is done 10 times in 1 session & 3 sessions per day.
- Arm circles:
- The patient is standing with the feet shoulder-width apart & the arms at the sides.
- Must be Keep the arms straight & move them around in big circles going forward.
- Do the 15 repetitions clockwise then repeat this exercise anti-clockwise.
- Pendulum exercise:
- The patient is in a standing position beside a table with the hand of the unaffected shoulder on the table & feet are slightly wider than shoulder-width apart.
- Then Bend the hip joint approximately to 75 to 90 degrees & let the affected arm hang down toward the floor.
- Shift the weight from side to side, letting the arms swing freely from side to side.
- Shift the weight forward & backward, letting the arms swing freely front to back.
- Once they feel comfortable with these movements, move the body so that the arm swings in a circle.
- Must be Keep the circle small, less than 8 inches.
- Continue for 30 seconds.
- Every day, increase the time to 3 to 5 minutes.
- Repeat this exercise 10 times per day.
- Wand exercise:
- This exercise is helpful to you for increasing ROM exercise.
- The patient is holding the wand with the help of both hands.
- Then perform the shoulder & elbow joint movement.
- Shoulder flexion,abduction,adduction,external & internal rotation & elbow flexion,extension movement perform with the wand.
Elbow pain:
- When the soreness occurs in the elbow joint follow the exercise :
- Elbow bends:
- Elbow bends:
- The patient is in a sitting & standing position.
- Then bend the elbow joint With the palm facing forward.
- Try to touch the shoulder joint with your fingertips.
- Then return to starting position.
- Perform 10 times in 1 session & 3 sessions per day.
Arm & wrist pain:
- When the soreness occurs in Arm & wrist follow the exercise :
- Wrist bends
- Wrist rotation
- Palm up, palm down
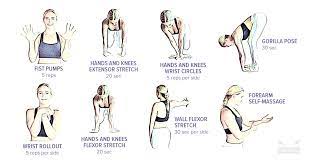
- Wrist bends:
- The patient is in a Sitting position.
- Then Bend the hand back toward the wrist joint so that the fingers are pointing toward the ceiling.
- Bend the hand down so that the fingers are pointing toward the floor.
- Perform 10 times in 1 session & 3 sessions per day.
- Wrist rotation:
- The patient is in a Sitting position.
- Move the hand from side to side.
- Roll the hand in circles clockwise.
- Roll the hand in circles the anti-clockwise.
- Perform 10 times in 1 session & 3 sessions per day.
- Palm up, palm down:
- The patient is in a Sitting position.
- Do the hand Face the palm down.
- Turn the palm so that it faces up toward the ceiling.
- Turn the palm so it is facing down.
- Perform 10 times in 1 session & 3 sessions per day.
Hand & finger pain:
- When the soreness occurs in Hand & finger follow the exercise :
- Finger bends:
- Finger spreads:
- Finger-to-thumb touches:
- Thumb-to-palm stretches:
- Finger bends:
- The patient is in a Sitting & standing position.
- Then Make a tight fist.
- Open & relax the hand.
- Perform 10 times in 1 session & 3 sessions per day.
- Finger spreads:
- The patient is in a Sitting & standing position.
- Open the hand &stretch the fingers.
- Then Bring the fingers together again.
- Perform 10 times in 1 session & 3 sessions per day.
- Finger-to-thumb touches:
- The patient is in a Sitting & standing position.
- One time, touch each fingertip to the pad of the thumb.
- Perform 10 times in 1 session & 3 sessions per day.
- Thumb-to-palm stretches:
- The patient is in a Sitting & standing position.
- Move the thumb & rest it across the palm.
- Move the palm out to the side again.
- Perform 10 times in 1 session & 3 sessions per day.
Back pain:
- When the soreness occurs in the backside do the exercise :
- Kegel
- Superman
- Bridge
- Knee to chest exercise
- Posture check
- Kegel:
- This exercise does by stopping the flow of the urine in midstream.
- This exercise starts with tightening the muscles for 10 seconds, then relaxing the muscle for 5 seconds.
- This exercise is done 10 times in 1 session & 3 sessions per day.
- Superman:
- The patient is lying on the stomach on a flat surface & raises both the arms & legs at the same time, like flying.
- Hold this exercise for 10 seconds, then return to the starting position.
- This exercise is done 10 times in 1 session & 3 sessions per day.
- Bridge:
- The patient is Lying on the back either on the floor & on a bed & arms are put at the sides, knee joint bent & feet are flat.
- Tighten the tummy & butt muscles, then lift the pelvis so that body is in a straight line from the shoulder joint to the knee joint.
- Hold this exercise for 15 seconds, then slowly return to the starting position.
- This exercise is done 10 times in 1 session & 3 sessions per day.
- Knee to chest exercise:
- Patient is to Lie on the back on the floor, then lift the one leg & bring the knee joint toward the chest.
- Hold this exercise for 10 seconds, with the abdominals muscle tight & spine pressed to the floor.
- Then Release & repeat on the other side.
- This exercise is done 10 times in 1 session & 3 sessions per day.
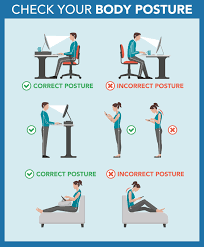
- Posture check:
- The patient is Stand with the back, buttocks & heels against the wall.
- When the patient can’t get into this position & only do it with the chin lifted, that patient needs to practice perfecting the posture.
- Place a couple of towels behind the head, then press the head & back against the wall.
- Then Imagine a patient is trying to bring the belly button toward the spine.
- Hold this posture for a minute & repeat this exercise 4 to 6 times each day.
Hip pain:
- When the soreness occurs in the hip joint follow the exercise :
- Clam-shell
- Hip extension
- Standing hip abduction
- Clam-shell:
- The patient is Lying on the side & legs are stacked or the knee joint is bent at a 45-degree angle.
- Must be Keep the heels touching, raise the upper knee as high as the patient can like an opening clamshell) without shifting the hips.
- Hold the position for 10 seconds, then return to the starting position.
- This exercise is done 10 times in 1 session & 3 sessions per day.
- Hip extension:
- Lie on the stomach with a pillow under the hip joint.
- Then extend the one leg out of the pillow.
- Hold the position for 10 seconds, then return to the starting position.
- This exercise is done 10 times in 1 session & 3 sessions per day.
- Standing hip abduction:
- Patient is in standing position, tighten the abdominal muscles & slowly move one of the legs out to the side.
- Must maintain the balance with the opposite leg.
- Hold the position for 10 seconds, then return to the starting position.
- This exercise is done 10 times in 1 session & 3 sessions per day.
Knee pain:
- When the soreness occurs in the knee joint follow the exercise :
- Straight leg raises
- Half-squat
- Knee extension
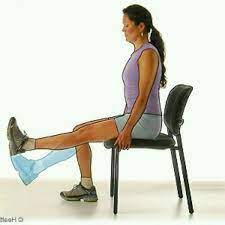
- Straight leg raises:
- Patient is Lying on the floor & elbow joint directly under the shoulders.
- Do the one leg is straight while the other leg is bent so that the foot is flat on the floor.
- Then Tighten the thigh muscle of the straight leg & raise the leg 6 to 10 inches off of the floor.
- Then Hold this position for 10 seconds, then return to the starting position.
- This exercise is done 10 times in 1 session & 3 sessions per day.
- Half-squat:
- The patient is Stand with the feet that are shoulder distance apart & hands are in front of the body.
- Then Lower the hip joint about 10 inches, as when the sitting down in a chair, with the weight in the heels.
- Hold this position for 10 seconds, then stand back up.
- This exercise is done 10 times in 1 session & 3 sessions per day.
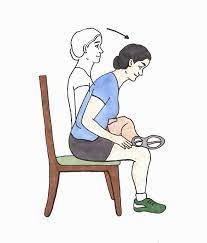
- Knee extension:
- Patient is in a sitting position at the edge of a chair.
- In the chair chest high, abdominals engaged so that your belly button in toward your spine.
- Then Slowly straighten one knee joint & raising that leg as high as possible & toes are pointed upward.
- Hold this position for seconds, then slowly return to the starting position.
- This exercise is done 10 times in 1 session & 3 sessions per day.
Ankle and foot pain:
- When the soreness occurs in the Ankle and foot follow the exercise :
- Ankle bends
- Ankle rotation
- Toe bends
- Toe spreads
- Ankle bends:
- The patient is sitting in a chair with both feet flat on the floor.
- Keep the toes on the floor & raise the heel.
- Then Lower the heel.
- Must keep the heel on the floor & raise the toes.
- Perform 10 times in 1 session & 3 sessions per day.
- Ankle rotation:
- The patient is sitting in a chair with both feet flat on the floor.
- Then Raise the foot slightly off the floor.
- Roll the ankle joint clockwise.
- After that roll the ankle joint in circles but the anti-clockwise.
- Perform 10 times in 1 session & 3 sessions per day.
- Toe bends:
- The patient is sitting position in a chair with both feet flat on the floor.
- Curl the toes down toward the sole (bottom) of the foot.
- Then Straighten the toes.
- Curl the toes up toward the ceiling.
- Then straighten the toes again.
- Perform 10 times in 1 session & 3 sessions per day.
- Toe spreads:
- The patient is sitting in a chair with both feet flat on the floor.
- Spread the toes apart.
- Bring them together again.
- Perform 10 times in 1 session & 3 sessions per day.
Yoga:
- Standing Forward Fold (Uttanasana)
- Downward Dog (Adho Mukha Svanasana) to Lunge (Anjaneyasana)
- Head to Knee Pose (Parsvottanasana Variation)
- Seated Forward Fold (Pascimottanasana)
- Single-Leg Hamstring Stretch (Janu Sirsasana)
- Seated Twist (Ardha Matsyendrasana)
- Groin Stretch
- Ankle to Knee (Supta Agnistambhasana)
Standing Forward Fold (Uttanasana):
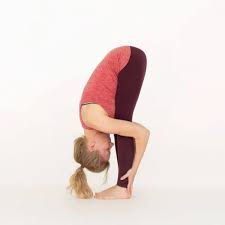
- The patient is Stand with the feet about hip-width apart.
- Must be Keep the gaze forward as the bend from the waist & lightly touch the fingertips to the ground.
- Then gently drop the head between the legs, and let it hang as they bring the hands around the outsides of the calves.
- Place the palms on the backs of the ankles.
Downward Dog (Adho Mukha Svanasana) to Lunge (Anjaneyasana):
- The patient is Stand with the feet about hip-width apart.
- Then Bend at the waist & walk the hands forward.
- Must keep the butt high in the air & shoulders away from the ears.
- Lift the right leg toward the ceiling till it forms a straight line with the torso.
- Then, bring the right leg into the chest and shift the body forward till the shoulders are stacked over the wrists.
- Must be Keep the right knee joint behind the right toes.
- Then gently drop the left knee joint to the ground.
- Square the hip joint to maximize the stretch.
- Hold for some time, then repeat this yoga on the opposite side.
Head to Knee Pose (Parsvottanasana Variation):
- The patient is starting in a low lunge with the right knee joint in front & fingertips on the ground beneath the shoulder joint.
- The right knee joint should be stacked over the right ankle joint & right thigh is parallel to the ground.
- Without lifting the hands, push up through the right heel to straighten the right leg.
- Let the head hang & come to rest on the right knee joint.
- Then Square the hips & bring both palms to the ground.
- Hold for some time, then repeat this yoga on the opposite side.
Seated Forward Fold (Pascimottanasana):
- The patient is Sitting on the floor with the legs outstretched in front of the body & feet flexed & both arms are straight up overhead. then Bend forward from the waist & bring the forearms to the outside of the legs as they let the head hang down.
Single-Leg Hamstring Stretch (Janu Sirsasana):
- The patient is Sitting on the floor with the legs outstretched in front of the feet flexed & hands in the lap.
- Bend the left knee joint & release it out to the left side as they bring to left heel into the upper thigh.
- Bend forward from the waist & bring the forearms to the outside of the extended leg as they let the head hang down.
- Hold for some time, then repeat this yoga on the opposite side.
Seated Twist (Ardha Matsyendrasana):
- The patient is Sitting on the floor with the legs outstretched in front of the feet flexed & hands in the lap.
- Bend the left knee joint & release the joint out to the left side as they bring the left heel into the upper thigh.
- Bend the right knee joint, lift the foot off the ground & place it on the floor outside the left thigh.
- Place the right hand on the floor behind for support.
- Reach the left elbow up over the right knee & press it against the knee as you twist to the right.
- Open the shoulders joint & reach the left fingertips up toward the ceiling.
- Hold for some time, then repeat this yoga on the opposite side.
Groin Stretch:
- The patient is Sitting on the floor with the knees bent & souls of the feet touching so that the knees fall out to the sides.
- Then Slowly bend forward from the waist & let the head drop toward the floor as they walk the hands straight out in front of the body.
- Hold for some time, then repeat this yoga on the opposite side.
Ankle to Knee (Supta Agnistambhasana):
- The patient is Lying on the floor on the back with the knees bent & the soles of the feet on the ground.
- Lift the right foot off the ground & turn the knee out to the right and place the outside of the right ankle on top of the left thigh.
- Must be Keep the lower back on the floor, take both hands behind the left thigh.
- Pull the left thigh in toward the chest and press into the right thigh with the right forearm.
- Hold for some time, then repeat this yoga on the opposite side.

One Comment