15 Best Exercises For Calf Muscle Tear
Find the most effective Exercises For Calf Muscle Tear to speed up recovery, lessen pain, and build back strength. You can effectively heal from a calf tear by learning safe stretching and strengthening Exercises For Calf Muscle tears.
Table of Contents
Introduction:
A common condition that can keep both athletes and regular people out of action is a calf muscle tear, also known as a calf strain. This injury requires a planned rehabilitation strategy to promote full healing and prevent re-injury, regardless of whether it occurred due to sudden movements, overuse, or a poor warm-up.
There are two primary muscles in the calf:
- The bigger muscle that is visible on the back of your lower leg is called the gastrocnemius.
- A deeper muscle beneath the gastrocnemius is the soleus.
Mild (Grade 1) to severe (Grade 3) tears or strains are possible. Depending on the severity of the injury and the stage of recovery, various rehabilitation exercises will be employed.
Calf muscle strains are a common injury in sports. A calf strain can happen when the muscles in the rear of the lower leg are overextended. Anyone, regardless of age or athletic ability, can experience them. However, running activities involving high volume, speed, and slowing down, and speed are the most common causes of these injuries.
They can be extremely painful and frequently caused by sudden movements, such as sprinting or jumping. As a result, calf strains are common in activities including casual running, football, rugby, and tennis.
A severe calf strain can cause a partially or totally torn calf muscle; however, most calf injuries are minor. You should consult a physician right away, regardless of how serious your injury is. You can resume your favorite sports and hobbies sooner with an early diagnosis and course of therapy.
It frequently takes quite some time and a lot of work for an individual to recover from a calf injury. An effective exercise regimen is essential for treating muscle injuries, and understanding how to approach it can greatly speed up healing.
Causes:
Sudden Increase in Speed or Running
- The main cause, especially in sports like basketball, tennis, soccer, and track.
- Because the calf contracts rapidly, sudden shifts in direction or speed enhance the risk of tearing.
Excessive Use and Tiredness
- Muscle fibers might become weaker and less elastic when the calf muscles are used repeatedly without enough rest.
- Fatigued muscles become less coordinated and timed, which increases the risk of tearing while exercising.
Unsuitable Footwear
- Shoes that don’t offer enough arch support or cushioning can affect muscular performance and gait.
- Because high heels reduce the calf muscle and Achilles tendon, they increase the risk of strain during daily tasks.
Muscle Imbalance
- Normal biomechanics are altered if specific muscle groups (such as the hamstrings or quadriceps) are noticeably tighter or stronger than the calves.
- The calf is subjected to an excessive amount of strain when sprinting, jumping, or walking because of this imbalance.
A history of Achilles or calf injuries
- Risk is increased by a history of calf strain, Achilles tendonitis, or muscle stiffness.
- Muscles with scar tissue from previous traumas may become less flexible and more prone to tearing.
Not Warming Up Enough and Not Being Flexible
- Unstable muscles are less able to tolerate unexpected strains.
- Lack of a warm-up reduces blood flow and muscular flexibility, which raises the chance of injury.
Poor Conditioning or Deconditioning
- Calf muscles that are not properly developed or weak cannot withstand severe force.
- The risk is increased for sedentary people who unexpectedly start doing intense activities.
Degeneration Associated with Age
- Muscle fibers and connective tissues become less supple and hydrated as we age.
- Partial or total tears are more common in older persons, particularly during sudden or forceful movements.
Poor Technique or Training Mistakes
- Ineffective running or leaping technique is the reason for the uneven tension in the calf.
- You can suddenly increase the duration, intensity, or location of your training.
Excessive Muscle Stretching
- It happens when you lunge or jump, for example.
- When muscles are cold or not properly warmed up, it can be especially harmful.
Biomechanical abnormality
- Overpronation, flat feet, or variations in leg length can all result in uneven calves.
- When a muscle is loaded or positioned incorrectly, it experiences stress.
Signs and symptoms:
Sharp, Unexpected Pain
- This is a common occurrence when engaging in activities that involve the lower legs.
- It is said to be “pulling,” “tearing,” or “snapping.”
- It could occur while you’re jumping, running, or doing quick movements.
The sensation of popping or snapping
- At the time of injury, some people have heard or felt a “pop” or “snap.”
- This indicates that the muscle fibers are torn, either completely or partially.
Swelling that has increased
- After an accident, it may appear immediately, or it may take several hours.
- Spread more broadly over the lower leg or limited to the region around the tear.
Weakness of Muscles
- Plantar flexion, or pushing the foot downward, causes a visible loss of strength.
- The ability to leap, climb stairs, and stand on your toes is compromised.
Bruising
- Within a few hours or days, bruising (discoloration) may appear due to internal bleeding from the tear.
Tightness or Rigidity
- This is a typical symptom following an accident,
- Especially in the morning or after sitting.
- Either as a result of muscle guarding, partial spasm, or inflammation.
Sensitivity
- Pain when the affected portion of the calf is compressed or touched.
Visible Defect or Gap
- A noticeable dent or gap where the muscle fibers have separated may be felt in cases of severe tears.
- This frequently comes with severe bruising and edema.
Delays in Symptom onset
- Mild tears can sometimes not hurt very much right away, but as inflammation develops, they get worse over the course of 24 to 48 hours, becoming stiff and uncomfortable.
Exercises With a Calf Tear:
Your physiotherapist might suggest the following exercises while you heal. However, until you speak with your treating physician, do not try exercising at any point throughout your recovery.
Range of motion
- Exercises for Range of Motion During the initial stage of recovery, you and your physiotherapist can practice these exercises within a range of motion that doesn’t cause pain.
- These could include range-of-motion exercises, which occasionally involve the use of a wall or an elastic band.
Stretching
- Stretching.. With a doctor’s approval, you can incorporate calf stretches into your exercise therapy regimen.
- Stretching should only start once the acute phase of the injury has been treated and your foot’s bending pain is gone.
Walking
- Your physiotherapist may encourage you to resume walking as you heal by having you utilize stair machines, climb stairs, or walk on level, hard surfaces.
- Once you can bear weight on the leg, you can begin with short walks.
Advantages of exercise:
Increases Range of Motion
- Leg movements become more fluid and pain-free when the entire range of ankle and knee motion is restored through stretching and mobility exercises.
Encourages Quicker Recovery
- Exercises that are mild and progressive improve blood flow to the wounded calf, delivering nutrients and oxygen that speed tissue healing and repair.
Increases Blood Flow and Decreases Scar Tissue
- Frequent exercise improves muscular flexibility and healing results by promoting circulation and preventing the production of excessive scar tissue.
Restores the normal pattern of gait
- In order to maintain an even weight distribution and avoid compensatory injuries, rehabilitation exercises help in training proper walking and running mechanics.
Keeps Your Muscles From Being Stiff
- Early mobility exercises maintain the calf muscles’ flexibility, avoiding contractures and tightness that may develop from extended rest.
Strengthens Muscles
- Following injury, strengthening exercises aid in the regeneration of muscle fibers and enhance the general strength and stamina of the gastrocnemius and soleus muscles.
Lessens Swelling and Pain
- Stretching exercises and controlled movement assist avoid stiffness and fluid buildup, which progressively lessens pain and swelling in the affected area.
Avoids Re-Injury
- Stability is improved, and the chance of future muscle injury is decreased with gradual calf strengthening combined with sense of direction and balance exercises.
Enhances Functional Performance
- Functional training helps people get back to their regular activities, sports, and physical labor without experiencing any pain or limitations.
Enhances Self-Belief and Mental Health
- Resuming physical activity under supervision promotes mental healing by lowering fear of re-injury and increasing movement confidence.
Exercises For Calf Muscle Tear:
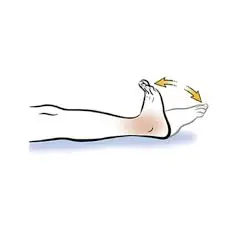
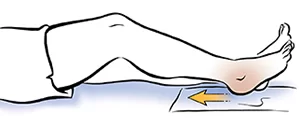
Ankle pump
- Sitting or lying down, spread your legs.
- Your legs should stay supported and at ease.
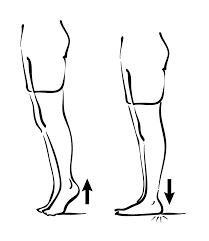
- Plantar flexion is the movement of your toes away from you as you press the gas pedal.
- Dorsiflexion is the following phase, which involves pinching your toes together and flexing your foot.
- Keep going in this motion, which is stable and flexible.
- Then return to your neutral position.
- Then relax.
- Repeat these exercises five to ten times.
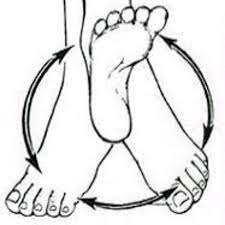
Ankle circle
- Start with the seating position on the table or chair.
- Only move your ankle while maintaining the stability of your leg.
- Turn your foot in clockwise circles, slowly and carefully.
- Finally, after 10 to 15 rotations, turn counterclockwise.
- Then return to your neutral position.
- Then relax.
- Repeat these exercises five to ten times.
Heel Slides
- Your back should be on a level surface, like a mat or bed.
- Maintain your composure while extending both legs.
- As you carefully bend your injured knee, slide your heel toward your buttocks.
- Maintain a foot on the bed or floor during the action.
- Avoid excessive bending and stop at a comfortable length.
- Hold this position for a few seconds.
- Slowly move your leg back to the starting position.
- Then return to your neutral position.
- Then relax.
- Repeat these exercises five to ten times.
Standing Calf Raises
- Ensure that your feet are hip-width apart and your toes are pointed forward.
- Place your hands on an upright surface, such as a countertop, chair, or wall, to help you stay balanced.
- Keep your lower back from arching, and use your core muscles to keep your posture straight.
- Keep your knees slightly bent to increase control.
- Gently lift your heels off the ground by applying pressure to the heel of your feet through your foot rather than your toes.
- Stand tall for a few seconds at the top of the exercise by using your calf muscles.
- Return your heels to the floor gently while managing your lower body and avoiding gravity.
- Make sure you maintain proper posture and balance during the exercise.
- Then return to your neutral position.
- Then relax.
- Repeat these exercises five to ten times.
Seated Calf Raises
- Place your feet hip-width apart on the floor and sit upright on a supportive chair.
- For support, lightly place your hands on your thighs.
- Keep your stance straight.
- Raise your heels off the ground slowly and stand up on your feet.
- Avoid bending too much forward or backward.
- Don’t bounce and move carefully.
- Put equal pressure via both feet.
- Take a few seconds to hold this position.
- As you raise and drop, exhale and inhale, respectively.
- Then carefully lower your heels once again.
- Then return to your neutral position.
- Then relax.
- Repeat these exercises five to ten times.

Single-leg calf raise
- Hold the back of a strong chair for support while you stand behind it.
- Lift one foot off the ground while maintaining a straight or slightly bent knee.
- To make it more difficult, you can either keep the other foot off the ground or hold it up.
- As high as you can, slowly rise onto the ball of the standing foot while maintaining an engaged core.
- Hold this position for a few seconds.
- Then return to the initial position by lowering your heel slowly and carefully.
- Then return to your neutral position.
- Then relax.
- Repeat these exercises five to ten times.

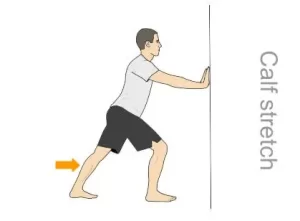
Standing calf stretch
- With your feet hip-width apart, stand with your hands supporting you on a wall or chair.
- Keep an upright body and a straight stance.
- With the back leg straight and the heel flat on the ground, take one leg and step it back two or three steps behind you.
- Make sure your front knee is slightly bent and your toes are pointed forward.
- The heel of the back leg should be carefully pressed down toward the floor.
- The back of your leg and even the back of your calf should feel stretched.
- Take a few seconds to hold this position.
- Keep your posture straight and avoid arching your back.
- Take deep breaths and be mindful of your relaxation during the stretch.
- Slowly release the stretch, then get back up.
- Then return to your neutral position.
- Then relax.
- Repeat these exercises five to ten times.
Seated calf stretch
- The seating position should come first.
- Spread your leg wide after that without bending your knee.
- Securely wrap a resistance band around the sole of your foot with both hands.
- With a gentle exhale, direct your toes at yourself and slowly drag the band toward you.
- Your calves should extend as a result of this.
- The stretch can be made more intense by pushing your heel away from you.
- Until the stretch hits its tension point, keep pulling the band.
- Then return to your neutral position.
- Then relax.
- Repeat these exercises five to ten times.

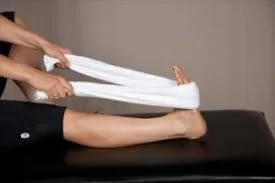
Seated Towel Stretch
- Grasp a bath towel or a strong strap that is roughly the same length as a towel.
- Extend both legs straight out in front of you as you sit down.
- To get the foot flat on the floor, bend the leg that is not injured.
- It helps you maintain stability.
- To feel a mild stretch in your calf, grasp both ends of the towel, hook it on your forefoot, and pull your foot back.
- Hold this position for a few seconds.
- Then return to your neutral position.
- Then relax.
- Repeat these exercises five to ten times.
Ankle Plantarflexion with Resistance Band
- Sitting on the floor, extend the leg that is affected.
- The heel of your foot should be wrapped in a resistance band.
- Put pressure on both ends of the band with your hands.
- Point your toes forward gradually as you push against the band’s resistance.
- Hold this position for a few seconds.
- Then return to your neutral position.
- Then relax.
- Repeat these exercises five to ten times.

Ankle Dorsiflexion with Resistance Band
- Sit on the floor
- Keep your injured leg extended.
- Put a resistance band around the top of your foot.
- Secure the other end of the band to a sturdy object or have someone hold it.
- Keep your knee straight and relaxed.
- Slowly raise your foot (toward your shin) against the band’s pressure.
- Hold this position for a few seconds.
- Then return to your neutral position.
- Then relax.
- Repeat these exercises five to ten times.

Toes on the Wall Stretch
- Position yourself approximately one foot away from a wall.
- One foot should be placed with its heel on the floor, and the other against the wall.
- Keep your other foot flat on the ground a little bit behind you for balance.
- Gently bend forward in the direction of the wall until your leg and underfoot start to stretch.
- Don’t stoop forward; instead, maintain an upright posture.
- Don’t jump; instead, enter the stretch fluidly.
- For upper calf stretches, keep your heel down and your knee straight; for lower calf stretches, slightly bend your knee.
- Hold this position for a few seconds.
- Then return to your neutral position.
- Then relax.
- Repeat these exercises five to ten times.

Single-leg stands
- Start by standing up straight, keeping your arms by your sides, and placing your feet hip-width apart.
- Make sure your posture is upright and balanced.
- Gradually transfer your weight to one leg while maintaining the second leg slightly elevated off the floor.
- You can either maintain your lifted leg straight or bend it at the knee, depending on your level of comfort.
- Raise the other leg off the ground to balance on one foot.
- You can bend the lifted knee slightly or extend it straight in front of you or to the side for more challenge.
- Be mindful of keeping your body stable and balanced.
- To hold this position for a few seconds, keep your posture straight and contract your standing leg’s muscles.
- Try to maintain the balance by focusing your attention on whatever is in front of you.
- Then return to your neutral position.
- Then relax.
- Repeat these exercises five to ten times.

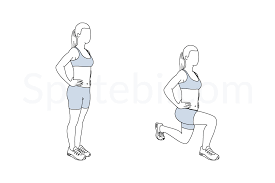
Lunges
- To start, stand up straight and place your feet hip-width apart. Take a big stride forward with your right foot.
- Make sure your knees and toes are in alignment as you lower your body.
- Bend your left rear leg as you descend, making sure your knee is just above the floor but without contacting it.
- Lower yourself until both knees are at 90 degrees.
- Keep your right front knee from extending past your toes.
- You should maintain a straight posture with your left back leg almost touching the floor and your chest wide.
- Use the heel of your front foot to push through and return to your starting position.
- Keep your core active to help you stay stable.
- Then return to your neutral position.
- Then relax.
- Repeat these exercises five to ten times.
Eccentric Heel Drops
- With both of your feet’ heels on the edge, place your heels hanging off the edge of a step or other raised surface.
- Make sure your posture is correct and your posture is straight.
- To increase your balance during the workout, maintain your knees straight but not locked, and use a wall or guardrail for support.
- To begin, raise both heels as high as you can to stand on your toes.
- Tighten your calf muscles as you raise.
- Take a few seconds to hold this position.
- With constant lowering of your heels below the step level, you enter the eccentric phase.
- In a few seconds, try to fully lower your heels by focusing on controlling the descent.
- Make an effort to move smoothly and avoid dropping your heels suddenly.
- Strength increases occur during this eccentric action, so the slower the better.
- Then return to your neutral position.
- Then relax.
- Repeat these exercises five to ten times.

Which safety precautions need to be taken when working out?
Prioritize getting enough rest and sleep.
- To allow for healing, schedule rest days in between sessions.
- To promote bone repair, balance rehabilitation with enough sleep, hydration, and nutrition.
Warm up and cool down.
- A gentle warm-up improves circulation and activates the nerves and muscles.
- Cooling prevents stiffness and lowers inflammation.
Proceed slowly.
- Gradually increase the resistance, range of motion, and repetitions.
- Don’t start running, jumping, or doing exercises specific to your sport until you’re fully recovered and under a doctor’s supervision.
Be mindful of pain and exhaustion.
- Having some soreness in your muscles is normal.
- Avoid ignoring severe pain, as this may indicate re-injury.
Keep Your Posture Correct
- Throughout each exercise, maintain a neutral stance for your hips, knees, and feet.
- To guarantee form, use mirrors, wall support, or supervision.
- An incorrect posture can put stress on the surrounding muscles or joints.
Do not move in painful ways.
- You should immediately stop exercising if you feel acute or ongoing pain.
- A strong pinching or pulling feeling is a sign of improper technique or overuse.
Breathe Frequently
- Your body is overworked when you hold your breath.
- Throughout the exercise, take slow, even breaths that can help in muscle relaxation.
Stretch carefully and gradually.
- Avoid jumping or overstretching.
- Hold each stretch for a few seconds without using too much force.
After working out, relax.
- Muscle stiffness and relaxation can be avoided by breathing deeply and stretching slowly.
- Avoid quitting quickly without engaging in any recovery exercises.
When did you stop exercising?
Indications of Overuse or Fatigue
- Continue for 24 to 48 hours following your exercise session.
- Feeling too worn out to perform rehabilitative exercises or simple movements.
Decreased Range of Motion or Power
- Your range of motion may decrease instead of increasing.
- If your legs start to feel weak.
Muscle tenseness or cramping
- If you get lower back cramps or spasms, stop exercising.
- Your muscles might not be ready for this level of work or may be strained.
Increased Pain While or After Working Out
- Typically, rehabilitation exercises result in very little pain.
- If your pain increases while you move, either quit the workout or switch it up.
- It doesn’t go away with time; the pain lasts for over an hour or two after a workout session.
Breathlessness or lightheadedness
- Watch out for dizziness, particularly when exercising.
- Excessive exercise or poor breathing technique could be the cause.
Muscle atrophy or ineffectiveness
- Repetition cannot be done correctly.
- Weakened or exhausted muscles are felt.
Burning, tingling, or numbness
- These indicate overstimulation or nerve compression.
- Stop right away and take a break to rest.
- See your physician if it continues.
Stability or Weakness Loss
- To avoid more harm, stop if you feel weak or unstable.
- If any of these symptoms occur, put on ice, stop working out, and relax.
Which exercises should you stay away from if you have a calf muscle tear?
As your calf heals from a gastrocnemius or soleus strain, it’s important to avoid activities that strain the muscle. If done too soon, it could worsen the rupture, take longer to heal, or result in long-term problems.
Running or Jogging
- is a high-impact activity and often requires doing calf contractions.
- In its early stages, a torn calf can be made worse by even walking quickly.
Jumping Exercises
- Burpees, box jumps, plyometrics, jump rope, etc.
- All of these rely significantly on the calf for both landing and movement.
Squats and Lunges (particularly Deep or Explosive Types)
- Walking lunges
- Split squats
- Jump squats
- Bulgarian split squats
While the glutes and quadriceps are the focus of these exercises, the calves may also be worked through stabilization and ankle extension, particularly when performed dynamically or with additional weight. Until the calf is strong enough to stabilize the ankle joint, modify or skip these exercises.
Step-Ups and Climbing Stairs
- The calf is stretched and contracted throughout both exercises.
- Problems can arise even when utilizing a stair climber.
Walking on an incline or using a treadmill
- More strain is placed on the posterior chain, particularly the calf muscles, when walking up an incline.
- The risk of overstretching or overusing the damaged calf is further increased when hiking on uneven surfaces.
Cycling with High Resistance or Sprint Intervals
- With each pedal stroke, cycling, particularly at high speeds or with resistance, activates the calf muscles.
- Cycling sessions or hill climbs significantly stimulate calf activity.
How can a calf muscle tear be prevented?
Calf tears are frequently caused by vigorous activity, particularly during sporting events. Preventive measures can therefore help lower the likelihood of calf injury.
Maintaining good health and avoiding possible problems requires preventing further muscle tears. Simple techniques like strength training, a correct warm-up, a gradual increase in the intensity of calf muscle tear exercises, and regular hydration help lower the risk of injury and improve long-term sports performance.
Techniques for Warming Up and Being Flexible
- By increasing muscular mobility and range of motion, flexibility, and warm-up practices are essential for reducing calf muscle injuries.
- Leg swings and calf stretches are examples of dynamic stretches that improve blood flow and prime muscles for action, lowering the chance of sprains or tears during exercise.
Strength Training Activities
- Through the promotion of muscle healing and the prevention of re-injury, strengthening exercises are essential in the management of calf muscle tear injuries.
- Tear in the calf muscle..e Strength, flexibility, and endurance are enhanced by workouts including resistance band exercises, heel drops, and calf raises.
- It can also lower the chance of future injuries.
Wear suitable shoes.
- Wear supportive, well-fitting footwear that suits your activities.
- To keep the calves from experiencing unequal stress, replace worn-out shoes.
Keep Your Technique and Posture Correct
- The calf may be strained by improper jogging or jumping technique.
- To have your form evaluated, think about speaking with a trainer or physiotherapist.
Give Enough Time for Recovery
- To allow muscles to get used to and heal, take a break in between sessions.
- Calf injuries often come on due to tiredness and overuse.
Maintain Your Nutrition and Hydration
- Muscle cramps caused by low electrolytes and dehydration raise the risk of damage.
- Make sure you’re getting enough calcium, magnesium, potassium, and water.
When to Consult a Physician or Physiotherapist:
Consult a specialist if:
- Activity makes the pain worse.
- Swelling does not get better.
- During an injury, you hear a popping sound.
- You are unable to support your weight.
- Repeated stresses happen
Summary:
Overstretching a calf muscle can result in a calf strain, often known as a pulled calf muscle. Your calf muscles run from the base of your thigh to your heel and are located in the lower leg, behind your shin bone (tibia). They assist you in bending and flexing your knee, ankle, and foot. You may have pain and be unable to run, jump, or engage in other activities due to a strained calf muscle.
Although calf tears can be uncomfortable and upsetting, you can heal quickly and securely with the correct care. An essential component of the healing process is physiotherapy is a great option for your treatment.
Once the pain is gone, a physician or physiotherapist may advise total rest combined with mild stretches, depending on the extent of the injury. After receiving treatment for the injury, you can gradually resume your regular workout routine.
It requires patience, time, and proper workouts to recover from a calf muscle strain. You can safely regain your strength, flexibility, and function by following a thorough rehabilitation program.
FAQ:
What is a calf muscle tear?
The two main muscles in your calf, the gastrocnemius and soleus, can sustain a tear when their fibers are overstretched or damaged. It often comes on by rapid speed, leaping, or overstretching when exercising.
What signs and symptoms are typical of a calf tear?
A sudden, severe ache in the lower leg’s back
Inflammation ofruises
Having trouble pushing off your toes or walking
A “popping” sound at the site of the injury
Tightness or tenderness in the calves
What causes tears in the calf muscles?
Running or suddenly taking off
Plyometric or jumping workouts
Improper warm-up
fatigued muscles or a history of injury
Overstretching or overuse
If my calf muscle is injured, should I stretch it?
No. An injury can worsen if a torn muscle is stretched too soon. Only stretch lightly under a doctor’s supervision and wait until you’re in the final stages of rehabilitation.
When can I start working out or playing sports again?
Once your strength and suffering are gone, you will gently return.
It may take two to twelve weeks to complete a return.
You can receive sport-specific rehabilitation guidance from a physiotherapist.
What can I do to avoid tearing my calf muscles again?
Before working out, fully warm up.
Build up your glutes, hamstrings, and calves.
Increase the mobility of your feet and ankles
Don’t increase your exercise intensity too quickly.
Regularly stretch once the muscle has recovered.
Which is better for a calf tear: heat or ice?
To lessen swelling, ice is preferable during the first 48 to 72 hours.
After the edema is gone, heat may be useful for improving blood flow and relaxing muscles.
How soon after a calf muscle tear can I resume exercising?
Depending on the severity of the tear, you can begin mild rehabilitation exercises as soon as the acute pain and swelling go away, which should happen in a few days to a week. But before you begin, always get advice from a physiotherapist.
With a torn calf muscle, is it still possible to walk?
A calf tear is usually classified as a grade 2 or grade 3 injury. You won’t be able to walk without pain due to the severe pain. A calf strain, on the other hand, is usually classified as a grade 1 injury. You might experience some pain, but it shouldn’t be too bad for you to walk.
Will a calf muscle tear heal itself?
Treatment for torn calf muscles varies depending on the severity of the injury and the limits it creates. Rest, ice, and other conservative measures are typically effective for small strains, allowing for good healing in a few weeks.
After a calf muscle tear, how long should I rest?
It might only take a few weeks to repair a grade 1 strain. Limiting activities as prescribed by a doctor is necessary for a more severe grade 2 tear, which can take up to two months to heal. Healing from grade 3 strains may take several months. To stabilize your leg in the event of a serious strain, you might need to wear a brace.
Which workout is most effective for calf pain?
Standing calf raise
Seated calf raise
Ankle pump
Ankle toe movement
Standing calf stretch
Seated calf stretch
References:
- Physio, S. (n.d.). Surrey Physio’s Top 5 Exercises for Calf Strains. The Surrey Physio. https://www.surreyphysio.co.uk/top-5/ideal-5-calf-strain-exercises/
- R. B. Taylor (2025, January 2).Top exercises for building stronger calf muscles. Web-MD. This link will help you strengthen your calf muscles.
- Strain in the calf (pulled calf muscle). June 10th, 2025. The Cleveland Clinic. There is a pulled calf muscle at https://my.clevelandclinic.org/health/diseases/21558
- April 3, 2025: SportsMed, Y. The Top 5 Exercises for Recovering from Calf Strains, Toronto Physiotherapy | Yorkville Sports Medicine Clinic. Toronto physiotherapists | Yorkville Sports Medicine Clinic. The top five exercises for recovering from calf strains can be found at https://www.yorkvillesportsmed.com/blog.
- July 31, 2025: Felman, A. When you have a strained calf, what workouts can you perform? DailyHealth.com. Exercise can cause strained calves, according to https://www.everydayhealth.com/orthopedic-conditions/.
- Brahmbhatt, A. April 25, 2024. The causes, symptoms, diagnosis, and treatment of calf muscle tears. Samarpan blog. Physiotattva.com/blog/muscle-tears-the-calf-and-hamstring-focus
- Eske, J. May 23, 2023. How to recognize, diagnose, and heal a pulled calf muscle. Articles/326431, https://www.medicalnewstoday.com
- On March 11, 2024, Ocs, T. P. D., Eight exercises to recover from a calf strain. Tim and I Have PT Time. These exercises are for calf strains: https://pttimewithtim.com/
- Massage and calf strain exercises. January 1, 2023. Calf strain exercises and massage: https://www.melbournesportsphysiotherapy.com.au/blog/2023
- Image 5, Seniors Health & Fitness | More Life Health | Seated Calf Raises Exercise | Strengthening Your Ankles and Lower Legs (n.d.). Senior Fitness & Health at More Life Health. Sitting calf raises: https://morelifehealth.com/content.
- Image 6, Calf-raise-single-leg_-step_1.max.v1.Chair-assisted (2012, December 14). Chair-assisted calf-raise single-leg-_step_1-max-v1/ http://jonesee90.wordpress.com/2012/12/14/here-are-the-12-moves-of-Christmas-love-your-trainer-Jenn
- Image 8, , T. Test (2025, Feb. 9). Leg stretch while seated. India Body Building. Sitting Calf Stretch https://www.bodybuildingindia.com/blogs/blog/seated-calf-stretch?srsltid=AfmBOooE-di9qH8ebL9rPjPnub-HSmBPdcRidW5CdbCheKDS67VeQj6g
- Image 11, Andries Lodder, biokineticist, Dorsi-Flexion-Resistance-Band | Bio4Me (2019, November 4). Andries Lodder, Biokineticist | Bio4Me. https://www.bio4me.co.za/2019/11/ankle-sprains/dorsi-flexion-resistance-band/
- Image 15, (2018, June 19) Bowler, T. Preventing Injury While Running… Is the “Running Bug” bothering you now that spring has arrived? — Dr. Tammy Bowler, Huntsville chiropractor, is back in balance in Muskoka. Dr. Tammy Bowler, Huntsville chiropractor, is back in balance in Muskoka. Chiropractic health articles and resources for 2018/6/18/running injury prevention: http://backinbalancemuskoka.ca. Having the running bug now that spring has arrived?