Deformity Of Toes
Table of Contents
Description
Toe deformities are frequent problems that happen due to abnormal positioning of the foot bones, insufficient biomechanics, and diseases like arthritis affecting the bones and tissues of the foot.
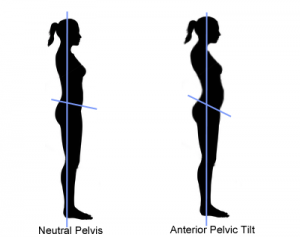
Toe deformities not only influence the alignment of the bones, joints, and tissues in the foot but can also influence the alignment of the weight-bearing joints like the hips or knees resulting in further problems. The most ordinary toe deformities are hammertoes, claw toes, and mallet toes.
Quick description of foot anatomy
- Anatomically the foot is split up into the forefoot, midfoot, and hind foot.
- The Forefoot has 4 tiny toes called phalanges and 1 large toe called the hallux or big toe.
- Phalanges have three bones and three joints, while the big toe has two bones and two joints.
- The midfoot and hind foot have different structures, which are accountable for bearing body weight and performing activities like walking and running.
Causes
- Toe deformities can be congenital, present at birth, or may happen later in life from wearing improperly fitted shoes or high-heeled shoes.
- Few disease conditions like diabetes, stroke, osteoarthritis, and rheumatoid arthritis influence the functioning of muscles and nerves and may cause tightening of ligaments or tendons resulting in these deformities.
- In some other cases, accidents or injuries may result in fractures and lead to toe deformities.
- Toes are the digits in the foot and are connected with walking, providing balance, weight-bearing, and other activities.
- A variety of toe deformities happen in children’s feet.
- They are as follows:
- Hallux Valgus:
- Hammertoe:
- Mallet Toe:
- Claw Toe:
- Curly Toe:
- Polydactyly:
- Syndactyly:
- Bunionette (Tailor Bunion):
- Hallux rigidus
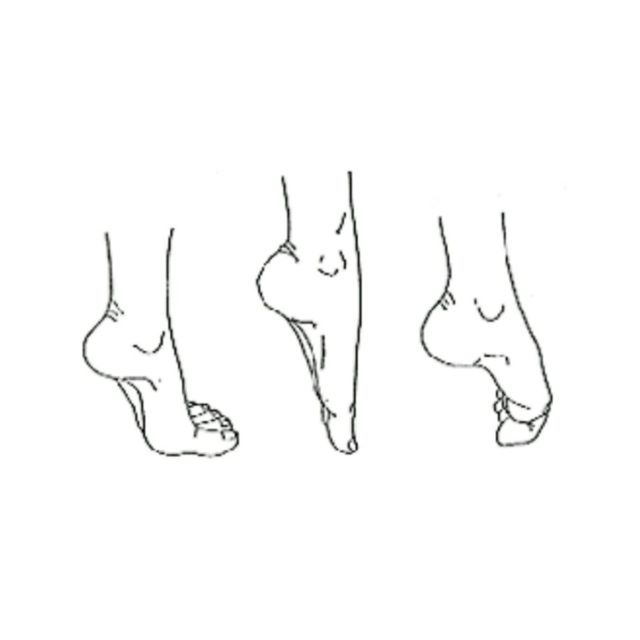
1-Hammer Toe
- A hammer toe is the deformity of the second, third or fourth toes.
- In this situation, the toe is bent at the middle joint, so that it looks like a hammer.
- At first, hammer toes are flexible and may be corrected with simple measures but, if left untreated, they may become fixed and require surgery.
Anatomy
- The forefoot is made up of five toes. Each toe has three joints—except for the first (big) toe, which generally has only two joints.
- In hammer toe, the injured toe is bent at the middle joint, which is called the proximal interphalangeal (PIP) joint.
- PIP joint-This demonstration of hammer toe shows the abnormal bend of the PIP joint.
Cause
- Hammer’s toe results from a muscle imbalance that places pressure on the toe tendons and joints.
- Muscles work in doubleton to straighten and bend the toes.
- If the toe is bent in one position long enough, the muscles and joints tighten and may not stretch out.
- Wearing shoes that do not fit accurately is a common cause of this imbalance.
- Shoes that are restricted toward the toe push the smaller toes into a flexed (bent) position.
- The toes buffing against the shoe, ruling to the formation of corns and calluses, which further exasperate the condition.
- Shoes with a higher heel force the foot down and push the toes as opposed to the shoe, increasing the pressure and the bend in the toe.
- After some time, the toe muscles may no longer straighten the toe.
Risk factors
- Elder individuals are more likely to develop hammer toes. females are at higher risk, because of the construction of women’s shoes.
- Injuries to the toes, and being born with a big toe that is short in contrast to the second toe, increase risk.
- Arthritis and diabetes can also enhance the risk of foot deformities.
Symptoms
- A hammer toe is painful, specifically, when the patient is moving it or wearing shoes.
Other symptoms may include:
- Swelling or redness
- Not able to straighten the toe
- Difficulty walking
- A corn or callus on the higher point of the middle joint of the toe or on the tip of the toe.
Doctor Examination
Physical Examination
- The doctor will perform a physical examination to identify if the toe joint is flexible or rigid.
- These statistics will help him or her committed to the appropriate treatment.
Tests
X-rays-
- X-rays give images of dense structures, like bone.
- The doctor may order an x-ray of the foot to confirm the diagnosis.
Other tests-
- Patients who have diabetes or reduced sensation in their feet can require further testing to identify whether a neurological condition is the cause of the tendon imbalance.
Treatment
Nonsurgical Treatment
- In the early stages of hammer toe, when the joint is still flexible, treatment generally consists of simple measures.
Changes in footwear-
- The doctor will recommend that patient should avoid wearing tight, narrow, high-heeled shoes.
- Shoes should be one-half inch longer than the longest toe, which, for too many people is the second toe, and have a soft, roomy toe box.
- The patient may also be able to find out a shoe with a deep toe box that fits in with the hammer toe.
- A shoe repair shop can be able to stretch a toe box so that it bulges out around the toe.
- Wearing sandals can help, if they do not pinch or rub some other areas of the foot.
Exercises-
- Specific exercises may help stretch and strengthen the muscles in the foot.
- The patient’s doctor may recommend gently stretching the toes manually or using the toes to pick things up off the floor.
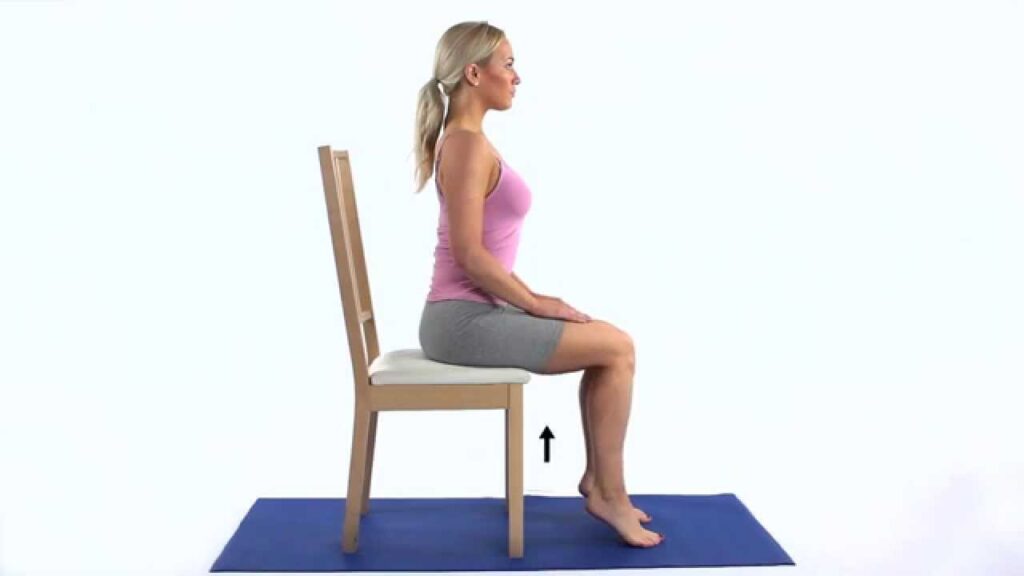
Toe Crunch:
- Toe crunch is one of the most important hammer toe exercises.
- It includes using the middle joint of the toe to pull the tip of the toe to the base.
How to perform-
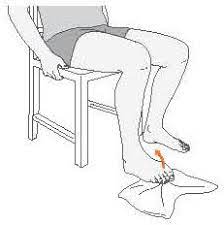
- Make sure that patient sits in a nice, comfortable chair.
- Then put a towel just beneath the upper half of the affected foot.
- Keep the heel firmly planted on the ground and use the toes for crunching the towel up.
- After the patient has reached the end of the towel, perform the exercise again.
- Repeat this exercise about 10-12 times.
- If the patient wants to add some resistance, the patient may place an item on the end of the towel.
Manual Hammer Toe Stretching:
How to perform-

- The patient can also use a towel to stretch the toes.
- Sit on the ground with the legs perfectly outstretched and a towel wrapped adequately around the toes.
- Make sure that the patient holds the towel ends with their hands and pulls the toes towards them.
- Keep themselves in this position for 20-30 seconds.
- The patient may also forgo the towel if they like and try pulling their toes by using their hands.
Toe Taps:
How to perform-

- This hammer toe exercise helps to stretch the joint.
- As the patient lay down, slowly extend the big toe towards the floor as the patient tries to point the other toes up.
- Now hold onto that position for about a second and then tap them gently back down to the floor.
- Repeat this exercise about 10-12 times and then reverse this process by slowly pulling the big toe up as the patient keep the other toes on the floor.
Hammer Toe Finger Splint:
- The Hammer Toe Finger Splint is also recommended to as a “squeeze” and involves using the fingers for creating little splits between the toes for stretching them.
How to perform-
- Sit in a comfortable position and then put one foot up and then place it right on the opposite thigh.
- Then slide the fingers slowly in between the toes, slowly pinching the fingers for squeezing the toes together.
- Repeat the exercise 12 times. If the person like they can perform each toe simultaneously by putting one finger between them and pinching.
Rolls:
- This particular hammer toe exercise includes tapping the toes slowly on the ground from one side to the other.
How to perform-
- Start with standing barefoot on some flat surface and try lifting all the toes off the ground, while making sure that the patient keeps the heel planted.
- Now bring the toes slowly down on the surface one by one, starting with the small and then ending with the big.
- Repeat the exercise 10 times and then move in the opposite direction.
- Over-the-counter remedies, using economically available straps, cushions, or nonmedicated corn pads may help reduce the pain.
- If the patient has diabetes, poor circulation, or a lack of feeling in the feet, talk to the doctor before attempting self-treatment.
Surgical Treatment
- If the toe joint is rigid and no longer mobile, or if nonsurgical treatment does not deteriorate the symptoms, the doctor can recommend surgery.
- Surgery is typically done on an outpatient basis using a local anesthetic.
- The actual procedure will rely on the type and extent of the deformity.
Tendon lengthening-
- For patients with a flexible toe joint, the condition may generally be treated by lengthening the tendons that are causing the joint imbalance.
Tendon transfer-
- Some patients with a flexible toe joint can benefit from treatment that involves transferring tendons from the end of the toe to the top of the toe to help pull the joint into a straight position.
Arthrodesis (joint fusion)-
- Patients who have a rigid toe joint can undergo tendon lengthening in combination with arthrodesis.
- In this surgery, the doctor will remove a small part of a bone in the toe joint to make sure that the toe may extend fully.
- He or she will then place an external wire or pin and/or internal plate to hold the bones in place while the bones fuse together.
2-Hallux Valgus
Definition
Hallux valgus is the most general foot deformity. It is a progressive foot deformity in which the first metatarsophalangeal (MTP) joint is affected and is frequently consummate by significant functional disability and foot pain and reduced quality of life. This joint is slowly subluxated (lateral deviation of the MTP joint) resulting in the abduction of the first metatarsal while the phalanges adduct. This frequently leads to the development of soft tissue and bony prominence on the medial side of what is called a bunion (exostosis on the dorsomedial aspect of the first metatarsal head).
Clinically relevant anatomy
- The Hallux or first toe is the medio-distal fragment of the foot.
- Established by the first metatarsal (effective with two sesamoid bones), the first proximal phalanx, and the first distal phalanx.
- Established by three bones instead of four, not like the other toes who have a spare bone called the intermediate phalanx.
- The Hallux (first toe) has three synovial joints, which are the following-
Tarsometatarso joint –
- Formed between the medial cuneiform bone and the first metatarsal, it does not permit a lot of movement.
Metatarsophalangeal joint –
- Joints are the first metatarsal and the first proximal phalanx.
- The joint permits the flexion and extension of the first toe and a tiny ab- and adduction towards the center of the second toe. It is also strengthened by ligaments (ligament. metatarsophalangeal collateral and ligament. Metatarso phalanges plantaris).
Interphalangae joint –
- Interrelation between the two phalanges of the first toe.
- This joint only permits flexion and extension and it is also strengthened by ligaments (ligament Interphalangeal collateralis and ligament Interphalangeal plantaris).
Two sesamoid bones were communicative with the first metatarsal bone.
- These sesamoid bones, Preserve the tendons of Flexor Hallucis Brevis FHB (Implant in the tendon of the FHB muscle) Main feature is helping FHB create more force by extending its levers.
Muscles acting on the joint-
- Muscle tibialis anterior, Muscle extensor hallucis longus, Muscle peroneus longus, Muscle, flexor hallucis longus, Muscle extensor Hallucis Brevis, Muscle abductor hallucis, Muscle flexor hallucis brevis, Muscle adductor hallucis, Muscle interossei dorsalis I, aponeurosis plantaris.
Causes of Hallux Valgus
- Causes is not well established – Few factors have been considered to play a vital role in the development of hallux valgus;
- Gender– Ten times more frequent in females.
- Footwear (tight pointed shoes)- Wearing tight shoes and/or heeled shoes between 20 and 39 years of age may be an important part of the development of hallux valgus in later years.
- Congenital deformity or predisposition
- Chronic Achilles tightness
- Severe flatfoot
- Hypermobility of the first metatarsal cuneiform joint
- Systemic disease
- Possible that abnormal muscle insertions are partly accountable for hallux valgus
- Hallux valgus is also connected with hip and knee OA and is vice-versa connected with a higher BMI.
Symptoms
- A distal end of the first metatarsal shifts medially and the proximal phalanx deviates laterally.
- First MTP becomes malalignment, leading to a lateral deviation of the hallux and medial displacement of the distal end of the first metatarsal.
- Bony expansion of the first metatarsal head.
Mechanism behind this hallux valgus formation-
- Begin with the stretching of the abductor hallucis muscle (for example as a result of wearing tight shoes).
- The base of the first proximal phalanx (PP) begins to lateralize and abducts.
- During walking- The forefoot is turned into pronation, which stretches the medial collateral ligament and the capsular structures of the first MTP joint.
- The first MTP joint consists of multiple bones, ligaments, sesamoid bones, and surrounding muscles, all affect other structures as they move or stretch.
- one time a threshold degree of valgus of the first PP is reached, the first metatarsal bone starts its way into a varus position.
- Hallux is pushed into a valgus position. The capsule becomes weaker and the abductor hallucis tendon turns into a flexor of the hallux.
- As the condition advances, multiple muscles tend to worsen the situation as their axis of pull is lateralized.
- As a bunion take shape, friction is raised when shoes are worn.
- There can be irritation of the MCL ligament of the first MTP joint, which conducts to inflammation and calcification of the joint.
- This worsens the pain and bunion size.
- In the primary stage, this leads to tenderness of the bunion because of footwear.
- The skin around the bunion is hard, warm, and red. after that, the patient may have other complaints due to osteoarthritis.
- The bunion keeps operating medially and the pain gets worse.
- A general problem in individuals with hallux valgus (pre-operative), is one or more disorders in their gait pattern because of the deformity of the first metatarsophalangeal joint.
Dysfunctions that may be present:
- Gait differentiation in the mid-stance (middle stage) and the propulsion phase (late stance).
- As the body weight moves ahead on the foot on the ground, the patient will tend to keep his weight on the lateral border of the foot.
- This result in a lateral and posterior weight shift
- The patient has also a pronation deformity.
- The patient is not able to supinate his / her foot and will tend to keep the body weight on the lateral border of the foot which results in a late heel rise.
- The period of single-limb support will be over.
- When a physical examination is executed, the given indications could be present: Lateral deviation of the MTP joint Swelling of the first MTP joint
- Shortening of flexor hallucis brevis muscle.
- Tenderness of hallux.
- Weakness of hallux abductor muscles.
- Pain (primary symptom).
Diagnostic Procedures-
Radiographs –
Using to identify the Hallux Valgus Angle (The angle created between the lines that longitudinally bisect the proximal phalanx and the first metatarsal)
- Angle is > than 15°, hallux valgus is diagnosed.
- An angle of 45-50° is considered serious.
- The degree of deracination of the sesamoids and the level of osteoarthritic change within the first MTP joint should be reviewed as well.
- It is not always possible or important to take radiographs to determine the severity of hallux valgus.
- Therefore, the Manchester scale was researched.
Treatment-
Non-operative treatment-
Prevention
- A hereditary factor or predisposition (for example as a result of a common ligamentous laxity) is not avoidable but other things are.
- For example, wearing shoes that fit properly (not too tight) and keeping away the high heels may be important factors in preventing hallux valgus.
Physiotherapy exercise for hallux valgus-
1-Toe points and curls
How to do?
- This works on the toe joints by flexing the muscles beneath the feet.
- Sit on a comfortable surface with feet about 6 inches away from the floor.
- Point and curl the toes gently. perform this exercise for 20 reps for 2 to 3 sets.
2-Toe spread-outs
How to do it?
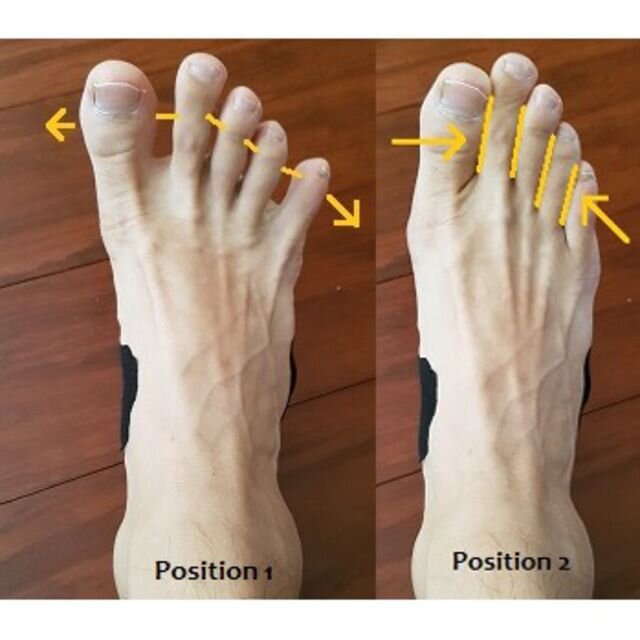
- Start with a sitting position, and place the foot on the floor.
- With the heel fixed to the ground, lift and spread the toes.
- Do it a further 10 to 20 times on both feet.
3-Toe circles
How to do it?
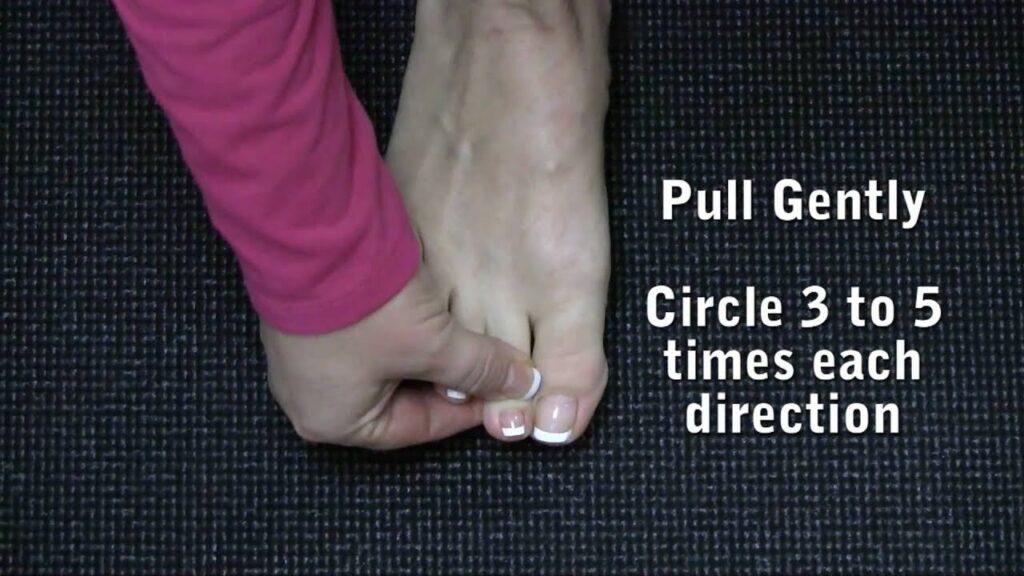
- This mobilizes the joints in the toe and helps to reduce stiffness.
- While sitting on a chair, lean over and grab the big toe. start circling the toe clockwise, 3 to 5 times. Stop and reverse the direction for another 3 to 5 circles.
- Complete 2 to 3 sets on both the toe.
4-Assisted toe abduction with the exercise band
How to do?
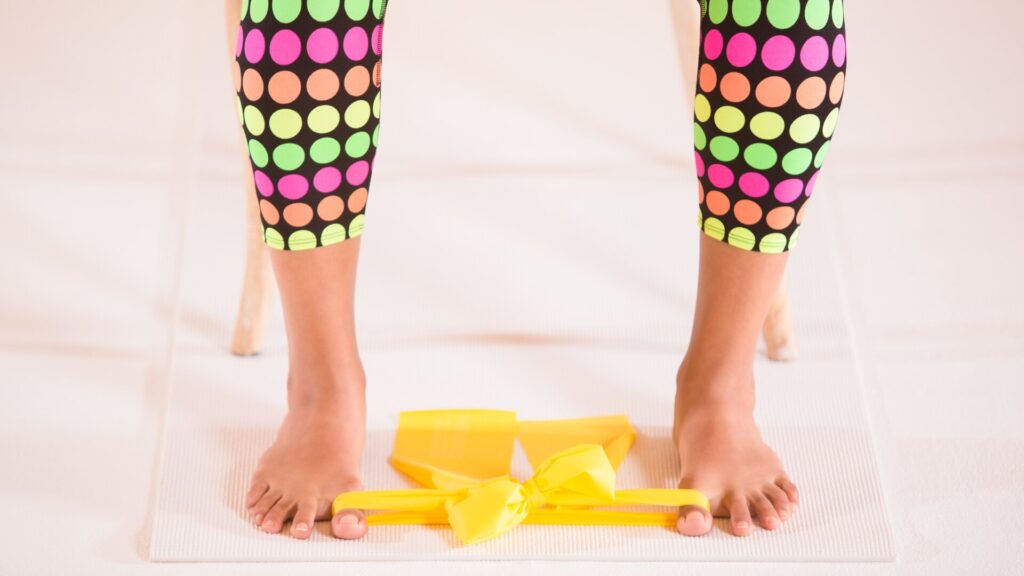
- Muffle an exercise band around both of the big toes.
- With the band tight, pull both big toes from here to the other toes with a tiny exercise band.
- When fully extended, Clench for 5 seconds, then release and repeat the motion for 20 reps.
5-Ball roll
How to do it?
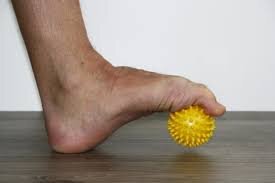
- Put the tennis or lacrosse ball on the floor and put the foot on top.
- Spin the foot back and forth over the ball.
- Repeat this movement for 3 to 5 minutes on each foot, even if the bunion is only on one foot.
6-Towel grip and pull
How to do it?

- Place a tiny towel or washcloth on the floor.
- Sit down and grip the towel with your toes and pull it towards you.
- Only use the toes to scrunch the towel.
- Do it further for up to 5 minutes.
7-Marble pickup
How to do it?

- For this exercise, The patient will need a bowl and 10 to 20 marbles.
- Place the marbles on the floor and set down the bowl close by.
- Sit on a comfortable surface with the feet close to the ground.
- With the toes, pick them up one by one marble and place them in a bowl.
- Make sure to grip the toe around the marble.
8-Figure eight rotation
How to do it?
- This exercise is similar to the toe circle, but the patient will move the toe in a figure-eight motion rather than a circle.
- This assists with flexibility and range of motion.
- Repeat 10 times on both toes for 2 to 3 sets.
9-Barefoot beach walking
How to do it?
- This exercise depends on the location.
- If the patient leave nearby the beach, prescribe this exercise a try by walking barefoot in the sand.
- It will experience a foot massage while also helping to strengthen the muscles in the feet and toes.
10-Heel raise
How to do it?
- Start with a sitting position, and place the foot flat on the floor.
- Raise the heel and set down most of the weight toward the outside of the ball of the foot.
- Hold this motion for 5 seconds and return to the floor.
- Repeat 10 times on both feet.
11-Walking along the beach
- Whenever possible, spend time walking on the sand.
- This may provide a gentle foot massage and also help strengthen the toes.
- It is especially beneficial for individuals who have arthritis associated with their bunions.
Operative treatment
- If non-operative treatment fails, surgery could be contemplated.
- Just before the operation, the severity of the hallux valgus has to be diagnosed.
- In order to do that, weight-bearing plain film radiography is applied.
- There are about too many different surgical techniques.
- Too many surgeons merge one or two techniques based on the severity of the condition and the history of the patient.
- Below given are a few examples of Hallux Valgus correction techniques:
- Austin/Chevron Procedure and Reverdin Procedure- These two procedures are used in mild deformity.
- Scarf Procedure and Closing Base Wedge Procedure- These two procedures are used in moderate to severe deformities.
- Akin Procedure, First Metatarsal Joint fusion in cases of midfoot instability, and First Metatarsal-Phalangeal Joint Arthrodesis- These three are used in severe foot deformities.
Rehabilitation Program after Surgery-
Session 1
In the very first session, the elevation of the leg, lymphatic drainage, activation of the muscle pump, and cryotherapy (cool packs) were applied to reduce the swelling.
Lymphatic Drainage:
- Each individual was placed in the supine position.
- Lymphatic drainage was implemented starting from the anterior cervical region at the fossa supraclavicular using the careful friction technique to stimulate the supraclavicular lymph nodes in order to improve autonomic rhythmic contractions of these nodes.
- In addition, the patient was asked to do deep inspiration with the therapist’s hands on the lower rib cage.
- The goal of this intervention was to stimulate the diaphragm to improve lymphatic flow toward the cisterna chyli and thoracic duct.
- After that the technique was described previously for the inguinal lymphatic nodes for continuing with the adductor region, stimulating the popliteal region (popliteal lymphatic nodes) and the calf.
- After this, the therapist began working around the malleolar region and forefoot and finished with a couple of effleurages from the toes to the inguinal region.
Activation of the Muscle Pump:
- Plantar flexion and dorsiflexion of the ankle, and also the flexion and extension of the hip and knee.
Scar Tissue Massage.
Cryotherapy:
- It was implemented with ice or cool packs at the first metatarsophalangeal (MTP) joint region as well as the forefoot.
Mobilization:
- It was performed at all MTP joints.
- These manipulations mostly focused on the improvement of plantar flexion for MTP joints 2–5 and on the improvement of dorsiflexion for the first MTP joint.
- They incorporate caudal sliding of the proximal phalanx to increase the plantar flexion and dorsal sliding of the proximal phalanx to increase the dorsiflexion.
Manual Therapeutic Interventions:
- oscillating traction was implemented to activate the mechanoreceptors that inhibit the afferent pain sensors.
- The main goal of this therapy option was the MTP joints.
- The proximal hand was placed close to the MTP joint line in order to support the metatarsus, while the distal hand was put on the proximal phalanx.
Gait Training:
- In this session, the main aim of gait training was to reach optimal load distribution for the whole foot during the entire stance phase, with a great aim on weight bearing of the 1st MTP joint and hallux.
Session 2
Mobilization:
- Mobilization of the MTP joints was implemented as described in the first session.
- Furthermore, pronation of the forefoot while stabilizing the calcaneus was implemented.
- The physical therapist also implements isolated caudal glides of the navicular toward the talus, the cuneiform toward the navicular, and the first metatarsal toward the cuneiform.
- For this technique, the patient was situated in a supine position.
- The physical therapist’s lower hand stabilized the plantar aspects of the manipulated regions, while the proximal hand was applying longitudinal pressure focusing on the specific joint (imitating the translating movements in the metatarsus).
- These mobilization exercises also could be implemented in a sitting position.
Soft-Tissue Techniques:
- They were performed on the flexor hallucis longus, adductor hallucis (oblique and transverse heads), abductor hallucis, and tibialis anterior muscles to improve blood flow and decrease tension.
- Also, soft-tissue techniques on the peroneal fascial loge (especially in the tendinous region of the muscle) were implemented in combination with active pronation in a supine or sitting position.
Motor Learning / Strengthening Exercises:
- Muscle imbalance among the abductor hallucis and adductor hallucis has been signified in hallux valgus (HV).
- The toes-spread-out (TSO) exercise can be prescribed for preventing or correcting HV deformity at an early stage.
- The goal of these exercises was to strengthen the lumbrical, interosseous, adductor hallucis, peroneal longus and brevis, and flexor hallucis longus and brevis muscles.
- The patients had to learn to selectively activate one of these muscles and keep away from using the flexor digitorum longus muscle in order to decrease pressure on the MTP joints (For example, patients had to plantar flex the MTP joint without bending the distal and proximal interphalangeal joints).
- Then the exercise was merged with active pronation.
- To improve the strength, this exercise may be implemented with an elastic band (Thera-Band).
- At the start, the patients did the exercises in a positive dynamic manner.
- When the patients became muscular, the exercises were performed as eccentric training.
- Pronation is important for ground contact of the first ray, the most heavily loaded structure of the foot during gait.
- If the peroneus longus muscle is too weak, individuals compensate by pushing the knee into a valgus position to achieve midfoot pronation.
- Moreover, fascial release techniques for the peroneal muscles as well as to reduce the tone (velocity-dependent resistance to stretch) of the tibialis anterior muscle were performed to increase the interaction of those antagonists.
- Concentric strengthening exercises of the great toe flexors and extensors were described as well.
- The participants also were commanded to do a marble pick-up exercise.
Gait training
- The prior learned understanding of functional muscle control of the transverse arch of the forefoot then was educated in mid-stance as well as the terminal stance position while standing.
- The main focus was the active participation in push-off (barefoot).
Session 3
Sensory-motor Training:
- Intermuscular and intramuscular coordination was the aim of this treatment modality.
- Exercises were performed mostly in a standing (mid-stance) position, with improving load on the weight-bearing foot and going into the one-foot position, controlling the foot, the knee, and the hip in a neutral long-standing leg axis (meaning the weight is distributed on the lateral aspect of the heel and MTP 1 and 5 with the knee normally flexed in a neutral valgus and varus position, the hip in neutral, elevating the opposite leg and bending the hip in 90 degrees of flexion, and controlling this position in a freehand manner).
- The eyes were opened and closed in order to aim at the neuromuscular feedback system (proprioceptors).
Gait Training:
- The goal of gait training was to improve intense pronation, weight bearing of the first MTP joint, and weight bearing and push-off of the hallux.
- Patients had to be allowed to do a calf raise with full weight bearing on the big toe and manage the correct leg axis while walking on stairs, with a focus on controlling the knee in an impartial position and having enough control of the pelvic region with tension toward abduction and external rotation, which otherwise seems to be the normal weak pattern.
Sessions 4, 5, and 6
- Based on the patient’s condition, parts of strengthening exercises or sensory-motor training, and gait training had to be repeated and increased.
3-Mallet toes-
What are mallet toes?
A mallet toe alludes to an upward bend at the toe joint. Also known as Morton’s toe. It can cause the toe to gaze curled instead of flat. The mallet toe happens mostly in the second toe, next to the big toe. That’s because it is often the longest of the four little toes. But a mallet toe may also affect the third and fourth toes.
Description of involved joints and muscles-
- The mallet toe involves two parts of the body.
- They cry out the distal interphalangeal joint (DIPJ) and the flexor digitorum longus (FDL).
- The DIPJ is the ending joint in the toe, nearest to the toenail.
- The FDL is a muscle that begins near the shin and runs down to the four tiny toes.
- It helps the toes curl.
- When the muscle becomes too tight, it may bend a toe joint upward.
Different types of mallet toes
- Mallet’s toes are normally identified as flexible or rigid:
- Flexible mallet toes: The muscle and toe joint are until now flexible and mobile.
- Rigid mallet toes: The muscle and surrounding tendons (tissues that attach muscle to bone) tighten. This change fixes the toe joint in a bent position.
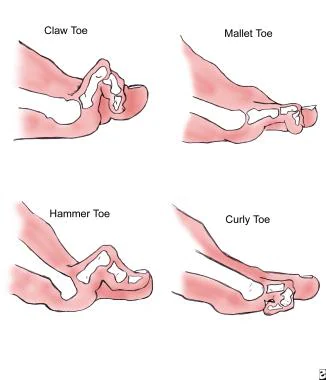
What is the difference between mallet toes, hammertoes, and claw toes?
- Hammertoes: Curve in the second, or middle, toe joint.
- Claw toes: Curve in the first toe joint, and possibly the second and third joints.
- Mallet toes: Bend in the third toe joint, nearest to the toenail.
Etiology
- The Etiology of Morton’s toe may be incorporated with idiopathic congenital conditions and acquired disorders.
- Idiopathic congenital conditions may incorporate some situations like as hereditary early epiphyseal plate closure, connected congenital disorders like Down’s, Turner’s, Larsen’s, Albright’s syndromes, pseudohypoparathyroidism, poliomyelitis, dystrophic dysplasia, pseudo hyperparathyroidism, too many epiphyseal dysplasias, and myositis ossificans.
Morton’s toe may thus be existing with one or both of two problems that may influence the first metatarsal bone.
- The first metatarsal bone is teeny than the second metatarsal bone.
- Hypermobility or uncertainty of the First Metatarsal Bone.
These in turn influence the usual walking process and place pressure on the second metatarsal during the toe-off phase.
Pathophysiology
- Pronation is the only most necessary term used in the discussion of how the foot works.
- The most customary reason for the individual to have foot problems is because of an abnormal amount of Pronation.
- Morton’s Toe will cause a person to have abnormal or overpronation.
- It is this pronation that is the eventual cause or contributing factor to most of the problems not only of the foot but also of the entire body.
- Pronation is a series of motions the foot must make in order for the individual to walk perfectly.
- But, it is not that simple.
- There are mainly two types of pronation of the foot-
- Normal pronation, or
- Abnormal, or over-pronation
Symptoms and causes
Causes of mallet toes?
- Mallet’s toes happen when a toe is constantly forced upward.
- The most usual causes of mallet toes involve:
- Arthritis.
- Bone and muscle imbalances, like foot bones that are too short or muscles that are specifically weak.
- Injury to the toe.
- Shoes that are too tight.
Symptoms of Mallet’s toe
- The most usual symptom of a mallet toe is a curling or curving at the toe joint nearest the toenail.
- Other symptoms may incorporate:
- Redness and swelling of the affected toe.
- Corns or calluses on the curved part of the toe.
- Toe pain when wearing shoes or walking.
- Toe sores or ulcers, specifically in individuals with diabetes.
- Toenail thickening or changes.
Diagnosis and tests
- Mallet toes should get identified by a healthcare provider.
- A person may start with the primary care physician (PCP) or visit a podiatrist (foot and ankle doctor).
- Mallet toes generally just need a thorough physical exam. The doctor will:
- Look at the footwear.
- Likely check the toe’s flexibility.
- Possibly do a gait analysis, to assess the way a person walks.
- Take an X-ray of the foot.
- Do a foot and ankle exam.
- Debride (remove) any painful skin or nails.
- The physical exam may help identify if the person is putting added pressure or stress on the affected toe.
- In some cases, The healthcare provider may also order imaging tests. An X-ray will find out any toe fractures (broken bones).
Treatment
There are a diversity of treatments available for conservative treatment and surgical correction of Morton’s toe. Foot surgery is the last option, not first aid.
Conservative Intervention
Orthotic devices:
- Orthotics that feature arch support to hold the foot in line, and a metatarsal pad to decrease stress on the ball of the foot are generally recommended when treating this condition.
Metatarsal pads:
- The basic, simple treatment for Morton’s Toe and most of the problems associated with it, like back pain, knee pain, hip pain, fibromyalgia, arthritis, and most foot pains, is with a pad that is put into the bottom of the first metatarsal bone that we call the “Toe Pad.”
Wide toe-box shoe gear:
- Perfect treatment of Morton’s Toe begins with selecting proper footwear. Footwear with a high and wide toe box (toe area) is great for treating this condition.
- It can be important to purchase footwear a half size to a size larger to accommodate the longer second toe.
- Ideal footwear merged with an effective orthotic will give relief from the pain associated with Morton’s Toe.
Exercise therapy-
1-Toe points and curls
How to do it?
- This works on the toe joints by flexing the muscles beneath the feet.
- Sit on a comfortable surface with feet about 6 inches away from the floor.
- Point and curl the toes gently.
- Try this exercise for 20 reps for 2 to 3 sets.
2-Toe spread-outs
How to do it?
- Start with a sitting position, and place the foot on the floor. With the heel fixed to the ground, lift and spread the toes.
- Do it a further 10 to 20 times on both feet.
3-Toe circles
How to do?
- This mobilizes the joints in the toe and helps to reduce stiffness.
- While sitting on a chair, lean over and grab the toe.
- Start circling the toe clockwise, 15 times.
- Stop and reverse the direction for another 15 circles.
- Complete 2 to 3 sets on both the toe.
4-Assisted toe abduction with the exercise band
How to do it?
- Muffle an exercise band around both of the big toes.
- With the band tight, pull both big toes from here to the other toes with a tiny exercise band.
- When fully extended, Clench for 5 seconds, then release and repeat the motion for 20 reps.
5-Ball roll
How to do it?
- Put the tennis or lacrosse ball on the floor and put the foot on top. Spin the foot back and forth over the ball.
- Repeat this movement for 3 to 5 minutes on each foot, even if the bunion is only on one foot.
6-Towel grip and pull
How to do it?
- Place a tiny towel or washcloth on the floor.
- Sit down and grip the towel with your toes and pull it towards you.
- Only use the toes to scrunch the towel.
- Do it further for up to 5 minutes.
7-Marble pickup
How to do it?
- For this exercise, The patient will need a bowl and 10 to 20 marbles.
- Place the marbles on the floor and set down the bowl close by.
- Sit on a comfortable surface with the feet close to the ground.
- With the toes, pick them up one by one marble and place them in a bowl.
- Make sure to grip the toe around the marble.
Surgical Intervention
- The metatarsal heads 2-4 resection.
- Proximal ostectomy of metatarsals 2- Success after (Teflon prosthesis) implant arthroplasty in the first metatarsal.
- Chappaqua procedure: First proximal phalanx shortening, merged with shortening of the proximal aspect of metatarsals 2, 3, 4 and lengthening medial cuneiform – allowing hallucal interphalangeal joint (IPJ) to compensate for first metatarsophalangeal (MTP) joint.
4-Claw toe-
Definition-
Claw toes, as the name suggests, are toes that curve into an abnormal claw-like shape. The condition generally happens to four little toes of the foot and it is the middle and end joints (the joints furthest away from the ankle) that buckle. Claw toes are frequently incorporated with high arched (cavus) foot type, muscle imbalances, or sometimes a neurological condition. Ulcers can develop in individuals with diabetes due to reduced foot sensitivity. The patient does not get treatment for the claw toes, they can turn permanently stiff.
What causes the pain?
- Claw toes may cause pain due to the toes getting pushed down into the soles of the shoes.
- Corns or calluses may effect by the pressure and rubbing on the base of the shoe or on the top of the toes.
- Rarely, infections can happen.
What are the stages of claw toes?
There are mainly two stages:
- Flexible: This is the primary stage. The toes still flex at the joints, although they are stiff. Surgery is most fruitful during the flexible stage.
- Rigid: This is the last stage where the toes are stuck, unmovable.
What causes claw toes?
Most of the time an imbalance of foot muscles generally causes claw toes. Especially, the toe muscles contract too far, tighten the tendons, and curve the joints. Foot muscles become unbalanced because of the following factors:
- Genes.
- Ill-fitting shoes.
- Nerve damage caused by diabetes.
- Rheumatoid arthritis or osteoarthritis.
- Nerve damage caused by alcoholism.
- Charcot-Marie-Tooth Disease.
- Spinal cord tumors.
- Polio and cerebral palsy.
- Stroke. The stroke-side foot is affected.
- Trauma.
What are the symptoms of claw toes?
Claw toes are more than just bent toes. Additional symptoms include:
- Corns.
- Calluses.
- Blisters.
- Pain.
- Swelling.
- Ulcers (rare).
How are claw toes diagnosed?
The physician will do a physical examination of the toes, likely touching them to see how they move. The patient may be tested for neurological problems. Some neurological disorders may weaken the muscles of the foot, which generates imbalances that bend the toes. Some questions might be asked by doctors to diagnose claw toes. They are as follows;
- When did the person start to notice their toes bending?
- Do you have any corns?
- Do you have any calluses?
- Have you tried any at-home treatments?
- Do members of your family have claw toes?
- What is the cause of the family members’ claw toes?
Treatment
There are mainly two non-surgical and surgical treatments for claw toes. Most of them the person may do at home. Non-surgical treatments for claw toes include:
- Just wear shoes that have roomy toe boxes, low heels, and better arch support.
- Just wear shoes with increased width and depth, with soft soles and minimal seams in the toe box.
- Wear pads, arch supports, or other shoe inserts to cushion the toe.
- Strengthening and stretching the muscles through exercises.
- A splint or tape to hold the toes where they are supposed to be.
- Avoid high heels.
- Avoid tight shoes.
- The severity of the claw toes determines what type of surgery the patient will have. The doctor will categorize the claw toe as early or late stage, either flexible or rigid.
Surgical treatments for claw toes include:
- Tendon lengthening and rerouting.
- Shortening the bones of the phalanx.
- For the moment insert a steel pin to hold the toe in the correct position until healing occurs.
- Toe fusion.
Exercise therapy-
1-Toe points and curls
How to do it?
- This works on the toe joints by flexing the muscles beneath the feet.
- Sit on a comfortable surface with feet about 6 inches away from the floor.
- Point and curl the toes gently.
- Try this exercise for 20 reps for 2 to 3 sets.
2-Toe spread-outs
How to perform?
- Start with a sitting position, and place the foot on the floor.
- With the heel fixed to the ground, lift and spread the toes.
- Do it a further 10 to 20 times on both feet.
3-Toe circles
How to do it?
- This mobilizes the joints in the toe and helps to reduce stiffness.
- While sitting on a chair, lean over and grab the big toe.
- Start circling the toe clockwise, 3 to 5 times. Stop and reverse the direction for another 3 to 5 circles.
- Complete 2 to 3 sets on both the toe.
4-Assisted toe abduction with an exercise band
How to do it?
- Muffle an exercise band around both of the big toes.
- With the band tight, pull both big toes from here to the other toes with a tiny exercise band.
- When fully extended, Clench for 5 seconds, then release and repeat the motion for 20 reps.
5-Ball roll
How to do it?
- Put the tennis or lacrosse ball on the floor and put the foot on top.
- Spin the foot back and forth over the ball.
- Repeat this movement for 3 to 5 minutes on each foot, even if the bunion is only on one foot.
6-Towel grip and pull
How to do it?
- Place a tiny towel or washcloth on the floor.
- Sit down and grip the towel with your toes and pull it towards you.
- Only use the toes to scrunch the towel.
- Do it further for up to 5 minutes.
7-Marble pickup
How to do it?
- For this exercise, The patient will need a bowl and 10 to 20 marbles. Place the marbles on the floor and set down the bowl close by.
- Sit on a comfortable surface with the feet close to the ground.
- With the toes, pick them up one by one marble and place them in a bowl.
- Make sure to grip the toe around the marble.
8-Figure eight rotation
How to do it?
- This exercise is similar to the toe circle, but the patient will move the toe in a figure-eight motion rather than a circle.
- This assists with flexibility and range of motion.
- Repeat 10 times on both toes for 2 to 3 sets.
5-Plydactyly-
Definition
Polydactyly is when a baby is born with an extra digit on the hand or an extra toe on the foot. It can be only on one or both hands or feet. Polydactyly normally takes place on the little finger side of the hand or little toe side of the foot (called “post-axial”). Less often, it takes place on the thumb or big toe side (“pre-axial”). Occasionally, it can be midway or in the middle of the hand or foot. The extra digit is normally smaller than the other fingers or toes.
What Causes Polydactyly?
- Polydactyly occurs prior to a baby being born.
- When a baby’s hands and feet are forming earlier, they are shaped like mittens.
- Then the fingers or toes form.
- If an additional finger or toe forms, this causes polydactyly.
Types of polydactyly
- Polydactyly most frequently happens without other abnormalities.
- This is known as isolated or non-syndromic polydactyly.
- Sometimes it is incorporated with another genetic condition.
- This is called syndromic polydactyly.
Isolated polydactyly
There are three types of isolated polydactyly, divided by the position of the extra digit:
- Postaxial polydactyly happens on the outside of the hand or foot, where the fifth digit is.
- Preaxial polydactyly happens on the interior part of the hand or foot, where the thumb or big toe is.
- Central polydactyly takes place in the central digits of the hand or foot. It is the slightest common type.
How Is Polydactyly Diagnosed?
- Polydactyly can be seen prior to birth on an ultrasound.
- Or else, doctors diagnose it when the baby is born.
- Sometimes doctors suggest X-rays look out if the extra digit has bones and joints.
- This help out the surgeon decides what kind of treatment is needed.
How Is Polydactyly Treated?
- Treatment for polydactyly pivots on the location of the finger on the hand or foot and how it is formed.
- An additional pinky or little toe that is associated with a thin stalk may be separated easily, sometimes right in the surgeon’s office with a surgical clip or stitch.
- Extra thumbs, big toes, or middle fingers or toes that involve bones and/or joints need surgery in the hospital.
6-Syndactyly
Definition
- Syndactyly is when a child is born with two or more fingers or toes fused or “webbed” together.
What Happens in Syndactyly?
Syndactyly may be:
- Simple: The fingers or toes are fused by just skin.
- Complex: The bones and other parts of the fingers or toes are fused.
- The joined part may go from the base to the tip of the finger or toe or just part of the way up.
- A child may have syndactyly in one or both hands or feet.
What Causes Syndactyly?
- Syndactyly occurs prior to a baby being born.
- It is not the cause of anything a mother did or did not do during the time of pregnancy.
- When a baby’s hands and feet are first forming, they are shaped like mittens.
- Then the fingers (the fingers and toes) divide.
- In babies with syndactyly, the fingers or toes do not break completely.
How Is Syndactyly Diagnosed?
- Syndactyly can be exposed before birth on an ultrasound.
- Otherwise, doctors diagnose it when the child is born.
- Physicians suggest X-rays look out if the bones are joined.
- This helps doctors decide what type of treatment is needed.
How Is Syndactyly Treated?
- Most of the children with syndactyly of the hand benefit from surgery to divide the fingers.
- Surgery will help them utilize their fingers in a better way.
- The surgery is usually performed when a child is 1 to 2 years old.
- Occupational therapy (OT) and home exercises may help a child’s recovery after surgery.
- Most of the children with syndactyly of the toes do not require surgery.
- They will be allowed to walk and run well.
Treatment
Nonoperative
- observation.
- Indications.
- simple syndactyly.
- Rarely need treatment as this is an aesthetic deformity.
- complications include contractures and painful scar tissue.
Operative
- Digit release
6-Bunionette (Tailor Bunion):
Description
A tailor’s bunion, known as a bunionette, is a bony lump that forms along the side of the little toe. It occurs when the fifth metatarsal bone becomes bigger or shifts outward. The fifth metatarsal is the base bone on the pinky toe. A bunion may be painful, specifically if it rubs opposite to the shoe. A tailor’s bunion is alike a regular bunion but in various locations. Typical bunions enlarge on the inner side of the foot below the big toe. Tailor bunions get enlarged on the outer side of the foot at the base of the pinky toe. Tailor’s bunions are not as usual as regular bunions.
Symptoms
- A tailor’s bunion is a swollen bump on the outer side of the pinky toe.
- The bump might begin out small but grow bigger with time.
- It may also be red and painful.
- The bunion can become more swollen and painful when it rubs against the shoe.
- The person may get this kind of bunion on one or bilateral feet.
- The bunion on one foot may be inferior to the one on the other foot.
Causes
- The person may get this type of bunion from wearing poorly fitting shoes, like narrow, high-heeled shoes.
- A person is more likely to get a tailor’s bunion if they have inherited a structural foot problem from their parents.
- This problem could be that the bone in the little toe is in an abnormal position or the head of the bone is enlarged, which causes the bone to move out of place.
Other causes include:
- A foot that leans to the outer side (inverted foot)
- Loose ligaments in the foot
- Lower-than-normal fifth metatarsal bone
- Tight calf muscles
- A tailor’s bunion generally begins when the person is young and gradually gets worse with time.
- By the time the person reaches their 40s, the bunion can be painful.
How it is diagnosed?
- A podiatrist should be capable to diagnose a tailor’s bunion just by looking at your foot.
- An X-ray may show problems with the bone of your little toe.
Treatment
Medical treatment-
- Nonsteroidal anti-inflammatory drugs (NSAIDs) like ibuprofen (Advil, Motrin) bring down swelling and relieve pain.
Exercise therapy-
Wall push-
- Perform calf stretches twice per day.
- Stand facing a wall with the toes pointing toward the wall.
- Take a few steps back with the involved leg to stretch the calf.
- Do it further for 30 to 60 seconds.
How to treat it at home?
- Some basic alterations may help to decrease the pain of a tailor’s bunion, although they won’t get rid of the bump.
Try these remedies:
- Put a silicone bunion pad over the tailor’s bunion to reduce the pain and reduce the bunion from rubbing against the shoe.
- Wear shoes that are comfortable and flexible and have a wide toe box. try to avoid wearing narrow, pointed shoes and high heels.
- Hold ice to the foot for 5 to 10 minutes up to 3 times per day.
FAQ
Hammer’s toe is a painful flexion deformity of the proximal interphalangeal joint in which the middle and distal phalanges are flexed down onto the proximal phalange. The second toe is affected most frequently, and the condition is generally bilateral.
Minor toe deformities may be the outcome of injuries to the toes and surrounding tissue and tendons caused by: Ill-fitting shoes pushing the toes upwards. A bunion on the big toe causes extra weight to be put on the small toes. Congenital nerve disorders(conditions you are born with), like Charcot Marie Tooth.
Finally, hyperflexion injury takes place when the big toe is forcibly rolled beneath the foot and the dorsal capsule is injured. This is most usual in beach volleyball and is therefore termed.
Tendons associated the muscles with the bones. The tendons lose their flexibility and shorten when they go through the same compression as the muscles. When muscles tighten and tendons contract/shorten, the outcome is a crooked toe.
A small change in the color and temperature of the feet. Thickened, yellow toenails. Fungus infections like athlete’s foot between the toes. The blister, sore, ulcer, infected corn, or ingrown toenail.