Reflex sympathetic dystrophy
Table of Contents
What is reflex sympathetic dystrophy?
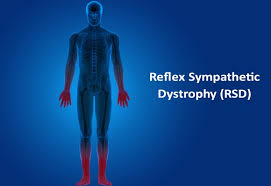
- Reflex sympathetic dystrophy (RSD) is the type of complex regional pain syndrome (CRPS). It happens due to malfunctions in the sympathetic nervous system as well as the immune system. Reflex sympathetic dystrophy causes severe pain in one or even more limbs that last months or longer.
- Reflex sympathetic dystrophy is the older term used to describe one form of Complex Regional Pain Syndrome (CRPS). It is characterized by severe burning pain, most often affecting one of the extremities (arms, legs, hands, or even feet). There are often pathological changes in bone & skin, excessive sweating, tissue swelling as well as extreme sensitivity to touch, known as allodynia.
- Reflex sympathetic dystrophy is sometimes called Type I CRPS, thwhichriggered by tissue injury where there is no underlying nerve injury, whereas Type II CRPS mainly refers to cases where the high-velocity impact (such as the bullet wound) happened at a site & is clglaciatedith the nerve injury.
- This condition is a disorder that causes lasting pain, usually in the arm or even leg, & it shows up after an injury, stroke, or heart attack. But the severity of pain is typically worse as compared to the original injury itself. Sometimes doctors do not know exactly what causes it.
- The term reflex sympathetic dystrophy syndrome isactshe name that doctors use anymore. It is the older term used to describe one form of Complex Regional Pain Syndrome (CRPS).
Prevalence
- Reflex sympathetic dystrophy affects approximately 26 out of every 100,000 individuals. This is more common in females as compared to males, with a ratio of 3.5:1. RSD may affect people of all ages, including children as young as three years old & adults as old as 75 years, but typically is most prevalent in the mid-thirties. RSD Type I happens in 5% of all traumatic injuries, with 91% of all CRPS cases after surgery.
Causes of Reflex sympathetic dystrophy
- RSD happens when the sympathetic nervous system as well as immune system malfunction owing to nerve damage. The damaged nerves misfire, sending the brain excessive signals of pain from the injured area.
- If the person may experience RSD with no prior medical condition, the doctor will try to determine the cause of the RSD if this is the case.
The doctor thinks pain caused by reflex sympathetic dystrophy comes from issues in the sympathetic nervous system. The sympathetic nervous system controls blood flow motions that assist regulate the heart rate as well as blood pressure.
When the patient gets hurt, the sympathetic nervous system tells the blood vessels to get smaller so you do not lose too much blood at the injury site. Later, it tells them to open back up therefore blood may get to damaged tissue & repair it. - When the patient has RSD, the sympathetic nervous system gets mixed signals. This turns on after the injury but does not turn back off. It causes a lot of pain & swelling at the injury site.
Sometimes, the patient can get reflex sympathetic dystrophy even if he/she has not had the injury, even though it is not as common. - Many underlying conditions, as well as factors, may lead to RSD, including:
Trauma, namely fractures, broken bones, or even amputation
Infection
Soft tissue injuries namely, burns and bruises as well.
Sprains
Radiation therapy
cancer
Surgery
Paralysis of one side of a body
Heart attack
Emotional stress
Nerve pressure
Stroke
Stages of the reflex sympathetic dystrophy
- Stage I: Acute inflammation: denervation as well as sympathetic hypoactivity
TiPeriodStarts 10 days post-injury; Lasts 3-6 months
Classic Signs & Symptoms: Pain: more severe as compared to expected; burning or even aching; increased with position, physical condition, or even emotional disturbances
Hyperalgesia, allodynia, and hyperpathia: Lower pain threshold, increased sensitivity, all stimuli are perceived as painful, enhanced pain threshold after that increased sensation intensity (faster as well as greater pain)
Edema: soft and localized as well
Vasomotor/Thermal Changes: warmer
Skin: hyperthermia, and dryness
Other: increased hair as well as nail growth. - Stage II: Dystrophic: Paradoxic sympathetic hyperactivity
Time PPperiod months after the onset of the pain; Lasts about 6 months
Classic Signs as well as Symptoms: Pain: worsens, constant, burning, and aching
Hyperalgesia, allodynia, hyperpathia: present
Edema: Hard, causes joint stiffness
Vasomotor/Thermal Changes: Nothing
Skin: Thin, glossy, cool because of the vasoconstriction, sweaty
Other: Thin as well as rigid nails, osteoporosis & subchondral bone erosion were noted on x-rays. - Stage III: Atrophic
Time PPperiod2 months after the onset of the pain; Lasts for years, or even may resolve & reappear
Classic Signs as well as Symptoms:Pain: Spreads proximally & occasionally to the entire body, may plateau
Edema: Hardening
Vasomotor/Thermal Changes: Reduced SNS regulation, and cooler
Skin: Thin, shiny, cyanotic, and dry
Other: Fingertips & toes are atrophic, thick fascia, possible contractures, demineralization & ankylosis seen on x-rays.
Symptoms of Reflex sympathetic dystrophy
- Reflex sympathetic dystrophy happens in the extremities. This most commonly affects the upper limbs, still, it is possible to get it in the lower limbs as well. Specifically, the patient may experience reflex sympathetic dystrophy in the:
Hands, fingers, arms, shoulders, legs, hips, and knees - Symptoms include:
Stiffness,
Discomfort,
Pain or even burning sensation,
Swelling,
Sensitivity to heat or cold,
Weakness,
Feeling warm to the touch,
Skin redness,
Changes in skin color: often blotchy, purple, pale o,r ,ven red
Skin paleness with the blue tone,
Tenderness,
Sweating around the injured area,
Changes to the skin in an affected area,
Muscle weakness,
Muscle spasms,
Muscle atrophy
Joint pain as well as stiffness,
Nail and hair changes as well, - Most symptoms start at the site of the condition but can spread as reflex sympathetic dystrophy progresses. They may have symptoms on one side but notice them in the opposite limb as the condition worsens. Symptoms can embark as mild & then become more severe, interfering with daily life.
Risk factors
- A person can be more susceptible to reflex sympathetic dystrophy if he/she:
- is between the ages of 40 & 60 years,
- is a woman
- has other inflammatory or even autoimmune conditions:
- Type 1 diabetes
- Rheumatoid arthritis (RA)
- Psoriasis/psoriatic arthritis
- Multiple sclerosis
- Systemic lupus erythematosus (SLE)
- Inflammatory bowel disease
- Addison’s disease
- Graves’ disease
- Sjögren’s syndrome
- Hashimoto’s thyroiditis
- Myasthenia gravis
- Autoimmune vasculitis
- Pernicious anemia
- Celiac disease.
Associated Co-morbidities
- Reflex sympathetic dystrophy may also be associated with:
- Arterial Insufficiency
- Asthma
- Bone Fractures
- Cellulitis
- Central Pain Syndromes
- Conversion Disorder
- Depression/Anxiety
- Factitious Disorder
- Lymphedema
- Malignancy
- Migraines
- Nerve Entrapment Syndromes
- Osteomyelitis
- Osteoporosis
- Pain Disorder
- Peripheral Neuropathies
- Rheumatoid Arthritis
- Scleroderma
- Septic arthritis
- Systemic Lupus Erythematosus
- Tenosynovitis
- Thrombophlebitis
Diagnosis
- The doctors say there is not a definitive test for “Reflex sympathetic dystrophy”. The doctor will require to take the medical history, conduct several tests, as well as perform a thorough physical examination. It is important to diagnose a condition early to prevent it from getting worse, though the diagnosis is not always straightforward. The patient may wait for many months or longer before the doctor diagnoses reflex sympathetic dystrophy.
- Often, the doctors do not know the pain is being caused by reflex sympathetic dystrophy until they had it for some time. When pain does not go away, or is more severe than it should be for the type of injury, it may be the first clue that it could be RSD.
Tests the doctor may perform include: - Bone scans: The test may detect if any of the bones are wearing away at the ends or even whether there are problems with regular blood flow.
- MRI scans: The doctor might order the MRI to look inside the body, specifically at the tissues, for noticeable changes.
- X-rays: These are typically ordered if the syndrome is in later stages to look for a mineral loss in the bones.
- Sympathetic nervous system tests
The doctor may check for other medical conditions before diagnosing reflex sympathetic dystrophy. These conditions are treated differently than RSD. They include:
Arthritis, Lyme disease, muscle diseases, blood clots in the veins, and small-fiber polyneuropathies. - The Budapest Criteria
The Budapest criteria (also famous as the IASP) have been developed for a diagnosis of “Reflex sympathetic dystrophy” but improvements still need to be made. Clinical diagnostic criteria for the RSD syndrome are:
Constant pain, higher as compared to the normally perceived pain,
Minimum 1 symptom in 3 of the following four symptoms. Categories can be reported:
Vasomotor: The temperature asymmetry and/or skin color changes/asymmetry,
Sensory: Hyperalgesia and/or allodynia,
Sudomotor/edema: Changes in sweating,
Motor/trophic: Smaller range of movement, motor dysfunction, and/or changes in hair, nails as well as skin,
Additionally, a patient can also show signs of developing symptoms in at least two symptom categories
No other illness can explain the set of symptoms a patient is presenting with. - Infrared Thermography
Infrared thermography (IRT) is the effective mechanism to find significant asymmetry in the temperature between both limbs by determining if an affected side of a body shows vasomotor differences in comparison to another side. This is reported to have a sensitivity of 93% & a specificity of 89%. The test is hard to obtain so this is not often used for diagnosing ofD. - Sweat Testing
Determining if a patient sweats abnormally. Q-sweat is an adequate machine to measure sweat production. The sweat samples may be taken from both sides of a body at the same time. - Three-Phase Bone Scan
A triple-phase bone scan is the best method to rule out Type I RSD. With the use of technetium Tc 99m-labeled bisphosphonates, an increase in bone metabolism may be shown. Higher uptake of the substance means enhanced bone metabolism and a body part could be affected. A triple-phase bone scan has the best sensitivity, NPV, & PPV than MRI & plain film radiographs. - Bone Densitometry
The affected limb often shows less bone mineral density & a change in a content of a bone mineral. During treatment of an RSD, the state of a bone mineral will improve. So the test may also be used to determine if a patient’s treatment is effective. - Sympathetic Blocks
If a patient appears with vasomotor or even sudomotor dysfunction & severe pain, blocking the sympathetic nerves proves to be an effective technique to evaluate if a sympathetic nervous system is causing pain to remain. The technique needs a local anesthetic or even ablation & is successful if at least 50% of the pain is decreased.
Treatment of Reflex sympathetic dystrophy:
Early treatment is imperative to stop “Reflex sympathetic dystrophy” from worsening or even spreading, but early treatment may be difficult if this takes time to diagnose a condition.
Treatments for Reflex sympathetic dystrophy vary. Certain interventions, as well as medications, can assist to relieve & treat symptoms. The patient may also seek physical therapy & psychotherapy to decrease the effects of Reflex sympathetic dystrophy. The patient may find that the condition improves dramatically with treatment. However, some individuals have to learn how to manage their symptoms.
Medical procedures
- Interventions for RSD include:
- Transcutaneous electrical nerve stimulation,
- Biofeedback,
- Peripheral nerve blocks,
- Spinal cord stimulation,
- Pump implantation,
- Sympathectomy, either chemical or surgical, destroys some of the sympathetic nerves,
- Deep brain stimulation,
- Intrathecal (in the spine) drug pumps,
- Electroacupuncture.
Medical treatment
- Treatment of Reflex sympathetic dystrophy should be immediate, & most importantly directed toward restoration of full function of an extremity. There are several options to treat RSD,
Oral pain-relieving medications including corticosteroids as well as NSAIDs, & acupuncture, provide effective pain relief in
approximately 20% of those with RSD, but it is supported by weak evidence.
Treatments can be geared toward assisting patients to manage symptoms. Amitriptyline reduces depression & acts as a sleeping aid. - Calcium channel blockers may assist to increase circulation through the SNS effect. Intrathecal baclofen, among other measures, increases motor dystonia.
- The excessive inflammatory reaction may lead to an overproduction of free radicals, resulting in the destruction of healthy tissue & possibly leading to RSD. Free radical scavengers have, hence, been proposed to curtail a disease process. To date, three free radical scavengers, namely dimethyl sulfoxide (DMSO), have been investigated for the treatment of RDS.
A score list (based on pain, daily activities, edema, color, as well as a range of motion) showed greater improvement by dimethyl sulfoxide treatment. DMSO seems to provide a mild improvement in range of motion as well as vasomotor instability in patients with RDS. Owing to the inflammatory response seen in RDS, steroids have been used & resulted in significant improvements in the pain, edema & a better post-treatment score. - Intravenous immunoglobulin may decrease pain in refractory RDS conditions.
Hyperbaric oxygen therapy is an effective & well-tolerated method for reducing pain, allodynia, and edema, improving the range of motion in RSD, and also returning the skin color to a normal color.
There is no significant difference between the effectiveness of Dimethylsulfoxide 50% (DMSO) as well as N-acetylcysteine (NAC) in treating RDS type I, but DMSO treatment was more favorable for warm RDS while NAC is more favorable for cold RSD.
Low doses of ketamine infusion have been shown to reduce pain in patients with RDS type I who had been unsuccessful with other conservative methods of treatment. Ketamine blocks central sensitization by affecting an N-methyl-D-aspartate receptor that haaffectedn RDS. - Antidepressants can be utilized to treat associated depression.
Use of surgical as well as chemical sympathectomy shows moderate enhancement in pain scores in patients with Reflex sympathetic dystrophy. There were no significant differences found between surgical & chemical groups when comparing pain scores from day one to 4 months. More high-quality research is required to be done before recommending this as the first line of defense. High frequency repetitive transcranial magnetic stimulation on a motor cortex in addition to pharmacological treatment was effective in decreasing pain. It was demonstrated by the scores on a McGill Pain Questionnaire & Short Form-36 that include different aspects of other pain namely sensory-discriminative & emotional-affective.
Surgery, casts, & ice may be avoided when treating RDS due to they further aggravate the nervous system. Surgery leads to further stress, inflammation, as well as immune system disturbances.
A stellate ganglion block, or even sympathectomy, blocks the nerve pathways causing pain. It can be most beneficial in the early stages of RDS. - Bone demineralization is not unusual in RDS patients, therefore treatment with calcitonin & biphosphonates is suitable. Calcitonin has received considerable interest in the treatment of RDS owing to it is analgesic properties through the release of ß-endorphin and its inhibition of bone resorption.
- Alendronate: Less pain & swelling, more range of motion.
Clodronate: Less pain, increased global assessment & higher perceived efficacy.
Pamidronate: Less pain, higher overall improvement (patient self-reported), & higher functional assessment scores.
Generally, bisphosphonates have been shown to reduce pain as well as swelling & to improve the range of motion of patients with RDS.
Physical Therapy Management
- It is challenging to manage RDS as there is a lack of understanding of the pathophysiologic abnormalities, the lack of specific diagnostic criteria & very low-quality evidence to treat RDS. The main goals of management are the reduction in pain, preservation of limb function, and a return to work as well. Comorbidities namely depression, sleep disturbance, & anxiety also need to be addressed & treated concurrently in the patient-centered, multidisciplinary approach.
- The combination of physical as well as occupational therapy is effective in decreasing pain as well as increasing function in patients who have had RDS for less than one year. Physical therapy focuses on the patient education about the condition and functional activities. Physical therapy intervention could include any of the following:
Elecrotherapy
- TENS: Pain intensity & perception of pain is sometimes relieved through the use of the implanted transcutaneous electrical nerve stimulation (TENS) unit. Electrical stimulation of a spinal cord may decrease pain intensity & improve health-related quality of life. Spinal cord stimulation was more effective compared to conventional medical management in decreasing pain in patients with RSD type I & was also shown to be effective in coeliminatingain in adolescent females two to six weeks after stimulation.
- IFT: Interferential therapy (IFT) is the commonly used modality in physiotherapy practice for pain relief. Pain relief is believed to be achieved through the production of endogenous opioids such as endorphins & enkephalins.
- Deep heat: This modality has used the reduction of pain.
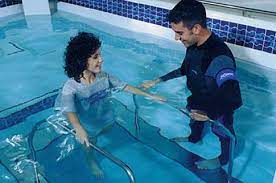
- Aquatic therapy: This therapy allows activities to be performed with reduced weight bearing on the lower extremities. This
(Aquatherapy) is any activity performed in water to help in rehabilitation as well as recovery from Reflex sympathetic dystrophy. This is a form of exercise in warm water & is a popular treatment for patients with neurologic & musculoskeletal conditions. The aims of this therapy are muscle relaxation, increasing joint movement & decreasing pain.
Physiotherapists are often involved in hydrotherapy in the rehabilitation setting. Patient satisfaction & adherence to this form of exercise are often high. The therapeutic effects are often improved by the social setting of the sessions.
- Mirror therapy: In mirror therapy (MT), the mirror is used to originate the reflective illusion of the affected limb into rickhe brain into thinking motion has happened without pain, or to create positive visual feedback of the limb movement. This involves placing an affected limb behind the mirror. A mirror is positioned so a reflection of the opposing limb appears in place of the hidden limb.
The physical therapist may create this illusion with the mirror box. The device is simply a box with a mirror in the center permitting the hands to be placed on either side of the mirror. An affected limb is always covered while the unaffected limb is placed on the other side so its reflection may be seen in the mirror. - Gradual weight bearing
- Stretching
- Fine motor control
This is essential to recognize that RDS typically follows blood vessel pathways, thus symptoms can not always follow neural patterns. As a result of a spread pattern, RDS management should also be provided bilaterally, because of the contralateral connections present between the extremities. Management can be based on the basic principles of pain treatment (pain & symptom relief, supportive care, rehabilitation), and owing to a lack of evidence in the treatment of RDS treatments are based on that of other neuropathic pain syndromes.
Stretching exercises

- Lying Hamstring Stretching
This stretch is ideal for those with tight hamstrings muscle, who may not handle the forward fold or the single-leg hamstring pull. This described stretch will permit the patient to fully relax as the legs rest against a wall, gently stretching the hamstrings and making space in the lower back. This stretching can be done as many times a day as the patient see fit, as far as per the preference. Embark by finding a wall that the individual may rest the legs against. After that, lay on the floor & place both feet on the wall above you. Next, move closer to the wall slowly, and try to get the back of the legs to rest fully against the wall. Then, stop when the patient feels the stretch, & slowly move closer to the wall as you feel ready. Hold the described stretching for 30-second intervals, moving closer as he/she sees fit. - Lying Spinal Twist
A stretching exercise is the best way to release, stretch, as well as decrease pain along the side of the back & spine as well. These muscles are most likely tight on everyone, as people are affected by everyday activities.
This is a more advanced stretching, as it can feel intense for those with tight back muscles or a lack of mobility. If an individual deals with chronic back pain, he/she may require to work a way through some of the other back stretches before progressing to this stretching. For the stretch, the patient will need the space to lie down as well as extend the arms on the flat surface, once a day on each side. Start by lying on a back, with both legs extended straight out, and the arms out in the T for the starting position. Pick the right leg up to the ninety-degree angle, parallel to a roof & place a left hand on a right knee. Gradually twist the right leg to the left side of a body, whereas turning a head to the right. Make sure to stop when a patient feels a light stretch, and ease slowly into the deeper stretch. Allow gravity to pull a knee towards the ground, whereas keeping the right arm & both shoulders on the ground. Hold until a spine has released as well as repeat on the opposite side. - Standing Calf Stretch
Stand about three feet from a wall & place the palms flat on the wall, shoulder-width apart. After that, place a right foot behind a patient with toes facing forward. Next, keep a right knee straight, the heel on the ground as well as lean forward. Hold the stretch for a few seconds and repeat with the other leg as well. Do three repetitions in a day. - Shoulder Stretch
First of all, stand straight as well as grab one elbow with an opposite hand and pull the elbow across the chest. Hold for thirty seconds & repeat on the other side also. Do it ten times a day.

- Butterfly Groin Stretch
To begin with, sit on the floor upright, bend the knees, press the soles of the feet together, as well as pull them toward the groin. After that, grasp the feet, drop the knees to the sides and gently apply pressure until he/she feels a stretch on the groin as well as inner thighs. Turn the chest to the left and then right. Do three times per session with 30 seconds of rest on each side. - Triceps Stretch
This triceps stretching exercise is one of the most popular upper-body stretches, that loosens up the muscles on the back of the upper arms, making it great to do after a chest or shoulders workout. Kneel, sit, or even stand tall with feet hip-width apart, as well as arms extended overhead. Then, bend the right elbow & reach the right hand to touch the top middle of the back. After that, reach a left-hand overhead and grasp just below the right elbow. Gradually pull the right elbow down & toward the head. Switch arms and repeat. Stretches neck, shoulders, back, as well as triceps. Do three repetitions in a day. - Lying Pectoral Stretch
To begin with, lie on a stomach(prone position) with both arms extended to the sides therefore a body is in the T shape. After that, push off the ground with the left hand as well as bend the left knee for balance as a patient embark to roll to the right side. A patient should feel this in the right-side pectoral muscles. As the mobility increases, a patient may be able to stretch further as well as roll a body further. Repeat on the other side too. Do three repetitions in a day. - Knee to Chest Stretch
To start with, lie on a back(supine position) with both legs extended. Next, pull a right knee into the chest, during keeping a left leg straight and a lower back pressed to the floor. Next, hold for 30 seconds. Repeat on the other leg as well. Stretches lower back, hips, and hamstrings. Do three sessions in a day. - Seated Neck Release
To embark with, stand with feet shoulder-width apart, or sit down with a back straight and chest lifted. After that, drop a left ear to a left shoulder. Next, to deepen a stretch, gently press down on a head with the left hand. Hold for 30 seconds per repetition. Do three repetitions in a day. - Biceps Stretch
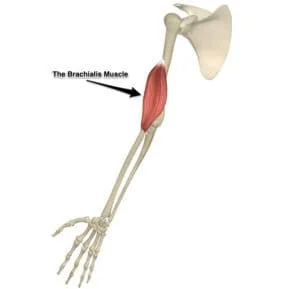
To embark take the arms out to the sides, slightly behind the patient, with the thumbs up, such as the hitchhiker. Next, rotate the thumbs down as well as back until they are pointing to a back wall to stretch the biceps muscle. After that, hold for 30 seconds, repeating one to three times per session.

- Chest stretch in the door
Tightness in the chest, & shoulders, is often found in people with poor posture. This can lead to bigger problems later in life.
Doing daily chest-opening stretches can help prevent tightness and promote proper posture as well as better breathing.
Equipment required: Doorway.
Muscles used: Chest, anterior deltoid, as well as biceps
To embark with, a clinician giinstructs patient that stands in the middle of the open door. Next,
place the forearms on each side of a doorframe, if possible by the patient. If a doorway is also wide, do one arm at a time. Then,
slowly lean forward into the doorway until a patient feels a stretch through the front of the chest & shoulders as well.
Only go as far as comfortable. Hold the position for nearly thirty seconds. Do three times in a day & repeat on the other side also. - Runner’s stretch
This stretching is great for the lower body, especially for the hamstrings as well as hip flexors. Tight hamstrings muscle are sometimes the culprits of low back pain. This may be worse in people who sit for extended peperiodsEquipment needed: None
Muscles used: Hamstrings, hip flexors, low back, as well as calves.
To begin with, stand with both feet hip-width apart. Then, step back with a left leg and place both of the hands on the ground on either side of a right foot, about shoulder-width apart. Next, lower the hips till a patient feels the stretching in the front of the left hip & leg. Hold it for nearly 30 seconds. Slowly, straighten the front leg, keeping the hands planted on the floor. Do not worry if a patient cannot get a leg completely straight. Hold it for around 30 seconds. Repeat on the other side too. Do it three times a day. - Upper Back Stretch
Clasp both hands together in front of a patient as well as round the back, pressing the arms away from a body to feel a stretch in the upper back. Next, contract the abs to get the most out of the stretch. Next, hold for around 30 seconds, repeating three times also. - Extended Puppy Pose
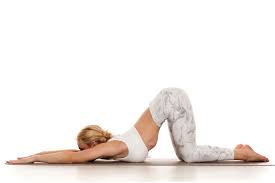
Embark on all fours. Then, walk the arms forward a few inches & curl the toes under. After that, push the hips up and back
halfway toward the heels. Next, push through the palms of the hands to keep the arms straight as well as engaged. Hold for about 30 seconds – 2 minutes. Stretches back, shoulders, and glutes as well. Do it three times a day.
Passive range of motion exercise
These are helpful for joints that have become inactive because of injury or even paralysis. In the passive range of motion exercises, a patient does not do any action themselves; instead, a clinician moves the limb or body part around a stiff joint, gently stretching muscles as well as reminding them how to move correctly. In most cases, therapeutic stretching exercises are also combined with passive range of motion exercises to get faster recovery. Here, a physical therapist stretches a patient’s soft tissue to relax the surrounding muscles & relieve tension. Passive range of motion exercises also assists minimize stiffness & rigidity in the joints that have been immobilized.
According to the involvement of the joint, the therapist may do passive range of motion exercise.
- Passive shoulder external rotation
To start with, the therapist tells the patient to take a relaxed position, namely supine. After that, the clinician should move an arm out to the side at shoulder level, as well as with the elbow bent, the arm should be held, at an elbow & the wrist. Next, roll it outward. Slowly, holding the shoulder out. Do ten repetitions per session. Do three sessions per day. - Passive shoulder internal rotation and external rotation
First of all, the clinician should tell a patient to take a relaxed position, like supine. Then, the clinician should move the arm inward to the side at the shoulder level, as well as the elbow bent to the 90degrees, with an arm should be held at the elbow and the wrist as well. Do ten repetitions in a session. Do three sessions in a day. After that, move the hand outward for external rotation.
- Passive shoulder flexion
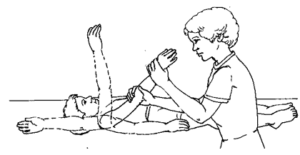
To embark with, tell the patient to take a relaxed position, namely supine. Then, the therapist should hold an arm at the elbow & the wrist. Next, the therapist moves it straight forward as well as upward toward the ear side. After that, bring back to the beginning position. Do ten repetitions per session. Do three sessions per day. - Passive shoulder abduction and adduction
First of all, the physical therapist asks the patient to take a relaxed position, such as supine. Next, a physical therapist should hold the arm at an elbow and wrist as well. Then, a physical therapist moves it away from a body’s midline and a clinician tries to touch the ear. Then, bring back to the starting position. Do ten repetitions in a session. Do three sessions in a day. - Passive elbow flexion and extension
First of all, the physical therapist may support the patient’s elbow or even upper arm with one hand as well as hold the wrist or even forearm with the other hand. After that, the therapist should gradually bend from an elbow & have the hand touch the elbow if possible, then come back to the starting position. Do it ten times per session. Do three sessions per day. - Passive elbow supination as well as pronation
To begin with, a clinician tells a patient to take the supine or even sitting position with the supported back. After that, the therapist should grasp a hand by shaking hand. Then, the physical therapist moves a hand in supination which is in pronation, so a palm of a hand should face the ceiling. Do it ten times per session. Do three sessions per day. Then, place the hand in full supination and then rotate in the pronation meaning outward side. - Passive wrist extension
To start with, the therapist tells the patient to take a relaxed position, like sitting on the chair as well as affected hand hanging on an edge of the table with full pronation. Next, place the rolled towel under an affected hand. After that, the physical therapist takes his/her position opposite the patient. The clinician tells the patient that tries to move a wrist upward, but the patient cannot move the wrist then the therapist moves a hand in the upward direction till a stretch can be felt by the patient. Do this motion ten times per session. Do three sessions per day. - Passive wrist flexion
To begin with, tell the patient to take a relaxed position, such as sitting on the chair as well as an affected hand hanging on the edge of the table with full supination. Next, place the rolled towel under an injured hand. Then, the therapist takes his/her position opposite the patient. During a physical therapist performs a motion, he/she gives a command to the patient to try to move a wrist down & a physiotherapist moves the wrist downward direction until a stretch should be felt by the patient. Do it ten times per session. Do three sessions in a day. - Passive wrist ulnar deviation
To begin with, a clinician tells a patient to take a comfortable position, such as sitting on a chair, & the injured hand should be in mid-pronation. In addition, place the rolled towel under the injured hand. Next, the physical therapist takes his/her position opposite a patient. Then, the clinician gives the command to a patient that tries to move a wrist down during a physiotherapist performs the motion, and then a therapist moves the wrist in the downward direction till the stretch should be felt by the patient. Do this movement ten times per session. Do three sessions in a day. - Passive wrist radial deviation
To embark with, the physical therapist tells the patient to take a relaxed position, such as sitting on a chair & the affected hand should be in mid supination position. Next, place the rolled towel under the affected hand, and the clinician takes his/her position opposite the patient. After that, the physiotherapist gives the command to the patient that tries to move the wrist upward during a clinician performs the movement, and the therapist moves the wrist in the upward direction till a stretch should be felt by the patient. Do this action ten times per session. Do three sessions in a day. - Passive finger flexion
To start with, the therapist gives the command to the patient that places a hand with the affected finger flat on the table, with palm up. After that, the therapist places his/her free hand on the back of the fingers as well as moves the fingers inward like bending the fingers. Next, an affected finger will be free to move and then straighten the finger. Repeat it ten times in a session. Do three sessions per day. - Passive thumb flexion
To begin with, the physiotherapist tells the patient to take a relaxed position, namely sitting on the chair & the hand should be in mid pronation. Next, a rolled towel is put under the affected hand. After that, use one hand of the therapist to bend the thumb down therefore the gentle stretch is felt. Repeat it ten times per session. Do three sessions in a day. - Passive thumb abduction
To start with, the physical therapist tells the patient to take a relaxed position, like sitting on the chair with the rolled towel under the affected hand, but a hand should be in mid-pronation. After that, stretch a thumb out from the palm as if the patient is opening it up to hold the large jar, but remember to stretch at the big thumb knuckle, not the tip. Repeat ten times per session. Do three sessions in a day. - Passive thumb opposition
First of all, the physical therapist gives the command to the patient to take a relaxed position, namely sitting on the chair. Then, touch a thumb to the tip of each finger. When the patient iscano the thumb opposition exercises easily, after touching further down on each finger till the patient is an ouch the base of each finger. Repeat it ten times in a session. Do three sessions per day. - Passive hip with knee flexion
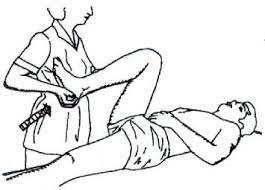
To embark with, the patient should take a relaxed position, namely supine. Then, cradle the leg by placing one hand under the bent knee, & then the other hand grasps the heel for stabilization. After that, lift the knee & bend it toward the chest side, with a kneecap pointed toward the roof. Do not allow the hip to twist while the motion. A foot should stay in a straight line with a hip, but not swing in or out. Next, a leg is lowered to the beginning position. Do it ten repetitons per session. Do three sessions per day.
- Passive hip abduction as well as adduction
To start with, a patient can take a comfortable position, namely supine. After that, the therapist cradles a leg by placing the hand under the knee & holding it. Then, place another hand under a heel to stabilize the hip joint. After that, keeping the knee straight, move a leg along the surface of a bed, away from another leg, to around 45 degrees, then bring a leg back towards the other leg. Do ten repetitions in a session. Do three sessions in a day. - Passive hip external rotation and internal rotation
To start with, the clinician tells the patient to take a comfortable position, namely supine with a back supported. Then, the therapist grasps the knee which is 90 degrees flexion position along with a hip at 90 degrees flexion. After that, the physical therapist rotates the leg outside and inside. Do it ten times in a session. Do three sessions per day. - Passive knee flexion in supine
To begin with, a clinician tells a patient to take a comfortable position, namely supine. Next, a therapist places one strong hand on the front of the thigh & grasps the ankle joint with the second hand. After that, a physiotherapist bends the knee & the hip toward a face, when the physical therapist moves the leg, a patient should also try to assist in bending the knee as well as the hip, which helps in the strengthening of the knee flexors. The clinician holds the affected leg at the endpoint for five seconds. Do it ten times per session. Do three sessions in one day. - Passive dorsi-flexion
To embark with, the physical therapist instructs the patient to take a relaxed position, such as lying on the bed with the knee straight & the foot should out of the bed. Next, the clinician cups the heel with one hand & places the other hand on the bottom of the foot. After that, the physical therapist gently pushes the foot up so that the toes point toward the head of the patient. Perform the exercise ten times per session. Do three sessions per day.

- Passive plantar-flexion
First of all, the clinician should give the command to the patient, to take a relaxed position, such as lying on the bed with the knee straight and the foot should out of the bed. After that, the therapist cups the heel of the uninjured foot with one hand & places the other hand on the bottom of the foot. Next, the therapist gently pushes the foot down so that the toes point away from the body. The physical therapist should make sure, do not to hold the auctions the endpoint. Perform it ten times in a session. Do 3 sessions in a day. - Passive inversion
To begin with, ask the patient to take a relaxed position, such as lying on the bed with the knee straight & the foot should out of the bed. After that, the physical therapist cups the heel with one strong hand and places another hand on the bottom of the foot as well. Next, the clinician gently turns the foot inward, not allowing the leg to rotate. Do it ten times in a session. Do three sessions in a day. - Passive eversion
To start with, the therapist should give the command to the patient to take a relaxed position, such as lying on the bed with the knee straight & the foot should out of the bed. Then, the physical therapist cups the heel with one hand & places another hand on the bottom of the foot. After that, the therapist gently turns the foot outward but does not allow the leg to rotate. Do it ten times per session. Do three sessions per day.
Active-assistive range of motion exercises
As the name suggests, these exercises mainly involve little assistance from a physical therapist. A patient does most of the motion, but they get partial help to complete the movements correctly. In most cases, this restricted movement is the result of weakness or even pain caused because of falls, bruises, or even accidents, up to serious injuries. A physical therapist mostly uses the strap or the band to secure a joint before assisting the movements. Initially, a patient can suffer a great deal of pain & weakness when performing these exercises. However, with time, they have a great scope for gradual as well as lasting improvement in the range of motion around the affected joint.
- Active-assisted shoulder flexion and extension
To begin with, the physical therapist should tell the patient to stand in front of the finger ladder. Next, place an affected hand on the finger ladder as well as move the fingers upward on a ladder meaning as far as possible improve the steps of the ladder & do shoulder flexion after that return to the embarking position. Do it ten times per session. Do three sessions per day. - Active-assisted shoulder abduction and adduction
To embark with, the physical therapist may tell a patient to stand at a 90degrees angle from the finger ladder. However, the affected side should be in front of the ladder. Next, place an affected hand on a finger ladder as well as move the fingers upward on the ladder meaning as far as possible increase the steps of the ladder & do shoulder abduction, after that return to the beginning position. Do it ten times in a session. Do three sessions in a day.

- Active-assisted elbow flexion and extension
To start with, the therapist should give the command to the patient that takes a relaxed position, namely sitting on the chair with a back supported. After that, the therapist should support a patient’s elbow or even upper arm with one hand & hold the wrist or forearm with another hand. Next, the clinician should tell the patient to move a forearm to the face side, meaning bend an elbow, but when the patient stops to do this motion, the therapist assists in completing a full range of elbow flexion and come back to the starting position. Do ten repetitions in a session. Do three sessions in a day. - Active-assisted forearm supination and pronation
To embark with, the physical therapist should give the command to a patient to take a relaxed position, namely sitting on the chair with the supported back, as well as the elbow should be 90 degrees flexed with full pronation. Next, the physical therapist should support a patient’s elbow or even upper arm with one strong hand & hold the wrist or forearm with another strong hand as well. After that, a physical therapist should tell a patient to rotate the forearm outward so the palm will be facing the ceiling, but when a patient stops doing this action, a physiotherapist helps to complete the full range motion after that come back to the starting (pronation) position. Do ten repetitions per session. Do three sessions per day. - Active-assisted wrist flexion and extension
To start with, the physical therapist gives commands to the patient to take a relaxed position, such as sitting on the chair & an affected hand relaxed on the edge of a table with full pronation. After that, place a rolled towel under the affected hand. Then, the physiotherapist takes his/her position opposite a patient. Next, the therapist gives commands to a patient that tries to move a wrist down, when the patient is unable to move his/her hand while that time a clinician prassistshe patient to reach the full range. Do it ten times in a session. Perform three sessions in a day.
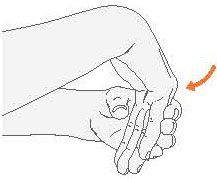
- Active-assisted wrist ulnar deviation and radial deviation
First of all, the physical therapist tells the patient to take a relaxed position, namely sitting on the chair, & the affected hand should be in mid-supination. Next, the clinician places the rolled towel under the affected hand. Then, the examiner takes his/her position opposite a patient. Moreover, the physical therapist gives the command to the patient that tries to move a wrist down, & when the patient stops while performing the movement, then the therapist assists the patient to reach the end range. Do it ten times per session. Do three sessions in a day. Next, come to the neutral position, and then move the affected hand upward towards the roof. - Active-assisted hip abduction and adduction
Hand placement: The patient lays on the uninjured hip in the side-lying position, & the injured hip is on the top. For comfort, a small pillow may be placed between the two knees. After that, the clinician should apply for additional assistance in lifting the injured leg to the side with support above the knee joint & at the ankle, if needed. Remember, the movement is straight up & slightly back towards the therapist. Then, the therapist makes sure that the top hip is rolled forward of an imaginary vertical line drawn straight through both hips, & does not let a patient roll backward at the hip when completing this exercise. - Active-assisted hip flexion and extension
Hand placement: The patient lies on the back to perform a hip flexion with straight knees, then the clinician supports the patient’s thigh above the knee joint & the ankle joint. Next, the clinician should give the command to the patient that moves the leg upside towards the roof, & a therapist should apply additional assistance is only needed to the patient to lift a thigh off the supporting surface as well as the leg back to the bed, in the event the patient fatigues & is unable to independently lower a leg slowly. After that, the physical therapist should watch for signs of muscle fatigue which includes quivering or even shaking muscles around the hip and increased feeling of weight in the affected limb; additional support may be needed. Do three sessions per day. Do three sessions per day. - Active-assisted hip internal rotation and external rotation
Hand placement: A patient lays on the back to perform the hip internal rotation with straight knees, after that a physical therapist supports the patient’s thigh above a knee joint as well as the ankle joint. After that, a clinician should give the command to a patient that moves the leg inward towards another leg side as well as outward meaning away from the unaffected leg & the therapist should apply extra help, which is only required for a patient to move the thigh inward & then the leg back to the starting position, in the event patient fatigue & is unable to independently move a leg back slowly. After that, a physiotherapist should watch for signs of muscle fatigue which includes quivering or it can see shaking muscles around a hip and an increased feeling of weight in the affected limb; additional assistance can be needed. Do three sessions in a day. Do three sessions in a day. - Active-assisted knee flexion in supine
The therapist should tell the patient to take a comfortable position, such as supine. After that, the physical therapist places one strong hand on the high & grasps the ankle joint with the other hand. Then, the physical therapist gives the command to the patient that bends the knee as well as the hip toward the face side. When the patient stops to complete the entire range, then the therapist helps to complete the knee flexion. Do it ten times per session. Do three sessions per day.
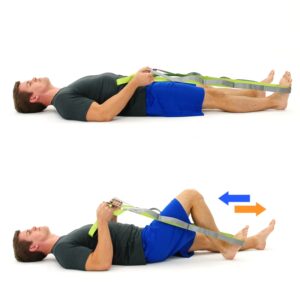
- Active-assisted dorsiflexion and plantar flexion
To begin with, tell the patient to take a relaxed position, namely lying on the bed with the knee straight and the foot should out of the bed. After that, the therapist cups the heel with one hand & places another hand on the bottom of the foot as well. Next, the clinician gives the command to the patient that moves the foot upward as well as downward as far as the patient can, & when the patient is not able to move the foot between the movement, the clinician assists the patient to reach the entire range of the motion. Thus, the toes move towards a face. Do the exercise ten times in a session. Do three sessions in a day. - Active-assisted inversion and eversion
To start with, the physical therapist tells a patient to take a relaxed position, such as lying on the bed with the knee straight & the foot should out of the bed. Next, the therapist cups the inner border with one hand & places another hand on the bottom of the foot. Then, the clinician gives the command to a patient that moves their foot inward as well as outward as far as patient can, & when a patient is not able to move the foot inward in between the motion, a physiotherapist assists the patient to reach the entire range of the movement. Perform ten times per session. Do three sessions per day. - Active assisted toe flexion and extension
First of all, the physical therapist tells a patient to take a relaxed position, such as lying on the bed with the knee straight and the foot should out of the bed as well. Then, the therapist cups the toes with one strong hand & places another hand on the bottom of a foot. Next, the clinician gives the command to the patient that moves the toes toward the floor as far as the patient can, and when the patient is not able to bend the toes in between the movement, the therapist assists the patient to reach the full range of the toe flexion. Do it ten times in a session. Do three sessions per day.
Active range of motion exercises
These exercises purely involve very small assistance from a physiotherapist. A patient is entirely capable of performing these exercises, & most often, a clinician’s involvement is limited to verbal cues as well as directions on how to improve a posture as well as movement involved in the exercises. They are most useful in cases of minor(small) injuries that do not severely restrict the movement of body parts but are painful, uncomfortable, or even hindering nevertheless.
- Shoulder flexion
To start with, the physiotherapist should instruct the patient to take a comfortable position, namely sitting. After that, the patient should be commanded by the therapist to begin with an arm by the injured side & slowly lifts the hand toward the roof with the elbow straight. Then, slowly bring the arm back down by a side with the straight elbow. Repeat it ten times per session. Do three sessions per day.

- Shoulder extension
First of all, the clinician should tell a patient to take a comfortable position, such as supine or even sitting, with a hand that should be flexed. Then, a patient may be commanded by the clinician that performs with the arm by the affected side, as well as slowly bring the hand toward the ground with an elbow straight. Repeat it ten times in a session. Do three sessions in a day. - Shoulder abduction
To begin with, the therapist should tell a patient to take a comfortable position, such as supine, side-lying, or sitting. After that, a patient should be commanded by the physical therapist that starts to do this exercise with the arm by the affected side, slowly lift the hand but move by the side toward the ground with an elbow straight. Next, slowly start an arm back down by the side with an elbow straight. Repeat it ten times in a session. Do three sessions in a day. - Shoulder internal rotation
To embark with, the physiotherapist tells the patient to take a comfortable position, such as supine or standing. After that, the patient should be instructed by the therapist to raise the arm to shoulder height at a 90- degrees angle to a body, next rotate the hand inward in standing or upward in supine until a hand is even with the elbow. Then, gradually let the hand rotate to the beginning position. Do it ten times per session. Do three sessions per day. - Shoulder external rotation
To begin with, the clinician should give instructions to the patient to take a relaxed position, such as supine or even standing. Next, a patient should be commanded by the physical therapist to raise an arm to shoulder height at a 90 degrees angle to the body, after that rotate a hand outward, if the patient is in standing or even downward if the patient is supine till the hand is even with the elbow. Then, gradually let the hand rotate to the beginning position. Do it ten times in a session. Do three sessions in a day. - Active elbow flexion and extension
First of all, the physical therapist tells the patient to take a relaxed position, like sitting or standing. After that, a clinician gives a command to the patient that bends the elbow meaning moving a forearm toward the face side and then coming back to the starting position which is an extension. Do it ten repetitions per session. Do three sessions per day.
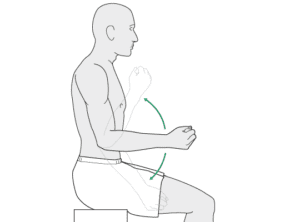
- Active forearm supination and pronation
To begin with, a physical therapist tells the patient to take a relaxed position, such as sitting or even standing with an elbow around 90 degrees of flexion. After that, the physiotherapist should give the command to the patient that moves the forearm outward so a palm will face the roof, then come back to the starting position of the forearm pronation. Do it ten times per session. Do three sessions in a day. - Active wrist flexion and extension
To embark with, the physical therapist tells a patient to place the forearm on a table on the rolled-up towel for padding with the hand hanging on the edge of the stable surface, like a table with the wrist in full pronation. Next, the therapist should give the command to the patient to move the hand down until a patient feels the mild stretch, and return to the starting position. Do it ten times per set. Do three sets in a day. Next, the therapist tells the patient to move the hand upward towards the roof for wrist extension. - Active wrist ulnar deviation and radial deviation
It is the responsibility of the clinician to give the command to a patient to take a relaxed position with the support of a forearm on a table on the rolled-up towel for padding or on the knee, along with a thumb upward in the position. After that, move a wrist down through its full range of motion. Do it ten times per session. Do three sessions in a day. Next, move the wrist upward for the wrist radial deviation towards the roof side. - Active thumb flexion and extension
A physical therapist gives the command to the patient to take a relaxed position with a forearm supported on the table on a rolled-up towel for padding or on a knee. After that, the thumb is positioned outward, & moving the thumb across a palm as well as back to the beginning position. Do it ten times in a session. Do three sessions in a day. - Active thumb abduction and adduction
To start with, the physical therapist tells a patient to take a relaxed position, such as sitting on the chair with a rolled towel under the injured hand, but a hand should be in mid-pronation. Then, tell a patient to stretch the thumb out from the palm as if the patient is opening it up to hold a large jar, but remember to stretch at a big thumb knuckle, not at the tip. Repeat ten times per session. Do three sessions in one day. - Active thumb opposition
First of all, tell the patient to take a relaxed position, like sitting on a chair. After that, a physical therapist gives a command to touch a thumb to the tip of each finger. Next, when the patient iscano this action effortlessly, touch further down on each finger till the patient is can touch the base of each finger. Repeat ten times in a session. Do three sessions per day. - Active finger flexion
To embark with, the physical therapist places a hand with the affected finger flat on the table, with palm up. Next, the clinician gives the command to a patient to bend the fingers inward. Then, straighten the fingers. Repeat it ten times in a session. Do three sessions per day. - Active thumb opposition
To start with, tell the patient to take a relaxed position, namely sitting on the chair. After that, a physiotherapist gives a command to touch the thumb to the tip of each finger. Next, when the patient iscano it effortlessly, touch further down on each finger till the patient can touch the base of each finger. Repeat it ten times in a session. Do three sessions per day. - Active hip flexion with knee flexion
To start with, a physical therapist tells the patient to take the supine position. After that, the clinician should give the command to the patient that bends a healthy hand. Do it ten times per session. Do three sessions per day. - Active hip abduction and adduction
To begin with, the physical therapist should give a command to a patient that takes a relaxed position, namely side-lying with the affected leg up. After that, the therapist tells the patient to move the leg up towards the ceiling as far as possible, but without any external support, & then return to the beginning position. Do ten repetitions in a session. Do three sessions in a day.

- Active hip internal rotation and external rotation
To start with, a therapist gives the command to the patient to take a comfortable position, like supine. After that, the therapist gives the command to the patient that rotates the leg inward towards the unaffected leg side as far as possible, without any external support. Do it ten times per session. Do three sessions per day. After that, move the leg outside for the external rotation. - Active knee flexion in supine
To start with, a clinician should tell a patient that takes a comfortable position, like supine. Next, a physiotherapist gives the command to a patient that bends the knee with the hip as far as possible but does not hold at the endpoint. Do it ten times per session. Do three sessions in a day. - Toe flexion
To do the exercise: To start with, the therapist tells a patient to take a sit-up straight on the chair, with the foot flat on the floor. Next, place the left foot on the right thigh. Then, they move the toes down toward the floor. Do ten repetitions in a session. Do three sessions in a day. - Active dorsiflexion and planterflexion
To embark with, the clinician tells the patient to take a relaxed position, namely lying on the bed. After that, the physical therapist should give the command to the patient to bend the foot toward the face side meaning upward as far as the patient can. Repeat it ten times per session. Do three sessions in a day.
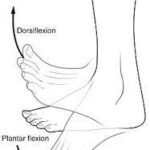
- Active ankle inversion
To begin with, the physical therapist tells the patient to take a relaxed position, like lying on the bed. Then, the physical therapist should give the command to a patient to move the foot inside as far as the patient can. Repeat it ten times per session in one set. Do three sessions in a day. - Active ankle eversion
To start with, the physical therapist gives the command to a patient to take a comfortable position, like lying on the bed. After that, a clinician should give the command to the patient to move the foot outside as far as the patient can, but at the endpoint, the hold should not be taken. Repeat it ten times per session. Do three sessions in a day.
Chronic Phase
- Lymphatic drainage may be used to facilitate regression of edema. Tender areas are recommended to be treated in the following order: more severe before less severe, more proximal as well as medial before more distally & laterally located points & the area of the greatest accumulation of tender areas is treated first. When tender parts are located in the row, the middle is treated first.
Therapeutic exercise includes isometric strengthening therapy followed by active isotonic training in combination with sensory desensitization programs. Strengthening exercise training includes exercises for all four extremities & the trunk. Desensitization programs consist of giving stimuli of various fabrics, different pressures (light or even deep), vibration, tapping, heat, or cold. The exercises may be stress-loading (i.e. walking, carrying weights), endurance training as well as functional training. When RDS happens in the lower extremities, gait re-training is recommended. - Mirror therapy or mirror visual feedback
Mirror therapy(MT) is where both hands are placed into the box with the mirror separating the two compartments & whereas moving both hands, a patient watches a reflection of the unaffected hand in the mirror.
There is various evidence to suggest that mirror therapy has the effect of:
Decreasing pain intensity as well as improving function in post-stroke RDS,
A significant improvement in the pain,
Increasing function (low-quality evidence), - Neuromodulation or Invasive Stimulation Techniques
Neuromodulation contains peripheral nerve stimulation with implanted electrodes, epidural spinal cord stimulation, deep brain stimulation & electrotherapy. Electrotherapy includes transcutaneous electric nerve stimulation TENS, spinal cord stimulation (SCS) as well as non-invasive brain stimulation (repetitive transcranial magnetic stimulation). These techniques assist to decrease pain, even though further trials are required
Strengthening exercises
- Squat
Stand with the feet slightly wider as compared to hip-width apart. Next, lower the hips into the squat as you bend the knees & keep the back flat. After that, continue to lower yourself till the thighs are parallel to the ground. Then, push into the ground through the heels to return to embark. It is one repetition. Keep the heels flat as well as knees aligned with the second toe so they do not cave in. The squat targets the glutes, quads, & core muscles. If this is too challenging, try starting with the chair squat: Squat in front of the chair (or bench) & lightly tap the butt to the chair with each repetition. Do it ten times per session. Do three sessions per day. - Deadlift
Stand with the feet hip-width apart, knees slightly bent, & arms relaxed by the front of the quads, with the dumbbell in each hand.
This is the embarking position. Hinge forward at the hips & bend the knees slightly as you push the butt way back. Keeping the back flat, slowly lower the weight along the shins. A torso may be almost parallel to the ground. Keeping the core engaged, push through the heels to stand up straight & come back to the beginning position. Keep the weight close to the shins as you pull up. Pause at the top & squeeze the butt. It is one repetition. The deadlift is the hip-hinging movement that targets the hamstrings & glutes. It also engages the shoulders, back, as well as the core. Do ten repetitions per session. Do three sessions per day. - Glute Bridge
First of all, lie on the back with the knees bent & feet flat on the ground, hip-width apart. Hold the dumbbell in each hand & rest the weights right under the hip bones. It is an embarking position. Squeeze the glutes & abs, as well as push through the heels to lift the hips a few inches off the ground, until the body forms a straight line from the shoulders to the knees. Hold for a second & then slowly lower the hips to come back to the beginning position. This is one repetition. Do ten repetitions per session. Do three sessions per day.

- Push-Up
Start in the high plank with the palms flat on the ground, hands shoulder-width apart, shoulders stacked directly above the wrists, legs extended behind you, as well as core & glutes engaged.
Bend the elbows & lower the body to the ground. Drop to the knees if needed. After that, push through the palms of the hands to straighten the arms. It is one repetition. Do three repetitions per session. Do three sessions per day.
A push-up is the push or press motion that works all the pressing muscles in the upper body, including the chest, shoulders, as well as triceps. It can assist you to improve in strength & form when performing dumbbell or even barbell chest presses. - Bent-Over Row
Stand with the feet hip-width apart, holding the dumbbell in each hand with the arms at the sides.
With the core engaged, hinge forward at the hips, pushing the butt back. Bend the knees as well as make sure you do not round the shoulders. ( The hip mobility & hamstring flexibility will dictate how far you can bend over.) Gaze at the floor a few inches in front of the feet to keep the neck in a comfortable, neutral position. Do a row by pulling the weights up toward the chest, keeping the elbows close to the body, as well as squeezing the shoulder. Blades for 2 seconds at the top of the motion. The elbows should go past the back as you bring the weight toward the chest. Gradually, lower the weights by extending the arms toward the ground. It is one repetition. Do ten repetitions per session. Do three sessions per day. - Hollow-Body Hold
To embark with, lie faceup on the mat with the legs extended as well as arms straight over the head, keeping them close to the ears. Contract the abs to press the lower back into the floor. Point the toes, squeeze the thighs together, squeeze the glutes, & lift the legs off the floor. Lift the shoulders off the floor and keep the head in a neutral position so that the patient not straining the neck. The legs & mid-back should both be off the floor, and you should be in the shape of the banana, with just the lower back as well as hips on the ground. Hold this position for as long as the patient can while maintaining proper form. Do ten repetitions per session. Do three sessions per day. - Dumbbell Chopper
Stand with the feet wider than hip-width apart, core engaged, hands clasped together, or even holding the small towel (or dumbbell once the patient has progressed) in both hands by the left leg. Raise the arms diagonally in front of the body to the upper right of the reach, allowing the torso as well as toes to naturally rotate to the right as you twist.
Now “chop” the weight down to the left, bringing it across the front of the body & aiming for the left ankle, allowing the torso & toes to naturally rotate in that direction. Focus on keeping the lower body stable & rotating from the core. It is one repetition. Do all the reps on one side, and then switch sides & repeat. Do ten times this exercise per session. Do three sessions in one day.

- Reverse Lunge
Stand with the feet about shoulder-width apart as well as engage the core. Next, step backward with the right foot, landing on the ball of the right foot & keeping the right heel off the floor. Bend both knees to 90 degrees as he/she sinks into the lunge. Focus on keeping the core engaged as well as the hips tucked ( do not stick the butt out). Sometimes it may be helpful to place the hands on the hips so you can make sure the hips are not tilting to the side or forward and back as well. Push through the heel of the left foot to come back to the beginning position. The patient can do all of the repetitions in a row, or you can alternate sides. Repeat this exercise ten times in one session. Do three sessions in one day. - Bird-dog
The bird-dog works on the gluteal muscles. This also exercises the back extensor muscles, which attach to a back of a spine & allow the individual to stand, bend, and lift objects as well.
To do the bird-dog exercise, an individual should follow these steps:
Step 1: Start the exercise on the hands as well as knees with the shoulders directly over the hands & the hips directly over the knees.
Step 2: Tense the abdominal muscles & stretch a right arm straight out in front of the body.
Step 3: Hold this position during staying balanced.
Step 4: Gradually lift the left leg as well as extend it straight out behind the body.
Step 5: Hold the position for around 15 seconds.
Step 6: Gradually return to the embarking position & repeat on the opposite side.
Step 6: Repeat ten times in a session, do three sessions per day. - Side plank
A side plank is the modified version of the plank that works the quadratus lumborum & the gluteus medius & tensor fascia lata (TFL).
The side plank involves the following steps:
Step 1: First of all, lie on the right side of the body with a right leg slightly bent & the left leg straight with the foot on the ground. Ensure that a right arm is directly beneath a right shoulder with the forearm extended out in front.
Step 2: Tightening the abdominal muscles, & lift the right hip off the ground.
Step 3: Lift a right knee off the ground to straighten the right leg & stack the feet on top of each other.
Step 4: Keeping a body straight, hold the position for five seconds.
Step 5: Slowly come back to the start position as well as repeat on the other side.
Step 6: Repeat the steps above 5 times in one session. Do three sessions per day. - Triceps dip
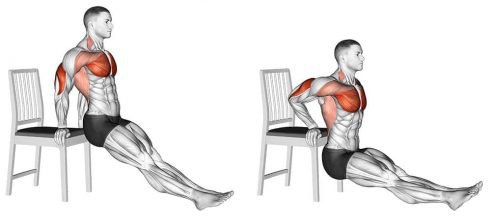
Embark with, seated in the chair (or on a step, etc.). Grab an edge of a chair with hands on either side of the hips. Lift up & out into the hovering position beyond a chair edge. Extend legs till mostly straight. Gradually, lower yourself toward the ground till elbows are roughly parallel with shoulders. Push down into the hands to raise back up till the arms are straight again. Repeat it ten times per session. Do three sessions per day.
- Inchworm
Stand with the knees slightly bent. Bend at the hips & slowly reach down and touch the toes. Place hands on the ground, then “crawl” them away from the torso till you are in the plank position. Take insect-size steps forward till feet meet hands. Repeat it ten times in a session. Do three sessions per day. - Lying dumbbell fly
Lie on the bench or the ground with the knees bent. Hold the dumbbells directly above the chest, with palms of hands facing each other. Lower the dumbbells in the slow arc to the patient’s body sides, bending elbows as far as feels comfortable (or till the patient touch the floor, if you are not using the bench). Keeping elbows bent, raise the dumbbells back above the chest again, then repeat it ten times per session. Do three sessions per day. - Biceps curl
How-to: During sitting or even standing, hold dumbbells straight down at the sides. Bend the elbows as well as bring the weights up toward the shoulders, rotating the arms until the palms of hands face the shoulders. Slowly return to the embarking position and repeat it ten times per session. Do three sessions per day. - Wrist curl
Sit on the bench or chair, holding the light dumbbell in each hand. Place the forearms on the thighs, with wrists on top of knees as well as hands extended beyond knees. Palms can face up or even down. Gradually, curl the weights up, then lower them. Move only the hands, not the arms. Repeat it ten times per session. Do three sessions per day. - Dumbbell walking lunge
How-to: Stand, holding the dumbbell in each hand. After that, lunge forward with the right leg, lowering till the knee is at a 90-degree angle. Push through the front foot to stand. Repeat by lunging with the other leg. Do it ten times per session. Do three sessions. - Calf raise
How-to: Stand, holding dumbbells at the body sides, right by the hips. Next, lift the heels, keeping toes on the ground & the weights by the body sides. Lower heels back to the ground. Do it ten times per session. Do three sessions per day.

