Lumbar examination
Table of Contents
Introduction
A lumbar examination is an important part of Diagnosing a lumbar spine-related condition mainly Low back pain, slip disc, listhesis of the spine.
- The classification of a patient who presents with back pain according to the diagnostic triage suggested in worldwide back pain guidelines is the initial goal of the physical therapy assessment. Although serious illnesses including fractures, cancer, infections, and ankylosing spondylitis are uncommon, screening for them is crucial.
- Other conditions that can cause back pain with neurological abnormalities include radiculopathy and caudal equine syndrome. One to two percent of patients who present with low back discomfort has serious problems. Between 5 to 10% of persons with low back pain may also have radicular features that contribute to their pain.
- Non-specific (also known as simple or mechanical) back pain is referred to when serious and specific causes of low back pain have been ruled out.
- Almost 90% of patients who present to primary care with low back pain have non-specific low back pain, and these patients make up the majority of those who seek physiotherapy for low back pain. A physiotherapy evaluation seeks to find any problems that may have contributed to the pain’s onset or that raise the risk of persistent discomfort.
- They include biological (such as weakness and stiffness), psychological (such as depression, mobility phobia, and catastrophizing), and social (such as poverty) problems (eg. work environment). As could be the case in peripheral joints like the knee, the assessment does not concentrate on identifying physical components (such as the intervertebral disc) as the source of pain.
- According to prior studies and worldwide recommendations, it is neither possible nor required to pinpoint the precise tissue cause of pain in order to effectively manage mechanical back pain.
- The objective evaluation (clinical testing), which confirms or disproves the hypothesis derived from the subjective interview, is by far the least significant component of the assessment. The inspection is briefly described in the video below.
Subjective Assessment
- One of the most effective methods a doctor may use while examining and treating patients with low back pain is subjective examination. The clinician’s certainty that they have discovered ominous pathology necessitating an outside referral can be increased as a result of the questions they ask during this process.
- It helps them match physiotherapy interventions with a patient’s symptoms and allows them to look for red signs that could affect particular physiotherapy interventions.
A patient’s medical history serves as a foundation for future therapy, prevention, and prognosis in addition to serving as a record of previous and present pain or other problems. - Flags of War
Although rare, about 5% of people visiting a primary care clinic may have significant spine problems (like those described below) that manifest as low back pain: - Coccygeal syndrome
Cancer
spondylitis with ankylosing
spine stenosis
Herniated discs in the back
spinal fracture
infected spine
aortic abdominal aneurysm.
Red flags
- Any “red flags” that may be present during your assessment must be taken seriously because they could point to serious disorder. Mechanical back pain may coexist with warning signs. According to Koes et al., the following are “red flags”:
- Age upon onset must be 20 or older.
- non-mechanical discomfort (unrelated to time or activity)
- sternal pain
- previous history of HIV, steroids, and cancer
- ill feeling
- Loss of weight
- neurological symptoms that are prevalent
- spinal structural malformation
Investigations
- Has the patient undergone any additional testing, such as blood work or radiology (X-ray, MRI, CT, or ultrasound)?
X-Rays
- Introduction
- Introduction to X-Rays X-rays is a type of electromagnetic wave with wavelengths between 0.01 and 10 nanometers. Images of your body’s interior are produced by X-ray imaging.
- The pictures show different parts of your body in black and white. This is due to the fact that different tissues respond differently to radiation.
- The most calcium in the bones absorbs x-rays, resulting in white bones. Soft tissues like fat absorb less water and appear gray. Lungs are seen as black because air absorbs the least.
- X-rays have long been utilized in diagnostic radiology for the purpose of imaging body tissues and aiding in disease diagnosis.
- When it comes to evaluating the various osseous structures that make up the body, the use of radiography frequently plays a crucial role. e.g., used to figure out what kind of fracture it is and how big it is. It can also be used to look at the lungs and soft tissue organs like the uterus and gastrointestinal system with contrast.
- Catheter angiography, stereotactic breast biopsies, and intra-articular steroid injections all benefit from the use of radiography.
Multiple conditions, such as fractures, pneumonia, cancer, and congenital anatomical anomalies, can be evaluated with radiography.
The visualization and investigation of radiographic opacities serve as the foundation for radiographic interpretation.
Angiography
- The use of fluoroscopy to examine the cardiovascular system is known as angiography. The bloodstream is monitored as an iodine-based contrast is injected and circulated. Contrast with a high density—similar to the large atoms of iodine—is used to view the vessels under X-ray because liquid blood and the vessels are not very dense.
- Aneurysms, leaks, blockages (thromboses), new vessel growth, and the placement of catheters and stents are all detected through angiography. Angiography is frequently used in balloon angioplasty.
MRI Scans
- Introduction
- Introduction to MRI Scans Magnetic Resonance Imaging, or MRI, is a body map of hydrogen atoms. Due to their single proton and large magnetic moment, hydrogen atoms are ideal for MRI.
- An MRI scanner is simply a large, powerful magnet that is placed in the patient’s position.
- The machine is able to determine the proton’s position because the magnets’ magnetic field causes resonance from each proton in the hydrogen atom.
MR imaging is able to capture precise and detailed images of the body region that is being viewed because approximately 75% of our bodies are made of water molecules. - The distinct signal that is sent by each kind of cell makes it possible to distinguish between different kinds of tissue, such as cartilage, muscle, bone, and joints. In any plane, any part of the body can be imaged.
The MRI computes a precise representation of that body region from a detailed “picture” of all hydrogen molecules in the body. - Based on whether the image is captured at a different decay of signal, there are multiple types of MRI. Early signal decay, which occurs shortly after the protons have been positioned, is captured by a T1-weighted MRI. The late stage of signal decay, or after a small amount of proton migration from the initial resonance, is captured by a T2-weighted MRI.
CT Scans
- Computed Tomography
- The imaging procedure known as computed tomography (CT) makes use of specialized x-ray equipment to produce detailed pictures, or scans, of specific areas within the body. Computerized axial tomography (CAT) and computerized tomography are two other names for it.
- The Greek words tomos (a cut, slice, or section) and graphein (to write or record) are the origins of the term tomography. Non-invasive and producing cross-sectional body images, computed tomography (CT) Like the slices in a loaf of bread, each cross-sectional image represents a “slice” of the person being imaged.
- There are numerous diagnostic and therapeutic applications for these cross-sectional images.
- Every part of the body can be examined with a CT scan for a variety of purposes, including diagnosis, treatment planning, intervention, or screening. The majority of CT scans are performed outside of a hospital. Because it was developed at EMI’s research division, a company best known for its music and recording business today, computed tomography was originally referred to as the “EMI scan.” Body section Röntgenography, as well as computed axial tomography (CAT or CT scan), followed.
- During a CT scan, cross-sectional images can be reformatted in multiple planes and even produce three-dimensional images that can be viewed on a computer monitor, printed on film, or transferred to electronic media.
- CT is utilized in a variety of other fields, including nondestructive materials testing, despite its predominant use in medicine. The DigiMorph project at the University of Texas at Austin employs a CT scanner to examine biological and paleontological specimens, providing another illustration.
Ultrasound Scans
- Ultrasound
- Medical ultrasonography uses high-frequency broadband sound waves in the megahertz range that are reflected by tissue to varying degrees to produce (up to) three-dimensional images (commonly associated with imaging the fetus in pregnant women).
- Ultrasound scans The World Health Organization states that ultrasonography is generally regarded as safe imaging:
Moreover, it is capable of providing information which is clinically relevant regarding the majority of the patient’s body in a rapid as well as cost-effective manner.” - The muscles and tendons, abdominal organs, heart, breast, arteries, and veins are all important applications for ultrasound imaging.
Objective
- The objective examination, also known as clinical testing, aims to either support or refute the hypothesis that was established by the subjective examination.
- You must determine the severity, irritability, and nature of the condition prior to any objective testing.
- Irritability can be assessed by determining the level of activity required to aggravate the symptoms, how dangerous the symptoms are, as well as how long it takes for the symptoms to subside. Severity is mainly related to the intensity of the symptoms, which is including the subjective pain level. If you are highly irritable, a small movement that causes a lot of pain and takes a long time to go away.
- The diagnosis, the type of symptoms, personal characteristics/psychosocial factors, and red and yellow flags are all included in nature.
- See Severity, Irritability, Nature, Stage, and Stability (SINSS) for more information. When evaluating the lumbar spine, the examiner must keep in mind that the presence or referral of neurological symptoms frequently necessitates “clearing” or ruling out lower limb pathology. The lumbar spine may be the source of many of the lower limb symptoms. A screening or scanning examination must accompany the assessment of the peripheral joint unless there is a history of definitive trauma to that joint in order to rule out problems in the lumbar spine that could be causing symptoms in that joint.
- Standing-sitting-lying examinations should be performed first, with pain-inducing movements saved for last.
- After the subjective and objective examinations are finished, it is very important to have an asterisk or something similar. This could be a measurable, reproducible clinical sign or one of your subjective examination outcome measures that is relevant to the patient’s condition. Reassessment tools like these are used to track a patient’s condition’s progress.
Posture
Scoliosis
- Description
Scoliosis is the abnormal lateral curvature of a spine. Posture Scoliosis Description It is typically diagnosed in early childhood or adolescence. - In the so-called “sagittal” plane, the normal curves of the spine are found at the cervical, thoracic, and lumbar regions. The head is positioned over the pelvis by these natural curves, which act as shock absorbers to distribute mechanical stress during movement. The term “coronal” (frontal) plane spinal curvature is frequently used to describe scoliosis. Scoliosis is a more complicated, three-dimensional problem that affects the following planes, whereas the degree of curvature is measured on the coronal plane:
- Coronal plane
- Sagittal plane
- Axial plane
Sagittal plane Axial plane The coronal plane divides the body into anterior (front) and posterior (back) sections. It runs vertically from the head to the foot and is parallel to the shoulders. The right and left halves of the body are separated by the sagittal plane. The coronal, as well as sagittal planes, are at right angles to an axial plane, which is parallel to the floor plane. - Cobb’s angle of curvature of the spine in the coronal plane is what defines scoliosis, which is frequently accompanied by vertebral rotation in the transverse plane and hyperkyphosis in the sagittal plane.
A “convex” and “concave” hemithorax is caused by this spine, costal-vertebral, and rib cage abnormalities.
When scoliosis gets worse, the rotation portion starts. A gibbous is the result of what is known as torsion-scoliosis.
Clinically Relevant Anatomy
- The vertebral column typically consists of 24 distinct bony vertebrae, including 5 fused vertebrae that make up the sacrum and 4 fused vertebrae that make up the coccyx. There are also 12 thoracic vertebrae, 5 lumbar vertebrae, 7 cervical vertebrae, and 12 thoracic vertebrae.
Hemi-vertebrae and fused vertebrae are examples of variation. - In an upright position, the vertebral column exhibits five curves when viewed from the side:
- Cervical curves
Curves of the cervical spine There are two normal curves of the cervical spine: the longer lordotic curve of the lower cervical spine, which runs from the axis to the second thoracic vertebrae, and the upper cervical curve, which runs from the occiput to the axis. The upper cervical curve is the opposite of the lower cervical curve and is convex forward. - Thoracic curve
From T2 to T12, the thoracic curve is concave and extends forward. The greater depth of the vertebral bodies’ posterior parts in this region accounts for the concavity. There is frequently a slight lateral curve in the upper part, with convexity to the right or left. - Lumbar curve
From L1 to the lumbosacral junction, the lumbar curve is convex and moves forward. - Sacral curve
From the lumbosacral junction to the coccyx, the sacral curve has an anterior concavity that faces forward and downward.
- Idiopathic scoliosis
About 80% of cases are diagnosed with idiopathic scoliosis when all other causes are ruled out.
Adult scoliosis, which is caused by degenerative changes in the aging spine and has a prevalence of 2,5 percent in the general population with a Cobb angle greater than 10 degrees, affects adults over the age of 25 and increases to 68% in those over 60.
The most prevalent form of scoliosis, adolescent idiopathic scoliosis, is typically diagnosed during puberty. - Subdivided into the following categories:
Scoliosis in infancy: The incidence of infantile scoliosis, which occurs between the ages of 0 and 3, is 1%.
Scoliosis in children: 10–15 percent of all idiopathic scoliosis in children is juvenile scoliosis, which occurs between the ages of 4 and 10. Untreated curves can Cause serious cardiopulmonary complications, and curves of 30 or more are more likely to progress.
Scoliosis in adolescents: About 90% of children with idiopathic scoliosis develop adolescent scoliosis between the ages of 11 and 18. - Congenital scoliosis
- Scoliosis can develop in any part of the spine as a result of a malformation of one or more vertebrae during embryogenesis.
Due to the fact that one region of the spinal column grows at a slower rate than the rest, vertebral abnormalities result in spine curvature and other deformities. - Because these abnormalities are present at birth, congenital scoliosis is typically detected at a younger age than idiopathic scoliosis. The rate at which scoliosis progresses in magnitude as the child grows is determined by the geometry and location of the abnormalities.
Scoliosis that is caused by a neurological or muscular condition is known as neuromuscular scoliosis.
includes spina bifida, muscular dystrophy, spinal muscular atrophy, and scoliosis associated with cerebral palsy. - Compared to idiopathic scoliosis, this type of scoliosis typically progresses more rapidly and frequently necessitates surgical treatment.
Scoliosis can also be brought on by infections and injuries to the spine. - The medical term for a severe inward curve of the spine, usually in the lower back or neck, is lordosis.
Typically, lordosis does not result in symptoms. However, if it is severe, it may be painful and necessitate surgical intervention.
We’ll talk about what lordosis is, what causes it, and how doctors diagnose and treat it in this article.
What is Lordosis?
- An exaggerated inward curve of the spine is known as lordosis. The condition is referred to by some as swayback.
- Health professionals refer to lumbar lordosis as the most common location for lordosis.
- Cervical lordosis is the medical term for it if it occurs in the neck.
- Kyphosis is another condition in which the spine can hump outward. Instead of affecting the neck or lower back, it typically affects the middle or upper back.
- In some cases, the body develops lordosis to make up for the imbalance caused by another type of spinal curve.
Symptoms
- The exaggerated inward curve of the spine is the defining feature of lordosis.
- Depending on where it occurs, lordosis can cause the stomach and buttocks to protrude. A person with lordosis may have trouble lying flat on the floor due to the curve in their back.
- The appearance of lordosis can often be altered without causing symptoms. But severe lordosis can result in:
- Medical professionals refer to sciatica as pain that radiates into the legs and feet. Tingling or numbness. Not frequently, lordosis may cause an individual to lose control of the bladder or bowels or to experience sudden, higher leg pain or weakness. They should get medical attention right away if this happens.
- The most prevalent type is lordosis in the lower back, also known as the lumbar spine. Lie on your back on a flat surface to check for this condition. This is the effortless path to do so. You should have little trouble getting your hand under your lower back.
- Between their back and the surface, lordosis sufferers will have more space. When they stand, a C-shaped arch will be apparent if they have an extreme curve. Additionally, their buttocks and abdomen will be visible from the side.
- The excessive anteroposterior curvature of the thoracic spine of more than 40 degrees is referred to as thoracic hyperkyphosis.
- Standard kyphosis angles vary between 20° and 40° in the younger public, 48° to 50° in women, and approximately 44° in men. The angle increases with age; there are no universally accepted thresholds for defining either hyperkyphosis or “normal” thoracic spine changes associated with aging. Standard kyphosis angles vary between 20° as well as 40° in the younger public.
- Scheuermann’s Disease is categorized as one of these in older populations: the form of hyperkyphosis in children. Wedging is brought on by a flaw in the growth plate that covers the vertebral body at the cortical level. stops growing when the growth cartilage has finished growing.
- Kyphosis of the spine: The most typical form has no visible vertebral deformities. as a result of weak spine muscles and ligaments and poor posture.
- Kyphosis at birth: Defective bone discovered at birth. If not treated promptly, the kyphosis angle will grow.
- Hyperkyphosis brought on by age: Age-related hyperkyphosis is the result of an increase in the kyphosis angle with age. Up to 70% of patients with age-related hyperkyphosis do not suffer from decreased bone mineral density, despite the fact that increased kyphosis is one of the typical outcomes of osteoporosis. It is unknown how many people have non-osteoporotic hyperkyphosis, but it is estimated that 10% to 45% of people over 50 are correctly diagnosed.
- Among people over the age of 65, thoracic hyperkyphosis increases by 50% in men and 65% in women.
Clinically Relevant Anatomy
- The natural kyphosis of the thoracic spine. The vertebrae are wedging slightly, causing this thoracic curvature.
In the sagittal plane, the normal degree of thoracic convexity is between 20 and 40 degrees.
When the thoracic flexion curve is greater than 40 degrees, thoracic hyperkyphosis is a defect that can be easily seen from the side (lateral view). - The gravity line extends ventrally toward the vertebral bodies when standing.
The thoracic kyphosis will worsen as a result of the weight of gravity. - Anatomical changes are caused by bending forces.
The passive constraint of the posterior ligaments is one example of anatomical change; contraction of the long extensors’ thoracic and deep one-joint muscles.
Clinical presentation
- The clinical presentation of thoracic spine hyperkyphosis can be structural or postural. Additionally, patients may present with both alignment impairments combined.
- Postural impairments are adaptable and respond to shifting alignment cues or positional shifts.
Regardless of the person’s position, structural alignment impairments, or fixed alignments of the bony structures, persist. e.g. Scheuermann’s disease: - Postural correction may only be partially successful when there are both structural and postural alignment issues. Initially a postural flaw, kyphosis can develop into a structural problem (typically not painful until severe thoracic kyphosis has developed).
- The most obvious sign is a rounded back, which is an exaggerated anterior curvature of the thoracic spine.
Over time, most changes in back posture are mostly gradual.
Symptoms of respiratory compromise Hyperkyphosis of the thorax may make breathing difficult. - Osteoporotic fractures and restricted range of motion in the spine
- Feeling “off-balance” and/or losing your balance, or close to falling Feeling more tired than usual (fatigue) Having difficulty breathing (in more severe cases) Walking more slowly.
Examining
- The following are common symptoms of age-related hyperkyphosis:
- Reduced physical function, compromised respiration, an increased risk of osteoporotic fracture, and an increase in the elderly’s mortality rate are all signs of dysfunction and pain in the spine and shoulder.
- Begins with observing the patient, such as abnormalities in their gait and undressing.
- Examined “in order to assess the most affected somatic areas and posture alterations” in the sagittal plane while standing and relaxed.
- The clinical examination’s standing position must be repeatable.
- The anatomical position of the ankles and toes is neutral.
The straightening of the lower limbs prevents an excessive recurvatum.
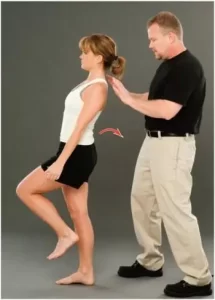
The eye is looking horizontally, the palms of the hands are on the lateral thighs, and the trunk and upper limbs are relaxed. - The Tragus to Wall Test can be used to diagnose thoracal hyperkyphosis when the angle is between 40 and 45 degrees.
- Apparatus for determining the angles of thoracic kyphosis.
They are: - The Debrunner hypsometer, the pantograph, and the modified Cobb Angle: The hypsometer’s arms are positioned on C7 and T12, and the protractor gives us the angle.
- The flexicurve index: Mark the lumbar-sacral joint space and C7 with a marker. Then, carefully insert a flexicurve between C7 and the L-S joint space. The back’s overall shape will remain unchanged when the flexicurve is removed from the back. Then, on a 10×10 piece of paper, place the flexicurve and draw a vertical line, followed by the TW and LW lines you need to measure for functional examination, such as potential rib cages abnormalities like pectus excavatum or carnatum;
- Other observations include body type, attitude, facial expression, skin and hair, and leg length discrepancies (functional and structural).
Functional Tests
- Functional tests include the squat test, which is a functional demonstration of movements that cause pain. Patients suspected of having arthritis or pathology in the lower limb joints, pregnant women, and older patients who exhibit weakness and hypomobility should not undergo this test.
- The patient should not be placed in the lying position for the peripheral joint scan if this test is negative.
Movement testing
- Testing for Movement Active range of motion (AROM) (flexion 40-60, extension 20-35, side flexion 15-20 – looking for a willingness to move, quality of movement, where movement occurs, range, pain, painful arc, and deviation) Overpressure (at the end of all AROM if they are pain-free, normal end-feel should be tissue stretch) Sustained positions (if indicated in subjective) Combined movements (if indicated in subjective) Repeated movements (if indicated in subjective) Muscle Strength (re Core Stability and Functional Strength Tests).
- Movement Control Tests A variety of tests that can measure lumbar movement control are called movement control tests. Poor lumbar movement control is frequently seen in people who suffer from low back pain and lack movement control.
- A reliable method for evaluating lumbopelvic control has been found to be a battery of six movement control tests.
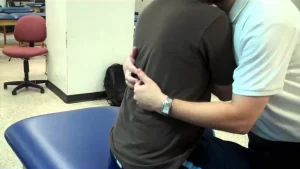
Palpation
- The palpation of the lumbar spinous processes is an essential component of the diagnosis of low back pain. When utilizing Maitland’s assessment methods, this is frequently carried out unilaterally and centrally.
- Concerns about the inter-therapist reliability in identifying each spinous process have sparked debate regarding the use of palpation in lumbar assessments. Nevertheless, Snider et al. discovered that it is more accurate than previously thought to identify lumbar spinous processes by utilizing various landmarks. “Examiner experience, the presence of anatomical anomalies, and participant characteristics were associated with differences in accuracy.” Phillips and co. discovered that manual examination is an accurate method for detecting a patient’s affected lumbar segmental level when combined with verbal feedback from the participant.
- Palpation is hindered by the following factors:
Anatomical abnormalities (For example, the spine of the 12th rib leads to reduced accuracy of palpation in the region L1-L4) - Clear Adjacent Joints Thoracic spine – seated rotation with combined movements and overpressure Sacroiliac joints (SIJ) – various tests have been described to clear the SIJ, such as the Gillet test, sacral clearing test, and cluster tests Hips – passive range of motion (PROM) with overpressure Knees and ankles – should also be cleared for restrictions that may affect movement patterns.
Special Tests
Special tests to look for neurological problems
Centralization
- Introduction
- Introduction to Centralization Centralization is a common clinical marker utilized in the evaluation of spinal pain patients. In 1956, Robin McKenzie discovered centralized therapy while treating a patient with acute low back pain whose symptoms disappeared or regressed as a result of an accidental therapeutic position.
- In the management of neck and low back pain ever since it has been one of the most important aspects of the McKenzie method and other classification systems. The phenomenon of pain radiating distally into the limb from the spine has also been referred to as peripheralization, which is the opposite of centralization.
- Role of physiotherapy
- Centralization is a symptom response induced by clinical conditions. This suggests that centralization is a phenomenon that occurs immediately following a physical examination or therapeutic approach.
- To elicit this response, physiotherapists employ a variety of tools, including manual tests, movement testing, and positions; The evaluation of the underlying acuity and nature of spinal symptoms, the formulation of a diagnosis or prognosis, or the selection of a treatment strategy may all benefit from this.
- Description
- Definition Since the first report on centralization, the definition and methods used in subsequent studies to elicit centralization have changed. Standardized criteria for centralization are frequently recommended because these differences make it difficult to compare study findings and draw conclusions about the best definition.
- To establish a uniform definition of centralization and operational criteria for eliciting this symptom response, a global Delphi study was conducted. “the progressive and stable reduction of the most distal pain towards the spinal midline in response to standardized repeated end-range movement or sustained loading testing procedures” was supported as a broader definition of centralization.
- When appropriate, testing incorporated multiple strategies and/or alternative forces, indicating a mutual appreciation of the various but equally acceptable approaches when employing this sign. This tactic is representative of the clinical setting, where therapists frequently employ multiple approaches rather than a single one.
- Diagnostic value
- Centralization has been found to have diagnostic value in about 40% of spinal pain cases. Patients’ prevalence is determined by the duration of their symptoms, with acute populations reporting a higher percentage (74 percent) than sub-acute and chronic patients.
- Although centralization has been linked to changes in pain that come from the intervertebral disc, it has not been linked to the type of disc lesion in sciatica patients. Reliability, or the capacity to deliver consistent and reproducible results among clinicians, is yet another crucial aspect of any clinical test.
- Although the influence of patient and clinician characteristics on these reliability outcomes needs to be clarified, centralized care has produced inconsistent results in terms of reliability and has yet to demonstrate adequate reliability across studies.
- Prognostic value
- Centralization has been cited and acknowledged as a significant favorable prognostic indicator that ought to be routinely taken into consideration for this patient group. In patients with sciatica, its presence has been frequent and has been linked to improvements in leg pain and activity limitation in outcome measures, arguing against surgery. However, these associations only pertain to favorable outcomes in the short and medium term, and there is insufficient evidence for areas other than the lumbar spine.
- Therapeutic value
- Value for treatment There is still a lack of consistent evidence to suggest that centralization is an important treatment indicator. However, the majority of it-incorporating study designs have not determined its presence at baseline or randomly assigned patients accordingly.
- Clinical bottom line
- The clinical bottom line Centralization is a clinical marker that physiotherapists frequently use to evaluate spinal pain patients. Patients with acute symptoms are more likely to have it than sub-acute and chronic populations.
- There have been observations of differences in the definition and methods used in different studies to elicit centralization.
- These differences make it difficult to compare study findings, draw firm conclusions about them, and draw inferences about the best definition to use. However, centralization has been mentioned and acknowledged as a significant positive prognostic indicator; especially for outcomes in the short and medium term. There is still a lack of consistent evidence to suggest that centralization is an important treatment indicator.
Crossed Straight Leg Raise Test
- Background
- Background of the Crossed Straight Leg Raise Test Fajersztajn was the first person to notice the crossed straight leg raise test, which is also known as the “well-leg raising test” or the “Fajersztajn sign.”
- It says that “the patient experiences pain on the ipsilateral or affected side” when the contralateral or unaffected leg is flexed at the hip.
- Purpose
- In cases of severe nerve root irritation or compression, a positive test result in a central disc herniation and is associated with a lumbar disc herniation in 97% of patients. The XSLR is more specific than the straight leg raise test, and it is typically only positive in patients with major nerve root impingement.
- Technique
- Method The examiner flexes their unaffected leg at the hip while maintaining knee extension while the patient is supine. When the patient complains of pain in the affected leg at a hip flexion angle of 40 degrees, the test is deemed positive.
- Evidence
- The crossed straight leg raise test (XSLR) has high specificity but low sensitivity, according to a systematic review. However, these findings cannot be applied to populations with lower prevalences because they were obtained from populations with a very high prevalence of disc herniation and a severe disease spectrum.
- The clinical utility of the XSLR in diagnosing disc herniation in primary care patients and other patient populations who have not yet been referred for surgery is not supported by sufficient evidence.
For a positive XSLR, intra-rater reliability ranged from moderate to substantial, while inter-rater reliability ranged from virtually zero to moderate for two “mixed” samples of participants. - Clinical considerations
- The absence of inter-rater reliability necessitates caution when interpreting test results for diagnosis.
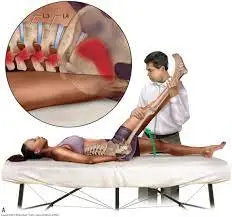
Femoral Nerve Tension Test
- Description
- Definition of the Femoral Nerve Tension Test The Femoral Nerve Tension Test, also known as the Femoral Nerve StretchTest (FNST), is a test used to check for nerve root impingements-related sensitivity to stretching soft tissue at the dorsal side of the leg.
- Wasserman first described it in 1919. Because upper lumbar radiculopathies are less common than lower lumbar radiculopathies, this test is not used as frequently as the Straight Leg Raise (SLR) test, according to the literature. It is a measure of the mobility of upper lumbar nerve segments and is regarded as an anterior corollary of SLR.
- Purpose
- The purpose of the prone knee bending test is to stress the femoral nerve and the mid lumbar (L2-L4) nerve roots with a neural tension test. The purpose of the femoral nerve tension test is to determine whether a person is sensitive to stretching soft tissue on the dorsal side of the leg, which could be caused by root impingements.
- Clinically Relevant Anatomy
- The Lumbar Plexus is where the femoral nerve originates. The inguinal ligament (superior), the medial border of the Sartorius’s muscle, and the lateral border of the Adductor Longus muscle make up the femoral triangle, which is also where the muscles Pectineus, Iliacus, and Psoas are located. The femoral nerve is within this triangle. Near the femoral artery and femoral vein (medially), the femoral nerve is located most laterally.
- Technique
- The patient lies prone, and the therapist stands on the side that is affected and holds the pelvis in place with one hand to prevent anterior rotation. The therapist then maximally flexes the knee to the end range with the other hand.
- The therapist moves on to extending the hip while maintaining knee flexion if there are no positive signs in this position. To determine which nerve is involved, the therapist can modify the test position in a few ways. The Saphenous Nerve bias test involves a prone-lying hip extension, abduction, and external rotation with knee flexion, ankle dorsiflexion, and eversion, whereas the Lateral Femoral Cutaneous Nerve bias test involves a passive hip extension, adduction, and knee flexion.
- Normal reaction: allowing the heel to touch the buttocks with knee flexion. The quadriceps is stretched or pulled in the exercise.
- The test is deemed positive if unilateral pain is felt in the lumbar region, buttocks, posterior thigh, or any combination of these areas between 80 and 100 degrees of knee flexion. Positive findings in this range could indicate a disk herniation affecting the L2, L3, or L4 nerve roots because the dura is strained between 80 and 100 degrees. Based on the range of pain, positive findings caused by disc herniation can be distinguished from quadriceps problems.
- Quadricep tightness or injury may be the cause of pain that occurs before 80 degrees of knee flexion. Additionally, when the hip flexes in response to passive knee flexion, if there is tightness, the pelvis rises on that side. Because tight rectus femoris can also cause pain in the anterior thigh, performing the test on both sides and comparing the symptoms is essential.

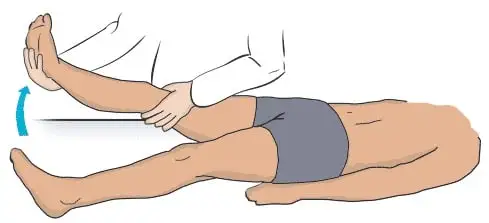
Prone Knee Bending Test
- The Prone Knee Bend Test aims to ascertain whether the patient’s symptoms are influenced by neural tension.
- Position of Test: Prone.
- Performing the Test
For 45 seconds, the examiner passively flexes the patient’s knee to the end range. Rotating the hip is not recommended. A tight or strained quadriceps muscle or neural tension in the femoral nerve could be the cause of pain in the anterior thigh. - Lumbar radiculopathy of the L2-L3 nerve roots may be the cause of pain in the unilateral lumbar area, buttock, or posterior thigh.
- Accuracy of the diagnosis: Unknown.
- Importance of this test
- The femoral nerve and its rootlets are stretched in the knee flexion position as a result of the nerve passing on the anterior side of the lower extremity, which highlights the significance of the test. Pain or other neural symptoms may occur in the lower extremity if the femoral nerve becomes stuck to the tissues it passes through.
- Because the test puts tension on the entire nerve and its rootlets, it may also show radicular pain or pain that comes from irritation of the spinal structures.
- Even though the innervation of the femoral nerve may cause irritation of the nerve roots L2-L3, the test should not be used solely for diagnosis. Always treat the underlying cause of the patient’s impairments as you would normally.
- The location of the pain and symptoms should help you locate the pathology and determine how to treat the patient.
- The femoral nerve and its rootlets are stretched in the knee flexion position as a result of the nerve passing on the anterior side of the lower extremity, which highlights the significance of the test. Pain or other neural symptoms may occur in the lower extremity if the femoral nerve becomes stuck to the tissues it passes through.
- Because the test puts tension on the entire nerve and its rootlets, it may also show radicular pain or pain that comes from irritation of the spinal structures. Even though the innervation of the femoral nerve may cause irritation of the nerve roots L2-L3, the test should not be used solely for diagnosis.
- Always treat the underlying cause of the patient’s impairments as you would normally. The location of the pain and symptoms should help you locate the pathology and determine how to treat the patient.
Slump Test
- The purpose
The Slump Test is a neural tension test that is used to look for altered neurodynamics or sensitivity in neural tissue. - Note on Technique: Different sources give different descriptions of the slump test. The reproduction of pain when tension is applied to the dura during testing is a common factor among sources. Mark Dutton was the inspiration for the method shown below.
- Description:
- The patient should be seated with their hands behind their back to create a neutral spine before the test begins. Slumping the patient forward at the thoracic and lumbar spines is the first step. Have the patient flex the neck by placing the chin on the chest and then extending one knee as far as possible if this position does not cause pain.
- Have the patient extend the neck into neutral if extending the knee causes pain. The test is deemed positive if the patient continues to experience pain while extending their knee.
- Ask the patient to actively dorsiflex the ankle if it does not hurt to extend the knee. Have the patient slightly flex the knee while still dorsiflexing if it causes pain. The test is deemed positive if the pain returns.
- Test again on the opposite side.
- During any of the test positions, overpressure can be applied.

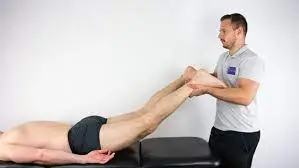
Straight Leg Raise Test
- Background
- Background of the Straight Leg Raise Test Because it mechanically stresses the lumbosacral nerve roots, the Straight Leg Raise (SLR) test is frequently used to identify disc pathology or nerve root irritation. Additionally, it plays a crucial role in the detection of neural compression and disc herniation. Because it is able to identify excessive nerve root compression or tension, it is also referred to as a neurodynamic evaluation test.
- The name “Laseaguestest” refers to this test, which was developed by Dr. Charles Laseague. However, it is thought that Dr. Lazar Lazarevic developed this test first.
- Tensile stresses are applied to the sciatic nerve and traction is applied to the lumbosacral nerve roots, particularly those from L4 to S2. These nerve roots are pushed anteriorly and inferiorly during the SLR, pulling the dura mater anteriorly, laterally, and caudally. As it pulls the sciatic foramen, the sacrum, the nerves that cross the pedicles, and the intervertebral foramen, the sciatic nerve experiences sequential tension.
- The greater sciatic notch is frequently the location of localized pain or tenderness.
- Clinical Application
- Application in Clinical Practice The majority of clinical practice guidelines recommend using the SLR test to determine whether radicular pain or radiculopathy exists. However, the SLR test’s ability to identify radiculopathy is only marginally supported.
- Because of its higher sensitivity than specificity, the SLR test is useful for excluding lumbosacral radiculopathy. In clinical practice, structural differentiation—such as neck flexion, ankle dorsiflexion, and hip adduction—improves the SLR test’s reliability to at least a moderate level.
- Technique
- The traditional straight leg raise is done passively. The unaffected leg is tested first, followed by each leg individually. The clinician stands on the side being tested, putting their distal hand around the patient’s heel and their proximal hand on the patient’s distal thigh (anterior) to maintain knee extension while the patient is lying down.
- While keeping the patient’s knee fully extended, the physician raises the patient’s leg by the posterior ankle. The doctor keeps lifting the patient’s leg slowly by flexing at the hip until the patient has the same symptoms or tightness in their back or posterior thigh.
- The examiner stops hip flexion when pain occurs and records ROM and pain location. As an outcome measure, the ROM of the affected leg can be compared to that of the unaffected leg. However, the low inter-rater reliability for this should be noted.
- Reasoning and Interpretation
- A true positive SLR test should include:
- Radicular leg pain (below-the-knee symptoms).
- Hip flexion at 30 degrees, 60 degrees, or 70 degrees from horizontal causes pain. A lumbar disc herniation at the L4-S1 nerve roots is suggested by neurological pain that occurs in the leg and lower back between 30 and 70 degrees of hip flexion.
Hip flexion pain at more than 70 degrees could be caused by pathology in the hip or sacroiliac joints or tightness in the hamstrings, gluteus maximus, or hip capsule. - If back pain is the primary symptom, the pressure placed on the anterior theca of the spinal cord is most likely caused by a disc herniation or a more central pathology. Patients with “back pain only” have smaller, more central disc prolapses.
- If the pain is mostly in the leg, the pathology that is putting pressure on the neurological tissue or tissues is more likely to be lateral.
It is more likely that disc herniations or pathology that places pressure between the two extremes will cause pain in both areas. - The SLR test can also be positive in patients with nerve root irritation, such as hypertrophy or cysts in facet joints. Intraspinal tumors and inflammatory radiculopathy are two additional causes of a positive SLR test.
- Sensitizing Maneuvers
- By increasing the load on neural tissue without altering the load on non-neural tissue, sensitizing maneuvers are performed to confirm that neural tissue is the source of the patient’s symptoms.
- The examiner can slowly and carefully lower the patient’s leg until the patient no longer feels pain or tightness after the symptoms have been elicited. After that, the examiner can either ask the patient to bring their chin up to the chest or passively dorsiflex the patient’s foot, or they can do both at the same time; Foot dorsiflexion, on the other hand, is usually done first. For neurological tissue, both maneuvers are thought to be provocative or sensitizing tests.
- Stretching of the dura mater of the spinal cord or a lesion within the spinal cord (such as a disc herniation, tumor, or meningitis) is the cause of pain that increases with neck flexion, foot dorsiflexion, or both.
- A lesion in the hamstring area, also known as tight hamstrings, or in the lumbosacral or sacroiliac joint, maybe the cause of pain that does not worsen with neck flexion.
For lumbar instability:
H and I stability tests
- The clinic uses this H and I stability test to check for lumbar instability.
- When a patient complains of back pain, the therapist uses these clinical tests.
The examination portion of the assessment utilized these H and I stability tests. - The H and I stability tests’ purpose:
- The lumbar spine’s muscle spasms are examined with this test.
Additionally, lumbar spine instability can be detected with this test. - How are the H and I stability tests carried out?
- The H movement is the first part of the H and I stability tests.
- The pain-free side is tested first, as the patient stands in the normal resting position, which is the center of the H.
- The patient has been instructed by the examiner and the clinician to flex their lumbar spine as far as possible—on the side of H.
- The patient is then asked to flex (the front of the H) and then move into extension (the back of the H) while in this position.
- If the pain of flexion was greater than that of extension, then the latter would be performed first.
- The patient then moves to the opposite side and returns to neutral.
- The clinician may use one hand to stabilize the pelvis and the other to guide the movement by touching the shoulder joint.
- I movement is the second part of the test.
- The patient stands in the typical resting position, which would be regarded as the center of the I. The first test is pain-free movement (flexion/extension).
The patient is instructed, with the clinician’s assistance, to forward flex the lumbar spine until the hips begin to move (top part of I). Once inflection has occurred, the patient is instructed to side bend (to the pain-free side first I), then back to neutral and side bend to the opposite side. - The patient then performs the opposite movement, side bending, and returns to neutral standing.
At least two of the movements would be restricted if there was a hypermobile present.
Once more, one quadrant will be affected by the moves if instability is present. - For instance, if the patient had spondylolisthesis instability in anterior shear—which is a part of forwarding flexion—and the I was attempted, there would be little movement during the attempted side bending/flexion and shear or slip-on forward flexion.
- Side bending is normal when the H is attempted, and the forward flexion that follows is full because the shear occurs in the second phase.
Therefore, the I movement is restricted in this instance, but not the H movement. - This H and I stability test is mostly used to look for structural instability, but if control is lost during one of the movements, an instability jog may show up.
The end range is typically normal in this scenario, but the loss of control occurs somewhere in the motion’s available range.
Farfan torsion test
- The facet joint, joint capsule, supraspinous and interspinous ligaments, neural arch, longitudinal ligaments, and disc are all stressed during this nonspecific test.
- How is the Farfan torsion test carried out?
- The patient is lying on their side.
At around T12, the examiner uses one hand to stabilize the ribs and spine and places the other hand under the ilium’s anterior aspect.
After that, the examiner pulls the ilium backward, which causes the spine to rotate on the opposite side and results in torque on that side. - What is the Farfan torsion test’s outcome?
- If the test reproduces all or some of the patient’s symptoms, it is considered positive.
The other side is put through compression testing.
Lateral lumbar spine stability test
- Test of lateral lumbar spine stability In what manner is the lateral lumbar spine stability test carried out?
- The lumbar spine is in neutral and the patient is placed on their side.
- As an illustration, the examiner places the forearm over the side of the thorax around the L3 level.
- After that, the examiner applies downward pressure to the transverse process of L3, which results in shear to the patient’s side of the vertebra below L3 and relative lateral shear to the segments above L3 in the opposite direction.
- What did the lateral lumbar spine stability test reveal?
- A positive test indicates the patient’s emergence of symptoms.
Passive lumbar extension test
- How is the passive lumbar extension test carried out?
- The patient is lying prone and at ease.
- To approximately 30 centimeters (one foot) from the bed, the examiner passively raises and extends both arms simultaneously.
- The examiner gently pulls on the legs while maintaining the extension.
- What is the passive lumbar extension test’s outcome?
- If the patient complains of intense pain in the lumbar region while in the extended position, feels very heavy in the low back, or feels like the low back is coming off, and the pain goes away when the legs are lowered to the starting position, the test is considered positive.
- A feeling of numbness or prickling is not a good sign.
Pheasant test
- How is the pheasant test carried out?
- The patient is lying on their side.
- The examiner applies gentle pressure to the lumbar spine’s posterior aspect with one hand.
- The examiner (therapist) passively flexes the patient’s knee until the patient’s heels touch the buttocks with the assistance of the other hand.
- What is the pheasant test’s outcome?
- The test is deemed positive and indicates an unstable spine segment if the patient experiences leg pain as a result of the hyperextension of the spine.
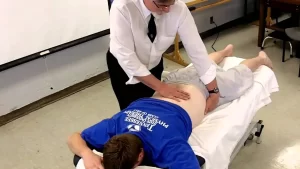
Prone Instability Test
- Purpose
The purpose of the test is to determine whether or not a patient with low back pain will benefit from a stabilization exercise program. - Method
The patient lies prone on the examining table with their legs extended over the edge and their feet flat on the floor. The examiner applies pressure from posterior to anterior to a single spinous process of the lumbar spine while the patient rests in this position with relaxed trunk muscles. - It is reported whenever pain is provoked. After that, the patient raises their legs off the ground (the patient may hold the table to maintain position), and the lumbar spine is compressed from posterior to anterior once more while the trunk muscles are contracted.
- If pain persists in the resting position but subsides in the second position, indicating lumbopelvic instability, the test is deemed positive. The spinal segment can be stabilized by activating the muscles.

Torsion Stress Test
- Type of test: Torsion Stress Test Stability of the joints Patient.
Body Segment Positioning: Position of the Examiner: The patient is prone. The examiner covers the L5 spinous process with one thumb. The opposite side’s anterior ilium is grabbed by the opposite hand. - Tissues Under Examination: The S-I joints, the anterior sacroiliac ligaments, the iliolumbar junction, and the lumbosacral junction.
- How to Pass the Test: The examiner grasps the ilium with one hand and pulls it upward, or posteriorly. The patient is then asked about their pain.
- Test Results: Pain in the lower back, the S-I joints, and the anterior aspect of the pelvis are all positive signs.
- Interpretation: Knowing which tissues are being stressed and distinguishing what is hurting while the examiner performs this test is very important. It’s possible that this is an S-I joint issue, but which one? Because of this, the examination must be carried out bilaterally and the patient must be asked, “Tell me where it hurt” and “Does it hurt down in the S-I joint or does it feel like a stress on the ligaments?” This could be a problem with the lumbar spine. When interpreting this test, the examiner should have these concepts in mind.
- Common exam-taking mistakes: The incorrect placement of the hands and not placing enough stress on the joint to achieve the desired results are two common mistakes when performing this test.
- Factors that could lead to an incorrect interpretation: The factors include failing to specify the location of pain, which obscures the true nature of the issue. The ilium might not move as it should if the rectus femoris is tight.
Anterior and posterior lumbar spine instability
- Tests for anterior and posterior lumbar spine instability
- These tests are used to determine whether the patient has lumbar instability.
When someone complains of low back pain, a therapist or doctor may use these anterior and posterior lumbar spine instability tests.
In the examined portion of the lumbar spine assessment, these anterior and posterior lumbar spine instability tests are used. - Technique for performing the test of anterior lumbar spine instability:
The patient lies on their side with their knees bent and hips flexed to 70 degrees.
The desired spinous processes [L4 to L5] are felt by the examiner.
The examiner can feel the relative movement of the L5 spinous process on L4 by pushing the patient’s knees posteriorly with the body along the femur line.
In most cases, there should be very little movement.
Similar tests could be done on other levels of the spine. - What is the outcome of the tests for instability in the anterior lumbar spine?
The fact that the examiner—the therapist—should check to see that the posterior ligaments of the spine are relatively loose or relaxed is a problem with the test. - Altering the amount of hip flexion can be used to control this instability in the anterior lumbar spine.
The tightening of the posterior ligaments occurs more from the bottom up when performing greater hip flexion. - Test of posterior lumbar spine instability
- Procedure for performing the test for instability of the posterior lumbar spine:
The patient begins the test by sitting on the edge of the examination table.
Standing in front of the patient is the examiner, or therapist. - The examiner’s shoulders are placed in front of the patient’s pronated arms, elbows bent.
The examiner wraps both of their hands around the patient so that their fingers touch the lumbar spine. Then, using their heels, they gently pull the lumbar spine into full lordosis. - What is the outcome of the tests for instability in the posterior lumbar spine?
The examiner or therapist stresses L5 on S1 by instructing the patient to push through the forearm while maintaining the lordotic posture and stabilizing the sacrum with both hands. - A posterior shear of L5 on S1 results from this posterior lumbar spine instability test.
Similar tests can be performed on other levels of the spine.
For joint problems
- The clinical test known as the bilateral straight leg raise is used to determine which bones and joints are causing low back pain.
- Method
The patient lies in a supine position with both knees extended; With the distal arm supporting the heels and the proximal hand resting on the patient’s thighs (anteriorly) to maintain knee extension, the examiner stands at the patient’s side. The examiner slowly raises both legs until the patient is relaxed and feels tightness or pain. - Positive test
The sacroiliac joint is to blame for low back pain if it occurs at less than 70 degrees of hip flexion; If hip flexion is greater than 70 degrees, the lumbar spine is to blame for low back pain.
One-leg standing (stork standing) lumbar extension test
- The purpose of the one-leg standing (stork standing) lumbar extension test is to determine the movement or asymmetry of the sacroiliac joint (SIJ) through a variety of mobility tests. The misalignment or abnormal movement of the SIJ, which can result in pain in or around the SIJ, is referred to as SIJ dysfunction.
- The Stork test, otherwise called the Gillet Test, surveys the development of the SIJ between the innominate and sacrum through the clinician’s palpation, which might be a helpful test for clinical assessment of a subject’s capacity to settle intrapelvic movement.
- Technique
The posterior superior iliac spine (PSIS) is palpated during the Stork test. The Stork test consists of two phases: the hip flexion or swing phase and the stance phase. - The patient is asked to stand while the examiner uses one thumb to palpate the posterior superior iliac spine (PSIS) and another to palpate the base of the sacrum, which is medial to the PSIS. After that, the patient is instructed to stand on one leg and pull the hip on the side being palpated into hip flexion of at least 90 degrees. After that, the test is repeated on the other side, and the results are compared bilaterally. The examiner ought to compare the quality and amplitude of movement on each side.
- The PSIS should drop or move inferiorly when the pelvis of the side being palpated rotates posteriorly in a pelvis that is normally functioning. The amount of movement between the left and right SIJs ought to also be symmetrical. When the PSIS on the ipsilateral side of the knee flexion moves minimally in the inferior direction, does not move, or is associated with pain, the test is positive. Sacroiliac joint hypomobility is indicated by a positive test result.
Kemp Test
- Description of the Kemp Test The provocative Kemp test, which is also known as the quadrant test and the extension-rotation test, can be used to diagnose pain related to facet joint pathology, such as osteoarthritis.
- The client extends and rotates their spine simultaneously (for the cervical or lumbar spines).
When the patient complains of pain, numbness, or tingling in the area tested, the test is deemed positive. - Purpose
The purpose of this test is to evaluate pain in the facet joints of the lumbar or cervical spines. It uses the patient’s trunk as both a compressive force and a lever to create tension. Although it is nonspecific, this test is used to differentiate and diagnose a lumbar posterior facet syndrome. It is a pain detection provocation test. Pain that radiates into the arm or leg is more likely to be caused by nerve root irritation than local pain. especially in cases where the pain is below the knee or elbow. - Method
Methodology The Kemp Test can be carried out with the patient either seated or standing. - Position from the side:
- The patient is in front of the therapist.
- The therapist uses one hand to fix the opposite ilium from the side being tested.
The patient is led into extension, ipsilateral side bending, and ipsilateral rotation by the other hand, which grabs the patient’s shoulder.
Keep your arm in this position for three seconds. - Sitting position:
- The patient was seated, her arms crossed in front of her chest.
On the side that will be tested, the therapist uses one hand to stabilize the patient’s lumbosacral region. - The patient’s upper body movement is controlled by the other arm.
The patient is guided passively through flexion, rotation, lateral flexion, and extension. - Axial compression may be applied in the fully extended and rotated position to put more stress on the posterior joints, depending on how the patient responds.
- When the patient complains of pain, numbness, or tingling in the lower back or limbs, the test is positive. The side being tested is where the pain is. While radiating pain into the leg is more indicative of nerve root irritation, local pain suggests a facet cause. particularly when the pain is below the knee.
Because there is less muscle activation and the therapist has more control over the patient’s positioning, the seated position is preferred.
For tense muscles
- What does the 90/90 hamstring test look like?
The 90/90 Hamstring Test Can Be Done in Two Different Ways There Are Usually Two Different Ways To Do This Test One is active, and the patient does everything on his own. Another is passive, which refers to the examiner’s involvement.
Using a goniometer, the examiner measures the patient’s range of motion in this scenario. Below, we go over each method in greater detail. - Procedure 1 (Testing Both Knees): The patient should lie supine.
The next step is to instruct your patient to bend both their knees and hips to 90 degrees of flexion.
The next step is to instruct your patient to maintain this position by placing their right hand behind the right knee and their left hand behind the left knee.
Now, instruct your patient to raise or fully extend (straighten) both knees one at a time. - Procedure 2: Use a goniometer to test only one knee The patient should lie in a supine position.
The next step is to instruct your patient to flex one side’s hip and knee into 90° of flexion. Let’s say the patient flexed his hips and knees on his left side.
The next step is to instruct your patient to keep this position stable by putting both hands behind the left knee.
The examiner will now position the goniometer so that its axis is on the femur’s lateral epicondyle. The goniometer’s moving arm is aimed at the lateral malleolus, while the stationary arm is aimed at the greater trochanter. - Keep in mind that the goniometer’s axis needs to be properly fixed to the lateral epicondyle of the femur. Because putting the goniometer in the wrong place won’t give you the right reading.
- During this time that the patient stabilized his left side hips and knees into a 90° flexion position by placing both of his hands behind the left knee. The patient can easily hold or stabilize the goniometer’s stationary arm in this position. The examiner will greatly benefit from holding or stabilizing the stationary arm of the goniometer.
- Now, as far as the patient is able to lift, the examiner will raise or extend the patient’s left knee. Keep in mind that the examiner will not push the patient’s tested knee up or apply any force to it. He will only assist the patient to the extent that the patient is able to lift up the tested knee on the left side.
The angle of the knee is now measured.
Ober’s Test

- Purpose
The purpose of Ober’s test is to determine whether the Tensor Fasciae Latae (TFL) and the Iliotibial Band (ITB) are tight, contracted, or even inflamed. It’s possible that Ober’s test and Noble’s and Renne’s tests—two other tests that are frequently used to identify iliotibial band syndrome—are not confused with one another. - Clinical Relevant Anatomy
The iliotibial band is an anatomical continuation of a tendinous portion of the tensor fascia latae muscle with some contributions from the gluteal muscles. This anatomy is relevant to clinical practice. A gluteus medius muscle’s synergy in the hip abduction is responsible for the TFL/ITB. - Origin:
The deep fascia latae surface, an outer surface of the anterior superior iliac spine, and an anterior part of an external lip of the iliac crest are where Tensor Fasciae Latae originates.
The lateral thickening of a fascia latae in the thigh is known as the iliotibial band (ITB) or tract. This divides proximally into shallow and deep layers, enclosing the tensor fasciae latae and securing the muscle to an iliac crest. Additionally, this receives the majority of a gluteus maximus tendon. - Insertion:
Tensor Fasciae Latae embeds into an iliotibial track at an anterolateral thigh at an intersection of the proximal as well as center thirds of a thigh.
Most people think of ITB as the band of dense, fibrous connective tissue that connects to Gerdy’s tubercle on the anterolateral side of a tibia and passes over a lateral femoral epicondyle. - Action:
A hip joint is abducted, flexed medially, and rotated by the Tensor Fasciae Latae; stretches the lata fascia; in addition to can aid in knee extension. The primary synergistic muscles of the hip abductors are the gluteus medius, gluteus minimus, and upper gluteus maximus fibers.
Because these muscles are inserted into the ITB, the iliotibial track makes it possible for the Gluteus maximus and the Tensor Fasciae Latae to influence the stability of an extended knee joint. - Technique
In the May 1935 article titled “Back Strain & Sciatica,” technique Frank Ober discussed the connection between contracted TFL and ITB and low backache and described a test for tightness of TFL and ITB. In 1937, it was revised to include a warning about avoiding hip internal rotation and flexion during the test. - Position of test:
How to take this exam:
First and foremost, the patient should be lying on their side with the affected side facing up.
After that, you can flatten a lumbar curve by flexing both the bottom knee and the hip.
The next step is to stand behind the patient and prevent motion in any direction by firmly stabilizing the pelvis and greater trochanter.
Test: With one hand, grasp the affected leg’s distal end and flex the leg at the knee to a right angle.
Abduct and extend a hip joint.
Adduct the hip by gradually lowering one leg toward the table until movement becomes restricted.
While performing the test and stabilizing the pelvis, check to see that the hip does not internally rotate as well as flex. Because allowing a thigh to drop in flexion and internal rotation would “give in” to a tight TFL and prevent an accurate length measurement.
Modify ober test
- In Posture and Pain, Kendalls offered the first recommendation for modifying the Ober test. This test provides complete stretch to the tensor fascia latae and relieves pressure on the medial aspect of your knee joint, your patella, and interference from a tight Rectus Femoris.
- Position of test:
To begin, the patient is lying on their side with one leg bent at the knee and hip to flatten their low back.
The examiner then maintains lateral trunk contact with the table and stabilizes the pelvis.
Note: A hip abduction and a “give in” to the tight TFL are the same as a downward lateral tilt. - Test:
A leg is extended by an examiner. must ensure that neither side of the leg is internally rotated. - Results:
A thigh drops about 10 degrees below the horizontal when the knee is straight and the pelvis is in the normal position. This suggests that the length is normal.
A leg that does not drop indicates tensiofascia latae and a tight iliotibial track.
Ely’s Test
- The purpose of Ely’s test or Duncan-Ely test is to evaluate spasticity or tightness in the rectus femoris.
- Technique
- The patient lies on their side, relaxed. At the side of the leg that will be tested, the therapist is standing next to the patient. The other hand should be holding the leg at the heel, with one hand on the lower back. Slowly and passively flex the knee. The buttocks should be near the heel. Compare the results from each side. When the patient experiences back or leg pain or tingling, the heel cannot touch the buttocks, the hip of the tested side rises from the table, and the test is positive.

Thomas Test
- The goal of the Thomas Test is to determine how flexible the hip flexors are.
- The hip’s limited range of motion may be an underlying cause of other conditions like psoas condition; syndrome of patellofemoral pain; osteoarthritis, pain in the lower back; arthritis with rheumatoid.
Frequently associated with gymnasts, dancers, and runners who report feeling “snapping” when flexing their waists and complaining of hip “stiffness.” - Relevant Anatomy
Hip flexors cross multiple joints and perform a variety of functions. The iliopsoas (psoas and iliacus), rectus femoris, sartorius, tensor fasciae latae, pectineus, gracilus, adductors, and a gluteus are the muscles that make up these muscles. the muscle in our iliopsoas that exerts the greatest pull and compressive force on our spine. The L1-L5 and T1 vertebrae are where it is attached. The spine and its associated discs are frequently compressed by tight psoas.
Low back pain can result from an ongoing state of shortening. - The Thomas Test measures a number of muscles in the hip flexor group, including:
Method The patient is supine, their hips and knees are bent, and their lower gluteal folds are at the end of the table. The patient may use their hands to hold the legs in flexion.
The therapist checks that the patient has a neutral pelvic tilt in their lower back.
The patient maintains flexion of the unaffected leg while gradually lowering the affected leg and allowing it to extend as far as it can. - Interpretation
In a modified version of the test, the patient lies on their back at the table’s edge with both legs free. The patient must then flex their knee and use both arms to pull it back to their chest as close as possible. The other leg may hang. Throughout the test, the lumbar spine must remain flat and in contact with the table.

Sign of the Buttock
- Introduction to the Sign of the Buttock Cyriax invented the term “Sign of the buttock,” which actually refers to seven signs rather than a single one. The buttock sign is one of several findings that point to serious gluteal pathology posterior to the hip flexion and extension axis. It aids in determining whether a patient’s buttock pain originates from the hip, sciatic nerve, or hamstring muscles or is caused by a local lesion in the buttock. It is regarded as a red flag and necessitates the patient’s return to the doctor for additional examination.
- The purpose of the testing is to determine whether the patient’s symptoms may have non-musculoskeletal causes.
- Patient presentation
The patient presents with pain in the glutes, which may or may not radiate down the leg. Because the hip is such a deep joint, color changes, and swelling are not expected, but they may be caused by trauma, bruising, or abrasions. The “sign of the buttock” can be redness and swelling in the buttock area without a history of trauma.
The standard examination reveals the following seven symptoms:
Buttock large, swollen, and tender to the touch Straight Leg Raise (SLR) limited and painful Limited trunk flexion Limited hip flexion with knee flexion limited and painful Empty end feel on hip flexion Non-capsular pattern of restriction at the hip (flex, abdominis, IR) Resisted hip movements painful and weak, especially hip extension The results of some resisted hip tests might be positive. - Testing Position
Supine - Technique
The examiner performs a passive straight leg raise (the patient typically is unable to perform an active SLR). The end feel is typically spastic or capsular, but it is definitely painful if the SLR is positive. Put the patient back into neutral. Flex the patient’s hip passively, this time with the ipsilateral knee bent to the end range. Determine whether additional hip flexion is possible. - Interpretation
The pathology is in the hip or buttock, not the hamstrings or sciatic nerve if there is no change in range of motion. The second part of the test is typically more painful than the first because it typically has an empty end feel. The Buttock Sign must have all of the following in order to be positive: restriction of SLR at the same time as restricted hip flexion and a pattern of non-capsular restriction of hip joint ROM. - Diagnostic Accuracy
Unknown - Importance / Explanation
Pathology in the hamstrings, sciatic nerve, buttock, or hip may result in limitations when an SLR is performed. Because the hamstrings and sciatic nerve cross the knee when the knee is flexed, the remaining limitation is caused by hip or buttock pathology. We are aware that there is a potential for serious pathology involved because the ending feels empty. - Conditions that are indicative
Include rheumatic bursitis, osteomyelitis of the upper femur, neoplasm of the ilium, fractured sacrum, ischiorectal abscess, septic sacroiliitis, and gluteal bursitis.
Beighton score
- Objective
- The objective of the Beighton score is a popular method of screening for hypermobility. Five maneuvers—four passive bilateral and one active unilateral—are required to complete this nine-point scale. In the beginning, it was used in epidemiological studies to identify populations with hypermobility. As a result, the scale was ideal because it could be completed quickly and easily by a large number of people. The Beighton score’s criteria were the first to be used to identify hypermobility, and they have been in use for 30 years. Only a few joints are evaluated, and no other involved systems are included.
- The Carter and Wilkinson scoring system was modified into the Beighton score in 1964. Passive extension of just the little finger beyond 90 degrees with the forearm flat on a table was used instead because the passive extension of the fingers was too strenuous.
- Disadvantages:
Because it only examines a small number of joints, hypermobile joints outside of this selected group will almost always go unnoticed.
It’s an “all or nothing” test. It simply reflects the widespread nature of its distribution and does not indicate the degree of hypermobility. The 10-point hospital Del Mar criteria is an alternative scale that provides a more comprehensive view of joint laxity, including the shoulder, hip, patella, ankle, foot, and toes. - Instructions for completing the Beighton scale:
Can you place your hands flat on the floor with your knees straight? I will bend your little finger up at 90 degrees to the back of your hand. I will bend your thumb back on the front of your forearm. I will bend your elbow backward. I will bend your knee backward.
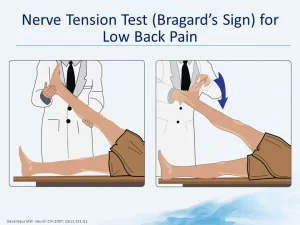
Bragard’s Sign
- Purpose
Purpose of the Bragard’s Sign The Bragard’s Sign (also: The Braggard’s test is used to determine whether lumbosacral radiculopathy (such as a disc herniation causing nerve root compression) is the cause of lumbar and/or ischaemic pain. - Method
The patient is lying on their side. (Straight Leg Raise test/Lasegue’s Sign) The examiner raises the straight leg passively into hip flexion until the familiar pain occurs. After that, the foot is pulled into dorsiflexion and the leg is lowered just below the pain threshold. Bragard’s sign is positive if the familiar pain returns. This would point to a nervous system involvement as the cause of the patient’s pain.
Gaenslen Test
- Purpose
One of the five provocation tests that can be used to identify musculoskeletal abnormalities and primary-chronic inflammation of the lumbar vertebrae and the Sacroiliac joint (SIJ) is the Gaenslen Test (Gaenslen’s maneuver). The following tests are included: the Sacral Thrust Test, Compression Test, Distraction Test, and Thigh Thrust Test. - A useful tool for identifying patients who are more likely to have SIJ pain than any other painful condition is the clinical prediction rule of three or more positive provocation tests that provoke familiar back pain and non-centralization of pain. When interpretation is restricted to back pain patients whose symptoms cannot be made to “centralize” with repeated movement testing, the diagnostic accuracy of composites of SIJ tests increases. Positive SIJ tests in patients with discogenic pain should be ignored because centralization is extremely specific to that condition.
- Specifically, an SIJ lesion, pubic symphysis instability, hip pathology, or L4 nerve root lesion can all be detected by Gaenslen’s test. It can also put a strain on the femoral nerve. In SIJ, this test is frequently utilized for the detection of spondyloarthritis, sciatica, and other forms of rheumatism.
- Technique
The patient lies down with the painful leg resting on the edge of the treatment table at the beginning. The examiner flexes the non-symptomatic hip sagittally while also flexing the knee (up to 90 degrees). While the therapist stabilizes the pelvis and applies passive pressure to the leg being tested (symptomatic) to hold it in a hyperextended position, the patient should hold the non-tested (asymptomatic) leg with both arms. A flexion-based counterforce is applied to the flexed leg, pushing it in the cephalad direction and causing torque to the pelvis, while a downward force is applied to the lower leg (symptomatic side), putting it into hyperextension at the hip. - The test is deemed positive for an SIJ lesion, hip pathology, pubic synthesis instability, or L4 nerve root lesion if the patient’s normal pain is reproduced. In the meantime, this test may put stress on the femoral nerve as well.
- If the patient complains of pain on both sides, it is best to test both sides. Importantly, a diagnosis of SIJ pathology is only possible with at least three positive SIJ provocation tests.
Leg Lowering Test
- Introduction
Introduction to the Leg Lowering Test The Double Leg Lowering Test (DLLT) is a general assessment of the core muscles. Because poor abdominal muscle strength can lead to poor posture and lower back pain, this test is critical. - The strength of the abdominal muscles’ lower muscle fibers is measured using the curl-up test. The DLLT, which examines the muscles as they work eccentrically while lowering the limbs and is more difficult than the curl-up, is a test.
- The objective of the test is to evaluate the strength of the abdominal muscles and their capacity to hold the posterior pelvic tilting position against a load (lowering both lower limbs from a vertical position). To control the limb’s lowering, the hip flexors and abdominal muscles work eccentrically together. The resistance to holding the pelvis in place increases as the legs lower.
- The rectus abdominis muscle, along with moderate work for the external oblique, internal oblique, and transversus abdominis, is the muscle that plays a significant role in the effort to maintain the position of the pelvis and low back during the leg-lowering movement.
- Procedure
The subject lies on his or her back with his or her arms crossed across the chest and his or her head on the floor. - The subject’s lower back is placed under the tester’s fingertips. Alternatively, a pressure biofeedback unit or blood pressure cuff can be utilized and inflated to 40 mmHg.
- While keeping the upper body flat on the floor, both legs are raised to a 90-degree angle (vertically).
Before straightening their knees, the subject may bend their knees first to get into the starting position. - By contracting the abdominal muscles as the legs are lowered, the subject aims to maintain pressure on the tester’s fingers or cuff under the lower back.
If the pressure on your hand or the cuff decreases during the test, the test is stopped and the angle is measured.
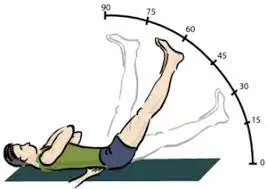
McKenzie Side Glide Test
- Introduction
- Introduction to the McKenzie Side Glide Test The classification-based McKenzie Method of Mechanical Diagnosis and Therapy (MDT) was developed to classify patients into homogeneous subgroups to direct treatment. Long, Donelson, and Fung demonstrated that a McKenzie assessment could identify a significant subset of acute, subacute, and chronic low back patients with a directional preference (pain relief from repeated lumbar flexion, extension, or side glides/rotations that lasted for an extended period of time). A provocation test for patients with back pain, particularly low back pain, is the McKenzie side glide test.
- Purpose
The purpose of this test is to determine whether the patient is experiencing pain while performing the pain provocation test and at which movement. The patient can be placed into one of McKenzie’s three primary classifications by performing this and other movements such as side glide, flexion, and extension, or flexion and extension. - Technique
- To observe the patient’s back during the movement, stand behind them. The patient should be instructed to stand with their feet about shoulder-width apart. By instructing the patient to move the pelvis and trunk in the opposite direction while keeping the shoulders level in the horizontal plane, this movement can be accomplished. Instead of side bending, McKenzie would rather the patient perform a side-gliding movement while standing. Let’s say we’re using Left side gliding as an illustration.
- The movement of the shoulder over the hip position from right to left is known as left-side gliding. From a logical standpoint, the shoulder movement and hip movement must be in opposition. Verbally prepare the patient for what will occur prior to the application of a glide. While it is acceptable, pain must be respected.
- Because the test is an active movement, the therapist need not add pressure to it. The therapist can assist the patient if they are having trouble performing this movement. It should be done again to the right and left, and the amount and quality of movement should be compared. This can be accomplished by asking the patient if moving to the left or right is as simple as moving to the right, and vice versa. By hiking their hip and lifting their lower extremity off the floor, patients may attempt to increase their range of motion. Stabilizing the patient’s pelvis with your arm while they perform the movement testing can reduce this.
- Take note of any curve discontinuities and curve angulations that may indicate hypermobility or hypomobility. Take note of how smoothly each intervertebral level contributes to the movement as a whole.
- Take note of whether the patient’s anticipation of pain or pain itself limits the range[3]. A disc protrusion lateral to the nerve root or intra-articular dysfunction could be the cause of the patient’s increased symptoms as they bend toward the painful side. A muscular or ligamentous lesion, which will cause the muscle or ligament to tighten, maybe the cause of the patient’s increased symptoms as they bend away from the painful side.
- A disc protrusion medial to the nerve root may also be present in the patient. The diagnoses will be easier to distinguish with the help of a thorough neurological examination.
Posterior Pelvic Pain Provocation Test
- Purpose
The purpose of the posterior pelvic pain provocation test is to ascertain whether or not sacroiliac dysfunction is present. It is frequently utilized during pregnancy to differentiate between low back pain and pain in the pelvic girdle. - The examination is also called:
- Technique: With the patient supine, the hip is flexed to 90° (with the bended knee) for the PPPP test, P4 test, Thigh thrust test, and POSH test to stretch the posterior structures. The femur serves as a lever to move the ilium forward by applying axial pressure along its length. To secure the position of the sacrum, one hand is placed beneath it, and the other hand is used to force the femur downward.
- Laslett and Williams advise against excessive hip adduction due to the patient’s discomfort, while Broadhurst and Bond recommend adding hip adduction toward the midline.
- If the axial pressure causes pain over the patient’s familiar sacroiliac joint, the test is positive for pelvic girdle pain.
Waddell Sign
- Introduction
Introduction to the Waddell Sign Professor Gordon Waddell first described the Waddell sign to identify patients who are likely to have a poor prognosis following surgery for low back pain. However, clinically and medico-legally, it has been misapplied and misinterpreted as a credibility test and a means of detecting fraud. Assessors frequently misuse Waddell’s sign to deny car accidents and imply that the patient is faking them. - There are eight clinical physical signs that are referred to as “non-organic signs” in Waddell’s sign. Professor Gordon Waddell did not intend for the term “non-organic” to imply that the pain is not real. As he assures that back pain should be considered in a psychosocial context and that Waddell’s sign should be used to identify patients who require physical, psychosocial, and behavioral low back pain management.
- The eight clinical signs identified by Waddell fall into five broad categories, which include:
- The tenderness that is not anatomic or superficial Axial loading and simulation of acetabular rotation Distraction, regional sensory disturbance, and weakness
- Overreaction
- Tenderness on the surface: tenderness to a light touch or pinch over a large portion of the lumbar skin.
The tenderness that is not anatomic: Deep tenderness that extends across non-anatomical boundaries and covers a large area. - Loading axis: During axial loading, the patient stands while the examiner presses vertically and downwards on their head, causing lumbar pain.
Turning the acetabulum: While the patient is standing, the examiner passively rotates the pelvis and shoulder in the same plane. If pain is felt in the first 30 degrees of rotation, this is a good sign. - Disturbance in straight leg raise: The same positive physical finding is tested in the distraction test while the patient is distracted, which can be accomplished by testing one body part and observing another. The variations of the Straight Leg Raising test can be used as a distraction test. When the patient reports pain during a formal SLR examination, such as while supine, and when the pain significantly decreases during a distracted SLR, in which the examiner extends the knee while the patient is seated, the test is positive.
- Sensory disturbance in the region: The patient describes pain that does not follow a dermatomal pattern but rather follows a disturbance that looks like a stocking.
- An area of weakness: A weakness or “giving away” of the cogwheel that cannot be explained by neuroanatomy.
- Overreaction: This is a painful response that is exaggerated in response to a stimulus and does not occur again when the same stimulus is given later.
The test is positive if you get a score of three or more out of the five categories. - The patient should not overreact while performing the examination test.
- The physical therapist also mainly focuses on the examination and also on the comfort of the patient.
FAQ
A patient is in the supine position as well as then an examiner asks the patient to lift both lower extremities. The knees may be extended. After that, an examiner asks the patient to come back gradually to the embarking position. If the lower extremities fell down instantly due to low back pain, a test was positive.
Lumbar Bulging Disc: Lower Back
Approximately 90% of bulging discs happen at L4-L5 as well as L5-S1, causing pain in the L5 or S1 nerve that radiates down a sciatic nerve. Symptoms of the bulging disc at these locations are described below: The bulging disc at lumbar segments 4 & 5 (L4-L5) usually causes L5 nerve impingement.
The lumbar bulging disc happens in the lower levels of the spine typically at L4-5 as well as L5-S1. This can be associated with disc herniation. The bulging disc is the desiccation of a disc that can happen with the aging process or with injury. The L4-5 & L5-S1 discs are the most commonly affected.
The common reason for chronic as well as acute lower back pain (backaches), is the L4–L5 spinal segment. The L4-L5 bulge in a disc may cause sciatic such as symptoms by impinging nerves running down the legs. The pinched nerve may be caused by the slipped disc.
Manual palpation is the most common tool utilized to assess patients with LBP. This includes static as well as dynamic palpation of soft tissue or joints and goals to identify painful structures & biomechanical dysfunction of the spine. However, the clinical utility of these tests is controversial.