Wrist range of motion exercise: Types, Benefits, How to do?
- Wrist range of motion exercise mainly refers to activity aimed at improving the motion of the wrist joint. This movement is influenced by several structures, namely the configuration of bone surfaces within a joint, joint capsule, ligaments, tendons, as well as muscles acting on the joint. Range of motion exercise is also called “ROM” exercise.
- This is the capability of a joint to go through its complete spectrum of movement. The range of motion of a joint can be
passive, active-assisted, or active.
Table of Contents
There are mainly three types of the Wrist range of motion exercises
- The first one is passive range of motion: Movement applied to a wrist joint only by another person or persons or the passive motion machine. When a passive range of motion is applied, the wrist joint of a person receiving exercise is completely relaxed whereas the outside force moves a body part, such as the wrist, throughout the available range.
- Secondly, active-assisted range of motion: Wrist Joint receives partial assistance from an outside force. This range of motion can result from the majority of the motion applied by a therapist or by a person or persons assisting an individual. It can be a half effort on the wrist joint from each source.
- Lastly, active range of motion: Motion of the wrist joint provided entirely by an individual performing the exercise. In this type of exercise, there is no outside force aiding in the motion.
Normal range of the wrist motions
- Wrist flexion:0 degree to 80 degrees
- Wrist extension:0 degree to 70 degrees
- Wrist ulnar deviation:0 degrees to 30degrees
- Wrist radial deviation:0 degrees to 20degrees
- Supination: 0 degrees to 90degrees
- Pronation: 0 degree to 90 degrees
- Finger flexion(IP): 0 degree to 90 degrees
- PIP flexion: 0 degree to 110degrees
- DIP flexion: 0 degree to 100degrees
Wrist Passive range of motion exercise
- Passive range of motion exercise is useful for the joints that have become inactive due to injury or paralysis. In the passive range of motion exercises, a patient does not perform any movement themselves; instead, the therapist or caretaker moves the limb or body part of the stiff joint, gently stretching muscles and reminding them how to move correctly as well. In most cases, therapeutic stretching exercises are also mixed with the passive range of motion exercises to promote faster recovery of a stiff or flaccid joint. Here, the therapist stretches the soft tissue of the wrist to relax the surrounding muscles and relieve tension as well. Passive range of motion exercises also helps minimize stiffness, rigidity, or flaccidity in the wrist joint that has been immobilized.
- Some of the most common as well as safest passive range of motion exercises are related to stretching the surrounding muscles with the goal of increasing muscle flexibility. One way to do this exercise is with a tool, such as a stretching strap. This will help a patient to hold the stretch for a more sustained period of time. However, having a physiotherapist who aids with the stretch is a more effective way to practice the passive range of motion exercises. With this type of exercise, the trained professional moves the body into the stretch and holds it, with the intent to increase muscle flexibility.
- This is superior for a few reasons.
First of all, the physiotherapist understands proper limits as well as knows how far to go.
Secondly, the clinician knows how long to hold the stretch.
Lastly, physiotherapists are also trained to know if it is targeting the proper areas to achieve more benefits. With that in the mind.
In which conditions the physiotherapist should apply a wrist passive range of motion exercise
- Passive range of motion(PROM) exercises are typically used where there is paralysis, when the patient is comatose, in the presence of a healing fracture, or if the pain is elicited during an active muscle contraction. One of the main goals of the passive range of motion exercise (PROM) is to counteract the negative effects of immobilization. However, it is important to remember that this type of (PROM) exercise cannot prevent muscle atrophy.
Some benefits of the Wrist passive range of motion exercise
- This type of exercise not only assists in promoting healthy joint functionality but also benefits a patient in reducing pain, promoting healing, restoring, and maintaining the range of motion of certainly affected joints, and building muscle mass, allowing for better blood flow and aids in increasing oxygen levels as well.
Various wrist passive range of motion exercises
- Passive wrist extension
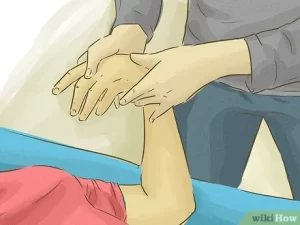
- First of all, take a relaxed position, such as sitting on the chair and affected hand hanging on the edge of the table with full pronation. In addition, place a rolled towel under the affected hand. After that, the physiotherapist takes his/her position opposite the patient. The therapist tells the patient to try to move the wrist upward, but the patient cannot move the wrist and the therapist move the hand in an upward direction until the stretch should be felt by the patient. Perform this action ten times per session and do three sessions per day.
- Passive wrist flexion
- To begin with, tell the patient to take a relaxed position, like sitting on the chair and injured hand hanging on the edge of the table with full pronation. Moreover, place a rolled towel under the injured hand. Then, the therapist takes his/her position opposite the patient. The physiotherapist gives the command to the patient to try to move the wrist down while the therapist performs the motion, and the therapist moves the wrist downward direction until the stretch should be felt by the patient. Perform this movement ten times per session. Do three sessions in one day.
- Passive wrist ulnar deviation
- First of all, tell the patient to take a relaxed position, such as sitting on the chair, and the affected hand should be in mid pronation. In addition, place the rolled towel under the affected hand. After that, the physiotherapist takes his/her position opposite a patient. Then, the therapist gives the command to a patient to try to move the wrist down during the physiotherapist performs the movement, and the clinician moves the wrist in a downward direction until the stretch should be felt by the patient. Perform this motion ten times in one session. Do three sessions per day.
- Passive wrist radial deviation
- To begin with, ask the patient to take a relaxed position, like sitting on the chair as well as affected hand should be in mid supination position. In addition, place a rolled towel under the injured hand. Then, the therapist takes his/her position opposite the patient. After that, the physiotherapist gives the command to the patient to try to move the wrist upward during the therapist performs the motion, and the therapist moves the wrist in an upward direction till the stretch should be felt by the patient. Perform this movement ten times per session. Do three sessions in one day.
- Passive supination
- First of all, tell the patient to take a relaxed position, such as sitting on the chair with an injured hand should be in full pronation position, meaning the back of the hand will be facing the ceiling. Moreover, place a rolled towel under the affected hand. After that, the physiotherapist takes his/her position opposite a patient. Then, the therapist gives the command to a patient to try to rotate the wrist during the therapist performs this motion, and the physiotherapist rotated the wrist passively till the stretch should be felt by the patient. Perform this motion ten times in one session. Do three sessions per day.
- Passive pronation
- To embark with, tell a patient to take a relaxed position, like sitting on the chair with the affected hand should be in full supination position, meaning the back of the hand will be facing the floor. In addition, place a rolled towel under an affected hand. Then, the therapist takes his/her position opposite the patient. After that, the physiotherapist gives the command to the patient to try to rotate the wrist while the physiotherapist performs this movement, and the therapist rotates the wrist passively till the stretch should be felt by the patient. Perform this movement ten times per session. Do three sessions in one day.
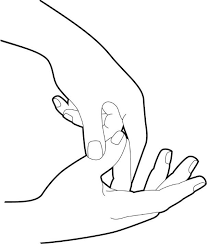
- Passive finger flexion
- Place the hand with the injured finger flat on the table, with palm up. After that, the therapist places his/her free hand on the back of the fingers and moves the fingers inward like bending the fingers. The affected finger will be free to move. Hold for about ten seconds. Then straighten the finger. Repeat this exercise 8 to 10 times in one session. Do three sessions per day.
- Passive finger extension
- First of all, place a hand with the affected finger flat on a table, with palm up. Then, the physiotherapist places his/her strong hand on the back of the fingers but the fingers should be in a flexion motion. After that, move the fingers outward like straightening the fingers. The injured finger will be free to move. Hold for about five seconds. After that, bend the fingers. Repeat this exercise ten times in one session. Do three sessions in one day.
- Passive thumb flexion
- First of all, tell the patient to take a relaxed position, such as sitting on the chair and the hand should be in mid pronation position. A rolled towel is put under the hand. After that, use the strong hand of the therapist to bend the thumb down so that a gentle stretch is felt. Hold six seconds. Repeat ten times per session. Do 3 sessions a day.
- Passive thumb extension
- To begin with, tell a patient to take a relaxed position, like sitting on the chair as well as the hand should be in mid pronation position. The rolled towel is placed under the affected hand. After that, use a strong hand of the therapist gently stretch the thumb out. Hold for the next six seconds. Repeat ten times in one session. Do 3 sessions per day.
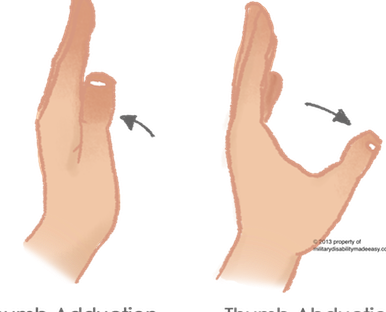
- Passive thumb abduction
- To embark with, tell the patient to take a relaxed position such as sitting on the chair with a rolled towel under the affected hand, but the hand should be in a mid pronation position. After that, stretch the thumb out from the palm as if the patient is opening it up to hold a large jar. However, remember that stretch at the big thumb knuckle, not the tip. Hold six seconds. Repeat ten times per session. Do three sessions in one day.
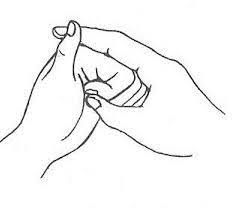
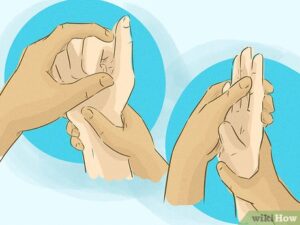
- Passive thumb opposition
- First of all, tell the patient to take a relaxed position such as sitting on a chair. After that, touch the thumb to the tip of each finger. When the patient is able to do this exercise easily, then touch further down on each finger till the patient is able to touch the base of each finger. Repeat ten times in one session. Do three sessions per day.
Active-assisted wrist range of motion exercises
- As the name suggests, these exercises mainly involve partial or minimal assistance from the physiotherapist or from the patient himself. A patient does most of the motion, but he/she gets little assistance to complete the motion correctly. In the major cases, this restricted motion is a result of weakness or pain caused due to falls, bruises, or accidents, up to serious injuries. The therapist mostly uses the strap or the band to secure the joint before helping the movement. In the starting, a patient can suffer a great deal of pain and weakness when performing these exercises, however, with the time, a patient has a great scope for gradual and lasting improvement in the range of movement around the wrist joint.
Various benefits of the active-assisted wrist range of motion exercise
- Increase motion of the wrist joint.
- Improve the function of the wrist joint as well as the whole limb.
- Improve motion efficiency.
- Increase independence.
- Decrease wrist pain.
- Increase as well as maintain wrist joint integrity.
Various active-assisted wrist range of motion exercises
- Active-assisted wrist flexion
- To embark with, tell the patient to take a relaxed position, like sitting on the chair as well as affected hand relaxed on the edge of the table with full pronation. Moreover, place the rolled towel under the injured hand. Then, the therapist takes his/her position opposite a patient. The physiotherapist gives commands to the patient to try to move the wrist down, when the patient is unable to move his/her hand during that time therapist provides assistance to the patient to reach the full range. Perform this movement ten times in one session and do three sessions in one day.
- Active-assisted wrist extension
- To begin with, tell the patient to take a relaxed position, such as sitting on a chair, and the injured hand should be relaxed on the edge of the table with full pronation. In addition, place the rolled towel under the injured hand. Then, the therapist takes his/her position opposite a patient. After that, the physiotherapist gives the command to the patient to try to move the wrist upward, when the patient is not able to reach the end range during that time the therapist provides the assistance to reach the full range. Perform this motion ten times in one session and do three sessions in one day.
- Active-assisted wrist ulnar deviation
- First of all, tell a patient to take a relaxed position, such as sitting in the chair, and the injured hand should be in mid supination. In addition, place a rolled towel under the injured hand. Then, the therapist takes his/her position opposite the patient. After that, the therapist gives the command to the patient to try to move the wrist down, and when the patient is stopped while performing the motion, then the therapist assists the patient to reach the end range. Perform this action ten times per session. Do three sessions in one day.
- Active-assisted wrist radial deviation
- To embark with, tell the patient to take a relaxed position, like sitting in the chair, and the injured hand should be in mid supination. In addition, place the rolled towel under the injured hand. Then, the therapist takes a position opposite the patient. After that, the therapist gives the command to the patient to try to move the wrist up, and when the patient is stopped while performing the movement, then the therapist aids the patient to reach the end range. Perform this movement ten times per session. Do three sessions in one day.
- Active-assisted supination
- To embark with, tell a patient to take a relaxed position, like sitting in the chair with an affected hand should be in full pronation position, meaning the front of the hand will be facing the floor. In addition, place a rolled towel under the injured hand. Then, the therapist takes a position opposite the patient. After that, the clinician gives the command to the patient that tries to rotate the wrist and when the patient stops the motion, the therapist provides outside force to reach the full range of supination. Perform this movement ten times per session. Do three sessions in one day.
- Active-assisted pronation
- To begin with, tell the patient to take a relaxed position, such as sitting on the chair with the injured hand should be in a full supination position, meaning the palm of the hand will be facing the roof. Moreover, place a rolled towel under the injured hand. After that, the therapist takes a position opposite a patient. Then, the therapist gives the command to a patient to try to rotate the wrist and when the patient is unable to reach the end range and stops at any point, the therapist assists the patient to perform full range. Perform this motion ten times in one session. Do three sessions per day.
- Active-assisted finger flexion
- First of all, place the hand with the affected finger flat on a table, with palm up. Then, the physiotherapist places his/her free hand on the back of the fingers and tells the patient to bend the fingers inward, when the patient is stopped at any point, the therapist assists the patient to reach the full flexion movement. Hold for about six seconds. After that, straighten the finger. Repeat this exercise 10 times per session. Do three sessions in one day.
- Active-assisted finger extension
- To begin with, place the hand with the affected finger flat on the table, with palm up. After that, the therapist places a strong hand on the back of the fingers but the fingers should be in a flexion motion. Then, the therapist will give the command to the patient to straighten the fingers, when the patient will stop the motion in between the range, the therapist will provide external force to the fingers. Hold for about three seconds. After that, relaxed the fingers. Repeat this exercise ten times per session. Do three sessions per day.
- Active-assisted thumb flexion
- To begin with, ask the patient to take a relaxed position, such as sitting on the chair and the hand should be in mid pronation position. The rolled towel is placed under the affected hand. After that, the clinician gives the command to the patient to bend the thumb down so that a gentle stretch is felt. Then, the finger will cross the palm. Repeat ten times in one session. Do three sessions per day.
- Active-assisted thumb extension
- First of all, tell the patient to take a relaxed position, such as sitting on the chair as well as the hand should be in mid supination position. The rolled towel is placed under the injured hand. After that, the therapist gives the command to the patient to stretch the thumb outside means slightly posteriorly to the palm, but when the patient is unable to reach the full range, the therapist gives the assistance to do a full thumb extension. Repeat ten times per session. Do three sessions in one day.
- Active-assisted thumb abduction
- To begin with, ask the patient to take a relaxed position, such as sitting in the chair with a rolled towel under the injured hand, but the hand should be in mid supination position. After that, tell the patient to stretch the thumb out from a palm as if a patient is opening it up to hold the large jar. However, remember that stretch at the big thumb knuckle, is not a tip, but when the patient is not able to reach the full range, the therapist assists to reach the full thumb abduction. Repeat ten times in one session. Do three sessions per day.
- Active-assisted thumb opposition
- First of all, tell a patient to take a relaxed position like sitting on a chair. After that, touch a thumb to the tip of each finger. When a patient is able to do this exercise easily, then touch further down on each finger till a patient is able to touch the base of each finger. Repeat ten times per session. Do three sessions in one day.
Active wrist range of motion exercises
- This type of exercise is performed by a patient himself because a patient is entirely capable to perform these exercises, and most often, the physiotherapist’s involvement is limited to verbal cues and directions on how to increase the posture as well as movement involved in the exercises as well. This is useful in the cases of minor injuries that do not severely restrict the movement of the wrist, but this can be painful, uncomfortable, or hindering.
Various active wrist range of motion exercises
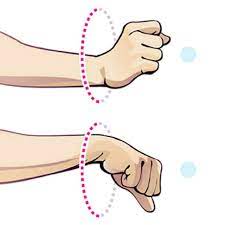
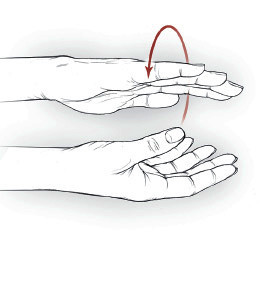
- Active wrist circles
- To begin with, the therapist should give the command to a patient to take a relaxed position like sitting on a chair. After that, bring the hands up with the elbows close to the body, along with making fists. Rotate the wrists in a circular motion. After that, try to keep the patient’s palms facing down to maximize the range of movement. Do around 20 circles in each direction per session. Do it in opposite direction too meaning anticlockwise. Do three sessions in one day.
- Active wrists shake
- First of all, tell a patient to take a namaste position of a hand. Then, simply shake the wrists out for one to two minutes per set in one session. Do three sessions in one day.
- Shake it out
- Shaking out the wrist and hands after staying in the same position for the while is a great mode to reintroduce blood flow as well as relieve the stiffness of the joints. To begin with, the hands are out in front of a patient as well as palms facing the floor. Slowly shake the hands by letting a wrist go limp Continue for 30 seconds. Repeat up to three times in one set. One set in one session is enough. Do three sessions in one day.
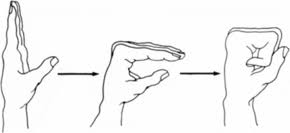
- Fist to Fan
- First of all, the hands in front of a patient as well as palms facing downwards. Make a fist with both hands. Open the fist halfway so that a finger is bent at the knuckles. Hold for five to ten seconds. Open the hands fully so all five fingers are straight and spread wide apart. Hold for five to ten seconds in one repetition. Do ten times per session along with three sessions in one day. Re-make the fist, as well as repeat the routine again.
- Active thumb touches
- This exercise assists to improve coordination in the thumb and forefingers as well, which helps to reintroduce blood flow back to the affected area. First of all, hold the hands outwards with the palms facing the ceiling. With the injured hand, slowly bring the thumb to touch the tip of every finger. Repeat on the other hand too, if the pain is present on the other hand. After that, return to an embarking position. Repeat ten times with both hands per session. Do three sessions per day.
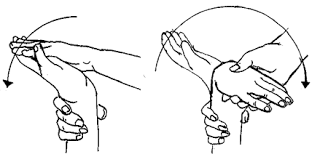
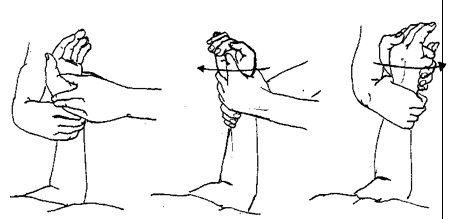
- Active wrist supination
- First of all, telling a patient to take a relaxed position means to stand or even sit with the arm at the side with the elbow bent to 90 degrees, with the hand in the mid supination over the edge of a table. Give the command to the patient that moves their hand upward facing the roof without holding it at the endpoint. Do 10 times per set in one session. Do three sessions in one day.
- Active wrist pronation
- To embark with, the therapist should give the command to the patient to take a relaxed position means to stand or sit with the arm at the side with the elbow flexed to 90 degrees, with the hand in the mid pronation position over the edge of the table. Then, tell the patient to move their hand downward facing the floor without holding it at the endpoint. Do ten times per set in one session. Do three sessions in one day.
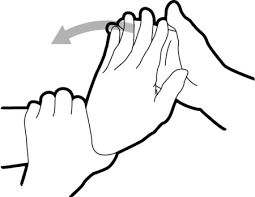
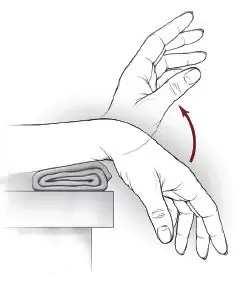
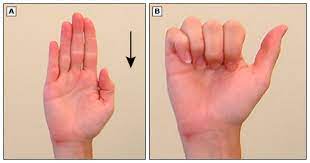
- Active wrist extension
- To begin with, place a forearm on a table on the rolled-up towel for padding with a hand hanging off the edge of the stable surface, such as the table with palm down. The physiotherapist should give the command to the patient that moves the hand upward till the patient feel the gentle stretch. After that, return to an embarking position. Do it ten times in one session. Do three sessions in one day.
- Active wrist flexion
- To start with, tell a patient to place the forearm on the table on the rolled-up towel for padding with the hand hanging on the edge of the stable surface, such as the table with the wrist is in full pronation position. After that, the therapist should give the command to the patient to move the hand downward till a patient feel a mild stretch. After that, return to the starting position. Do ten times per set as well as in one session. Do three sessions per day.

- Active wrist flexion in supination
- To embarking with, tell a patient to place a forearm on the table on the rolled-up towel for padding with the hand hanging off the edge of the stable surface, such as the table with palm down. The physiotherapist should give the command to the patient to move the hand upward till the patient feel a mild stretch. After that, return to the starting position. Do ten times per set in a session. Do three sessions in one day.
- Active wrist extension in supination
- To begin with, give the command to a patient to place a forearm on the edge of the table on the rolled-up towel for padding with a hand, which is in full supination. After that, the therapist should give the command to the patient to move the hand down until a patient feels the gentle stretch. Then, return to the embarking position. Do ten repetitions in one session. Do three sessions per day.
- Active wrist ulnar deviation
- To begin with, it is the responsibility of the therapist to give the command to a patient to take a relaxed position with a support of a forearm on a table on the rolled-up towel for padding or even on the knee, along with a thumb upward in position. Move a wrist down through its full range of motion. Do it ten times per session. Do three sessions in one day.
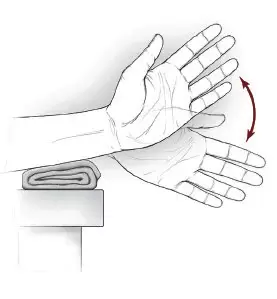
- Active wrist radial deviation
- To embark with, the physiotherapist gives the command to a patient to take a relaxed position with a forearm supported on the table on the rolled-up towel for padding or even on the knee, with a thumb upward in position. After that, move a wrist up through the full range of movement. Do it ten times in one session. Do three sessions in one day.
- Active thumb flexion
- To embark with, the therapist gives the command to the patient to take a relaxed position with a forearm supported on the table on a rolled-up towel for padding or even on the knee. After that, the thumb is positioned outward, and move the thumb across a palm and back to an embarking position. Do it ten times in one session. Do three sessions in one day.
- Active thumb extension
- First of all, the therapist should give the command to a patient to take the relaxed position with the forearm supported on a table on a rolled-up towel for padding or even on the knees. A thumb is positioned outward direction. After moving a thumb across the palm after that come back to an embarking position as well as move slightly backward but not in abduction. Do ten repetitions in one session. Do three sessions per day.
- Active finger flexion
- To begin with, place a hand with the injured finger flat on the table, with palm up. After that, the therapist gives the command to the patient to bend the fingers inward. Hold for about five seconds. Then, straighten the fingers. Repeat it 10 times in one session. Do three sessions per day.
- Active finger extension
- To embark, place a hand with the affected finger flat on the table, with the palm up. After that, the therapist will give the command to a patient to straighten the fingers. Hold for about five seconds. Then, relaxed the fingers. Repeat it ten times in one session. Do three sessions in one day.
- Active thumb abduction
- To embark with, tell a patient to take a relaxed position, like sitting in the chair with the rolled towel under the affected hand, but the hand should be in mid pronation position. Then, tell a patient to stretch the thumb out from the palm as if the patient is opening it up to hold a large jar, but remember that stretch at the big thumb knuckle, is not at a tip. Repeat ten times per session. Do three sessions in one day.
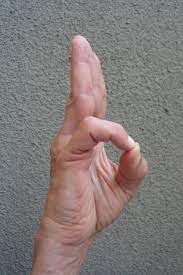
- Active thumb opposition
- To begin with, tell the patient to take a relaxed position such as sitting on a chair. Then, touch the thumb to the tip of each finger. When the patient is able to do this exercise effortlessly, then touch further down on each finger till the patient is able to touch the base of each finger. Repeat ten times in one session. Do three sessions per day. The most important exercise of the thumb.