
Piriformis muscle strengthening exercises
Table of Contents
What is Piriformis strengthening exercise?
- Piriformis strengthening exercises are a great way to improve the strength of the gluteal region mainly external rotators & if the patient is performing this exercise regularly, may have many health benefits as well as improve the Physique & performance and also reduces the risk of injury.
- The Piriformis muscle is a very small muscle in the glutes that is flat as well as band-like. This arises internal surface of the sacrum & inserts at the superior border of the trochanter of the femur. It is also why issues related to piriformis may be described as pain that the patient feels in the hip or buttocks. The piriformis helps us with lower limb motion since this stabilizes our hip joint & lifts and rotates our thighs away from the body.
- The piriformis muscle rotates the femur while the hip extension & abducts the femur during the hip flexion. If the piriformis muscles are weak then this will put extra strain on the knee joints by making the inner side weak & the outer side tight. It will make the joint unstable.
Health benefits of Piriformis strengthening exercise
- Helps relieve the pain of the sciatic nerve
- Helps the patient in running more efficiently & avoid injury.
- The piriformis muscle rotates the femur while the hip extension & abducts the femur while flexion of the hip Healthy piriformis can ease knee and ankle pain as well.
- Helps to decrease piriformis syndrome pain.
- Helps to improve hip as well as knee range of motion.
Different types of strengthening exercises for the Piriformis muscle
Resistance band abduction
- How to do this strengthening exercise:
- To do this exercise the patient has to stand on one end of a resistance band as well as which is tied around the ankle & the second end is attached to the stable object, close to the floor. Move the leg out to the side, away from the body, the knee should be straight.
- Once the patient gets as far as is comfortable, slowly come back to the leg to the starting.
- Repeat 15 to 20 times & gradually improve the repetitions up to 2 sets of 20 repetitions in one session. Do two sessions per day.

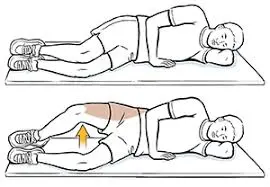
Side-lying clam exercise
- How to do this strengthening exercise:
- For this exercise, the patient has to Lie on the left side with the hip to be worked on top.
- Flexed the knees & position them forwards so that the feet are in line with the spine.
- Make sure the right hip is directly on top of the other & the back is straight.
- The ankles should be together, raise the right knee away from the bottom one.
- Remember, do not move the back or tilt the pelvis, all the motions should be started from the hip.
- Slowly come back to the initial position. Repeat 15 to 20 times initially & gradually build this up to 2 sets of 25 repetitions on both sides in a session. Do three sessions in a day.
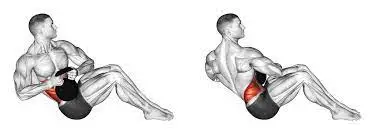
Bridging
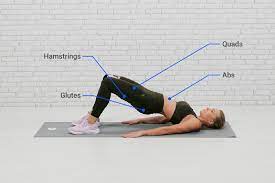
- How to do this strengthening exercise:
- Start this exercise while lying on the back with both knees flexed at about a 45-50 degree angle & both feet flat on the floor.
- Put the arms rest at the sides.
- Slowly raise the hips by pushing on the floor with the feet until the knee, hip, as well as shoulder are in a straight line.
- Repeat for 12 to 15 repetitions in a day in a session.
Seated Abductions
- How to do this exercise:
- For this exercise, the patient has to take a sitting position. The back should be straight.
- Wrap the resistance band around the ankle joint. Support the upper limb with the arms.
- Then Slightly rotate the feet out. Make sure the patient is not lifting the feet out to help pull a band.
- Complete 8-14 slow & controlled repetitions.
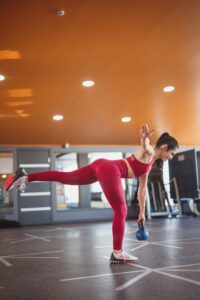
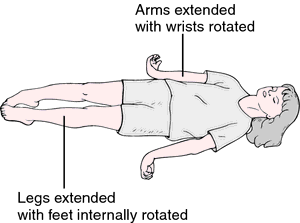
Leg Raises
- How to do it: To do this strengthening exercise, a patient has to stand against a wall.
- Elevate the leg up along a wall during externally rotating the foot when the patient reaches the up motion.
- Now slowly Lower the leg down & internally rotate the foot on the way down.
- The hips are not rotating forward. Repeat 10 to 20 times initially & gradually build this up to 2 sets of 25 repetitions in a session.

Side-lying Hip Abduction
- How to do this strengthening exercise:
- For this exercise, the patient has to lie on the left side.
- Then, slowly lift the right leg towards the sky.
- Now, lower this back to the starting position.
- The knee should be straight & do not let the hips roll backward or even forward while the exercise.
- Repeat 10 to 15 times initially & gradually build this up to 2 sets of 25 as well.

Prone Hip Extension
- How do this:
- Start by lying on your stomach with both Legs stretched straight behind you.
- Slowly lift one leg upward as far as the patient can.
- Without arching the low back, then lower It back to the embarking position.
- The knee should be straight & the torso steady while the exercise.
- Repeat 10 to 15 times initially & gradually build this up to 2 sets of 20 repetitions. Do two sessions in a day.

Clamshell (Small lifts)
- First of all, to do this strengthening exercise the patient should keep the pelvis stable.
- Lift the knee up slowly until the patient feels the contraction.
- Slowly bring the knee down.
- This exercise does not require big lifts. Avoid rocking back & forth to help raise the knee. Small lifts go a long way in this exercise.
Side-to-side walks
- Here is how to do lateral band walks with the proper form:
- Wrap the looped band just above both of the ankles. Step the feet out to about shoulder-width apart, or until there is tension in the band.
- Get into the athletic stance with the knees slightly bent, hips hinged forward about 45 degrees, as well as hands on the hips.
- Keeping the upper body facing forward, take one step to the right with the right foot. Feel the tension in the right hip, then slowly step the left foot to the right so that the feet return to shoulder-width apart.
- Take ten steps to the right with the right foot leading. Next, switch directions & take ten steps to the left with the left foot leading.
- As the patient does the exercise, make sure that the upper body, hips, & knees all stay facing forward. Also, make sure to take a step outwards directly from the hip joint. As you step, the foot should be in line with the hips & the rest of the body.

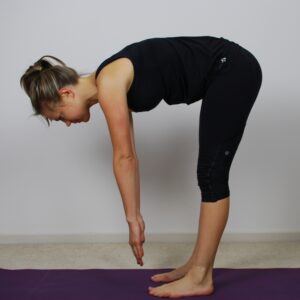
Hip Hinging Technique
Lowering portion (Hip Flexion)
- To do this strengthening exercise: Brace the core slightly
- Start the motion from the hips (Butt goes back first)
- The upper body should naturally lean fwd, as the butt goes back.
- Maintain a Neutral spine position (Avoid flexing or overextending the spine).
Coming up portion (Hip Extension):
- Use the knees as well as the glutes to initiate the coming-up movement.
- Push through the hips fwd, as you straighten the knees.
- Avoid arching the low back as you rise up.
- Keep your spine in a neutral position the entire time.
- In order to get better with hip hinging so that this becomes second nature, it is important to practice the motion often & to strengthen all the muscles involved. The following exercises provide different hip-hinging variations and are great for all levels.
Abduction Circles
- To do this strengthening exercise: The patient should take a side-lying position. When the patient lifts the leg, keep the foot points straight forward as well as keep the glutes engaged.
- This exercise will engage the piriformis muscles as the therapist adds the rotational motion.

Side plank leg raises
- To do this strengthening exercise: Place either the right or left elbow on the ground, lift the hips, as well as extend both legs. Balance on the outside edge of the bottom foot & lift the top leg up just a bit higher than the hip. Slowly lower the top leg back down. Repeat on the other side. When the patient gets into the plank position, keep the back straight & avoid arching or rounding the back.
- Pull the belly in a bit to make sure the patient is not using the hip flexors too. The patient also wants to keep the glutes tight. This exercise strengthens the glutes & the core at the same time.
Six Hip Hinge Exercises
Squat
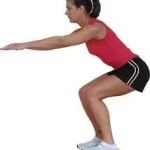
- First of all, Stand up straight & brace the core.
- Initiate the motion from the hips (butt going back).
- Allow the torso to move forward slightly, to counterbalance the hips.
- Lower down to a 90-degree angle with knees, or as low as comfortable for you.
- As the patient lower down, externally rotate the knees.
- Hold the down position for 3 sec before coming up.
- To come up, start the motion from the knees & then bring the hips through forward.
- Strive for 10 repetitions with 3 sets in a session in a day.
- Keep your chin tucked in and keep a Neutral spine.
Goblet Squat

- To perform this exercise: Hold the Kettlebell (or dumbbell) in both hands & lock the shoulders.
- Brace the core.
- Start the movement from the hips (butt going back).
- Then, allow the torso to move forward slightly, to counterbalance the hips.
- Lower down to a 90-degree angle with knees, or as low as comfortable for the patient.
- Hold the down position for around three seconds before coming up.
- To come up, embark on the motion from the knees & then bring the hips through forward.
- Strive for 10 repetitons with 3 sets per session. Do two sessions in a day. Most probably focus on Keep’s chin tucked in & Keep Neutral spine.
Single Leg Deadlift
- Stand with weight on one leg as well as brace the core.
- Start the motion from the hip of the standing leg (butt going back).
- The free leg (back leg) will lift up slightly as the patient moves more forward.
- Allow the torso to move forward slightly, to counterbalance the back leg.
- When the patient has reached the depth that he is comfortable with, use the knee & glutes to rise back up into embarking position.
- Strive for nearly 10 repetitons with 3 sets in a day.

Single Leg Deadlift with Kettlebell
- First of all, to do this strengthening exercise: Stand with weight on one leg & hold the kettlebell in the opposite arm.
- Press the scapulae down as well as lock the shoulders down.
- Start the motion from the hip of the standing leg (butt going back).
- The free leg (back leg) will lift up slightly as the patient moves more forward.
- Allow a patient torso to move forward slightly, to counterbalance the back leg.
- When the patient has reached a depth that he is comfortable with, use a knee as well as glutes to rise back up into embarking position.
- Strive for 10 repetitions in the 3 sets in a session. Do two sessions per day.
Romanian Deadlift with Barbell (No Weight)
- To Initiative with, Stand with feet just outside shoulder width
- Hold the barbell without weights, & externally rotate the shoulders (feel like the patient is breaking the bar), to engage the lats.
- Now, start hanging down from the hips (the butt goes back).
- Externally rotate the knees as the patient lowers them down it.
- Keep a neutral spine the entire time.
- Go down with the barbell to mid-shin level.
- After that, use the knees as well as glutes to push off the ground & come up.
- Squeeze the glutes when the patient stands up.
Romanian Deadlift with Dumbbells

- To start this strengthening exercise: Stand with feet just outside shoulder width.
- Hold 2 dumbbells (one in each arm), & press the shoulders down
- Brace the core before you start moving.
- Now, start hanging down from the hips (the butt goes back).
- Externally rotate the knees as you lower.
- Keep a neutral spine the whole time.
- Keep the dumbbells in front of you, & go down to mid-shin level.
- Now use the knees as well as glutes to push off the ground and come up.
- Squeeze the glutes when he stands up.
How To Effectively Strengthen a Piriformis Without Triggering Pain?
- This is essential to do these routines without pain. Do not push through the pain if the patient feels the muscles are getting to spasm.
- That is why I broke down the exercises into 3 separate routines.
- To make sure the patient is not triggered by the pain, make sure he always starts by activating the Gluteus Medius & Maximus first (and we perform that in all the workouts above).
- Gluteus maximus as well as medius are primary hip stabilizers, & when it is inactive, compensation happens when the piriformis is doing more than it should.
When did the patient not do this exercise?
- If the healthcare provider advised the patient to take rest.
- If the leg bone is recently fractured then avoid these exercises.
- If the patient feels any pain or even discomfort while these exercises then stop immediately and consult the physical therapist.
FAQ
While medications, namely pain relievers, muscle relaxants, & anti-inflammatory drugs may be recommended, the mainstay of treatment for piriformis syndrome is physical therapy, exercise, and stretching.
Piriformis syndrome happens when the piriformis muscle presses on the sciatic nerve. The condition can cause pain, numbness, or tingling in your butt, hip, or upper leg. Most episodes go away in a few days or weeks with rest and simple treatments
Healthcare providers may recommend stretching and strengthening exercises & other types of physical therapy to help you heal. A mild injury may heal in a few weeks, but a severe injury may take 6 weeks or longer.
The exact causes of piriformis syndrome are unknown. Suspected causes include Muscle spasms in the piriformis muscle, either due to irritation in the muscle itself or irritation of a nearby structure such as the sacroiliac joint or hip. Tightening of the muscle, in response to injury or spasm
If pain is caused by sitting or certain activities, try to avoid positions that trigger pain. Rest, ice, & heat may help relieve symptoms. A doctor or physiotherapist can suggest a program of exercises and stretches to help decrease sciatic nerve compression.
The muscle can become injured or irritated from long periods of inactivity or too much exercise. Some common causes of piriformis syndrome include overuse from excessive exercise. running & other repetitive activities involving the legs.

One Comment