26 Best Exercise for Forward Head Posture
Table of Contents
Introduction
In today’s digital age, where hours are spent hunched over computers, tablets, and smartphones, an increasing number of people are developing what is known as “Forward Head Posture” (FHP). This prevalent postural issue, also referred to as “text neck,” is characterized by the anterior positioning of the head in relation to the shoulders, leading to various musculoskeletal imbalances and discomfort.
However, the good news is that FHP is largely preventable and can be corrected through a combination of targeted exercises, lifestyle adjustments, and ergonomic awareness. Implementing a well-rounded exercise routine that focuses on strengthening the neck, upper back, and shoulder muscles, while simultaneously incorporating stretching techniques to improve flexibility, can significantly aid in the correction of Forward Head Posture.
In this article, we will explore a range of effective exercises and techniques that can help in the correction of Forward Head Posture. From simple stretches to specific muscle-strengthening exercises, we will provide a comprehensive guide to assist individuals in addressing this common postural issue and improving their overall physical well-being. By understanding the underlying causes of FHP and the appropriate exercise techniques to counteract it, individuals can take proactive steps to improve their posture and mitigate associated health concerns.
What is forward head posture?
Forward Head posture (FHP) is a common position where your head is positioned so that your ear is in front of the vertical midline of your body. In a normal or neutral head position, the ears are in line with the shoulders and midline. FHP can cause neck pain, stiffness, unsteady gait, and other side effects. It is also often associated with rounded shoulders known as kyphosis.
When a person holds good posture, their head is vertical with their spine. Forward-head posture (FHP) occurs when a person tilts their head forward with their spine in a neutral position. with a good posture, you feel great. Maintaining good posture and exercise are key to avoiding stress on bones, muscles, and ligaments. Posture is something that chiropractors are very aware of, as poor posture can affect your well-being in many ways.
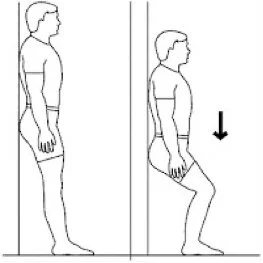
Forward Head posture (FHP) is exactly what it sounds like – when you carry your head in front of your shoulders instead of in line with your spine. This can trigger a number of postural mistakes that can strain muscles and cause pain. If you’re wondering if you’re one of the majority of adults with head orientation, here’s a simple test:
With the Standing position( your head should be against the wall)
Place your heels against the wall.
Place as many fingers as possible between the wall and the back of your head.
If you can fit at least three fingers between your head and the wall, you may have the forward head position. Looking at our computers and mobile devices, it’s easy to see how FHP can develop, but you may not be aware of the effects it has on your body.
These muscles are elongated and weakened due to long-term forward head posture including:
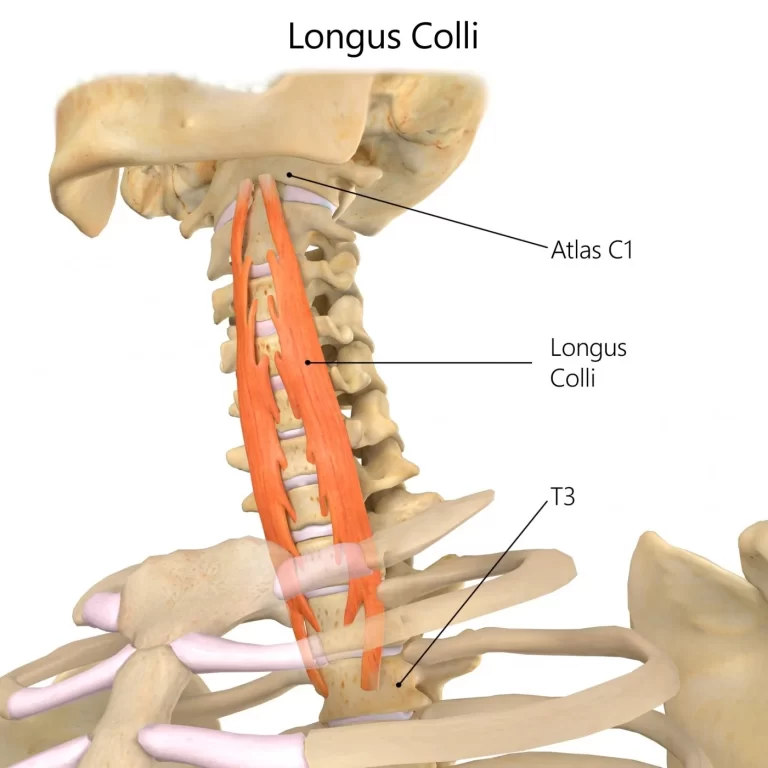
Deep cervical flexors. Also called longus capitus and longus colli, these muscles are located at the front of the cervical spine and help stabilize the neck. As the cervical flexors weaken, they lengthen as the chin tilts away from the neck, often referred to as a “chin thrust.”
Erector spinae (lower cervical and upper thoracic). These are extensor muscles attached to the back of the lower cervical and upper thoracic spine. Erector spinae plays a key role in rotating and straightening the spine. As the erector spinae muscles lengthen and lose strength, they are unable to prevent the neck and upper back from bending forward.
Scapular retractors. The middle trapezius and rhomboid muscles of the upper back help bring the scapulae (shoulders) back to keep the shoulders back and the chest open in a good position. Weakened trapezius and rhomboid muscles allow the shoulders to lean forward, further contributing to hunched shoulders and forward head posture. If you are trying to correct forward head position and relieve neck pain, these are the muscles that may need to be strengthened. Depending on the specific needs of the patient, other muscles must also be strengthened to reduce the forward head and rounded shoulder position.
Suboccipital muscles. These four pairs of small muscles that connect the lower back of the skull to the upper cervical spine help rotate and extend the head. These muscles work very hard and constantly contract to keep the head tilted and looking forward.
chest muscles As the upper back muscles lengthen as the shoulder rolls forward, the pectoral muscles can shorten and tighten. For example, the pectoral muscles, are thin triangular muscles at the top of the chest.
Levator scapula muscles. This pair of muscles is located on the back and side of the neck and runs from the top of the cervical spine to the scapula (scapula). The levator scapulae play a key role in raising or elevating the scapula, and they also aid in various neck movements. As the scapula begins to bend forward and turn upward with rounded shoulders, the levator scapulae muscles can shorten.
Causes/Epidemiology
The overall prevalence of neck pain in the general population is high at 86.8%.
Risk factors for previous head positions are female sex, older age, former smoker, high job demands, and low social or work support. Etiologies include:
Occupation physical appearance: long-term tilting of the head forward or backward, relaxed or slouched sitting, incorrect sitting position when using a computer or screen.
Effect of gravity: relaxation, poor ergonomic alignment.
Other faulty positions such as pelvic and hip positions.
Sleeping with a head too high.
A poor position maintained for a long duration.
Lack of development of back muscle strength.
Forward Head Posture and Muscle Pain Symptoms
When the forward head posture causes muscle pain, it usually feels like one or more of the following:
General tenderness. This dull or aching pain can radiate to the side or back of the neck, as well as the upper back, shoulders, and/or head.
Intense pain. When a muscle is stretched and/or goes into spasm, it results in a feeling of tension and severe pain that may feel sharp or burning. Severe neck pain may worsen in certain positions or movements, but ease in other positions or during rest. This pain is usually localized in one place – such as the side of the neck or the base of the skull – rather than spreading throughout the area.
Trigger point pain. This pain is accompanied by tender, tight spots in the muscles that can become even more painful when touched. Trigger points are particularly common in the back of the head, but the pain can also be directed up the head or down into the shoulders. Some studies have linked trigger point pain to a more likely forward head position, especially in people with migraines or other types of headaches.
Muscle tension. Muscles can become inflamed and strained as a result of overuse, injury, trigger point pain, or a nearby infection such as a herniated disc. Due to pain and decreased muscle function, the neck may become stiff or less mobile. Forward head position can cause more than just muscle pain, including pain from joints, discs, nerve roots, and other nearby structures.
Side effects of forward head posture
Reduce the normal range of cervical
Early disc degeneration and osteophyte formation
Temporomandibular joint pain and inflammation
Tension headache
Increase in dorsal kyphosis and reduction in height
Decreased strength and range of motion in the shoulders and arms
Possible protrusion of the pulp and nerve compression
Lack of movement in the muscles of the front of the chest (middle muscles), muscles of the upper limbs originating from the chest (Pectoralis major et minor, Latissimus dorsi, Serratus anterior), muscles of the cervical spine and muscles of the chest thoracic scapula and the head attached to the upper chest (Levetator scapulae, Sternocleidomastoid, Scalene, upper trapezius) and the muscles of the occipital region (Rectus capitis posterior major and minor, Obliquus capitis inferior and superior).
Decreased muscle activity in tight and weak lower neck and chest erector spinae muscles and scapular retractor muscles (rhomboids, middle trapezius), anterior throat muscles (suprahyoid and infrahyoid muscles), and flexors (Rectus capitis anterior and lateralis, superior oblique Longus Colli capitis).
In connection with temporomandibular joint symptoms, there may be increased tension in the masticatory muscles (Pterygoid, Masseter, temporalis muscles).
Research facts about forward head posture
According to a small study conducted in 2019 on healthy university students, FHP is associated with impaired respiratory function.
FHP and kyphosis are associated with increased mortality, especially in older men and women, reports a 2019 review article.
The effective weight of the head on your spine increases from 10 to 12 pounds in a neutral position to 49 pounds when your head is tilted forward at a 45-degree angle, a 2014 study found.
FHP reduces your balance capacity, according to a 2012 study that looked at people who worked at a computer for more than six hours a day.
How to check your posture?
This easy test gives you an idea about your good posture:
In a standing position your shoulder, hips, and feet touch the wall for support.
Now move your hands up and down against the wall Ten times.
When you complete the exercise and walk then take care that your body should be in proper alignment.
Preventive measures
Exercise for Forward Head Posture
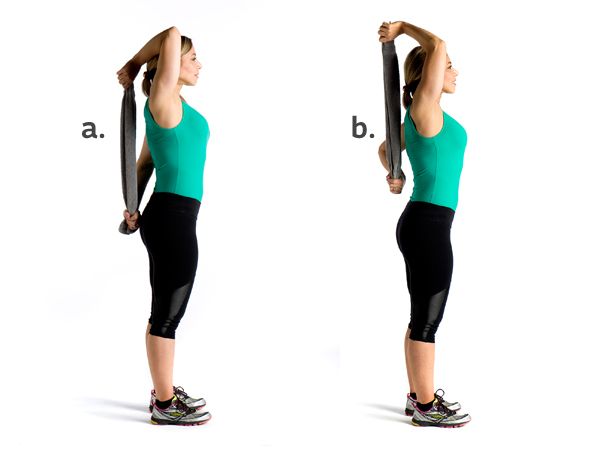
Trapezius stretching
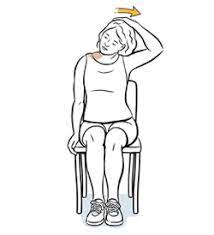
The trapezius stretch is the best and easiest exercise to do at home to improve the flexibility of the neck in relation to the shoulder region. This exercise also helps relieve neck pain and stiffness. Sit in a straight chair with your head and neck in a neutral position, and ears in line with your shoulders. Hold the edge of the chair seat with your right hand. Tuck your chin in a little. You have to put your hand on the opposite side of the shoulder and then move the neck(side flexion). Pull your head gently to the left.
Hold for 30-60 seconds. Use gentle pressure to increase the stretch. Do not force your head into position. back to the head anatomical position. Repeat this exercise two or three times or as directed. Switch sides and repeat two or three times or as directed. Avoid overstretching during the trapezius stretch.
You are doing this stretch to increase your range of motion, but you have to respect your current range of motion. Gaining mobility and flexibility takes time, your muscles don’t get more flexible overnight. It is normal to feel some discomfort during the stretch, but not pain. If you feel pain while stretching you can reduce the intensity of the stretching and provide them stretch.
Sternocleidomastoid strech
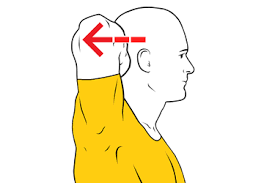
The SCM (sternocleidomastoid) is a muscle in your neck that is often associated with bad hump and neck pain. This neck stretch is designed to release SCM muscle tension, increase the range of motion, and reduce neck pain. start with your head in normal. Begin to stretch the left SCM muscle by turning your head from that side to the right side, then gently tilt your head back to engage and stretch the sternocleidomastoid muscles.
You should feel and in some cases see the SCM stretch in the mirror. You may need to slightly change the angle of the stretch for best results. Everyone’s anatomy is slightly different, so small changes in rotation or tilt can help. Hold the stretch for 20-30 seconds, then gently tilt your head back to neutral.
Then repeat on the opposite side. Try to repeat two to three times on each side, holding for 20-30 seconds each time. Try to repeat the stretch one to two times a day.
If you feel pain about it, stop the stretch. you should care of does not aggravate the pain.
Pectoralis Stretch
This exercise is a simple stretch in the muscles that exceed the width of the chest – the pectoral muscles, or pectoralis. When the shoulders fall forward, they pinch and strain the muscles, so it’s important to try to get them out of that position. The angle pectoral stretch is very similar to the wall press, except that the emphasis is on keeping the pectoral muscles in an extended position. Here are the basic moves:
Stand facing the corner of the wall. With elbows bent at 90 degrees and upper arms parallel to the floor, place palms and forearms against each adjacent wall. Breathe in and as you breathe out, pull your abdominal muscles toward your spine to stabilize your lower back. Lean your body against the wall without moving your legs until you feel a slight stretch across the front of your chest. Hold for 20-30 seconds, then return to the starting position and repeat three to five times.
The pectoral stretch is an important exercise to improve the flexibility of the pectoral muscles, mainly the pectoral muscles and pectoral muscles. This exercise improves chest mobility and improves your posture.
Types of pectoralis stretch included:
Above-the-head Chest Stretch
Bent-arm Wall Stretch
Side-Lying Parallel Arm Chest Stretch
Towel Chest Stretch
Doorway Pectoral Stretch
Lying Pectoral Stretch
Camel Pose
Floor Angels
One arm stretch
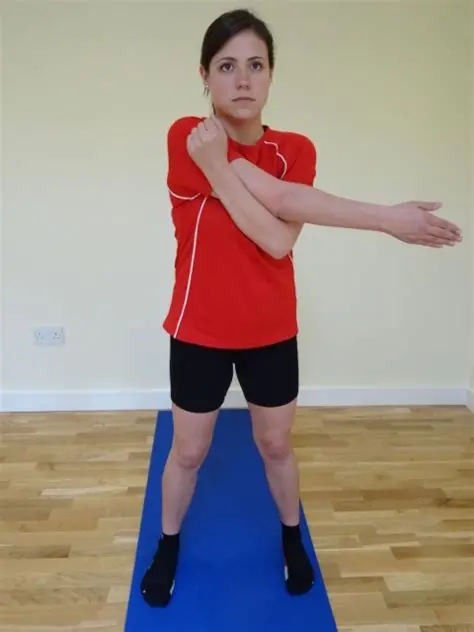
Start with the standing position and your shoulders hanging loosely at your sides. This is your starting point. Take your right arm and bring it up and across your body so that it is fully extended to your left side, arm parallel to the floor. Hold the right upper arm with the left hand and press the right hand closer to the body. Hold a few times and then relax from the stretch. Repeat on the other side.
Incorporating arm stretches into your routine is a great way to keep your biceps, triceps, and shoulder muscles strong and improve your posture. Arm stretches not only help sore muscles heal faster, but can also improve shoulder flexibility, mobility, and range of motion.
You can do three to five repetitions per session and do three to five sets per day.
Neck pull with towel

In the neck stretching exercise, start from a sitting position with support. Roll the towel along the long edge into a sausage shape. Place the pillow on your shoulders over your neck. Cross the ends of the pillow and hold one in each hand. Place one hand on your chest and raise the other hand at eye level with the pillow on your cheek. Pull the pillow forward and up. Turn your head away from the top, then use a pillow to help turn your head forward.
Another option is to slowly pull the ends of the towel towards your shoulders. To stretch, gently relax your neck and shoulders. Hold for 15-20 seconds and repeat three to five times for best results.
This helps to lengthen the neck muscles and improve the overall mobility of the neck. The benefit of this exercise is improved neck flexibility and range of motion.
Better posture and spinal alignment. Reduced stiffness and discomfort in the upper back, shoulders, and neck. Increased circulation in the neck to improve healing and recovery. Less risk of injury due to sudden movements or excessive strain on the neck muscles. if you are comfortable with the exercise you can gradually increase the repetition of the exercise.
Active Neck extension
This exercise targets the front of the neck. You can do this exercise by moving with each breath instead of holding the pose. before starting the exercise take three to five deep inspiration and expiration.
Active neck extension begins from a sitting position. Slowly reposition your head so that you are towards the ceiling. Hold this position (neck extension) for five to ten seconds gradually, you can increase the hold. Do five to ten repetitions per session and do three sets per day. If you are not able to do an active neck extension you can start with the passive neck extension after a few days you can start with the active neck extension.
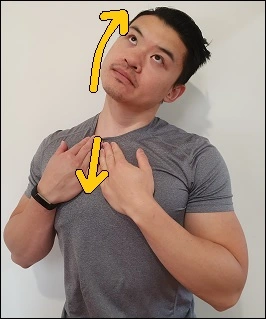
Neck Flexion (Suboccipital Stretch)

This tightens the muscles in your neck, including the suboccipital muscles. The occipital muscles are small but very important muscles that sit at the back of the head and help connect the head to the top of the neck. These muscles can strain and cause tension and sometimes headaches when the muscles are overworked.
A head position that can cause tension in the neck muscles is mainly a forward head position. We do activities that put our heads in front of our shoulders, like using a cell phone, any portable electronic device, laptops, computers, fine details like sewing or jewelry, cooking, etc.
First, press the chin with two fingers of one hand. Place your other hand on the back of your head and gently apply downward force as you pull your head toward your chest. If you feel tension in your neck, hold the position for 20-30 seconds. Repeat this stretch three to five times per session and do three sets per day.
Neck rotation
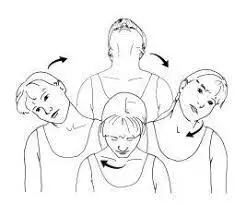
Neck rotation exercises can help improve flexibility, reduce stiffness, and relieve tension in the neck and upper back. When performing these exercises, it’s essential to move slowly and gently, avoiding any sudden or jerky motions. Here’s a simple guide to neck rotation exercises. Sit or stand comfortably with your spine straight and your shoulders relaxed. Begin by slowly turning your head to the right, bringing your chin toward your shoulder.
Keep your back straight without any support and keep your shoulders relaxed. Hold the position for a few seconds, feeling a gentle stretch in your neck muscles. Slowly return your head to the center. Repeat the same movement, this time turning your head to the left, bringing your chin toward your left shoulder. Hold the position for a few seconds, feeling the stretch in your neck muscles. Slowly bring your head back to the center. Aim for 5-10 repetitions on each side. Perform two to three sets of rotations, depending on your comfort level.
During the exercise, remember to breathe deeply and naturally. Avoid any movements that aggravate pain or discomfort. If you have any pre-existing neck conditions or concerns, it’s essential to consult with a healthcare professional before starting any exercise routine. They can provide you with personalized guidance and recommend specific exercises that are suitable for your condition. Incorporating regular neck rotation exercises into your daily routine can contribute to improved neck mobility, reduced stiffness, and enhanced overall comfort.
Reverse prayer pose
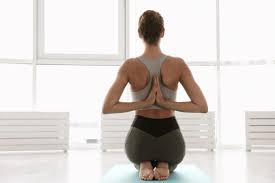
Reverse prayer yoga, also known as Pashchima Namaskarasana (also known as Parshva Namaskarasana), involves joining hands (namaskari gesture) behind the back. It mainly targets the shoulders and wrists. This is a particularly effective position for those who spend hours typing away at a computer. start with the sitting or standing position which position is comfortable for you.
Bring your feet together and keep your feet an inch apart. first, relax your both shoulders and keep your hands side of your body.
Begin to raise your arms behind your back. Now bring your palms together and hold your fingers down. Now inhale and curl your fingertips inward toward your spine and rotate until your palms touch as you curl your fingertips upward. Make sure your knees are slightly bent and your palms firmly against each other.
Stay in this position for about 25-30 seconds. Close your eyes. Now begin to curl your fingertips back down. take rest and keep your hand side of your body. You are now back in Tadasana. Take a minute to rest your body and repeat the movement. if you are comfortable you can gradually increase the repetition of exercise.
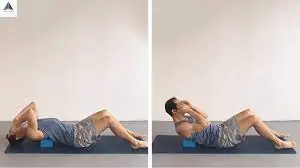
Bridging exercise
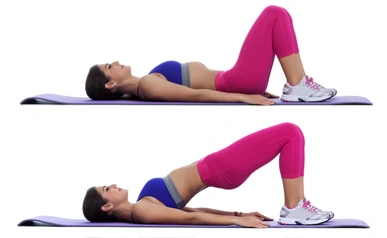
Start with a bridge exercise. start with the supine position with both knees in flexion(90-degree flexion of the knee). Do the expiration and lift the whole hip along with the knee. Keep your thighs and inner legs parallel. The back should form a straight line from the shoulders to the knees. You can support your arms, palms down, at your sides, and extend them along the floor below you.
Hold for ten seconds to one minute. Now lower your back to the floor and repeat this five to ten times in one session. during pregnancy period duration you should avoid this exercise. You can do this exercise three times per day either five to ten repetitions.
Variation of bridging exercise
Bridging exercise with Elevated Feet
Single-Leg Bridge
Gluteal Bridge With Marching
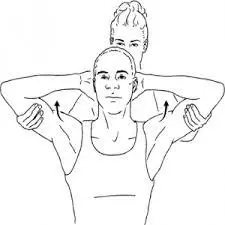
Shoulder stretch with a towel
The internal rotators of the shoulder are part of a muscle group often used in overhead sports activities such as the tennis serve or overhead throw. the elasticity of the towel increases your overall mobility, so there is less risk of injury when working out at the gym or doing physical activities like reaching something off a shelf at home. holding the stretch for about 15 seconds and no more. If you do this a few times on each side, you should try to stretch deeper each time, pulling a little more with your lower arm.
You can stretch these muscles by:
Hold the rolled towel firmly with both hands as shown in the picture. Gently pull the towel first upward direction and then downward direction. You will feel tension in the shoulder of your opposite arm as your lower arm is gently pulled deeper into your back. Hold for about 30 seconds. Switch hands and repeat.
Thoracic spine foam rolling
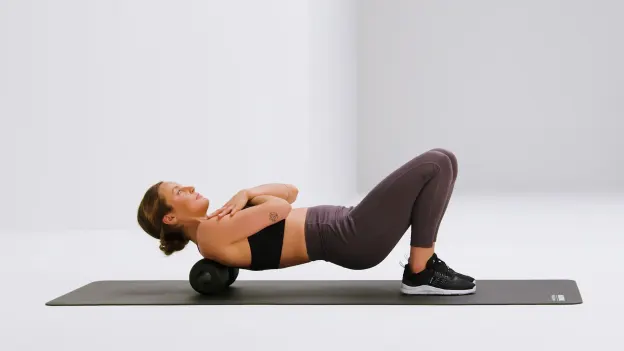
A foam roller is a cylindrical piece of foam used to relieve muscle soreness after exercise by providing myofascial release (SMR) or self-massage. By itself, myofascial release refers to the muscle (myo) and connective tissue (fascia). One of the biggest benefits of foam rolling is pain or tenderness caused by grips (also known as tension) or trigger points (also known as knots). Place the foam roller behind you and sit on the floor with your knees bent.
Bend back to place the foam roller in the center of your back. you should maintain the chin tuck position throughout the movement as if you were holding an edge under your chin. Cross your arms across your body and place your hands on opposite shoulders. Bring your nuclear power. Lift your hips off the floor to put your body weight on the foam roller. Each set should start from this starting position. Holding your line, slowly roll up and down, covering only the middle of the back to the shoulders.
Use the foam to slowly roll the sternum until you find the most sensitive spot. Once the most tender spot is identified, hold it still and stretch for 30 to 90 seconds while relaxing until the discomfort disappears. Do one to two sets 30-90 seconds before or after training.
Shoulder blade squeeze
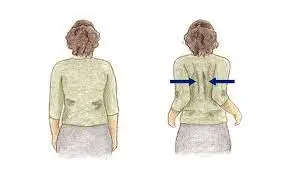
The scapular exercise, sometimes called the scapular blade squeeze, is primarily designed to strengthen the muscles between the shoulder blades. This is a simple but effective exercise that can help improve the overall health and function of your shoulders and maintain a comfortable posture.
Start with your elbows bent at a 90-degree angle and bend onto your sides.
Move your elbows and shoulders back by pressing your shoulder blades together. Then provide the relation to your shoulder joint and back to the starting position. Everyone is different, so you may need to modify this exercise to suit your needs. Benefits of shoulder presses:
Lifting and carrying. Strong scapular muscles can help stabilize your shoulders while lifting or carrying objects, reducing the risk of injury. Pushes and pulls. Whether it’s opening heavy doors or pushing a shopping cart, strong shoulder blades provide a stable base for these movements.
To squeeze the scapula harder:
Hold the resistance band between your hands. As you squeeze your shoulders, move your hands slightly apart to stretch the band.
You can also hold weights like dumbbells in your hands while doing this movement.
Shoulder rolls
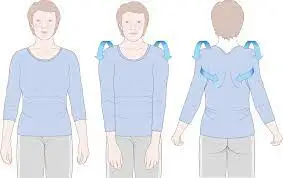
The benefit of shoulder rolls is that it reduces stress and strain on the neck. Those who regularly deal with tight shoulders and back muscles will want to add shoulder rolls to their stretching routine. Just a few sets of shoulder rolls will make your shoulders and upper back feel much better. Practicing shoulder rolls involves getting your body in the right position, which can help you develop better posture. Shoulder rolls also loosen tight muscles in the neck and upper back, the two areas most commonly associated with poor posture. start with the standing position. Pull your shoulders back and down. Keep your gaze forward.
To begin the shoulder roll, rotate your shoulders up toward your ears as high as you can. Do this with a developed arch at your back, stick out your neck, or allow your shoulders to collapse forward. As you raise your shoulders as high as possible, squeeze your shoulder blades together to pull your shoulders back.
Engage your central back to pull your shoulders down.
When you reach the neutral starting position, slightly rotate your upper back to push your shoulders forward while maintaining a strong core. Shrug again to start a new shoulder roll. Do 10-15 shoulder rolls, resting for 30 seconds before starting the second set. Try three to five sets.
Modifications and Variations
Sitting Shoulder Rolls
Half Shoulder Rolls
Banded Shoulder Rolls
Chin tuck

Chin tuck exercises are usually one of the most important exercises that recommend keeping the head above the spine rather than moving forward into a bad position. Chin tuck done regularly and correctly can help improve neck strength, flexibility, and function. Chin surgery can be performed standing or sitting.
Here’s an easy way to do chin cuts for a beginner:
Sit up straight and look straight ahead with your ears directly over your shoulders.
Place your finger on your chin. Pull your chin and head straight back without moving a finger until you feel a good stretch at the base of your head and the top of your neck. (There should now be some space between the chin and the finger). Hold for 5 seconds if possible. Bring your chin in front of your finger again. Repeat a total of ten times or as tolerated.
At first, it can be helpful to use your finger as a reference point. As chin removal becomes more convenient, you may no longer need to hold your finger. A variation of the chin-up that emphasizes strengthening the deeper neck flexors is to resist with a hand placed under the chin and apply gentle downward pressure to the hands using the five-second hold method. There are many possible ways to fit five to seven sets of chins in a day. When starting out, it can be helpful to think ahead to the next day and plan the best times for jaw surgery.
Wall angle
Wall angels are a great choice. From this exercise, you will strengthen the back muscles and lengthen the muscles of the front neck, shoulders, and deep part. Wall angels were also referred to as “V” to “W” stretches, named after the starting and ending hand positions. They are usually done with the back against the wall. The wall provides feedback, keeping the spine neutral and the arms still. This exercise is useful if you sit most of the day, as well as if you do a lot of upper-body resistance training. Stand with your feet about six to eight inches (about 15 to 20 cm) from the wall. provide support to your back, shoulders, and head against the wall.
If you feel uncomfortable getting your head against the wall, you should keep a small pillow behind your head. Next, adduct your shoulders straight up and place them overhead on the wall with the back of your hand touching the wall with the hand in the “V” position.
Then begin to bend your elbows, sliding your hands along the wall until your hands are just above your shoulders. At the same time, give the pressure against the wall by head and shoulder. Just lower as much as you can, maintaining proper posture with pain-free range (it’s good to feel the stretch). At the lowest point, hold for five before returning to the V starting position while maintaining focus. Do five to ten repetitions and stop when your muscles can no longer hold the position without pain.
Standing Forward Bend
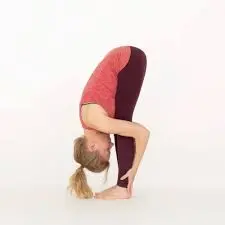
Standing Forward Bend exercises to stretch and lengthen the hamstrings and calf muscles. It also improves the posture of your head because, throughout the whole exercise, you can make the proper alignment of your upper extremity as well as the lower extremity.
From the Raised hand pose (Urdhva Hastasana), extend your arms above your head, and sweep your arms down on either side of your body so that they come in front of your hips.
This is often called a swan dive. Bring your fingertips to your toes. If you can, press your palms into the mat. Here you can use the blocks under the arm if they don’t reach the floor. Microbend your knees so they don’t lock. Engage your quads and pull them up. The more you use your quads, the more your hamstrings (the muscles at the back of your thighs) open up. Shift your weight slightly forward onto the balls of your feet so that your hips are over your ankles. Let your head hang. Inhale, stand up, and place your hands on your hips. Press down on the tail and contract the abdominal muscles as you slowly rise.
Modifications and Variations
Going back and forth between flat back (Ardha Uttanasana) and forward folds is a good way to deepen this pose. Use your inhale to achieve a long, straight spine with your hands on your shins. As you exhale, hold your spine as you fold into your legs.
Thread the Needle
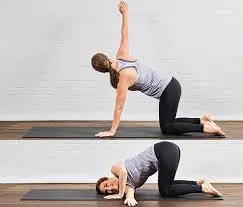
Thread the Needle stretch is a calming, friendly yoga pose that targets the back, shoulders, and neck. This involves gently rotating the spine, creating a deep stretch in the thoracic region of the back (an area that is often difficult to access). The Thread the Needle Workout is also suitable for both static and dynamic variations, so you can use it for all kinds of stretching and mobility routines.
In this exercise guide, we’ll explain how to perform this stretch correctly, what benefits it offers, and how to make the movement easier or harder. Get into a quadruped/tabletop position (shoulders over wrists and hips over knees). Tuck your chin in and make sure your back is flat. Keep your core strong. Support your weight with your right arm and reach for your left arm before bringing it under your stationary right arm as if the moving arm were a thread through a needle. Rotate your spine keeping your lower back and pelvis still as you extend your left arm deeper into the stretch.
Let your shoulders and head drop down so that your left shoulder and left ear rest on the floor. As you continue to extend your left arm in the pose, you will feel the twisting of the spine into the ribcage. Remember to keep your pelvis and lower back in place. This compresses the spiral of the spine while sparing the muscles of the lower back. If you feel a stretch, hold this position for 30-60 seconds (remember to breathe) before returning your left arm to the neutral starting position. Repeat the same method for another side.
Head to knee forward bend
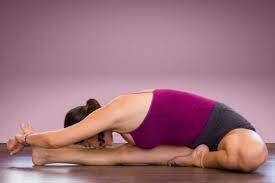
Start with the sitting position on a mat or plinth.
Bend your left knee and bring the bottom of your left foot to the inside of your right thigh. Place your body on top of your extended right leg. Begin to bring your body toward the leg by bending your hips forward and walking with your arms framing your extended leg toward your right leg so that the bend begins at the hip, not the lower back. Keep your right leg bent while pressing the back of your right thigh down to the floor.
When you reach the limit of maximum forward bend, you have a choice: you can keep a straight spine and a long neck in an active position, or relax with your heart and head toward the downstretched leg, rounding your spine. Do what pleases you. When the hands reach the leg, hold the leg. If not, you can hold the ankle or calf, or place your hands on the floor wherever they can reach. Lengthen your spine with each inhalation.
Stay here for five to ten breaths, then extend both legs, shake them, and repeat on the other side. Avoid this position if you have a back or knee injury. You should feel a stretch in your muscles, but stop if you feel pain. If you are using a strap, do not pull too hard to pull yourself forward.
Modification:
You can sit on the mat with tight hips. You can also place a blanket under the knee of the extended leg, which can help if you have tight hips or a sensitive knee. It is also acceptable to keep the knee slightly bent while the thighs are stretched.
If desired, place the strap around the extended leg. Leaning forward, hold the end of the strap with both hands.
Wide leg forward bend
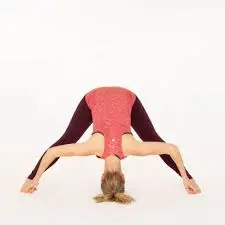
For this exercise the wide leg with the forward bend. Stand with your feet three to four feet apart, hands on your hips. Raise the height throughout the body and slowly fold over the legs. Instead of rounding your lower back, bend at the hips. If your back starts to round, stop leaning forward. Place your hands on the floor shoulder width apart; begin to stretch your body forward. Fold deeper, and bring the head to the floor.
Brace your legs, stretch your leg muscles, and activate your inner thigh muscles. Extend the entire spine from the sit bones to the crown of the head. After a few breaths, grind into your legs, extend your arms, and stretch your back forward. Inhale slowly as you stand up. Feet together, step into Mountain Pose at the front of the mat and pause.
Contraindicated condition
Injury and surgery
Lack of body strength
Pregnant women
Segmental Thoracic Mobilization
You will need a peanut ball or foam roller for this segmental chest mobilization. Some people like a peanut ball, but your foam roller will work just fine. We deal with the thoracic spine, ie. from about the middle of the back to the lower part of the neck. Try this exercise in five different areas of the thoracic spine. If you are short, you can only do four areas. Place the peanut ball low on the chest of the spine – about the middle of the back.
Come back and slowly bend three times.
Come back and slowly do three side bends.
Move the ball slightly up the spine and repeat.
Slow, controlled movements are key here.
If it hurts more than usual with the foam roller, try rolling the foam roller up and down your back to release tension in the superficial muscles. Because the muscles are activated, it is an active technique. This means maintaining good posture by increasing the extension of the t-spine and increasing the length of the spine.
Scaption
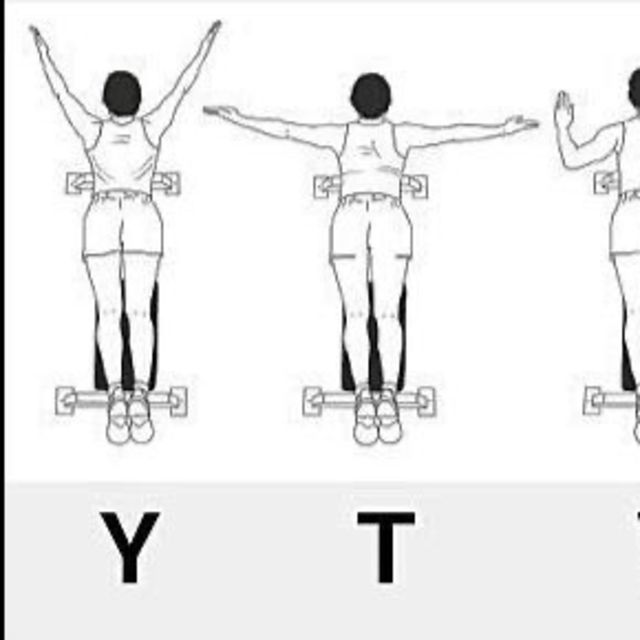
Starting position: Lie (stomach) on the mat, arms, and legs fully extended. keep your shoulder side of the body. for the support of the abdominal muscles to stabilize the spine, squeeze and pull the scapular muscles (pull the shoulders back and down), and try to maintain these positions during the exercise. Align the head with the thoracic (upper) spine.
“I” Formation: Exhale gently and slowly raise your arms off the floor (maintain the shape of the letter I), palms facing inward. maintain the alignment of your head along with your thoracic (upper) spine. Focus on the lift with the help of the shoulders, not the lower back, although some extension (arching) of the lower back is allowed by the body. Stay in this position for five to ten seconds, relax, and return to the starting position. Do two to five repetitions.
Y Formation: Exhale gently from the same starting position slowly lift your arms off the floor and move your hands in a Y (45-degree angle to form a Y) as shown, palms facing in. Maintain the alignment of the head along with your thoracic (upper) spine. Focus on the lift with the help of the shoulders, not the lower back, although some extension (arching) of the lower back is allowed by the body. Stay in this position for five to ten seconds, relax, and return to the starting position. Do two or five repetitions.
“T” formation: Exhale gently from the same starting position and slowly raise your arms off the floor, moving your arms into a “T” shape (90-degree angle to form a T) as shown, palms facing forward. Maintain the alignment with the head along with your thoracic (upper) spine. Focus on the lift with the help of the shoulders, not the lower back, although some extension (arching) of the lower back is allowed by the body. Stay in this position for five to ten seconds, relax, and return to the starting position. Do two to four repetitions.
“W” formation: Exhale gently from the same starting position and slowly raise your arms from the floor, bend (bend) your elbows, and lower them at a 45-degree angle to the sides of your body, as shown in the picture, palms. to each other. in (“W” formation to form the letter “W”). Maintain the alignment with the head along with your thoracic (upper) spine. Focus on the lift with the help of the shoulders, not the help of the lower back, although some extension (arching) of the lower back is allowed by the body. Stay in this position for five to ten seconds, relax, and return to the starting position. Do two to three repetitions per set.
“O” Formation: In a position with your arms at your sides, gently exhale and lift your shoulders while rotating both arms inward, as if reaching behind you and scratching your back. Bring your hands together in the small of your back in an O shape (form the letter O). maintain the alignment of the head along with your thoracic (upper) spine. Focus on the lift through the shoulders, not the help of the upper back, although some extension (arching) of the upper and back is acceptable. Stay in this position for five to ten seconds, relax, and return to the starting position. Do two to three repetitions per session and do three sets per day.
Diamond press
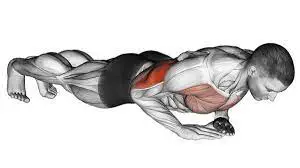
This is an example of exercises that address forward head posture and its symptoms. The exercises should be continued for weeks. Your doctor can assess your condition and recommend home exercises. You place your hands in a diamond shape, land, and push back up. It targets both the chest and abdominal muscles. It is good to do this exercise on a mat, which softens the hands a little.
Working on hard surfaces can be hard on your hands and wrists.
Face the mat and stretch your arms and legs slightly to prepare. Make the diamond shape by placing your hands under your chest. Touch your index fingers and pinch your thumbs together. you can consider the pyramid(diamond shape). Lower your body to the surface and then push yourself up.
Keep your back straight and tighten your abs and chest. Make sure your fingers are in the correct diamond position. repeat and Start the first one as slowly as possible to make the shape look realistic. Then increase the speed later on the climb until it is normal. Make sure you don’t push yourself too much when you’re still learning.
Cat and cow pose
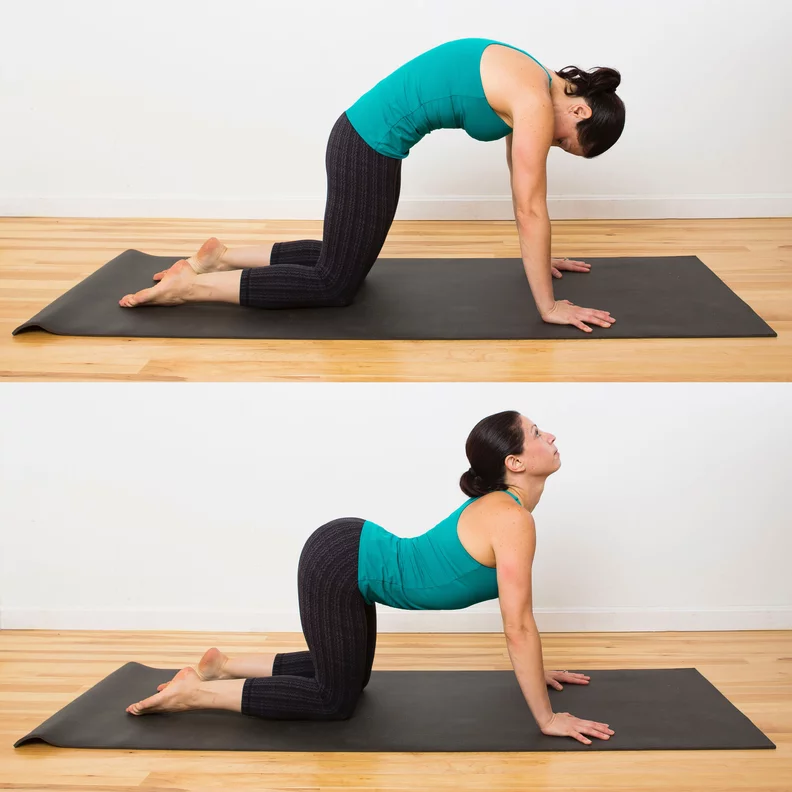
Start on your hands and knees. your whole weight on your hands and your knees and you should take care of this thing. Many people tend to put their knees a little too far. Laying the nicest, square stack provides a solid foundation from which to move forward. Spread your fingers apart and press down through the finger pads. Externally rotate your upper arms so that your elbows are facing forward. Look at the floor directly in front of your hands to keep your neck in a neutral position.
As you inhale, tilt your pelvis forward so that (imaginary) water flows out of the front of your pelvis. Raise the tail and cut the sit bones. Your belly will naturally arch toward the floor, but keep your navel pulled toward your spine. Stretch your neck so that you are looking up at the ceiling. Your back is U-shaped from tail to neck. On the next exhale, push your hips down, preventing the (imaginary) water from escaping. Tuck in the tail and twist the spine like an angry cat. Continue to extract polar water. Relax your neck and turn your head so that your eyes come to your navel.
This is a flexed position of the spine that continues up through the neck. Continue to slowly go back and forth between cow and cat with each inhalation and exhalation. Five to ten laps usually improve the curves and provide a nice warm-up. Cat-Cow stretches are featured in many yoga classes and are a great warm-up for home practice. The movement between cat and cow takes the spine from curved (extension) to rounded (flexion) and back again, warming the synovial fluid that lubricates each vertebra. The integration of breath and movement required in this simple vinyasa sets the tone for the rest of the practice.
Child pose
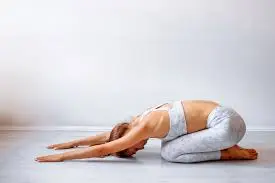
It may help to start in a downward-facing dog position on a yoga mat or plinth. start with the Kneeling position and bring your big toes together(flexion) so they touch the surface. gradually do expiration and move your hips toward your thighs so that your bottom rests on your feet or ankles. Try to stretch through the spine. Reach through the crown of the head and sink through the tail. Keep your shoulder adducted on the plinth then gradually move them away from your body so that your chest is on or between your thighs.
Depending on your flexibility and starting position, your forehead may touch the surface if you are unable to touch the floor so you can avoid it and regularly try this pose. If you can’t rest your forehead on the floor, you can place your forehead under a block to prevent neck strain. If you want to progress to the child’s pose, take Mula bandha and lower your body without walking, arms forward. Holding your arms in front of you will help you stretch and keep your tailbone extended.
You should avoid this exercise if you have this condition which includes:
You’re pregnant
You have diarrhea
You have ankle problems
Knee injury or any other condition which included the cartilage
Eye or ear infection
Hypertension
Cobra pose
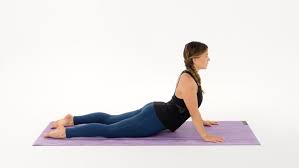
Cobra Pose is also called Bhujangasana. It combines two Sanskrit words: bhujanga (“serpent”) and asana (“pose”). The cobra pose opens your chest and strengthens your back. The muscles you use are pectorals and pectorals, rectus abdominis, trapezius, and erector spinae. Follow the instructions below in the cobra position. You can adjust the movements slightly to suit your flexibility and fitness. Begin by lying on your stomach on the floor with your forehead and feet on the floor or on a yoga mat. Try to keep your feet close enough together so that your heels are touching, but no more than hip-width apart.
Place your palms on the ground under your shoulders or to your sides, whichever is more comfortable. The fingers should point forward. Keep your elbows close to your sides. Inhale and gently push up, extending your elbows as you lift your upper body off the ground. Keep your navel and pelvis pressed to the floor. Pull your shoulders back and drop your shoulders away from your ears, keeping your shoulders relaxed. It opens the pectoral muscles. Keep your neck straight or turn your head to the sky, depending on your preference and level of flexibility. Continue to extend your elbows, pushing your chest off the ground. Keep your pelvis and thighs pressed into the ground. Exhale as you lower your body back to the ground to release the movement.
Cobra pose modification:
Wall modification
Sphinx pose
Twisted cobra
There are many tips that can be used to prevent neck stiffness. Try one of the following options.
Organize your workstation so that your computer, keyboard, and tools are in the right place.
If possible, use a standing desk or different workstations.
Choose a chair that supports the natural curvature of the spine. For every hour of sedentary work, stand up to walk or do light exercise for at least five minutes.
Use a pillow designed to prevent and relieve neck pain.
Sleep on your side or back with your head and neck in line with your body.
Do not sleep on your stomach as this can cause neck pain. Invest in a firm mattress to help support and relieve pain.
As you move through the day, monitor your posture in all positions.
Instead of carrying heavy bags on your shoulder, use a backpack or a wheeled bag.
Apply an ice pack or apply heat to the affected area for 15 minutes at a time.
Get a massage.
If you smoke, make a plan to quit or cut back.
According to a 2018 study, about one in four American adults sit for more than 8 hours a day. People who sit for long periods tend to sag in their chairs.
Slouching posture occurs when the shoulders drop in front of the chest and the head leans forward. This position puts an extreme arch on the spine, stretches the neck, and contracts the lungs. People can also appear smaller when they stoop while standing. A person can correct their posture by pulling their shoulders back and keeping their head in an upright position with their spine.
Sitting for several hours may be unavoidable, but a person can maintain good posture. there are some tips to improve your sitting posture(converted into the correct posture)
Change your sitting position often.
Avoid crossing your legs or ankles.
Keep your shoulders relaxed by resting your hands and elbows on the table or desk.
Avoid twisting your waist, instead twist your entire body. Stand up often.
Take short walks.
The National Institutes of Health (NIH) also recommends the following general tips for improving posture:
Be aware of your posture during everyday activities such as walking, watching TV, and doing housework.
Stay active by participating in regular exercise that includes cardio, strength training, or stretching.
Maintain a healthy weight, as excess weight can weaken your abdominal muscles and strain your joints and ligaments.
Wear comfortable, low-heeled shoes with arch support. High heels change a person’s center of gravity, which can put more strain on muscles and joints, especially in the knees. Place desks and tables at the correct height when you use them to work or eat.
Maintaining a “Nerd Neck” Exercise Routine
The right exercises can improve your posture and correct overwork. Do several of the following exercises two to three times a day, three to four sets of each exercise:
Gently tilt your head forward, touch your chin to your chest, hold for ten seconds, then back to the starting position. Rotate your neck to the left until you feel a mild to moderate stretch. Hold for a stretch for around seven seconds and give pressure to your head forward until you feel a stretch in your throat. Hold for five seconds and back to the starting position.
Gently tilt your head to the side, trying to touch your ear with your shoulder until you feel a slight stretch. hold the position for around ten seconds then back to the original position.
Squeeze and massage the muscles between the ears and collarbone for about a minute. Sitting or standing with your feet shoulder-width apart, squeeze your shoulders. Hold for five seconds and then release. Try 10-15 repetitions.
How to correct a poor posture?
Organize your workspace ergonomically
It’s easy to lean your head forward when you sit in a chair and stare at a screen most of the day. Organize your workstation in a way that encourages you to keep your head on your shoulders.
Raise your computer screen so that your eyes are on the top third of the screen looking straight ahead. Place the mouse and keyboard so that your hands are parallel to the floor and your elbows are bent at about 90 degrees.
Buy an office chair with a headrest so you can keep your head level with the back of the chair while you work. You can use footrests, portable lumbar support, or even a towel or small pillow when sitting in an office chair, on soft furniture, and while driving.
Using purses, bags, and backpacks that reduce back strain can also affect good posture.
Correct corrective glasses, and placing the computer screen in the natural resting position of the eyes can also help prevent the neck from bending or straining when the head is tilted forward.
Recognize the warning signs of back pain caused by poor ergonomics and posture
The cause of back pain can be bad ergonomics and posture, if the back pain is stronger at certain times of the day or week (for example, after sitting for a long time in an office chair in front of the computer, but not at the weekend. ); pain that starts in the neck and moves down to the upper back, lower back and limbs; pain that disappears after a change of position; sudden back pain in a new job, new office chair or new car; and/or back pain that comes and goes for months.
When sitting and standing in an office chair, keep your body in proper alignment
While standing, distribute your body weight evenly on the front, back, and sides of your legs. If you’re sitting in an office chair, take advantage of the chair’s features. Sit up straight and align your ears, shoulders, and hips in the same alignment. Any prolonged sitting or standing position, even with good posture, can be tiring. Moving forward with a straight back to the edge of the chair can alternate with the back against the support of the office chair to facilitate the work of the back muscles.
Get up and move
When muscles tire, limping, falling and other bad positions are more likely; this in turn creates additional pressure on the neck and back. Maintain a relaxed but supported position, changing position frequently. One option is to take a two-minute break from sitting in your office chair every half hour to stretch, stand, or walk.
Increase awareness of posture and ergonomics in everyday environments
Being aware of posture and ergonomics at work, at home, and at play is an important step towards good posture and ergonomic techniques. This involves making conscious connections between episodes of back pain and specific situations where poor posture or ergonomics may be the root cause of the pain.
Sleep on a cervical pillow
A cervical pillow, sometimes called an orthopedic pillow, has a special shape and the center of the pillow is curved inside to better support the natural curves of the head and neck spine. The purpose of the design is to keep the neck neutral, not bent forward. You can achieve a similar effect by sleeping on your back with a wrapped towel under your neck instead of a pillow. There is no clear medical evidence to support one type of pillow over another, so let personal comfort decide which pillow to use. You will not improve your head position overnight. Follow these tips and see if you can see improvement in the coming weeks and months. If your forward head position is difficult or causing pain, consult a physical therapist who can provide additional guidance and ways to improve your posture.
How Chiropractors Can Treat the Forward Head Posture?
Chiropractors are specially trained to understand the biomechanics of body structure and function and how posture affects them. Once we detect a forward head position, we can adjust the cervical spine with precise, controlled movements or instruments to help you back into alignment. We may also recommend stretches, exercises, and/or equipment to help you achieve your posture goals. Once we get you there, we’ll cover some important lifestyle tips that will keep you from slipping back into FHP.
The forward head position can be reversed with practice, attention, and practice. Here are some exercises you can try after consulting with your chiropractor so you know how to do them correctly.
Press and pull your chin in.
Stretch the hamstrings, the back muscles that connect the shoulders to the spine.
Try movement control exercises (MCE) such as yoga, pilates, or tai chi.
Your chiropractor may also recommend lifestyle changes to combat FHP, which may include:
Pull your chest up while sitting.
Hold the computer or device at eye level so that your gaze falls on the top third of the screen.
Use a chair with a headrest that allows your head to rest flat.
If you work sitting down, stand up and stretch every 20-30 minutes. Try a neck pillow that supports the natural curvature of the head and neck. It takes time to break old habits and change long-term postural problems like FHP. Your joints have adapted to the position and you have to retrain them and your brain. Conscious FHP awareness will help you correct yourself until it becomes natural. Consider asking your chiropractor about FHP and how you can avoid pain and reduce your risk of injury.
Good Posture alignment
Improving your posture provides relaxation to the muscle and promotes strength and flexibility to the muscles. There are lots of exercises that can reduce or prevent the forward head posture condition.
You should be aware of what is proper posture in standing, sitting, or walking position/
It’s necessary to practice good posture if you sit at for computer for many hours. To have correct posture at work:
use a chair that supports your back
keep your feet flat on the floor
position your screen at eye level
use a modified mouse that prevents the strain on your wrist
Good posture takes practice as well as awareness. If your regular posture is slumping, work at correcting it through exercise and good practice. For example, keep your phone or another screen (computer) at eye level, so you are not bending your cervical forward.
Precaution while exercise
Exercises to address forward head posture can be beneficial, but it’s important to approach them with caution to prevent any strain or further discomfort. Here are some precautions to keep in mind while performing exercises for forward head posture:
Consultation with a Professional: Before starting any exercise regimen for forward head posture, it is advisable to consult with a healthcare professional, such as a physical therapist or chiropractor. They can assess your specific condition and provide guidance on the most suitable exercises.
Gentle Movements: Perform exercises slowly and gently, without sudden or jerky motions. Overexertion or aggressive movements can potentially strain the neck muscles and exacerbate the issue.
Correct Posture: Ensure that you maintain proper posture throughout the exercises. Keep your shoulders relaxed, your spine straight, and your chin slightly tucked in to avoid any unnecessary strain on the neck.
Range of Motion: Focus on a comfortable range of motion that does not cause pain or discomfort. Gradually increase the intensity and range of the exercises over time as your muscles become more flexible and stronger.
Breathing: Remember to breathe deeply and naturally during the exercises. Avoid holding your breath, as this can increase muscle tension and limit the effectiveness of the exercise.
Consistency: Be consistent with your exercise routine, but avoid overtraining. It’s important to give your muscles time to rest and recover between exercise sessions to prevent overuse injuries.
Other Measures: In addition to exercises, consider incorporating lifestyle changes such as adjusting your workstation ergonomics, taking regular breaks to stretch, and practicing good posture throughout the day.
Benefit of exercise
By following these precautions, you can reduce the risk of injury and effectively improve your posture over time. Be patient and consistent in your approach, and consult with a healthcare professional if you experience persistent discomfort or have any concerns during the exercises.
Exercises targeted at correcting forward head posture can offer several benefits, contributing to improved posture, reduced muscle tension, and enhanced overall neck and spinal health. Some of the benefits of exercises for forward head posture include:
Postural Improvement: Specific exercises can help realign the head and neck, promoting a more neutral and balanced posture, which can alleviate strain on the neck and upper back muscles.
Muscle Strengthening: Targeted exercises can strengthen the neck, upper back, and shoulder muscles, providing better support for the head and promoting better overall posture.
Improved Flexibility: Incorporating stretching exercises can increase the flexibility of the neck muscles, reducing stiffness and enhancing the range of motion in the cervical spine.
Pain Relief: Regular exercise can help reduce muscle tension and alleviate discomfort associated with forward head posture, such as neck pain, headaches, and shoulder tension.
Prevention of Degenerative Changes: By promoting proper alignment and reducing the strain on the neck and spine, exercises can help prevent or slow down the progression of degenerative changes that may occur due to poor posture.
Enhanced Spinal Health: Correcting forward head posture can contribute to better spinal health, reducing the risk of developing long-term spinal issues and related complications.
Improved Body Awareness: Engaging in exercises for forward head posture can increase your awareness of proper posture and encourage better habits in daily activities, leading to a more sustainable and healthier lifestyle.
When performing exercises to address forward head posture, it’s essential to start slowly and progress gradually, ensuring that the exercises are performed with proper technique and alignment. Consultation with a healthcare professional, such as a physical therapist or chiropractor, can provide personalized guidance and ensure that the exercises are suitable for your specific condition and needs. Consistent practice and incorporating these exercises into your daily routine can lead to improved posture, reduced discomfort, and better overall neck and spinal health.
A Note from Samarpan Physiotherapy Clinic
If you are prone to neck pain, have injured your neck, shoulders, or back, or have a medical condition such as arthritis, consult your healthcare provider or physical therapist before doing these (or any other) exercises. the first time.
These steps can be helpful, but you need to know how to prevent an existing problem from getting worse. You have to maintain a good posture which provides the relation to the muscles and also provides the mobility to the neck muscles. Regular stretching exercises, mobility exercises, and strengthening exercise for the neck muscles reduces the pain and regain the normal range of the neck joint.
FAQ
Can you correct the previous head position?
Best ways to correct forward head posture (nerd neck)
Start the “Nerd Neck” training program.
The right exercises can improve your posture and correct overwork. Do several of the following exercises two to three times a day, three to four sets of each exercise: Tilt your head slightly forward, touch your chin to your chest, hold the retraction for around five seconds, and then release.
Is the forward head position constant?
How to correct forward head position
In addition to neck pain, consistently maintaining poor posture during these or other daily activities can lead to muscle and spinal remodeling that can eventually lead to permanent FHP.
Is the front treatable?
A person can treat FHP with stretching, exercise, and other treatments, including medications and physical therapy. A person should talk to their doctor if they experience pain or stiffness that affects their daily life. A doctor can help monitor conditions and recommend the most appropriate treatment.
What are good neck exercises?
Nine Stretches to Relieve Neck Pain | Samparpan Physiotherapy Clinic
Neck sliding. Start with a straight neck. …
Extension of the neck. Without turning your back, slowly move your head back so that you are looking up. …
Rotation of the neck. Start by looking straight ahead. …
Lateral extension. Start by looking straight ahead. …
shrugs. …
Bend forward Bending. …
Deep stretching. …
Resistance clamps.
What are the symptoms of Forword’s head posture?
Symptoms and Complications of Forward Head Posture – Treatment… The bones move and can compress other nearby structures, causing shoulder tension, headaches, and scarring of the neck. Also pains in the back, arms, fingers, hands, wrists, and elbows. Some sufferers may also notice numbness and tingling in the upper limbs.
Can a forward head posture affect vision?
An unexpected connection between your posture and your eyes
In fact, poor posture can lead to many health problems, including poor circulation, shallow breathing, and blurred vision. If you have poor vision, you may squint, lean forward, or tilt your head in an unnatural position to see better.
What causes weak neck muscles?
Exercises for Weak Neck Muscles: Say Goodbye to Neck Weakness…
The main cause of a weak neck is poor posture. Today, most of us have a bad attitude because of technology. We constantly strain our necks forward to computer screens or look at phones, which weakens the muscles in the back of the neck and causes tension in the front pectoral muscles.
What is the fastest way to correct the forward head posture?
The best ways to improve forward head posture (nerd neck)
Start the “Nerd Neck” training program.
Gently tilt your head forward, touch your chin to your chest, hold for five seconds, and release. Rotate your head to the right side until you experience a slight stretch. Hold the stretch for ten seconds, then repeat to the left side of the muscle. Push your head forward until you feel tension in your throat.
Can Yoga Improve Forward Head posture?
You can counteract the effects of a forward head and rounded shoulder position by moving your shoulders back with a stretch. Take your hands press your fingers behind your back and gently press your palms together. Avoid arching your back or fully extending your elbows. Hold the position for five breaths.
REFERENCES
- Scapular Squeezes. (n.d.). Hingehealth. https://www.hingehealth.com/resources/articles/scapular-squeezes/
- Head Tilt / Upper Trapezius Stretch (Flexibility). (n.d.). Saint Luke’s Health System. https://www.saintlukeskc.org/health-library/head-tilt-upper-trapezius-stretch-flexibility
- Clinic, M. P. (2023, June 27). Trapezius stretching exercise. Mobile Physiotherapy Clinic. https://mobilephysiotherapyclinic.in/trapezius-stretching-exercise/
- Inhc, A. C. A. C. (2020, December 28). How to Do Shoulder Rolls. Verywell Fit. https://www.verywellfit.com/how-to-do-shoulder-rolls-for-stretching-techniques-benefits-variations-5087065
- Back Exercises | Prone Scapular (Shoulder) Stabilization Series – I, Y, T, W, O Formation. (n.d.). https://www.acefitness.org/resources/everyone/exercise-library/249/prone-scapular-shoulder-stabilization-series-i-y-t-w-o-formation/
- E. (2019, June 11). Sub-occipital Stretch (back of head) -. https://errolstchiro.com.au/sub-occipital-stretch-back-of-head/
- How to Foam Roll Your Thoracic Spine With Perfect Form – 2023 – MasterClass. (2021, September 3). MasterClass. https://www.masterclass.com/articles/foam-roll-thoracic-spine
- What Is Reverse Prayer Yoga And What Are Its Benefits? (2023, August 25). STYLECRAZE. https://www.stylecraze.com/articles/what-is-reverse-prayer-yoga-and-its-benefits/
- Kanellopoulos, B. (2023, August 25). How to Do a Diamond Pushup: 4 Steps (with Pictures) – wikiHow. wikiHow. https://www.wikihow.com/Do-a-Diamond-Pushup
- Ryt, A. P. (2022, October 25). How to Do Standing Forward Bend (Uttanasana) in Yoga. Verywell Fit. https://www.verywellfit.com/standing-forward-bend-uttanasana-3567133
- Ryt, A. P. (2020, November 10). How to Do Head-to-Knee Pose (Janu Sirsasana) in Yoga. Verywell Fit. https://www.verywellfit.com/head-to-knee-pose-janu-sirsasana-3567088
- Pt, G. M. (n.d.). Forward Head Posture’s Effect on Neck Muscles. Spine-health. https://www.spine-health.com/conditions/neck-pain/forward-head-postures-effect-neck-muscles
- Forward head posture symptoms and complications – Caring Medical Florida. (n.d.). https://www.caringmedical.com/prolotherapy-news/forward-head-posture/
- Forward Head Posture. (n.d.). https://www.memphistotalhealth.com/articles/dear_doctor_chiro/592981-forward-head-posture
- Cpt, A. A. (2021, October 5). How to Fix Forward Head Posture and Why It Matters. Verywell Health. https://www.verywellhealth.com/neck-exercise-for-forward-head-posture-296838
- Forward Head Posture. (n.d.). Physiopedia. https://www.physio-pedia.com/Forward_Head_Posture
- Cronkleton, E. (2019, September 9). What Is Neck Flexion? Plus Exercises for Improving Your Range of Motion. Healthline. https://www.healthline.com/health/neck-flexion#what-it-is
- B. (2023, August 5). The Best Ways to Fix Forward Head Posture (Nerd Neck). Benevida Health & Wellness Center – Kyle & Buda Texas. https://www.benevidawellness.com/how-to-fix-forward-head-posture/
- Neck Flexion Exercises: Rotation, Extension, and Lateral Bending. (n.d.). Neck Flexion Exercises: Rotation, Extension, and Lateral Bending. https://www.healthline.com/health/neck-flexion