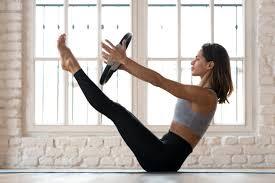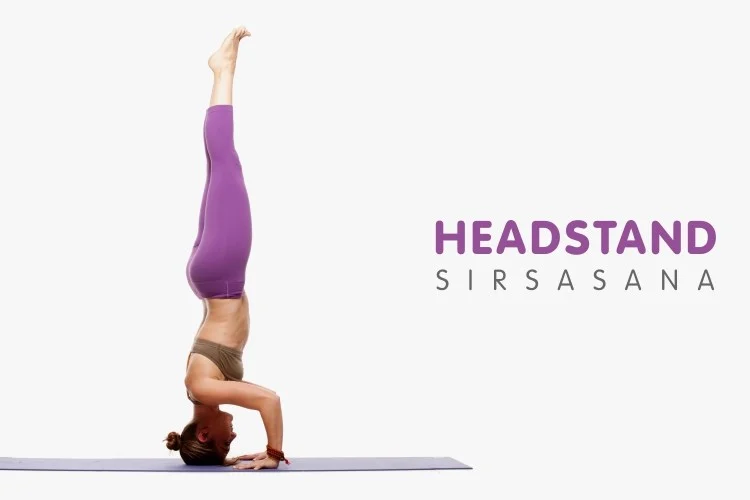
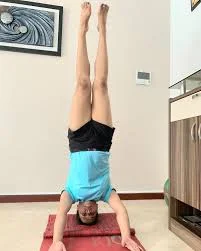
Headstand (Sirsasana)
Table of Contents
What Is the Headstand Pose in Yoga?
Which muscles does the Headstand Pose use?
What Health Advantages Does Headstand Pose Provide?
Which poses are necessary to prepare for the headstand pose?
Although Sirsasana (Headstand Position) is considered an Improve Level Position, the overall activity in the yoga sequence changes depending on the time of the workout.
When their bodies are so stiff and rigid, some people may have trouble finding a comfortable yoga pose before doing Sirsasana. However, if one wants to perform it after a yoga practice, which may take approximately 45 minutes, the gradual technique to start the body must be followed. If one does this exercise in the late evening or early at night, a few Sun salutations (Surya Namaskar) before this position is sufficient because the body usually opens up more rapidly even when it is weary.
To warm up and prepare the body for the asana, particularly if it is done early in the morning, one can start with Surya Namaskar. Following a modern asana, such as the headstand position, one can practice the following postures: Balasana, Sarvangasana, and Savasana. Here is a summary of how to get ready for Sirsasana.
Tadasana Gomukhasana (Standing Cow Face Pose)
In sirsasana, the elbows, arms, shoulders, and upper abdomen are all severely stressed. Beginning with Tadasana with Gomukhasana will strengthen your arms and encourage upper arm extensions and external rotation.
As you move weight away from your head and neck in Sirsasana, the cow face pose will help you develop an effective upper body basis and a sense of lightness during headstand practice.
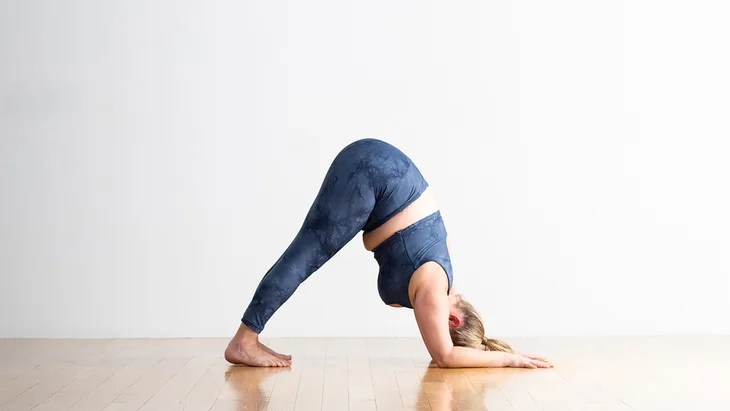
Adho Mukha Svanasana (Downward Facing Dog Pose)
The power, stability, and balance of the downward-facing dog pose will help you improve your Sirsasana practice. Here, the legs are extended to develop the hamstring and hip muscles and improve core stability in the downward pose.
Prasarita Padottanasana (Intense Leg Stretch Pose)
When standing, the feet are spaced apart in a forward bend. By placing the full weight on the head and spreading the feet far apart, this tense preparation for Sirsasana effectively stretches the leg muscles.
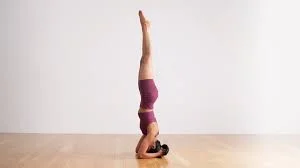
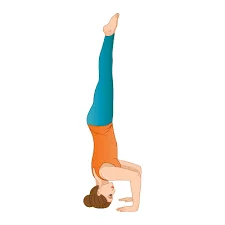
How to Perform Headstand Pose?
- Maintaining your elbows behind your shoulders, push your forearms to the ground.
- Put your hands around the opposite elbow. Adjust as needed so that your elbows are shoulder-width apart.
- Release your hands and elbows.
- Tuck your bottom fingertip into your handbasket to avoid compressing.
- Place the top part of your head on the floor. At the top, you should have your head down, not too far forward or back. The back of your head will rest on the bases of your thumbs rather than your hands.
- As in Downward-Facing Dog, raise your hips and straighten your legs.
- To get your hips as close to above your shoulders as possible, carefully move your feet up towards your head.
Headstand Pose Video:
Which Headstand Pose Follow-Up Poses Are There?
- Relaxing Yoga Positions: Headstand Pose
- To do this, a few poses must be performed right after Sirsasana.
Balasana(Child Position):
Additionally, you should maintain a flexible and light body. This pose relieves tension in the neck muscles and supports the stretched spine in Sirsasana. The hip is controlled in this posture.
Sarvangasana (Shoulder Stand Position):
Use the back to supine behind technique to adjust into Balasana (Child Position). Stretch your arms and legs and hold the posture for a few breaths after your spine is near the mat or blanket. After that, lift your body such that your shoulders and upper back support all of your weight, and your legs, middle back, and lower back are no longer on the mat. Raise your body higher by bringing your feet just above eye level and using your arms to support yourself close to your hips. Lock your neck and bring your chest close to your neck. This pose will help the neck and spine, which were stretched during the Sirsasana exercise, regain their equilibrium.
Savasana (Corpse Position):
To adjust to the full body in Savasana, breathe slowly and maintain the head, trunk, and limbs parallel to the mat. Reduce the force of your breathing and let your whole body relax. Here, take several breaths.
Headstand Pose Level-Up Follow-up Positions:
Sirsasana, often called the King of the Asanas, is the strongest of all the yoga positions. Different leg placements are used in some forms of this position, though. A list of these variations is provided below.
(Angle Position) in Headstand:
When the body is constant, start with your knees out and perform Namaste with your feet in the air. The head will be placed under a significant amount of tension if the feet are not properly positioned.
Eagle Legs in Headstand:
Once your strength in Sirsasana has increased, carefully place your foot above the other leg, connecting your thighs with one knee, and stand up in the Eagle Position. After a few moments, move in the opposite direction and change the posture of your thighs.
Twisting Splits in Headstand:
Dissimilar to the first variation, perform them forward and backward with the legs spread wide. Before separating them anteriorly and posteriorly, make sure you’ve worked out one leg first, as this imbalance could result in the neck being tight and the body falling.
Lotus legs in Headstand:
One can go deeper into the position by performing the legs in the Lotus Position (Padmasana) and alternating them. However, this position needs to be practiced when seated because it is hard to form in the air. To achieve this level of Sirsasana, it is better to do the Lotus position while seated, when the flexibility of the legs will make it less difficult to enter the pose without using your hands.
Which Headstand Pose techniques are best for beginners?
- The headstand is a difficult pose. Some trainers no longer train it because they feel the risk of the weight on the neck is too great, although the fact that it is known as the King of Pose because of its potential benefits.
- Considering these instructions are meant only to be a guide, we recommend practicing in front of a trainer who can help you with your position.
- Strengthening your arms, shoulders, and core is an important initial step, regardless of whether you choose to practice the complete position. This preparation work is more challenging than a headstand in many ways, but it will help your general yoga practice, so be patient.
- Exercises that strengthen the core will help with any inversions. Just keeping the Plank position and Downward Dog for one to two minutes is a great place to start. To get used to being upside down with no weight on the neck, practice the dolphin posture next, then a handstand or forearm balance.
What is the Headstand Pose’s Breath Awareness?
- Exhale by placing the top of your head close to your palms, then your body close to your palms.
- Exhale to lengthen your spine and take your knee back up after raising it off the mat or blanket with another inspiration.
- To get your body ready for the pose, tighten your knees and shoulders as you release the breath. Then, keep your toes towards your chest as you walk.
- Make moving currently, focus on the tightness in your neck and upper head, and breathe while being mindful of your body.
- Keeping your back straight and your legs in line with your hips, neck, and chest, lift both of your feet off the mat or floor as you release the breath and put the legs in a 90-degree position.
- As you exhale, apply more pressure to your hips, and as you inspire, raise your body upward. To help the brain get more fresh blood at this stage of the pose, start breathing softly, keep your cool, and smile.
- One leg at a time, move it closer to the floor to get back to your position. The head, shoulders, and neck should then be adjusted by encouraging and directing the complete body to fall into the Child Position.
What are Headstand Pose positioning tips?
- This is permanent when it comes to extended holding.
- Take up the position described a little further down in Modifications, though, as you begin to grasp the function.
- Keep growing your weight on top of your head as your arms support it and provide a protective surface.
- Pull your shoulder blades towards your middle and away from your ears, maintaining an upright position and extended neck.
Which Headstand Pose Types Are There?
Four kinds of sirsasana occur.
- Salamba Sirsasana I – Supported Headstand.
- Salamba Sirsasana II – Tripod Headstand.
- Salamba Sirsasana III – Supported Headstand.
- Niralamba Sirsasana.
Salamba Sirsasana I – Supported Headstand
What is Salamba Sirsasana I – Supported Headstand?
Salamba Sirsasana (Supported Headstand) is a challenging reverse that requires training, mental focus, and strength in the upper and core muscles. Salamba Sirsasana is pronounced, “sah-LOM-bah shear-SHAHS-ah-nah.”
This is a challenging position that you must maintain with a “safety first” approach, despite the many physical benefits, such as strengthening your arms, legs, and core. The secret to this posture is to avoid putting too much weight on your head and neck. As a result, depend on your arms and shoulders for support.
The standard Headstand (Sirsasana) is not the same as this. The opposite side radiates power, class, and control. The Sanskrit phrase Calamba, referring to “with support,” Salamba Sirsasana I comes from the words Sirsa, which means “head,” and asana, which means “posture/position.” In English, this pose is also referred to as a “supported headstand.”
How Can I Perform Salamba Sirsasana I’s Supported Headstand?
To begin, cushion your head and forearms with a doubled blanket or an adhesive pad. Activity your elbows to the floor, keeping them shoulder-width apart. Move around your fingers, roll your upper arms outward a little, and press your inner wrists carefully to the floor. Keeping your arms in position, press your hands over the back of your head. Move your hips upward as if your lower body were in a downward dog. Push your shoulder blades towards your tailbone instead of your back to keep your torso extended and secure your head and neck.
Exhale and raise both feet off the ground at the same time, even if this involves jumping a little off the ground and bending your knees slightly. As you straighten your spine, harden your tailbone rather than the back of your pelvis. Rotate your thigh bones slightly inward and increase the distance between the balls of your feet. Firmly press your forearms down to support your weight rather than your head and neck. Keep your weight evenly distributed across both arms. If you thought of a twist, now straighten your knees.
When performing Salamba Sirsasana for the first time, hold the pose for ten seconds. Come down, expiring while keeping your shoulder blades strong. Hold both feet to the ground at the same time. If you aim to do the Supported Headstand often, increase your continuous duration by 5 to 10 seconds each time. Repeat the exercise seven to fifteen times when you can hold this position for three minutes. Start your gradual increase before increasing your stay to five minutes.
Salamba Sirsasana II – Tripod Headstand
What is the Salamba Sirsasana II Tripod Headstand?
Salamba Sirsasana II is a “grandeur” yoga pose that radiates strength, grace, and beauty, much like other Headstands. It acts as an opening for expressing Sirsasana in its whole form.
The Tripod Headstand is sometimes regarded as an improved form of Sirsasana, though this isn’t always the case. Sirsasana II is just more comfortable for people who find Sirsasana I difficult. That’s most likely because it is like the Headstands, where children were hanged.
It is therefore advisable that you become comfortable with the tripod before moving on to the complete headstand. You won’t have any reason not to try it out and learn the entire version if you set it up correctly and make the necessary modifications. When you raise into the full position, make careful moves to strengthen your control and strength.
How Is the Tripod Headstand in Salamba Sirsasana II Performed?
- Place a four-fold blanket on the floor and kneel beside it.
- Only your left knee should be covered by your left palm. Your palms should be near each other, and your fingers should be pointing straight towards your head. Your palms should remain on the floor no wider than shoulder-width apart. Place your top in the center of the blanket and raise your legs above your head.
- Lift your knees off the floor and straighten your legs once your head is in position. While keeping your toes near your head and your spine straight, lower your ankles to the floor.
- Hold this position for a few seconds while extending the dorsal part of your spine and pushing your chest forward. Take three or four breaths.
- Lift slightly off the ground, raise your legs, and bend your knees as you release the breath. Both feet should be lifted off the ground simultaneously. After you have a secure position, lift your legs, release your breath, tighten your knees, keep your toes up, and keep your balance.
- The balanced position puts both hands and the top of the head on the ground. From wrist to elbow, your forearms should be square to the floor and collateral to each other. From elbows to shoulders, your upper arms should be collateral to the ground and one another.
- If you can balance, follow Headstand’s easy directions and signals.
- This variation of Sirsasana is necessary to learn more difficult postures such as Bakasana (Crane Position), Urdhva Kukkutasana (Upward Rooster Posture), Galavasana (Flying Pigeon Position), and Koundinyasana (Position Dedicated to the Sage Koundinya).
Salamba Sirsasana III – Supported Headstand
What is Salamba Sirsasana III – Supported Headstand?
The headstand position, also called Sirsasana (Headstand posture) iii, is a variation of the base/master yoga pose that calls for stability and shoulder strength at the top of the head. While the base position, also known as the master position, balances the body on top of the head while supporting the head with cupped hands, Sirsasana (Headstand Position) iii uses the palms on the ground for support. The Ashtanga Yoga sequence and variations of Sirsasana (Headstand Position) were established by Sri Krishnamacharya.
How Can I Complete Salamba Sirsasana III’s Supported Headstand?
While Sirsasana (Headstand Position) III is a promoted-level yoga position, it requires the guidance of a yoga instructor. Before moving to the next phase, please ensure that you have a thorough understanding of the previous one by following the comprehensive instructions found under the building. Those who are new to yoga should not use this information; only those who have experience with yoga in general should.
Method 1:
- A Comprehensive Guide to the Sirsasana Headstand Position III.
- Sitting in Adho Mukha Virasana (Downward Facing Hero Position) in the center of the mat, take about eight deep, peaceful breaths.
- Use the Rabbit Position to open the shoulders and neck muscles and increase the flexibility of the head. Hold on for about six breaths.
- Let go and relax in the Dolphin Position or Catur Svanasana. To relax, take around four deep breaths.
- In Catur Svanasana (Dolphin Position), place your head on the floor. Then, carefully raise yourself onto your toes by raising your hips into Tripod Dolphin Position. Hold this pose for around four breaths to get ready for Sirsasana (Headstand Position).
- When performing the Tripod Dolphin Position, move your arms to place your palms on the ground, making sure your fingers are pointed outward towards your face. The elbows remain collateral to each other while the lower body balances on its toes.
- As you perform Catur Svanasana Sirsasana Eka Janu Kurpara (Tripod Headstand Prepare One Knee On Elbow), bend your right leg. Then, slowly place your right knee over your right upper arm. Maintain your balance while inhaling for about two breaths.
- In Catur Svanasana Sirsasana Janu Kurpara (Tripod Headstand Prepare Knees On Elbow), the right knee should be pushed and then done to rest on the right upper arm. To achieve a comfortable equilibrium on your head, hands, shoulders, and elbows, adjust your hips and knees. After that, remain for about two breaths.
- Adho Mukha Virasana (Downward-Facing Hero Position) is a good place to start if you feel uncomfortable continuing the exercise. Now relax and go back to the step-by-step instructions in steps two through six.
- Let’s return to step six. Raise the right leg gradually by encouraging it while maintaining the left leg resting on the elbow. Tripod Headstand According to Catur Svanasana Sirsasana Eka Janu Kurpara Eka Pada Ardha Urdhva, one knee should rest on the elbow and one leg should be half-lifted. To help you keep balance and balance your complete body, use the strength of your core muscles to support your first lift and second. Continue to walk behind her for about two breaths.
- Raise and fully stretch the right leg in Catur Svanasana Sirsasana Eka Janu Kurpara Eka Pada Ardha Urdhva (Tripod Headstand Prep One Leg Half Raised). Stay back here for two breaths and focus on your breathing while keeping your core muscles balanced.
- Let go and relax in the Dolphin Position or Catur Svanasana. To relax, take around four deep breaths.
- In Catur Svanasana (Dolphin Position), place your head on the floor. Then, carefully raise yourself onto your toes by moving your hips into Tripod Dolphin Position. Hold this pose for around four breaths to get ready for Sirsasana (Headstand Position).
- When performing the Tripod Dolphin Position, move your arms to conduct your palms on the ground, making sure your fingers are facing outward toward your face. The elbows remain collateral to each other while the lower body balances on its toes.
- As you perform Catur Svanasana Sirsasana Eka Janu Kurpara (Tripod Headstand Prepare One Knee On Elbow), bend your right leg. Then, slowly place your right knee over your right upper arm. Maintain your balance while inhaling for about two breaths.
- In Catur Svanasana Sirsasana Janu Kurpara (Tripod Headstand Prepare Knees On Elbow), the right knee should be placed and then done to rest on the right upper arm. To achieve a comfortable equilibrium on your head, hands, shoulders, and elbows, adjust your hips and knees. After that, hold on for around two breaths.
- Adho Mukha Virasana (Downward-Facing Hero Position) is a good place to start if you feel uncomfortable continuing the exercise. Stop here and go back to the step-by-step instructions in detail.
- Let’s return to step six. Raise the right leg gradually by stimulating it while maintaining the left leg resting on the elbow. Tripod Headstand According to Catur Svanasana Sirsasana Eka Janu Kurpara Eka Pada Ardha Urdhva, one knee should rest on the elbow and one leg should be half-lifted. To help you keep balance and balance your complete body, use the strength of your core muscles to support your first lift and second. Continue to walk behind her for about two breaths.
- Raise and fully stretch the right leg in Catur Svanasana Sirsasana Eka Janu Kurpara Eka Pada Ardha Urdhva (Tripod Headstand Prep One Leg Half Raised). Stay back here for two breaths and focus on your breathing while keeping your core muscles balanced.
- Encourage the second leg to grow to its full length in the Tripod Headstand Sequence Flow. Use all of the core muscles, shoulder strength, and head strength while you fully extend the legs upward to maintain body balance.
- Hold here for around two breaths, maintaining carefully the breathing and balance of your body. Turn your right palm slowly till the fingers are facing the other way once you feel comfortable.
- When the right palm is finished, direct the fingers of the left hand to point oppositely. Both hands’ fingers are now sharp, and the torso is pointing inward.
- Here, it’s important to move the hands cautiously to avoid securing the head and neck. You might start by doing this against the wall or even using a great, thick blanket to support the head.
- To get to Sirsasana (Headstand Position), slowly adjust your body without affecting your head. Continue for two breaths or more. Take some time to determine the breath flow and the control part.
- Bending the right leg and placing the toes on the ground is the first step in delivering. After that, place your toes on the floor and use your arms to support yourself while you perform your left leg.
- Take time to rest before moving into the poses of Sarvangasana (Shoulderstand Position) and Savasana (Corpse Position) to relax the Mass muscles throughout the neck and shoulders. Following the Sirsasana (Headstand posture) exercise, this pose must be performed to aid in the recovery of the various overstretched muscles.
- If Method 1 is too difficult, one can proceed to another series of yoga poses by following the steps below to enter Sirsasana (Headstand Position) III. It is essential to learn the foundation or basic yoga pose, Sirsasana (Headstand pose), regardless of the method one uses.
Method 2:
- The many step-by-step directions for the posture known as headstand (Sirsasana) iii Maintain this position for roughly six breaths.
- Let go, then take Adho Mukha Svanasana, the downward-facing dog posture, and hold it for six breaths.
- You may encourage and lower your body while stabilizing it in the Swan Position by placing your knees on the floor and twisting your arms so that your fingers move inward toward your feet and your palms are on the floor.
- As you balance on your toes and push your weight on them, your stomach should rest on the back of your elbows. Take about two deep breaths and hold steady. Release and come to fold the head and shoulders down while working the legs to fold at the knee.
- The head should be placed a few meters away from the palms on the ground in front of you. One approach is to move the lower body as much as is comfortable while keeping the top of the head on the ground.
- Take several rounds of breaths after the top of the head is on the ground to help identify and relax the movement and the tightness around the neck and shoulders.
- Raise your hips and walk your feet straight up to your hands and chest. Take it carefully, one foot at a time, and focus on the pressure at the top of the head.
- As you take a breath, carefully lift your right foot off the ground and fold it at the knee. Go and relax. As you inhale, raise your left foot off the floor and fully extend both legs into the Headstand Position (Sirsasana) iii.
- It can be difficult to move the legs up here if you don’t have enough wrist strength, so make sure you understand how the weight of the body affects the wrists. Even the top of the head will be under a lot of pressure when the legs are raised. Take your time and enjoy your body’s mobility iii before trying to completely enter Sirsasana (Headstand Position).
- To keep the position, lift your legs once you’re comfortable and use your core muscles to hold yourself. Take two or three deep breaths at first, then more. To appreciate the flow, use the wall and a large blanket.
- Slowly release by lowering one leg and allowing the other to relax in the poses of Savasana (Corpse Position) and Sarvangasana (Shoulderstand Position).
Niralamba Sirsasana
What is Niralamba Sirsasana?
The Unsupported Headstand, or Niralamba Sirsasana, is one variation of the conventional Headstand Position. It is far more challenging to perform than its fundamental asana while you are trying to balance your complete body weight on your head. Your arms are only used to create balance awareness; they are not used for maintaining weight.
The four Sanskrit terms represent the Niralamba Sirsasana method. Nira means “without,” while Lamba means “support.” Sirsa means “head,” whereas asana means “position” or “posture.” In English, Niralamba Sirsasana refers to “Unsupported Headstand.”
Niralamba Sirsasana can be performed in a variety of ways, depending on how you position your arms. Sometimes you can keep them on your sides, and other times you can keep them on the floor on the front side of your body. The muscles in your head and neck support your entire body weight. Again, your arms are there to help you maintain equilibrium when bent.
How to Perform Niralamba Sirsasana?
- Niralamba Sirsasana should be attempted after mastering Salamba Sirsasana, commonly known as the supported headstand. The methods to achieve this pose are the same as for Salamba Sirsasana, except for changing the hands so that the head is the weight of the body. This adjustment needs to be well thought out. One technique, which helps with balance even if it does not support any weight, is to gradually shift the hands to the front of the body on the ground. Professional supporters can even lift their hands off the ground and place them next to the thighs or legs. This required a great deal of skill and equilibrium. It is also possible to remove a wall’s support in the early stages. Additionally, have a companion watch you to prevent falls.
- Just hold the final position for a few seconds at first. Depending on one’s skill and ability, it can be raised.
- As in Salamba Sirsasana, put the hands back on the floor and place them next to the head. The hands now support a portion of the body weight and aid in balancing the forward turn of the lower body. Return to the starting position of Marjariasana by sloping gently. Tadasana can be performed purposefully to help redirect the blood flow from the head to the body. Rest in Shavasana for a few minutes to relax.
What are the Headstand Pose’s precautions and contraindications?
Precautions:
- Learn this position at a level below that of a trainer. Only exercise on your own once your trainer gives the all-clear.
- Get some exercise and go at it slowly. It takes time to hold this position.
- Remember to perform it close to a wall for strength, especially if you’re new to the exercise or a beginner.
- Always be aware of how your neck moves.
- Avoid doing this throughout the menstrual cycle.
- The muscles in your hands, neck, and shoulders hold the weight of your complete body. If you have spondylitis, please see your yoga instructor before starting this pose.
- Additionally, people with heart conditions, vertigo, or high blood pressure should be careful.
- Additionally, maintain stable breathing when doing yoga positions.
Contraindications:
- Hypertension
- Cardiovascular issues
- Neck issues
- Shoulder issuesArthritis
- Osteoporosis
- Brain injuries
- Spinal and lower back problems (such as sciatica, herniated discs, unstable SI joints, and chronic pain)
- Acute headache or migraine
- Use products for short periods and stay away from them entirely if they cause severe pain, nausea, or dyspnea in people with asthma or other respiratory disorders.
- The skull is still inactive and comparatively fragile, so practitioners under the age of seven should avoid putting weight on it.
Which Headstand Pose Mistakes Are Most Common?
- When doing the headstand, stay away from the common mistakes.
- Your hips can be positioned behind your shoulders. On the other hand, your elbows stand far apart due to your strength.
- The head could land too far to the back or too far to the forehead, which is the wrong position.
- This pose should not be done on a hard surface.
- breathing too rapidly or too slowly.
Conclusion
The Headstand, often known as the “King of Asanas,” is a potent inversion that has several advantages, such as more focus, better circulation, and improved core strength. Sirsasana promotes mental and physical balance, stimulates the nervous system, and revitalizes the mind by reversing the flow of gravity.
To avoid injury, it is essential to practice with correct alignment and mindfulness, just like with any other yoga pose. Beginners should approach this pose patiently, increasing strength and stability gradually and using wall support if needed. A safe and fulfilling experience is ensured by consistent practice, appropriate warm-ups, and counterposes like Child’s Pose (Balasana).
In addition to its physical benefits, Sirsasana promotes inner peace, self-control, and mental clarity. It becomes a peaceful experience that nourishes the body and mind when done with awareness and calm breathing. To fully benefit from this profound inversion, as with all yoga practices, you must pay attention to your body and go at your own pace.
FAQs
What advantages does the headstand position provide?
The benefits of headstand (Sirsasana) are numerous and include improved blood flow to the brain, improved mental clarity and focus, strengthened core and upper body, reduced stress, and increased vitality. Additionally, it improves better posture and balance.
In yoga, what is a headstand?
What advantages does the headstand position provide?
The benefits of headstand (Sirsasana) are numerous and include improved blood flow to the brain, improved mental clarity and focus, strengthened core and upper body, reduced stress, and increased vitality. Additionally, it improves better posture and balance.
Is abdominal fat reduced by headstands?
Shirshasana, or headstand, is likely one of the best yoga poses for weight loss. The disadvantage is that it will take some practice to become good. It is considered a power yoga for weight loss. The headstand pose helps you eliminate belly fat by increasing digestion and toning your abdominal organs.
Why is the headstand known as the “King of Asanas”?
The Headstand, the first of the 12 āsanas, is known as the “King of the Āsanas” because of its numerous advantages. It works Amazing to improve memory, and concentration, and transform want into a powerful life force.
Who shouldn’t perform sirsasana?
Strengths and Weaknesses of the Body Individuals with vertigo, migraines, severe headaches, or any other medical condition cannot perform Headstand Pose. Children under seven should not be permitted to Choose this posture because their vertebrae are not fully joined or adequately hard.
References
- Sirsasana Yoga (Headstand Pose) | Yoga Sequences, Benefits, Variations, and Sanskrit Pronunciation | Tummee.com. (2017, October 15). Tummee.com. https://www.tummee.com/yoga-poses/headstand-pose
- Ryt, A. P. (2021, December 9). How to Do a Headstand (Sirsasana) in Yoga. Verywell Fit. https://www.verywellfit.com/how-to-do-a-headstand-3567150
- Sorathiya, D. (2024c, October 13). Sirsasana Yoga Pose: Health Benefits, How to do? – Mobile Physio clinic. Mobile Physiotherapy Clinic. https://mobilephysiotherapyclinic.in/sirsasana-yoga-pose/
- EkhartYoga. (2021c, August 4). How to do a Headstand (Sirsasana) – Ekhart Yoga. Ekhart Yoga. https://www.ekhartyoga.com/resources/yoga-poses/headstand
- Team, T. A. (2024, January 3). Health Benefits Of Shirshasana. https://www.tataaig.com/knowledge-center/health-insurance/health-benefits-of-shirshasana